


Using the Partner Platform as an Azure Service Provider
Configure Microsoft CSP Partner Account
Set up your Microsoft CSP partner account to manage your Azure customers in the VMware Tanzu CloudHealth platform.
Enable Multi-Factor Authentication
Microsoft Azure requires you to enable Multi-Factor Authentication (MFA) in the Azure Active Directory to improve security and prevent malicious attacks on your data. You can enable MFA as an global admin and admin agent in the Azure Portal or through a third-party service that is compatible with Azure Active Directory. For more information on enabling MFA, refer to the How It Works topic.
The email that you authorize MFA with must belong to an admin agent Azure account.
Set Up a Microsoft CSP Partner Account
Partner-owned accounts are created by a partner for their own usage. Customer-owned accounts are created by the customer, even though they are managed by a partner as a partner-delivered service.
You must be a global admin and admin agent in the Azure Portal to complete this setup.
- Log in to the Microsoft Partner Center.
- In the Quick Links section of the Dashboard, click View your partner profile.
- From the left menu, select App Management.
- In a separate browser window or tab, log in to the Tanzu CloudHealth partner platform.
- From the left menu, select Setup > Accounts > Azure Partner Center. Then click New Partner Center to open the New Partner configuration form.
- Leave the Are You an Indirect Reseller? toggle switched to No.
- Enter a Partner Center Name that you can identify later.
- Copy and paste the Domain name from the Microsoft Partner Center to the Tanzu CloudHealth partner Center form.
You can also retrieve the Domain name from the Organization Profile menu in the Microsoft Partner Center.
- Leave the For Azure Government? toggle switched to No.
- Select the Save & Authorize with Microsoft button.
- Select the email account you enabled with MFA.
- Click Save Partner Center.
Tanzu CloudHealth begins ingesting all accounts associated with this Partner. This process takes up to 24 hours to complete.
Add Service Principal as the Billing Account Reader
Prerequisite: You must have global administrator privileges to register an App. While the connection between Tanzu CloudHealth and Azure is read-only, a global administrator must register the App to ensure that there are no errors.
In this step, you will:
- Create a new service principal at the partner level.
- Assign the Billing Account Reader role to the service principal.
- Connect the service principal with the partner tenant in the Tanzu CloudHealth platform.
Complete this step only if you are configuring a Modern Commerce billing account. You must add a new service account as the billing account reader for all billing accounts managed by the partner. For example, if you have one partner billing account with 15 partner customers, you need to complete this step only once.
- Log in to the Azure Portal as the partner tenant.
- From the left menu, select Azure Active Directory > App registrations and click New registration.
- Fill out the following fields in the form and then click Register:
- Name: Enter the name of the service principal
- Supported account types: Select Accounts in this organizational directory only.
- Redirect URI: Select Web from the dropdown and enter
https://apps.cloudhealthtech.com
- Open a text editor so that you can store specific parameters of the service principal that you need to provide in the Tanzu CloudHealth platform.
- Open the Application Registration you just created.
- Copy the Display Name into the text document.
- Copy the Application ID into the text document.
- Go to Certificates & Secrets in the left menu. Click New Client Secret.
- Add a key description. Make sure there are no spaces.
- Select a duration. It is recommended that you set the expiration to at least one year.
- Click Save. A value is generated.
- Copy the key description and value into the text document.
- Go back to the App Registrations main page and click Endpoints.
- From the list of endpoints, copy the OAuth 2.0 Authorization Endpoint (V1) into the text editor and derive the tenant ID from the endpoint. The tenant ID is the string of letters and numbers between
https://login.microsoftonline.com/and/oauth2/authorize. For example, if the endpoint ishttps://login.microsoftonline.com/c846dfb1-98g2-4e5f-a28f-52f2af60ef51/oauth2/authorize, then the tenant ID isc846dfb1-98g2-4e5f-a28f-52f2af60ef51. - In the Azure home page, select Cost Management under Tools.
- In the left menu, select Access Control (IAM).
- Select +Add to add a new permission.
- Fill out the Add Permission form as follows and click Save:
- Select Billing Account Reader from the Role dropdown.
- Enter the name of the service principal in the Select field.
Repeat steps 11-14 for each billing account. To switch your scope to a different billing account, see Switch Billing Scope in the Azure Portal.
- Switch to the browser tab that has the Tanzu CloudHealth platform open. Log in as the partner tenant.
- From the left menu, select Setup > Accounts > Azure Service Principal. Click New Service Principal.
- Paste values from the text editor into the Service Principal configuration form.
- Click Save Service Principal.
- To verify that the billing account Service Principal was configured correctly, go to Assets > Azure > Billing Account and confirm that the billing account appears.
Configure Microsoft CSP Account for Customers
Configure your Microsoft CSP customers so that you can manage them in the Tanzu CloudHealth platform.
Step 1: Create and Configure Customer Tenant
- Log in to the Tanzu CloudHealth platform as a partner. From the left menu, navigate to Partner > Customers > Lists. Then click New Customer.
- In the New Customer Sign Up form, enter Account Information, Company Information, and Company Address for the customer.
- Select Set Up Partner Generated Billing to proceed.
- Select a Classification to determine the level of customer access:
- Managed: A partner-managed customer who has an Tanzu CloudHealth environment established, but the customer does not have login credentials to the Tanzu CloudHealth console. These partner-managed customers may see reports from Tanzu CloudHealth as shared by the Partner, or perhaps have billing data generated by Tanzu CloudHealth, but the partner-managed customer never sees the Tanzu CloudHealth UI directly.
- Managed with Access: A partner-managed customer who has a direct login provided to the Tanzu CloudHealth console. This customer has either partial or full access to the Tanzu CloudHealth UI and has been provided with at least one set of login credentials by the partner.
- Click on Azure CSP or Azure EA tab to configure Azure accounts.
- Azure CSP: To configure a CSP partner customer account
- Azure EA: To configure an Enterprise Agreement whose subscriptions belong to different partner customers that the partner manages.
- Select the Charge PAYG pricing checkbox to use the Azure Pay As You Go rate cards for customer bills.
- If the account type is CSP, from the Available CSP Accounts list, select the customer accounts to assign to this customer. Click Add to move them over to the Selected CSP Accounts list.
- If the account type is EA, from the Available EA Subscriptions list, select EA subscriptions to assign to the customer. Click Add to move them over to the Selected EA Subscriptions list.
- Click Update. Tanzu CloudHealth creates a customer account
Step 2: Configure Customer Service Principal
Prerequisite: You must have global administrator privileges to register an App. While the connection between Tanzu CloudHealth and Azure is read-only, a global administrator must register the App to ensure that there are no errors.
- In a separate browser tab, open the Microsoft Partner Center Dashboard. Go to Customers and open the customer’s profile. Go to Service management and open the Microsoft Azure Management Portal for the customer.
- From the left menu, select Azure Active Directory > App registrations and click New registration.
-
Fill out the following fields in the form and then click Register:
- Name: Enter the name of the service principal
- Supported Account Types: Select Accounts in this organizational directory only.
- Redirect URI: Select Web from the dropdown and enter
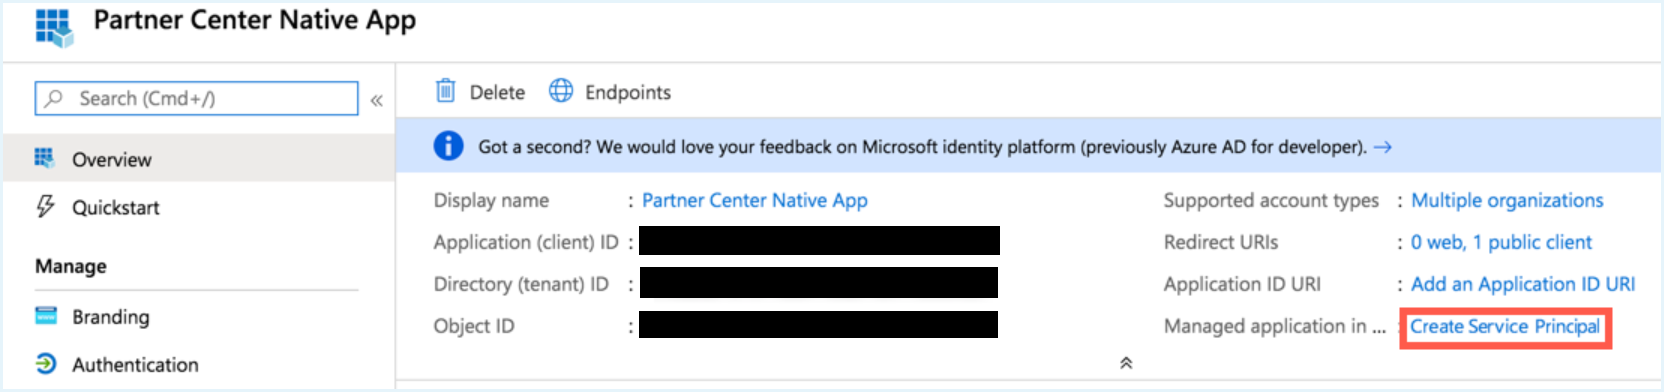
https://apps.cloudhealthtech.comDue to a rare issue in the Azure Portal, creating a new app registration might fail to create a new service principal as expected. If this occurs, click the Create Service Principal link in App Registrations > Overview.
- Open a text editor so that you can store specific parameters of the service principal that you need to provide in the Tanzu CloudHealth platform.
- Open the Application Registration you just created.
- Copy the Display Name into the text document.
- Copy the Application ID into the text document.
- Go to Certificates & Secrets in the left menu. Click New Client Secret.
- Add a key description. Make sure there are no spaces.
- Select a duration. It is recommended that you set the expiration to at least one year.
- Click Save. A value is generated.
- Copy the key description and value into the text document.
- Go back to the App Registrations main page and click Endpoints.
- From the list of endpoints, copy the OAuth 2.0 Authorization Endpoint (V1) into the text editor and derive the tenant ID from the endpoint. The tenant ID is the string of letters and numbers between
https://login.microsoftonline.com/and/oauth2/authorize. For example, if the endpoint ishttps://login.microsoftonline.com/c846dfb1-98g2-4e5f-a28f-52f2af60ef51/oauth2/authorize, then the tenant ID isc846dfb1-98g2-4e5f-a28f-52f2af60ef51. - Switch to the browser tab that has the Azure Partner Portal open. From the left menu, select Subscriptions.
- For each subscription in the list, follow these steps:
- Select the subscription.
- Select Access Control and click Add.
- Select Reader from the Role dropdown menu.
- In the Select field, paste the Application ID you copied into the text document in an earlier step. Select the application that appears in the search result.
- Click Save.
The Reader role allows Tanzu CloudHealth to gather usage and performance data from all Service Principals.
Step 3: Connect Service Principal with the Partner Customer Tenant
- Switch to the browser tab that has the Tanzu CloudHealth platform open. Log in as the newly created partner customer tenant.
- From the left menu, select Setup > Accounts > Azure Service Principal. Click New Service Principal.
- Paste values from the text editor into the Service Principal configuration form.
- Click Save Service Principal.
Step 4: Connect Service Principal with the Partner Tenant
- In the Tanzu CloudHealth platform, from the bottom-left corner, switch to the partner tenant.
- From the left menu, go to Setup > Accounts > Azure Service Principal. Click New Service Principal.
- Paste the same values from the text editor that you used above in Step 3 into the Service Principal configuration form.
- Click Save Service Principal. The customer tenants as well as the partner tenant are now configured to receive customer usage and performance data.
Step 5: Assign a Reader Role to Azure Reservation Orders
To allow Tanzu CloudHealth reader-only access to your partner customer’s reservations, you must assign a reader role to all your partner customer’s reservation orders. Failure to do so will prevent Azure reports from working correctly.
Complete the following configuration in the tenant in which the reservation order was purchased. For example, if the reservation order was purchased in the partner customer tenant, you should log in to both the Azure portal and the Tanzu CloudHealth platform as the partner customer tenant.
- Log in to the Azure Portal and go to Azure Active Directory > App Registrations.
- Copy the display name of the application you registered for Tanzu CloudHealth and paste it in a Text file (such as NotePad or TextEdit).
- Log in to the Tanzu CloudHealth platform. Go to Assets > Azure and select Reservation Orders from the Other section.
- For the first reservation order in the table, select the Azure Portal icon to open that reservation order in the Azure Portal.
- Go to Access Control (IAM) and click Add.
- Fill out the fields as follows:
- Select Reader from the Role dropdown menu.
- In the Select field, copy and paste the service principal display name from step 2 that is associated with the reservation order and select the user returned by the search.
- Click Save.
- Repeat steps 4-7 for each reservation order.
Next, invite CSP customers to the partner platform.
Step 6: Configure Application Permission for Azure AD User Collection (Optional)
The Tanzu CloudHealth platform supports Azure AD User collection through Azure Service Principal. To collect the Azure AD objects, you need to add an additional Graph API permission to the Service Principal.
- Log in to the Azure Portal, go to Azure Active Directory > App Registrations, and select the Tanzu CloudHealth app.
- Click API permissions > Add a permission.
- Select Microsoft Graph and click Application permissions.
- Under Select Permissions, expand Users, and select
User.Read.Allpermission. - Click Add Permissions.
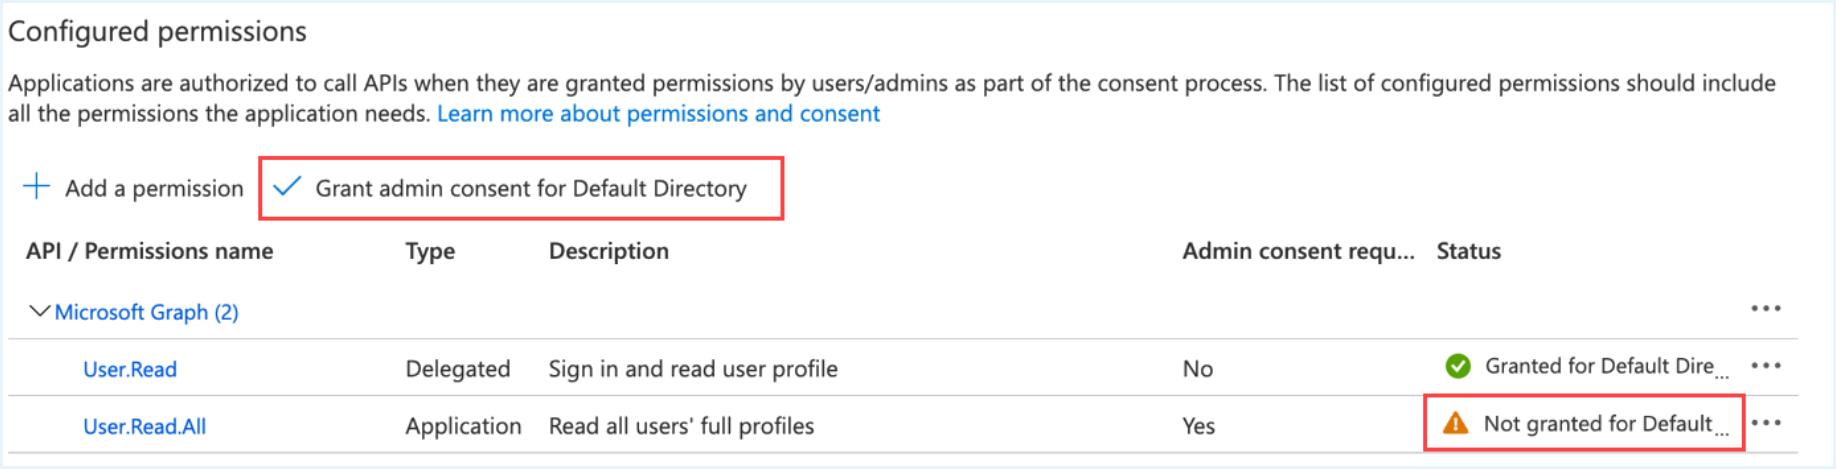
Once you add the required permissions, click Grant admin consent for Default Directory to allow an admin to grant admin consent to the configured permissions.

Configure Microsoft CSP Indirect Reseller Account
Directly manage customers and serve as indirect providers through indirect resellers
Microsoft CSP indirect resellers serve as the middleman between partners and customers. In this two-tier model, indirect resellers work with indirect providers (also known as partner distributors), who provide customer support and billing, to deliver the Microsoft CSP cloud experience to customers. Tanzu CloudHealth allows partners to both directly manage customers and serve as indirect providers through indirect resellers.
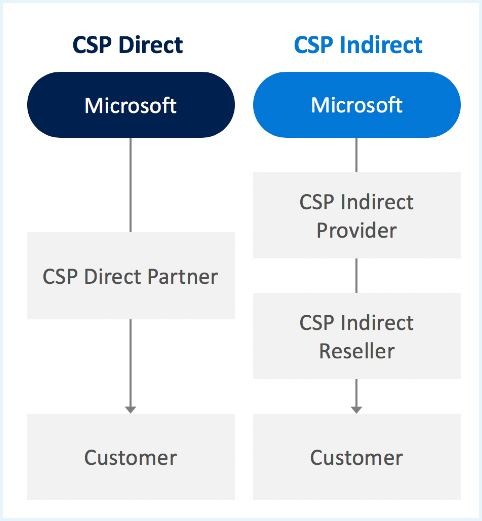
Microsoft CSP indirect resellers currently cannot manage Modern Commerce customer accounts in the Tanzu CloudHealth platform.
Enable Multi-Factor Authentication
Microsoft Azure requires you to enable Multi-Factor Authentication (MFA) in the Azure Active Directory to improve security and prevent malicious attacks on your data. You can enable MFA as a global admin and admin agent in the Azure Portal or through a third-party service that is compatible with Azure Active Directory. For more information on enabling MFA, refer to the How It Works topic.
The email that you authorize MFA with must belong to an admin agent Azure account.
Set Up a Microsoft CSP Reseller Account
Invite an Indirect Provider User with Admin Privileges
The indirect reseller’s account is configured in the indirect reseller tenant by a user from the indirect provider. To allow an indirect provider user access to the indirect reseller tenant so that the user can complete configuration, the indirect reseller must invite the user to the tenant as an admin user.
You must be a global admin and admin agent in the Azure Portal to complete this setup.
- Log in to the Tanzu CloudHealth platform as the indirect reseller tenant.
- Go to Setup > Admin > Users. Click Invite User.
- Enter the name and email address of the user you want to invite and select Administrator from the Role dropdown. Then click Invite User.
If you invite an indirect provider user whose email address is enabled for SSO in the Tanzu CloudHealth platform, you must use an alternate email address that is not enabled for SSO.
Configure Microsoft CSP Indirect Reseller Account in Tanzu CloudHealth
Microsoft CSP indirect reseller account configuration must be completed by the indirect provider user who was invited to the indirect reseller tenant in the above step.
- Log in to the Microsoft Partner Center.
- In the Quick Links section of the Dashboard, click View your partner profile.
- From the left menu, select App Management.
- In a separate browser window or tab, log in to the Tanzu CloudHealth partner platform as the indirect reseller partner tenant.
- From the left menu, select Setup > Accounts > Azure Partner Center. Then click New Partner Center to open the New Partner configuration form.
- Switch the Are You an Indirect Reseller? toggle to Yes.
- Enter the Azure GUID of the indirect reseller in the Indirect Reseller GUID field. The indirect reseller’s Azure GUID can be located in the reseller’s Microsoft Partner Center under Settings > Partner Settings > Tenants > Azure AD tenant-id.
- Enter the discount you want to pass on to the indirect reseller in the Discount from Indirect Provider field. The discount is automatically added to the indirect reseller’s Azure bills. The indirect reseller is charged the PAYG rate minus the discount.
- Enter a Partner Center Name that you can identify later.
- Copy and paste the Domain name from the Microsoft Partner Center to the Tanzu CloudHealth Partner Center form.
You can also retrieve the Domain name from the Organization Profile menu in the Microsoft Partner Center.
- Select the Save & Authorize with Microsoft button.
- Select the email account you enabled with MFA.
- Click Save Partner Center. Tanzu CloudHealth begins ingesting all accounts associated with this indirect reseller. This process takes up to 24 hours to complete. The indirect reseller can invite and configure customers and to create partner billing rules. If the indirect reseller needs to update their Azure Partner Center account in Tanzu CloudHealth, the indirect reseller must contact the indirect provider to make those changes on the indirect reseller’s behalf. To invite customers to the Tanzu CloudHealth platform, see Invite CSP Customers to the Partner Platform.
Indirect resellers must establish a reseller relationship with their customers to view those customers in the Tanzu CloudHealth platform. For more information, refer to the Connect with Customers topic.
Configure Azure Government Cloud Partner Account
Set up an Azure Government Cloud Partner Account
Set Up an Azure Government Cloud Partner Account
Partner-owned accounts are created by a partner for their own usage. Customer-owned accounts are created by the customer, even though they are managed by a partner as a partner-delivered service.
You must configure the API access permissions for the web app before you can set up an Azure Government Cloud partner account. For more information, see Configure API access permissions for web app
- Log in to the Microsoft Partner Center.
- In the Quick Links section of the Dashboard, click View your partner profile.
- From the left menu, select App Management.
- In a separate browser window or tab, log in to the Tanzu CloudHealth partner platform.
- From the left menu, select Setup > Accounts > Azure Partner Center. Then click New Partner Center to open the New Partner configuration form.
- Leave the Are You an Indirect Reseller? toggle switched to No.
- Enter a Partner Center Name that you can identify later.
- Copy and paste the Domain name from the Microsoft Partner Center to the Tanzu CloudHealth Partner Center form.
You can also retrieve the Domain name from the Organization Profile menu in the Microsoft Partner Center.
- Switch the For Azure Government? toggle to Yes.
- Copy and paste the Application ID and Account ID from the Microsoft Partner Center to the Tanzu CloudHealth Partner Center form.
- In the Microsoft Partner Center, select from the dropdown the duration you want application secret keys to remain active. Then click Add key. Paste the copied key value into the Account Secret Key field in the Tanzu CloudHealth platform.
- Enter date the secret key expires in the API Expiration Date field based on the duration you selected in step 10. For example, if today is December 31, 2019 and you selected the secret key duration as 1 year, enter
2020-12-31. - Click Save Partner Center. Tanzu CloudHealth begins ingesting all accounts associated with this Partner. This process takes up to 24 hours to complete.
Next, invite CSP customers to the partner platform.
Configure EA Bill Splitting
Complete the following steps to configure your Enterprise Agreement (EA) bill splitting for Azure account with the Tanzu CloudHealth platform.
Configure Enrollment
Enrollment step for EA bill splitting workflow
- Navigate to Setup > Accounts > Azure Enrollment and click Add Enrollment.
- Enter the Enrollment ID and Enrollment Name.
- Under Partner > Scope, select:
- Full Enrollment: To pull in all costs for the entire EA.
- Partial Enrollment: To pull in only costs for subscriptions assigned to the tenant.
Create and Configure Customer Tenant
Configuring customer tenant for EA bill splitting
- Navigate to Partner > Customers > Lists. Then click New Customer.
- In the New Customer Sign Up form, enter Account Information, Company Information, and Company Address for the customer.
- Select Set Up Partner Generated Billing to proceed.
- Select a Classification to determine the level of customer access:
- Managed: A partner-managed customer who has a Tanzu CloudHealth environment established, but the customer does not have login credentials to the Tanzu CloudHealth console. These partner-managed customers may see reports from Tanzu CloudHealth as shared by the Partner, or perhaps have billing data generated by Tanzu CloudHealth, but the partner-managed customer never sees the Tanzu CloudHealth UI directly.
- Managed with Access: A partner-managed customer who has a direct login provided to the Tanzu CloudHealth console. This customer has either partial or full access to the Tanzu CloudHealth UI and has been provided with at least one set of login credentials by the partner.
- Click on Azure CSP or Azure EA tab to configure Azure accounts.
- Azure CSP: To configure a CSP partner customer account.
- Azure EA: To configure an Enterprise Agreement where only a subset of subscriptions are being assigned to the customer tenant being configured.
- Select the Charge PAYG pricing checkbox to use the Azure Pay As You Go rate cards for customer bills.
- If the account type is CSP, from the Available CSP Accounts list, select the customer accounts to assign to this customer. Click Add to move them over to the Selected CSP Accounts list.
- If the account type is EA, from the Available EA Subscriptions list, select EA subscriptions to assign to the customer. Click Add to move them over to the Selected EA Subscriptions list.
- Click Update. Tanzu CloudHealth creates the customer tenant.
Bill Customers Using Microsoft EA Partner Billing Rules
- Log in to the Tanzu CloudHealth platform as a partner. From the left menu, navigate to Partner > Partner Billing > Billing Rules and click New Partner Billing Rule.
- Enter Billing Rule Name and select Cloud and Target Customers from the drop-down list. You can create billing rules at per subscription basis.
Register Tanzu CloudHealth App with Service Principal
Prerequisite: You must have global administrator privileges to register an App. While the connection between Tanzu CloudHealth and Azure is read-only, a global administrator must register the App to ensure that there are no errors.
- Open a text editor (such as NotePad or TextEdit).
- Log in to the Azure Portal.
- From the left menu, select Azure Active Directory.
- Select the App Registrations tile and then click New App Registration from the top of the page.
- Fill out the following fields in the form and then click Create:
- Name: Enter the name of the service principal
- Supported Account Types: Select Accounts in this organizational directory only.
- Redirect URI: Select Web from the dropdown and enter
https://apps.cloudhealthtech.com
Due to a a rare issue in the Azure Portal, creating a new app registration might fail to create a new service principal as expected. If this occurs, click the Create Service Principal link in App Registrations > Overview.
- Open the Application Registration you just created.
- Copy the Display Name into the text document.
- Copy the Application ID into the text document.
- Go to Certificates & Secrets in the left menu. Click New Client Secret.
- Add a key description. Make sure there are no spaces.
- Select a duration. It is recommended that you set the expiration to at least one year.
- Click Save. A value is generated.
- Copy the key description and value into the text document.
- Close the App Registration blade and return to the Active Directory menu.
- Under the Manage header, select Properties.
- Locate the directory ID. Select the Copy icon to copy the ID and then paste it into the text document.
- Repeat steps 3-12 for each directory you manage.
Checkpoint: At this point, you have this information in the text document.
* Display Name
* Application ID
* Key Description
* Key Value
* Directory ID/Tenant ID
Assign an Enrollment Reader Role to the Service Principal
You can only create or update this billing role using the API.
- Use your account credentials as an Enterprise Admin to sign in to the tenant with the enrollment access that you want to assign.
- Open the Role Assignments - Put - REST API (Azure Billing) article. Click Try it.
- Provide the following parameters as a part of the API request.
- Object ID
- Azure Tenant ID
- BillingAccountID
- Role definition (already pre-filled with correct role ID).
NOTE - For help locating these values, see Find your SPN and tenant ID.
-
Update the following API request body with required details and run the API. API Request Body:
{ "properties": { "principalId": "REPLACE WITH OBJECT ID", "principalTenantId": "REPLACE WITH TENANT ID", "roleDefinitionId": "/providers/Microsoft.Billing/billingAccounts/REPLACE WITH BillingAccountID/billingRoleDefinitions/24f8edb6-1668-4659-b5e2-40bb5f3a7d7e" } } - Generate the GUID
billingRoleAssignmentName. Generate a GUID using the New-Guid PowerShell command. You can also use the Online GUID / UUID Generator website to generate a unique GUID. Note down the GUID for later use. - Use the Role Assignments - Put - REST API (Azure Billing) command to update the role assignments.
- Repeat the previous steps for other Service Principles.
Mapping Multiple Enrollments to the Same Service Principal
If you have multiple enrollments mapped to the same service principles, you will need to run the Role Assignments - Put - REST API (Azure Billing) command for each enrollment.
- Open the Role Assignments - Put REST API article, and click Try it.
- Sign in to the tenant as an Enterprise Admin with the enrollment access.
- Provide the following parameters as a part of the API request.
- Object ID
- Azure Tenant ID
- Enrollment Id
- Role definition (already pre-filled with correct role ID) For help locating these values, see Find your SPN and tenant ID.
-
Update the following API request body with required details and run the API.
{ “properties”: { “principalId”: “SPN ID OR OBJECT ID”, “principalTenantId”: “ADtenant ID OR Azure Tenant ID”, “roleDefinitionId”: “/providers/Microsoft.Billing/billingAccounts/EnrollmentID/billingRoleDefinitions/24f8edb6-1668-4659-b5e2-40bb5f3a7d7e” } }- Change the EnrollmentID parameter in the request Body.
- Generate a new GUID using the New-Guid PowerShell command.
- Click Run.
- Repeat the previous steps for each enrollment.
Add Reader Role for Subscriptions
Assign a Reader role for subscriptions that are managed in the directory.
For help assigning roles in Azure, see Assign Azure Roles using the Azure Portal.
When assigning the role, make the following selections:
- Role: Reader
- Members: Tanzu CloudHealth
Note - Repeat this step for each subscription.
Find API Parameters
Object ID
- In the Tanzu CloudHealth platform, navigate to Setup > Accounts > Azure Enrollment. Click View the Enrollment you configured and verify the Service Principal ID.
- In the Azure portal, navigate to Azure Active Directory. From the left menu, select Enterprise applications.
- Select Service Principal you configured with Tanzu CloudHealth, and copy the Object ID.
Make sure that you copy and paste the Object ID from Enterprise applications. Do not use Object ID from App Registrations.

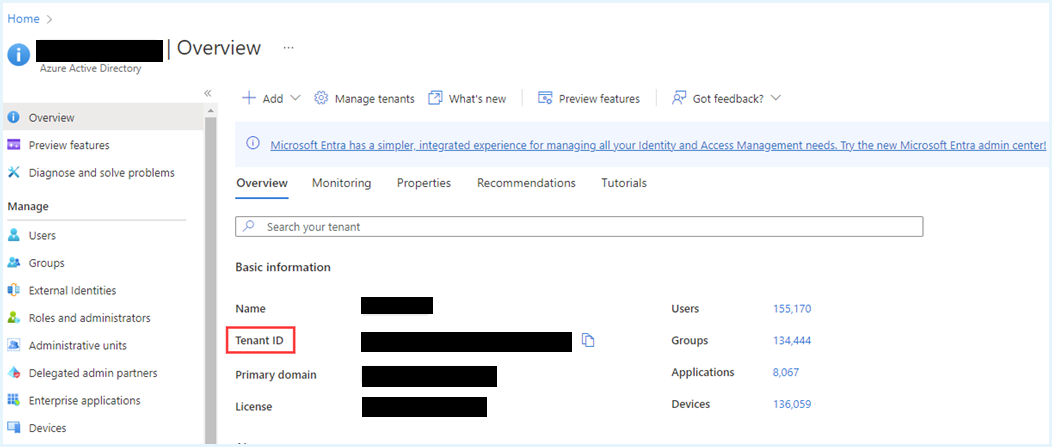
Azure Tenant ID
- In the Azure portal, go to Azure Active Directory.
-
Copy the Tenant ID from the Overview tab.
BillingAccountID
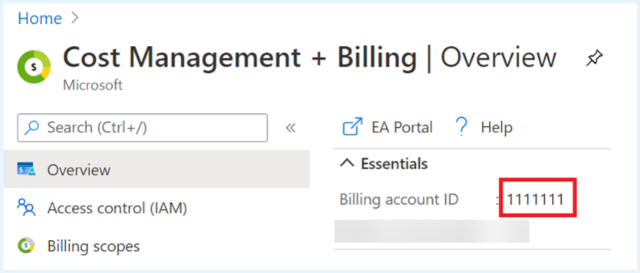
- In the Azure portal, go to Cost Management + Billing.
-
From the Overview section, copy the Billing Account ID.
Role Definition
Already pre-filled with correct role ID. For example- “roleDefinitionId”: “/providers/Microsoft.Billing/billingAccounts/REPLACE WITH BillingAccountID/billingRoleDefinitions/24f8edb6-1668-4659-b5e2-40bb5f3a7d7e”
Enrollment ID
- In the Tanzu CloudHealth platform, navigate to Setup > Accounts > Azure Enrollment.
- Click the view icon to see the enrollment you configured and copy the Enrollment ID.
Add Permissions to Access Key Vault (Optional)
With the additional get and list permissions, Tanzu CloudHealth gets access to keys and secrets for each key vault under each subscription. Providing this access offers the following benefits:
- Visibility: Get all keys & secret details under each key vault in Asset reports.
- Policies: Create policies on keys and secrets and get notified if any key/secret doesn’t have an expiry date set.
- Perspectives: Since Key Vault Keys & Secrets are taggable assets, you can create perspective groups based on tags.
Use the following steps to grant additional permissions to the service principal:
- Log in to the Azure Portal, and click the Cloud Shell icon on the top navigation bar.
- Enter the following PowerShell script for every active Service Principal that you have added in the Tanzu CloudHealth platform.
$subs = Get-AzureRmSubscription
$client_id = 'Application id of service principal'
foreach ($sub in $subs) {Set-AzureRmContext -SubscriptionId $sub.SubscriptionId
$key_vaults = Get-AzureRmKeyVault
foreach ($key_vault in $key_vaults) {Set-AzureRmKeyVaultAccessPolicy -VaultName $key_vault.VaultName -ServicePrincipalName $client_id -PermissionsToKeys get,list -PermissionsToSecrets get,list } }
Get the Application id of the service principal from the Tanzu CloudHealth platform. Go to Setup > Accounts > Azure Service Principal.
The script accesses current key vaults and grant permission to the service principal to retrieve and display key vault keys and secrets.
For a newly-added key vault, you need to separately grant permission to the service principal to retrieve and display keys. You can either run the above PowerShell script or manually add the service principal using following steps:
- In the Azure Portal, go to the newly added key vault.
- From the Settings menu, navigate to Access Policies, and click Add Access Policy.
- Select
get,listpermissions from the__ Key permissions__ and Secret permissions dropdown. - Select Service principal.
- Click Add.
Connect Service Principal in Tanzu CloudHealth
- Log in to the Tanzu CloudHealth platform. From the left menu, select Setup > Accounts > Azure Service Principal. Then click New Service Principal.
- Select Global Azure from the Account Type dropdown.
- Copy the information from the text document into corresponding fields in the setup form.
Make sure there are no spaces.
- Optionally, select the Security Asset Collection dropdown if you want to disable asset collection on certain assets for security reasons. Tanzu CloudHealth recommends enabling asset collection for all assets and does not store sensitive data.
Disabled assets are marked as inactive in Tanzu CloudHealth and cannot be used in policies.
- Click Save Service Principal.
Assign a Reader Role to Azure Reservation Orders
Assign a reader role to Azure reservation orders to enable Azure data in Tanzu CloudHealth reports.To allow Tanzu CloudHealth reader-only access to your reservations, you must assign a reader role to all your reservation orders. Failure to do so will prevent your Azure reports from working correctly.
- Log in to the Azure Portal and go to Azure Active Directory > App Registrations.
- Copy the display name of the application you registered for Tanzu CloudHealth and paste it in a Text file (such as NotePad or TextEdit).
- Log in to the Tanzu CloudHealth platform. Go to Assets > Azure and select Reservation Orders from the Other section.
- For the first reservation order in the table, select the Azure Portal icon to open that reservation order in the Azure Portal.
- Go to Access Control (IAM) and click Add.
- Fill out the fields as follows:
- Select Reader from the Role dropdown menu.
- In the Select field, copy and paste the service principal display name from step 2 that is associated with the reservation order and select the user returned by the search.
- Click Save.
- Repeat steps 4-7 for each reservation order.
STEP 8 Assign a Reader Role to Azure Savings Plans
- Log in to the Azure Portal and go to Azure Active Directory > App Registrations.
- Copy the display name of the application you registered for Tanzu CloudHealth and paste it in a Text file (such as NotePad or TextEdit).
- Log in to the Tanzu CloudHealth platform. Go to Assets > Azure and select Savings Plans from the Other section.
- In the Savings Plan table, click the Go to Azure Portal icon to open the savings plan in the Azure portal.
- From the left pane, go to Access Control (IAM) and click Add role assignment.
- Fill out the fields as follows:
- Select Reader from the Role dropdown menu.
- In the Select field, copy and paste the service principal display name from step 2 that is associated with the savings plan and select the user returned by the search.
- Click Save.
- Repeat steps 4-7 for each Savings Plan.
STEP 9 Configure Application Permission for Azure AD User Collection (Optional)
The Tanzu CloudHealth platform supports Azure AD User collection through Azure Service Principal. To collect the Azure AD objects, you need to add an additional Graph API permission to the Service Principal.
- Log in to the Azure Portal, go to Azure Active Directory > App Registrations, and select the Tanzu CloudHealth app.
- Click API permissions > Add a permission.
- Select Microsoft Graph and click Application permissions.
- Under Select Permissions, expand Users, and select
User.Read.All permission. - Click Add Permissions.
Once you add the required permissions, click Grant admin consent for Default Directory to allow an admin to grant admin consent to the configured permissions.
Complete Additional Configuration
After setting up Azure accounts, complete the following additional configuration as required:
Invite CSP Customers to Partner Platform
Wait at least 24 hours after all customer accounts have been added to the Tanzu CloudHealth Partner Platform to invite customers to their account.
- Log in to the Tanzu CloudHealth partner platform. In the bottom-left corner, switch to the customer that you want to invite.
- From the left menu, select Setup > Admin > Users. Click Invite User.
- Enter the name, email address, and role of the user you want to invite. Then click Invite User.
Co-brand the CSP Partner Platform
You can co-brand the Tanzu CloudHealth partner platform so that your customers see your logo and branding when they log in to the Tanzu CloudHealth platform.
- Log in to the Tanzu CloudHealth partner platform. From the left menu, select Setup > Admin > Settings.
- Scroll to the Partner Settings section. In the Account Logo section, click Choose file to upload a logo. The logo must meet the following requirements:
- Format: PNG
- Dimensions: 150px x 130 px
- Click Update Company Profile.
Results: When your customers log in, the logo appears in the top-left corner of the Tanzu CloudHealth platform.
Update Microsoft CSP Partner Account for New Azure Security Model
Microsoft has updated its security model to improve security vulnerabilities and to protect your data from malicious attacks. If you already created and configured your CSP partner accounts in Tanzu CloudHealth, you must update these accounts to allow Tanzu CloudHealth to continue to report on your customers’ cloud information. For more information, see the Enable Secure Application Model topic.
Enable Multi-Factor Authentication
Microsoft Azure now requires you to enable Multi-Factor Authentication (MFA) in the Azure Active Directory to improve security and prevent malicious attacks on your data. You can enable MFA as a global admin in the Azure Portal or through a third-party service that is compatible with Azure Active Directory. For more information on enabling MFA, refer to the How It Works topic.
Update Microsoft CSP Partner Account
Microsoft has updated its security model so that control panel vendors like Tanzu CloudHealth no longer need to store your application ID and vendor keys to provide our services. Instead, you must authenticate Microsoft with Tanzu CloudHealth.
To verify whether you need to authenticate Microsoft with Tanzu CloudHealth, log in to the Tanzu CloudHealth Partner Platform and go to Setup > Accounts > Azure Partner Center. If the status of your partner center is Healthy, no action is required. If your status is Warning, complete the steps below to update your account.
- Log in to the Tanzu CloudHealth Partner Platform.
- Go to Setup > Accounts > Azure Partner Center and edit your partner center account.
- Select the Save & Authorize with Microsoft button.
- Select the email account you enabled with MFA.
- Click Save Partner Center.
- Repeat steps 3-5 for all partner centers with a Warning status.
Send Azure Billing Files to AWS S3 Bucket
You can opt to send your Azure billing files to the same AWS S3 bucket specified in the Bill Generation S3 Bucket field. This is useful if you want to use automation to extract billing files from the S3 bucket for invoicing.
- In the Partner tenant in the Tanzu CloudHealth Platform, navigate to Setup > Admin > Settings and scroll to the Partner Billing section.
- Toggle the Upload Azure Billing Records to Bill Generation S3 Bucket setting to ON.
- Click Update Customer Settings.
