


This topic describes how to configure Windows worker-based Kubernetes clusters in VMware Tanzu Kubernetes Grid Integrated Edition (TKGI).
Overview
In Tanzu Kubernetes Grid Integrated Edition you can provision a Windows worker-based Kubernetes cluster on vSphere with NSX-T. Additionally, TKGI provides beta support for provisioning Windows worker-based Kubernetes clusters on vSphere with Flannel.
To provision a Windows worker-based Kubernetes cluster:
- Verify your environment meets the Windows worker-based Kubernetes cluster Prerequisites.
- Configure a Windows Worker-Based Kubernetes Cluster.
- Upload the Windows Server Stemcell.
- Create a Windows Worker-Based Cluster.
For information about the architecture of TKGI Windows worker-based Kubernetes clusters, see Windows Worker-Based Kubernetes Cluster High Availability in Tanzu Kubernetes Grid Integrated Edition Architecture.
Warning: Support for Windows-based Kubernetes clusters is activated for TKGI on vSphere with NSX-T and as a beta feature on vSphere with Flannel.
Do not activate this feature if you are using TKGI with Google Cloud Platform (GCP), Azure, or Amazon Web Services (AWS).
Prerequisites
Support for Windows-based Kubernetes clusters is activated for TKGI on vSphere with NSX-T and as a beta feature on vSphere with Flannel.
vSphere with NSX-T Requirements
The following are required for creating a Windows worker-based Kubernetes cluster in Tanzu Kubernetes Grid Integrated Edition on vSphere with NSX-T:
- Tanzu Kubernetes Grid Integrated Edition must be installed in a vSphere with NSX-T environment.
-
Your vSphere environment meets the vSphere with NSX-T Version Requirements.
-
Tanzu Kubernetes Grid Integrated Edition has been configured as described in Installing Tanzu Kubernetes Grid Integrated Edition on vSphere with NSX-T.
-
You must have a vSphere stemcell for Windows Server version 2019. For vSphere stemcell version requirements, see Product Snapshot in Release Notes.
Note: Windows stemcells for vSphere are not available on Broadcom Support. These stemcells must be created using your own Windows Server disk image (ISO file). To create a Windows stemcell for vSphere, complete the procedures in Creating a Windows Stemcell for vSphere Using Stembuild.
- If your Tanzu Kubernetes Grid Integrated Edition installation is in an air-gapped environment, you must prepare a Windows pause image in a private registry. For information about setting up a Windows pause image, see Using a Windows Pause Image for an Air-Gapped Environment.
vSphere with Flannel Requirements (Beta)
The following are required for creating a Windows worker-based Kubernetes cluster in Tanzu Kubernetes Grid Integrated Edition on vSphere with Flannel:
- Tanzu Kubernetes Grid Integrated Edition must be installed in a vSphere with Flannel environment.
- Your vSphere environment meets the vSphere Prerequisites and Resource Requirements.
- Tanzu Kubernetes Grid Integrated Edition has been configured as described in Installing Tanzu Kubernetes Grid Integrated Edition on vSphere.
-
You must have a vSphere stemcell for Windows Server version 2019. For vSphere stemcell version requirements, see Product Snapshot in Release Notes.
Note: Windows stemcells for vSphere are not available on Broadcom Support. These stemcells must be created using your own Windows Server disk image (ISO file). To create a Windows stemcell for vSphere, complete the procedures in Creating a Windows Stemcell for vSphere Using Stembuild in the TAS for VMs [Windows] documentation.
- If your Tanzu Kubernetes Grid Integrated Edition installation is in an air-gapped environment, you must prepare a Windows pause image in a private registry. For information about setting up a Windows pause image, see Using a Windows Pause Image for an Air-Gapped Environment.
Configure a Windows Worker-Based Kubernetes Cluster
- Configure a Windows worker plan as described in Plans, below.
- Configure Windows worker networking as described in Networking, below.
- Upload the Windows Server stemcell as described in Upload the Windows Server Stemcell, below.
- Click Apply Changes to complete the configuration changes.
Plans
A plan defines a set of resource types used for deploying a cluster.
Activate a Plan
Note: Before configuring your Windows worker plan, you must first activate and configure Plan 1. See Plans in Installing Tanzu Kubernetes Grid Integrated Edition on vSphere with NSX-T for more information.
To activate and configure a plan, perform the following steps:
-
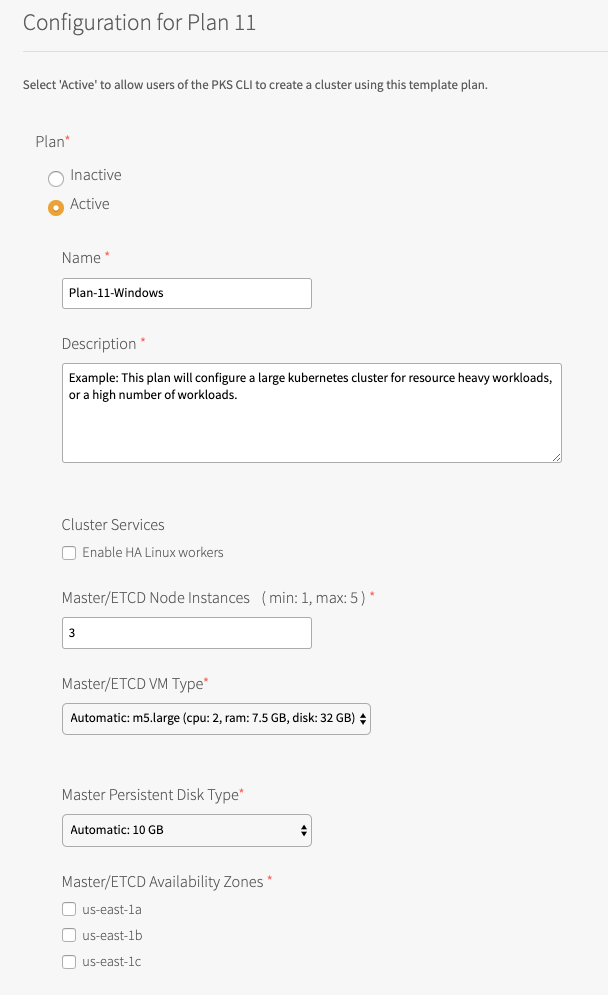
Click the plan that you want to activate. You must activate and configure either Plan 11, Plan 12, or Plan 13 to deploy a Windows worker-based cluster.
-
Select Active to activate the plan and make it available to developers deploying clusters.
-
Under Name, provide a unique name for the plan.
- Under Description, edit the description as needed. The plan description appears in the Services Marketplace, which developers can access by using the TKGI CLI.
- Select Enable HA Linux workers to activate high availability Linux worker clusters. A high availability Linux worker cluster consists of three Linux worker nodes.
- Windows workers are mediated by one or three Linux workers.
- For an illustration of how Linux workers connect Windows workers to their control plane node, see Windows Worker-Based Kubernetes Cluster High Availability.
- Under Master/ETCD Node Instances, select the default number of Kubernetes control plane/etcd nodes to provision for each cluster. You can enter
1,3, or5.Note: If you deploy a cluster with multiple control plane/etcd node VMs, confirm that you have sufficient hardware to handle the increased load on disk write and network traffic. For more information, see Hardware recommendations in the etcd documentation.
In addition to meeting the hardware requirements for a multi-control plane node cluster, we recommend configuring monitoring for etcd to monitor disk latency, network latency, and other indicators for the health of the cluster. For more information, see Configuring Telegraf in TKGI.WARNING: To change the number of control plane/etcd nodes for a plan, you must ensure that no existing clusters use the plan. Tanzu Kubernetes Grid Integrated Edition does not support changing the number of control plane/etcd nodes for plans with existing clusters.
-
Under Master/ETCD VM Type, select the type of VM to use for Kubernetes control plane/etcd nodes. For more information, including control plane node VM customization options, see the Control Plane Node VM Size section of VM Sizing for Tanzu Kubernetes Grid Integrated Edition Clusters.
-
Under Master Persistent Disk Type, select the size of the persistent disk for the Kubernetes control plane node VM.
-
Under Master/ETCD Availability Zones, select one or more AZs for the Kubernetes clusters deployed by Tanzu Kubernetes Grid Integrated Edition. If you select more than one AZ, Tanzu Kubernetes Grid Integrated Edition deploys the control plane VM in the first AZ and the worker VMs across the remaining AZs. If you are using multiple control plane nodes, Tanzu Kubernetes Grid Integrated Edition deploys the control plane and worker VMs across the AZs in round-robin fashion.
Note: Tanzu Kubernetes Grid Integrated Edition does not support changing the AZs of existing control plane nodes.
- Under Maximum number of workers on a cluster, set the maximum number of Kubernetes worker node VMs that Tanzu Kubernetes Grid Integrated Edition can deploy for each cluster. Enter any whole number in this field.
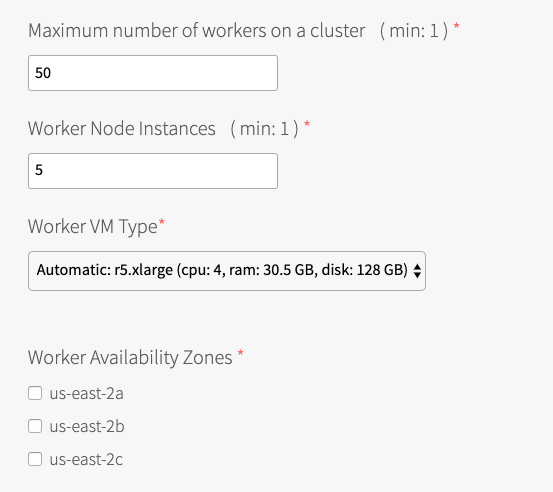
- Under Worker Node Instances, specify the default number of Kubernetes worker nodes the TKGI CLI provisions for each cluster. The Worker Node Instances setting must be less than, or equal to, the Maximum number of workers on a cluster setting.
For high availability, create clusters with a minimum of three worker nodes, or two per AZ if you intend to use PersistentVolumes (PVs). For example, if you deploy across three AZs, you must have six worker nodes. For more information about PVs, see PersistentVolumes in Maintaining Workload Uptime. Provisioning a minimum of three worker nodes, or two nodes per AZ is also recommended for stateless workloads.
For more information about creating clusters, see Creating Clusters.Note: Changing a plan’s Worker Node Instances setting does not alter the number of worker nodes on existing clusters. For information about scaling an existing cluster, see Scale Horizontally by Changing the Number of Worker Nodes Using the TKGI CLI in Scaling Existing Clusters.
-
Under Worker VM Type, select the type of VM to use for Kubernetes worker node VMs. For more information, including worker node VM customization options, see Worker Node VM Number and Size in VM Sizing for Tanzu Kubernetes Grid Integrated Edition Clusters.
Note: Tanzu Kubernetes Grid Integrated Edition requires a Worker VM Type with an ephemeral disk size of 32 GB or more.
Note: BOSH does not support persistent disks for Windows VMs. If specifying Worker Persistent Disk Type on a Windows worker is a requirement for you, submit feedback by sending an email to [email protected].
-
Under Worker Availability Zones, select one or more AZs for the Kubernetes worker nodes. Tanzu Kubernetes Grid Integrated Edition deploys worker nodes equally across the AZs you select.
-
Under Kubelet customization - system-reserved, enter resource values that Kubelet can use to reserve resources for system daemons. For example,
memory=250Mi, cpu=150m. For more information about system-reserved values, see the Kubernetes documentation.
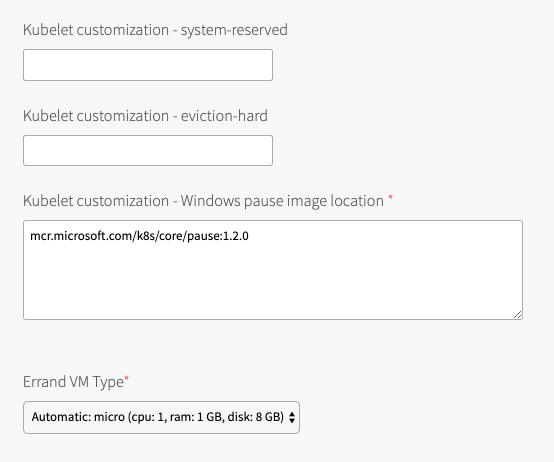
- Under Kubelet customization - eviction-hard, enter threshold limits that Kubelet can use to evict pods when they exceed the limit. Enter limits in the format
EVICTION-SIGNAL=QUANTITY. For example,memory.available=100Mi, nodefs.available=10%, nodefs.inodesFree=5%. For more information about eviction thresholds, see the Kubernetes documentation.WARNING: Use the Kubelet customization fields with caution. If you enter values that are invalid or that exceed the limits the system supports, Kubelet might fail to start. If Kubelet fails to start, you cannot create clusters.
- Under Kubelet customization - Windows pause image location, enter the location of your Windows pause image. The Kubelet customization - Windows pause image location default value of
mcr.microsoft.com/k8s/core/pause:3.6configures Tanzu Kubernetes Grid Integrated Edition to pull the Windows pause image from the Microsoft Docker registry.
The Microsoft Docker registry cannot be accessed from within air-gapped environments. If you want to deploy Windows pods in an air-gapped environment you must upload a Windows pause image to an accessible private registry, and configure the Kubelet customization - Windows pause image location field with the URI to this accessible Windows pause image. For more information about uploading a Windows pause image to a private registry, see Using a Windows Pause Image for an Air-Gapped Environment. - Under Errand VM Type, select the size of the VM that contains the errand. The smallest instance possible is sufficient, as the only errand running on this VM is the one that applies the Default Cluster App YAML configuration.
- (Optional) Under (Optional) Add-ons - Use with caution, enter additional YAML configuration to add custom workloads to each cluster in this plan. You can specify multiple files using
---as a separator. For more information, see Adding Custom Linux Workloads.
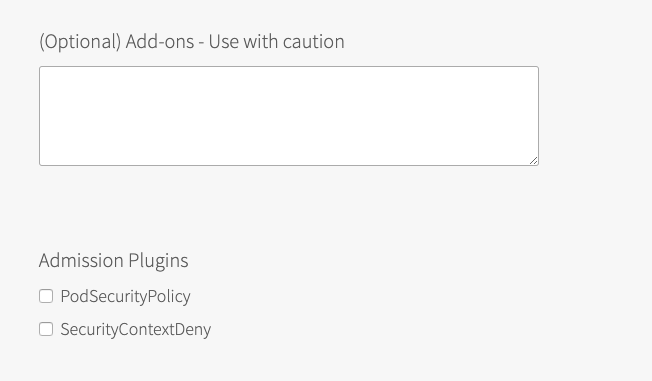
Note: Windows in Kubernetes does not support privileged containers. See Feature Restrictions in the Kubernetes documentation for additional information.
-
(Optional) Activate or deactivate the SecurityContextDeny admission controller plugin. For more information see Using Admission Control Plugins for Tanzu Kubernetes Grid Integrated Edition Clusters. Windows in Kubernetes does not support the PodSecurityPolicy Admission Plugin feature. See API in the Kubernetes documentation for additional information.
-
Click Save.
Networking
To configure networking, do the following:
- Click Networking.
-
Under Container Networking Interface, select:
- NSX-T for Windows worker based clusters on vSphere with NSX-T.
- Flannel for Windows worker based clusters on vSphere without NSX-T beta.
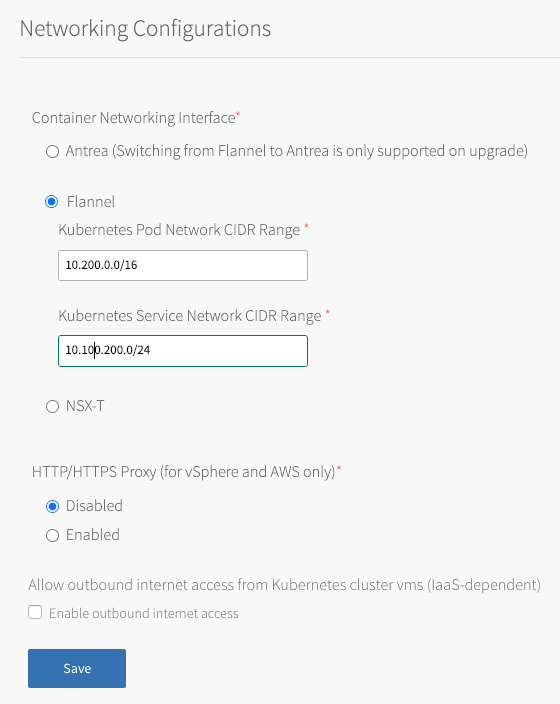
Note: Antrea is not supported for the TKGI Windows-worker on vSphere without NSX-T beta feature.
- (Optional) Enter values for Kubernetes Pod Network CIDR Range and Kubernetes Service Network CIDR Range.
- For Windows worker-based clusters the Kubernetes Service Network CIDR Range setting must be
10.220.0.0/16.
Note: vSphere on Flannel does not support networking Windows containers.
- For Windows worker-based clusters the Kubernetes Service Network CIDR Range setting must be
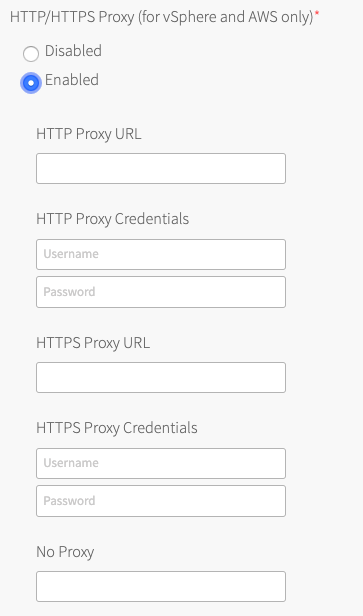
- (Optional) Configure Tanzu Kubernetes Grid Integrated Edition to use a proxy.
Production environments can deny direct access to public Internet services and between internal services by placing an HTTP or HTTPS proxy in the network path between Kubernetes nodes and those services.
Configure Tanzu Kubernetes Grid Integrated Edition to use your proxy and activate the following:- TKGI API access to public Internet services and other internal services.
- Tanzu Kubernetes Grid Integrated Edition-deployed Kubernetes nodes access to public Internet services and other internal services.
- Tanzu Kubernetes Grid Integrated Edition Telemetry ability to forward Telemetry data to the CEIP and Telemetry program.
Note: This setting does not set the proxy for running Kubernetes workloads or pods.
-
To complete your global proxy configuration for all outgoing HTTP/HTTPS traffic from your Kubernetes clusters, perform the following steps:
- To proxy outgoing HTTP traffic, enter the URL of your HTTP proxy endpoint under HTTP Proxy URL. For example,
http://myproxy.com:1234. - (Optional) If your outgoing HTTP proxy uses basic authentication, enter the user name and password in the HTTP Proxy Credentials fields.
- To proxy outgoing HTTPS traffic, enter the URL of your HTTP proxy endpoint under HTTPS Proxy URL. For example,
http://myproxy.com:1234.
Note: Using an HTTPS connection to the proxy server is not supported. HTTP and HTTPS proxy options can only be configured with an HTTP connection to the proxy server. You cannot populate either of the proxy URL fields with an HTTPS URL. The proxy host and port can be different for HTTP and HTTPS traffic, but the proxy protocol must be HTTP.
- (Optional) If your HTTPS proxy uses basic authentication, enter the user name and password in the HTTPS Proxy Credentials fields.
- Under No Proxy, enter the comma-separated list of IP addresses that must bypass the proxy to allow for internal Tanzu Kubernetes Grid Integrated Edition communication.
Include127.0.0.1andlocalhostin the No Proxy list.
Also include the following in the No Proxy list:- Your Tanzu Kubernetes Grid Integrated Edition environment’s CIDRs, such as the service network CIDR where your Tanzu Kubernetes Grid Integrated Edition cluster is deployed, the deployment network CIDR, the node network IP block CIDR, and the pod network IP block CIDR.
- The FQDN of any registry, such as the Harbor API FQDN, or component communicating with Tanzu Kubernetes Grid Integrated Edition, using a hostname instead of an IP address.
- Any additional IP addresses or domain names that must bypass the proxy.
The No Proxy property for AWS accepts wildcard domains denoted by a prefixed\*.or..
For example:
127.0.0.1,localhost, *.example1.com, .example2.com, example3.com, 198.51.100.0/24, 203.0.113.0/24, 192.0.2.0/24 - Your Tanzu Kubernetes Grid Integrated Edition environment’s CIDRs, such as the service network CIDR where your Tanzu Kubernetes Grid Integrated Edition cluster is deployed, the deployment network CIDR, the node network IP block CIDR, and the pod network IP block CIDR.
Note: By default the
10.100.0.0/8and10.200.0.0/8IP address ranges,.internal,.svc,.svc.cluster.local,.svc.cluster, and your Tanzu Kubernetes Grid Integrated Edition FQDN are not proxied. This allows internal Tanzu Kubernetes Grid Integrated Edition communication.
Do not use the_character in the No Proxy field. Entering an underscore character in this field can cause upgrades to fail.
Because some jobs in the VMs accept\*.as a wildcard, while others only accept., we recommend that you define a wildcard domain using both of them. For example, to denoteexample.comas a wildcard domain, add both\*.example.comandexample.comto the No Proxy property. - To proxy outgoing HTTP traffic, enter the URL of your HTTP proxy endpoint under HTTP Proxy URL. For example,
-
Under Allow outbound internet access from Kubernetes cluster vms (IaaS-dependent), ignore the Enable outbound internet access check box.
- Click Save.
Upload the Windows Server Stemcell
- When prompted by Ops Manager to upload a stemcell, follow the instructions and provide your previously created vSphere stemcell for Windows Server version 2019.
Create a Windows Worker-Based Cluster
- To create a Windows worker-based cluster follow the steps in Creating Clusters.
