This topic describes how VMware Tanzu Kubernetes Grid Integrated Edition (TKGI) administrators can define TKGI network profiles for pod networks on vSphere with NSX integration.
TKGI supports network profiles on TKGI on vSphere with NSX only.
To create or delete a network profile, you must be a cluster administrator, pks.clusters.admin.
Custom Pod Networks
When you configure your NSX-T infrastructure for TKGI, you must create a Pods IP Block. For more information, see the Plan IP Blocks section of Planning, Preparing, and Configuring NSX-T for Tanzu Kubernetes Grid Integrated Edition.
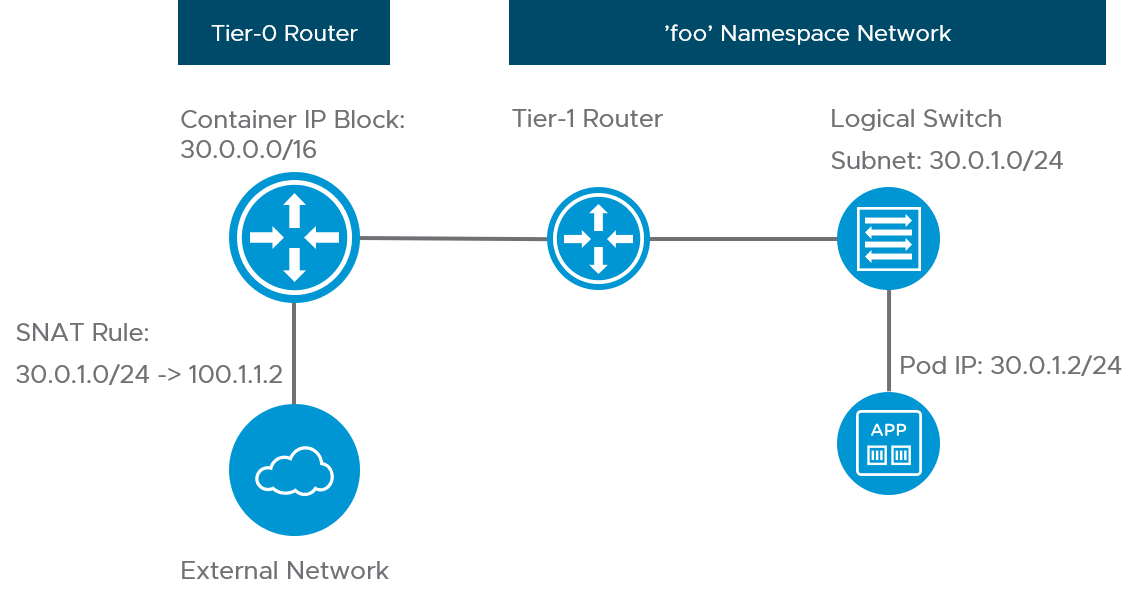
By default, this subnet is non-routable. When a Kubernetes cluster is deployed, each pod receives an IP address from the Pods IP Block you created. Because the pod IP addresses are non-routable, NSX-T creates a SNAT rule on the Tier-0 router to allow network egress from the pods. This configuration is shown in the diagram below:

You can use a network profile to override the global Pods IP Block that you specify in the Tanzu Kubernetes Grid Integrated Edition tile with a custom IP block. To use a custom pods network, do the following after you deploy TKGI:
-
Define a custom IP block in NSX-T. For more information, see Creating NSX-T Objects for Tanzu Kubernetes Grid Integrated Edition.
-
Define a network profile that references the custom pods IP block.
For example, the following network profile defines non-routable pod addresses from two IP blocks:{ "description": "Example network profile with 2 non-routable pod networks", "name": "non-routable-pod", "parameters": { "pod_ip_block_ids": [ "ebe78a74-a5d5-4dde-ba76-9cf4067eee55", "ebe78a74-a5d5-4dde-ba76-9cf4067eee56" ] } }
Note: You cannot use the same Pod IP Block ID (UUID) that is specified in the TKGI Tile. Create a new Pod IP Block ID (UUID) that is not referenced in the TKGI Tile and use it to define a network profile.
You can add pod addresses to an existing cluster. You cannot remove any pod addresses. For more information, see Add Pod IPs below.
Pod Subnet Prefix
Each time a Kubernetes namespace is created, a subnet from the pods IP block is allocated. The default size of the subnet carved from this block for such purposes is /24. For more information, see the Pods IP Block section of Planning, Preparing, and Configuring NSX-T for Tanzu Kubernetes Grid Integrated Edition.
You can define a Network Profile using the pod_subnet_prefix parameter to customize the size of the pod subnet reserved for namespaces.
For example, the following network profile specifies /27 for the size of the two custom Pod IP Block IDs:
{
  "description": "Example network profile with 2 non-routable pod networks and custom prefix",
  "name": "non-routable-pod",
  "parameters": {
    "pod_subnet_prefix": 27,
    "pod_ip_block_ids": [
      "ebe78a74-a5d5-4dde-ba76-9cf4067eee55",
      "ebe78a74-a5d5-4dde-ba76-9cf4067eee56"
    ]
  }
}
Note: You cannot customize the size of the Pod IP Block ID (UUID) that is specified in the TKGI Tile. To customize the size of the Pod subnet block you must create a new Pod IP Block ID (UUID) that is not referenced in TKGI Tile and use it to define a network profile.
Note: The subnet size for a Pods IP Block must be consistent across all Network Profiles. TKGI does not support variable subnet sizes for a given IP Block.
You cannot modify the size of the pod subnet configuration on an existing cluster.
Routable Pod Networks
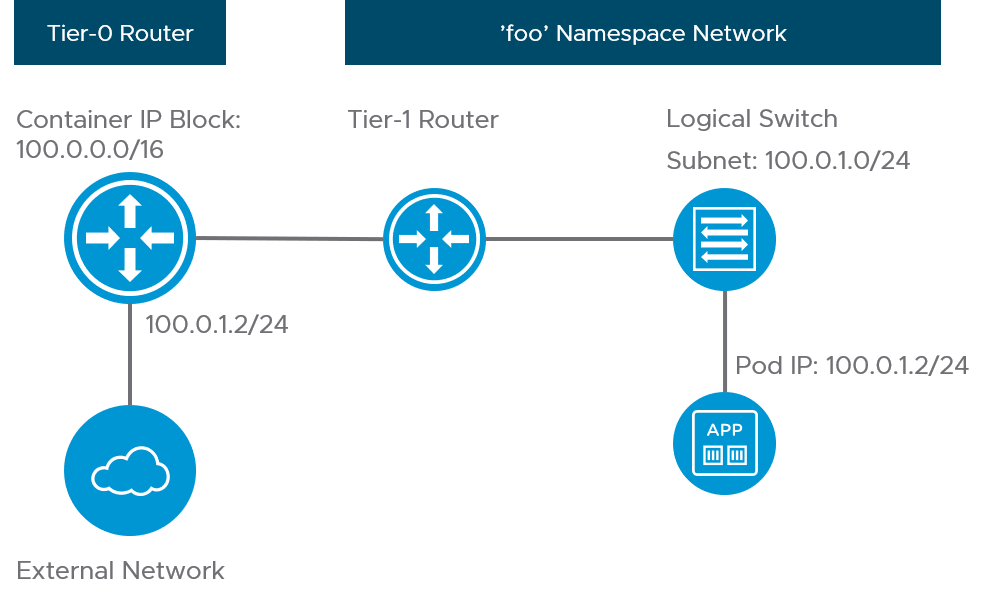
Using a network profile, you can assign routable IP addresses from a dedicated routable IP block to pods in your Kubernetes cluster. When a cluster is deployed using that network profile, the routable IP block overrides the default non-routable IP block described created for deploying TKGI. When you deploy a Kubernetes cluster using that network profile, each pod receives a routable IP address. This configuration is shown in the diagram below. If you use routable pods, the SNAT rule is not created.

To use routable pods, do the following after you deploy TKGI:
-
Define a routable IP block in NSX-T. For more information, see Creating NSX-T Objects for Tanzu Kubernetes Grid Integrated Edition.
-
Define a network profile that references the routable IP block.
For example, the following network profile defines routable pod addresses from two IP blocks:{ "description": "Example network profile with 2 routable pod networks and custom prefix", "name": "small-routable-pod", "parameters": { "pod_routable": true, "pod_subnet_prefix": 27, "pod_ip_block_ids": [ "ebe78a74-a5d5-4dde-ba76-9cf4067eee55", "ebe78a74-a5d5-4dde-ba76-9cf4067eee56" ] } }
Note: You cannot use the same Pod IP Block ID (UUID) that is specified in the TKGI Tile. Create a new Pod IP Block ID (UUID) that is not referenced in TKGI Tile and use it to define a network profile.
You can add pod addresses to an existing cluster. You cannot remove any pod addresses or modify the size of the pod subnet configuration on an existing cluster. For more information, see Add Pod IPs below.
Add Pod IPs
If a cluster exhausts the number of IP addresses allocated to pods, you can use the network profile pod_ip_block_ids field to add pod IP addresses to existing clusters.
ImportantThis section applies to clusters that already use a network profile. To add a new network profile to an existing cluster that does not currently use a network profile, see Add a New Network Profile to a Cluster that Does Not Have a Network Profile.
To add pod IP addresses to the network profile on an existing cluster:
- Create one or more new Pod IP Blocks in NSX-T Manager.
- Follow these procedures in Creating and Deleting Network Profiles:
On update, the cluster automatically starts using IPs from the second block after the first block is exhausted.
Note: You cannot change a cluster’s network profile to remove pod IP block IDs.