


This topic explains how you can use a Kubernetes profile in Tanzu Kubernetes Grid Integrated Edition (TKGI) to override the default Identity Provider (IDP).
Overview
The TKGI UAA pane configures a default IDP for all the clusters that TKGI creates. You can use a Kubernetes profile to override this default IDP.
The Kubernetes profile applies a custom OIDC-compatible IDP to a cluster by deploying an OIDC connector as a service pod on the cluster.
The following diagram provides an overview of how this configuration works:
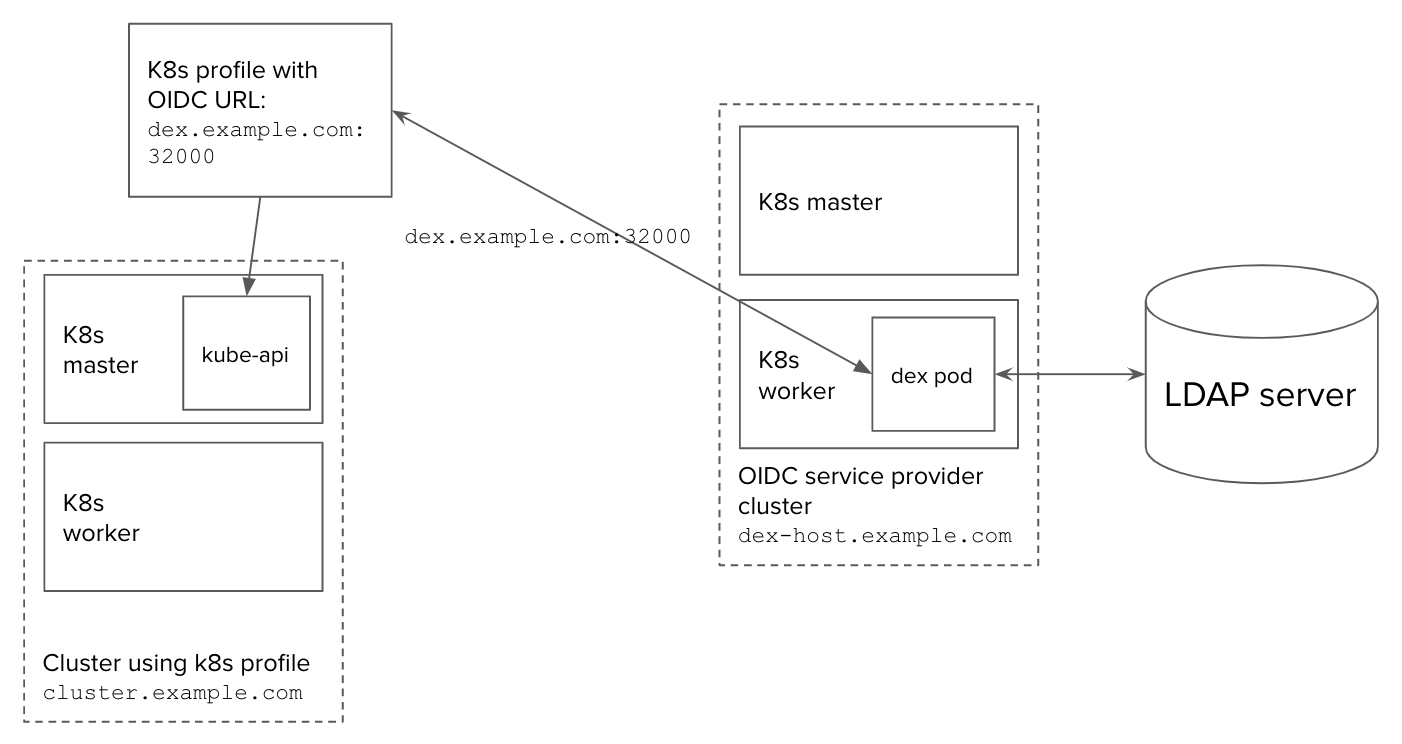
- OIDC service provider cluster with external hostname
dex-host.example.com- Hosts a dex pod that accesses the LDAP server
- Publishes its OIDC service to
dex.example.com:32000
- OIDC Kubernetes profile has the URL of the OIDC service
- Host cluster with external hostname
cluster.example.com- Uses the OIDC Kubernetes profile
- Calls the OIDC service at
dex.example.com:32000to authenticate the user whenever a user requests an app hosted on the cluster
The Kubernetes profile in this topic deploys dex as an OIDC provider, but you can use any OIDC service.
For more information and other uses of Kubernetes profiles, see Using Kubernetes Profiles.
Prerequisites
To use UAA as your OIDC provider, the TKGI API Certificate to secure the TKGI API field on the TKGI tile must be a proper certificate chain and have a SAN field. For more information, see configuring TKGI API in the Installing TKGI topic for your IaaS.
Configure a Custom OIDC Provider
To configure a custom OIDC provider for TKGI clusters, complete the following:
- Set Up Dex Workload
- Set Up Communication Path
- Deploy and Expose Dex
- Create Kubernetes Profile
- Create Cluster
- Test Cluster Access
Set Up Dex Workload
To configure dex as an OIDC provider for an LDAP directory:
-
Create a cluster in TKGI for installing dex as a pod:
tkgi create-cluster dex -p small -e dex-host.example.com -
Run
tkgi clusterfor the cluster and record itsKubernetes Master IPaddress.
For example:$ tkgi cluster dex TKGI Version: 1.18.5-build.10 Name: dex K8s Version: 1.27.15 Plan Name: small UUID: dbe1d880-478f-4d0d-bb2e-0da3d9641f0d Last Action: CREATE Last Action State: succeeded Last Action Description: Instance provisioning completed Kubernetes Master Host: dex-host.example.com Kubernetes Master Port: 8443 Worker Nodes: 1 Kubernetes Master IP(s): 10.0.11.11 Network Profile Name: Kubernetes Profile Name: Tags: -
Add the
Kubernetes Master IPaddress to your local/etc/hostsfile. -
Populate your
~/.kube/configwith context for dex:tkgi get-credentials dex -
Switch to the
admincontext of the dex cluster:kubectl config use-context dex -
To deploy a dex workload on a Kubernetes cluster, follow the steps in Deploying dex on Kubernetes in the dex GitHub repository.
- To create a dex deployment that connects to an LDAP server, see dex/examples/ldap/config-ldap.yaml in the dex OIDC GitHub repository.
Set Up Communication Path
To set up \etcd\hosts and TLS so that clusters can access dex securely:
-
Add the
/etc/hostsentry for the public IP and the hostnamedex.example.comon your local workstation. This lets you retrieve a token to access your OIDC-profile cluster later.10.0.11.11 dex.example.com -
To generate TLS assets for the dex deployment, complete the steps in Generate TLS assets in the dex documentation.
-
To add the generated TLS assets to the cluster as a secret, complete the steps in Create cluster secrets in the dex documentation.
Deploy and Expose Dex
To run dex as a local service within a pod and exposes its endpoint via an IP address:
-
On a Kubernetes cluster, deploy dex using the instructions above.
-
Wait for the deployment to succeed.
-
Expose the dex deployment as a service named
dex-service:kubectl expose deployment dex --type=LoadBalancer --name=dex-serviceFor example:
$ kubectl expose deployment dex --type=LoadBalancer --name=dex-service
> service/dex-service exposed
This creates a dex service with a public IP address that clusters can use as an OIDC issuer URL.
-
Retrieve the dex service public IP address by running:
kubectl get services dex-service -
Add the IP of the dex service to your
/etc/hosts:35.222.29.10 dex.example.com- Ensure that you map the dex service to
dex.example.com, which the dex binary expects asissuer_urland for TLS handshakes. - For this example, we set up the issuer URL as
https://dex.example.com:32000.
- Ensure that you map the dex service to
Create Kubernetes Profile
To create a Kubernetes profile that lets a cluster’s kube-api-server connect to the dex service:
-
Create a Kubernetes profile
/tmp/profile.jsoncontaining your custom OIDC settings under thekube-apiservercomponent.
For example:$ cat /tmp/profile.json { "name": "oidc-config", "description": "Kubernetes profile with OIDC configuration", "customizations": [ { "component": "kube-apiserver", "arguments": { "oidc-client-id": "example-app", "oidc-issuer-url": "https://dex.example.com:32000", "oidc-username-claim": "email" }, "file-arguments": { "oidc-ca-file": "/tmp/oidc-ca.pem" } } ] }Of all the supported
kube-apiserverflags, the following are specific to OIDC:- In the
argumentsblock:oidc-issuer-url: Set this to"https://dex.example.com:32000".oidc-client-idoidc-username-claim: Set this to"email"for testing with the example app below.oidc-groups-claim
- In the
file-argumentsblock:oidc-ca-file: Set this to a path in the local file system that contains a CA certificate file. The certificate must be a proper certificate chain and have a SAN field.
For more information on
kube-apiserverflags, see kube-apiserver in the Kubernetes documentation. - In the
-
Create the profile:
tkgi create-kubernetes-profile /tmp/profile.json
In the example above, the file-path /tmp/oidc-ca.pem points to a CA certificate on the local file system, and the tkgi create-kubernetes-profile command sends this certificate to the API server when it creates the profile.
Create Cluster
To create a cluster using the Kubernetes profile created above:
-
Run the following:
tkgi create-cluster cluster-with-custom-oidc -e cluster.example.com -p small --kubernetes-profile oid-configNote: Use only lowercase characters when naming your cluster if you manage your clusters with Tanzu Mission Control (TMC). Clusters with names that include an uppercase character cannot be attached to TMC.
-
Confirm the cluster has custom OIDC settings from the profile.
Test Cluster Access
To test that the cluster uses the OIDC provider to control access, install an app, generate an ID token, and test the cluster.
You can use an example app from the dex repository or test with a full-fledged application, such as Gangway, instead of the example app.
To test that the cluster uses the OIDC provider:
-
To install an example app, complete the steps to install the
example-appin Logging into the cluster in the dex documentation. -
Run the dex example app:
./bin/example-app --issuer https://dex.example.com:32000 --issuer-root-ca /tmp/ca.pem- The example app only provides the
emailscope.
- The example app only provides the
-
To fetch the token, complete the steps to generate an ID token in Logging into the cluster in the dex documentation.
-
Log in using the Log in with Email option and enter the email and password of an account in your OIDC IDP.
-
A page appears listing the ID Token, Access Token, Refresh Token, ID Token Issuer (
issclaim), and other information.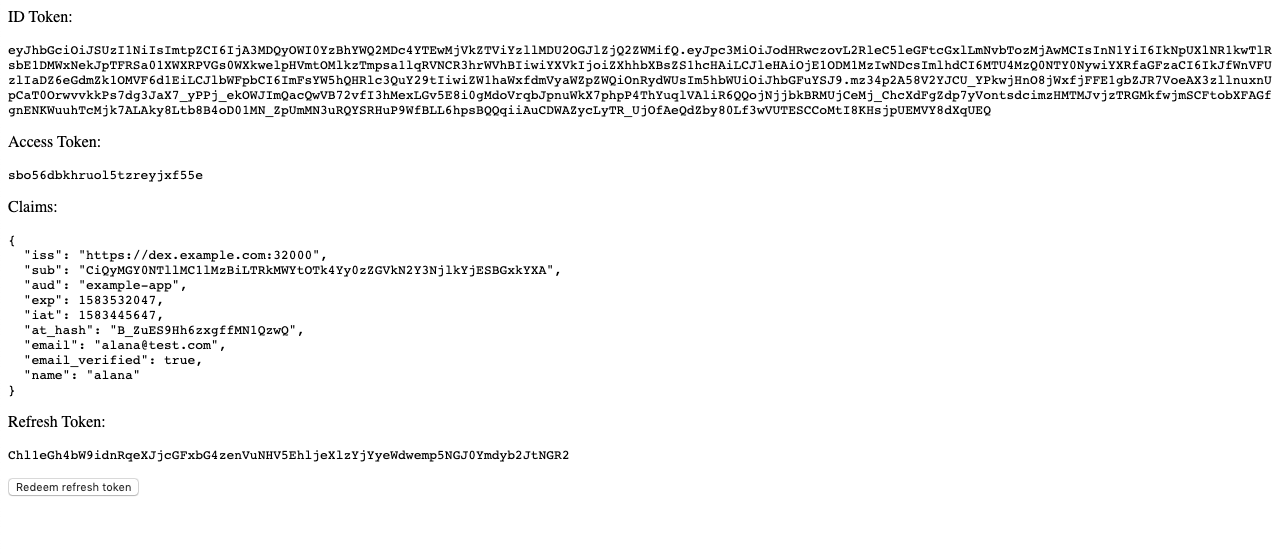
-
Wait for the token to be generated.
-
Edit your
.kube/configfile to add a new context for the test user:apiVersion: v1 clusters: - cluster: certificate-authority-data: CA-CERT server: CLUSTER-URL name: TEST-CLUSTER contexts: - [EXISTING-CONTEXTS] - context: cluster: TEST-CLUSTER user: TEST-USER name: TEST-CONTEXT current-context: TEST-CONTEXT kind: Config preferences: {} users: - [EXISTING-USERS] - name: TEST-USER user: token: ID-TOKENWhere:
CAis your CA certificate.CLUSTER-URLis the address of the test service, such ashttps://cluster.example.com:8443.TEST-CLUSTERis the name of the test cluster, such ascluster-with-custom-oidc.TEST-USERis the test account user name, such asalana.TEST-CONTEXTis a name you create for the new context, such ascluster-with-custom-oidc-ldap-alana.ID-TOKENis the ID Token retrieved by theexample-appapp above.
Include the
cluster.serveranduser.tokenvalues retrieved using the example app. -
Create a
ClusterRoleYAML file that grants permissions to access services and pods in thedefaultnamespace:apiVersion: rbac.authorization.k8s.io/v1 kind: ClusterRole metadata: namespace: default name: pod-reader-clusterRolebinding rules: - apiGroups: [""] # "" indicates the core API group resources: ["pods", "services"] verbs: ["get", "watch", "list"] -
Run
kubectl applyorkubectl createto pass theClusterRolespec file to the kube-controller:kubectl apply -f ClusterRole.yml -
Create a
ClusterRoleBindingYAML file that applies theClusterRolerole to the test user.
For example:apiVersion: rbac.authorization.k8s.io/v1 # This role binding allows "[email protected]" to read pods in the "default" namespace. kind: ClusterRoleBinding metadata: name: read-pods-clusterRolebinding namespace: default subjects: - kind: User name: [email protected] # Name is case sensitive apiGroup: rbac.authorization.k8s.io roleRef: kind: ClusterRole #this must be Role or ClusterRole name: pod-reader-clusterRolebinding # this must match the name of the Role or ClusterRole you wish to bind to apiGroup: rbac.authorization.k8s.io -
Run
kubectl applyorkubectl createto pass theClusterRoleBindingspec file to the kube-controller:kubectl apply -f ClusterRoleBinding.yml -
Confirm the test user can run the following:
kubectl get podsThe cluster is successfully authenticating the user by connecting to the dex OIDC provider via OIDC if the test user can run
kubectl get pods.
