


This topic describes how to generate and register the NSX Manager superuser principal identity certificate and key for VMware Tanzu Kubernetes Grid Integrated Edition (TKGI).
Overview
You must generate and register the NSX Manager superuser principal identity certificate and key for two situations:
- You are preparing to install Tanzu Kubernetes Grid Integrated Edition (TKGI) on vSphere with NSX. For instructions, see Generating the Certificate and Key for Installation.
- You need to rotate the NSX Manager certificate and key for an existing TKGI installation. For instructions, see Rotate the Principal Identity Certificate and Key.
The NSX Manager superuser for TKGI has the Enterprise Administrator role and permissions. See Role-Based Access Control in the VMware documentation for more information.
Installation Prerequisites
Review these prerequisites if you are installing TKGI on vSphere with NSX for the first time.
If you are rotating the NSX Manager certificate for an existing TKGI installation, see Rotate the Principal Identity Certificate and Key, below.
- Preparing to Install Tanzu Kubernetes Grid Integrated Edition on vSphere with VMware NSX
- Hardware Requirements for Tanzu Kubernetes Grid Integrated Edition on vSphere with NSX
- NSX-T v3.0: Installing and Configuring NSX-T Data Center v3.0 for Tanzu Kubernetes Grid Integrated Edition
- Deploying Ops Manager with NSX-T for Tanzu Kubernetes Grid Integrated Edition
- Generate and Register the NSX-T Management SSL Certificate and Private Key in Installing and Configuring NSX-T Data Center v3.0 for TKGI
- Configuring BOSH Director with NSX for Tanzu Kubernetes Grid Integrated Edition
How Ops Manager Accesses NSX Manager
To create, delete, and modify NSX networking resources, Ops Manager tiles, and APIs use a VMware NSX Manager account with the Enterprise Administrator role and permissions.
Users configure Ops Manager to authenticate to NSX Manager for different purposes in different tiles:
- Tanzu Kubernetes Grid Integrated Edition tile
The Tanzu Kubernetes Grid Integrated Edition tile uses NSX Manager to create load balancers, providing a Kubernetes service described in the Create an External Load Balancer section of the Kubernetes documentation.
To configure the Tanzu Kubernetes Grid Integrated Edition tile’s authentication to NSX Manager, see About the NSX Manager Superuser Principal Identity, below. - BOSH Director for vSphere tile
The BOSH Director for vSphere tile uses NSX Manager to configure networking and security for external-facing Ops Manager component VMs, such as VMware Tanzu Application Service for VMs routers.
To configure the BOSH Director for vSphere tile’s authentication to NSX Manager, see Configure vCenter for Tanzu Kubernetes Grid Integrated Edition in Configuring BOSH Director with NSX for Tanzu Kubernetes Grid Integrated Edition.
About the NSX Manager Super User Principal Identity
The TKGI API accesses the NSX Manager through an Enterprise Administrator account. This superuser account lets TKGI use NSX to create, delete, and modify networking resources for Kubernetes cluster nodes.
When you configure Tanzu Kubernetes Grid Integrated Edition with NSX as the container networking interface, you must provide the certificate and private key for the NSX Manager Enterprise Administrator account in the Networking pane of the Tanzu Kubernetes Grid Integrated Edition tile.
See the NSX Manager Super User Principal Identity Certificate field in the following screenshot:

View a larger version of this image.
For more information, see the Networking section of Installing Tanzu Kubernetes Grid Integrated Edition on vSphere with NSX.
Generating the Certificate and Key for Installation
There are two options for generating the principal identity certificate and private key:
- Option A: Run a script on a Linux host with OpenSSL installed that generates the certificate and private key. For more information, see Option A: Generate and Register the Certificate and Key Using Scripts below.
- Option B: Use the automatic Generate RSA Certificate option in the Tanzu Kubernetes Grid Integrated Edition tile. For more information, see Option B: Generate and Register the Certificate and Key Using the Tanzu Kubernetes Grid Integrated Edition Tile below.
After you have generated the principal identity certificate and key, you must register both with the NSX Manager using an HTTPS POST operation on the NSX API. There is no user interface for this operation.
Option A: Generate and Register the Certificate and Key Using a Script
This option uses a Bash shell script to generate and register the NSX Manager superuser principal identity certificate and key. When you configure TKGI for deployment, copy and paste the contents of pks-nsx-t-superuser.crt and pks-nsx-t-superuser.key to the NSX Manager Super User Principal Identity Certificate field in the Networking pane of the Tanzu Kubernetes Grid Integrated Edition tile.
Note: The Linux VM must have OpenSSL installed and have network access to the NSX Manager. For example, you can use the TKGI client VM where you install the TKGI CLI.
Step 1: Generate and Register the Certificate and Key
You must generate a certificate and private key, and create the Super User Principal Identity with the certificate in the NSX Manager.
To create the Super User Principal Identity, create and run the create_certificate_pi.sh script:
- Log in to a Linux VM in your Tanzu Kubernetes Grid Integrated Edition environment.
- Create an empty file using
vi create_certificate_pi.shornano create_certificate_pi.sh. -
Modify the file you created to have the following script contents:
#!/bin/bash
#create_certificate_pi.sh

NSX_MANAGER="NSX-MANAGER-IP"
NSX_USER="NSX-MANAGER-USERNAME"

PI_NAME="pks-nsx-t-superuser"
NSX_SUPERUSER_CERT_FILE="pks-nsx-t-superuser.crt"
NSX_SUPERUSER_KEY_FILE="pks-nsx-t-superuser.key"
NODE_ID=$(cat /proc/sys/kernel/random/uuid)

stty -echo
printf "Password: "
read NSX_PASSWORD
stty echo

# Create a certificate and key for the PI
openssl req \
  -newkey rsa:2048 \
  -x509 \
  -nodes \
  -keyout "$NSX_SUPERUSER_KEY_FILE" \
  -new \
  -out "$NSX_SUPERUSER_CERT_FILE" \
  -subj /CN="$PI_NAME" \
  -extensions client_server_ssl \
  -config <(
    cat /etc/ssl/openssl.cnf \
    <(printf '[client_server_ssl]\nextendedKeyUsage = clientAuth\n')
  ) \
  -sha256 \
  -days 730

# Define the payload of the request
pi_request=$(cat <<END
    {
         "display_name": "$PI_NAME",
         "name": "$PI_NAME",
         "role": "enterprise_admin",
         "certificate_pem": "$(awk 'NF {sub(/\r/, ""); printf "%s\\n",$0;}' ./"$NSX_SUPERUSER_CERT_FILE" )",
         "node_id": "$NODE_ID"
    }
END
)

# Create an API request to register a name-certificate combination
curl -k -X POST \
    "https://${NSX_MANAGER}/api/v1/trust-management/principal-identities/with-certificate" \
    -u "$NSX_USER:$NSX_PASSWORD" \
    -H 'content-type: application/json' \
    -d "$pi_request"

# List all PIs
curl -k -X GET \
    "https://${NSX_MANAGER}/api/v1/trust-management/principal-identities" \
    --cert $(pwd)/"$NSX_SUPERUSER_CERT_FILE" \
    --key $(pwd)/"$NSX_SUPERUSER_KEY_FILE"
Where:
NSX-MANAGER-IPis the IP address of the NSX Management Cluster VIP or NSX Management Load Balancer IP.NSX-MANAGER-USERNAMEis the Username for NSX Manager.
- Save the
create_certificate_pi.shfile. - Run the script using
bash create_certificate_pi.sh. - When prompted, enter the
NSX_MANAGER_PASSWORDfor the NSX user you specified in the script. -
Verify results:
- Confirm the certificate,
pks-nsx-t-superuser.crt, and private key,pks-nsx-t-superuser.key, are generated in the directory where you ran the script. - Confirm the principal identity associated with the certificate was created in NSX.
- Confirm the principal identity
pks-nsx-t-superuseris registered with the roleEnterprise Adminon the NSX Manager System > Users > Role Assignments screen.
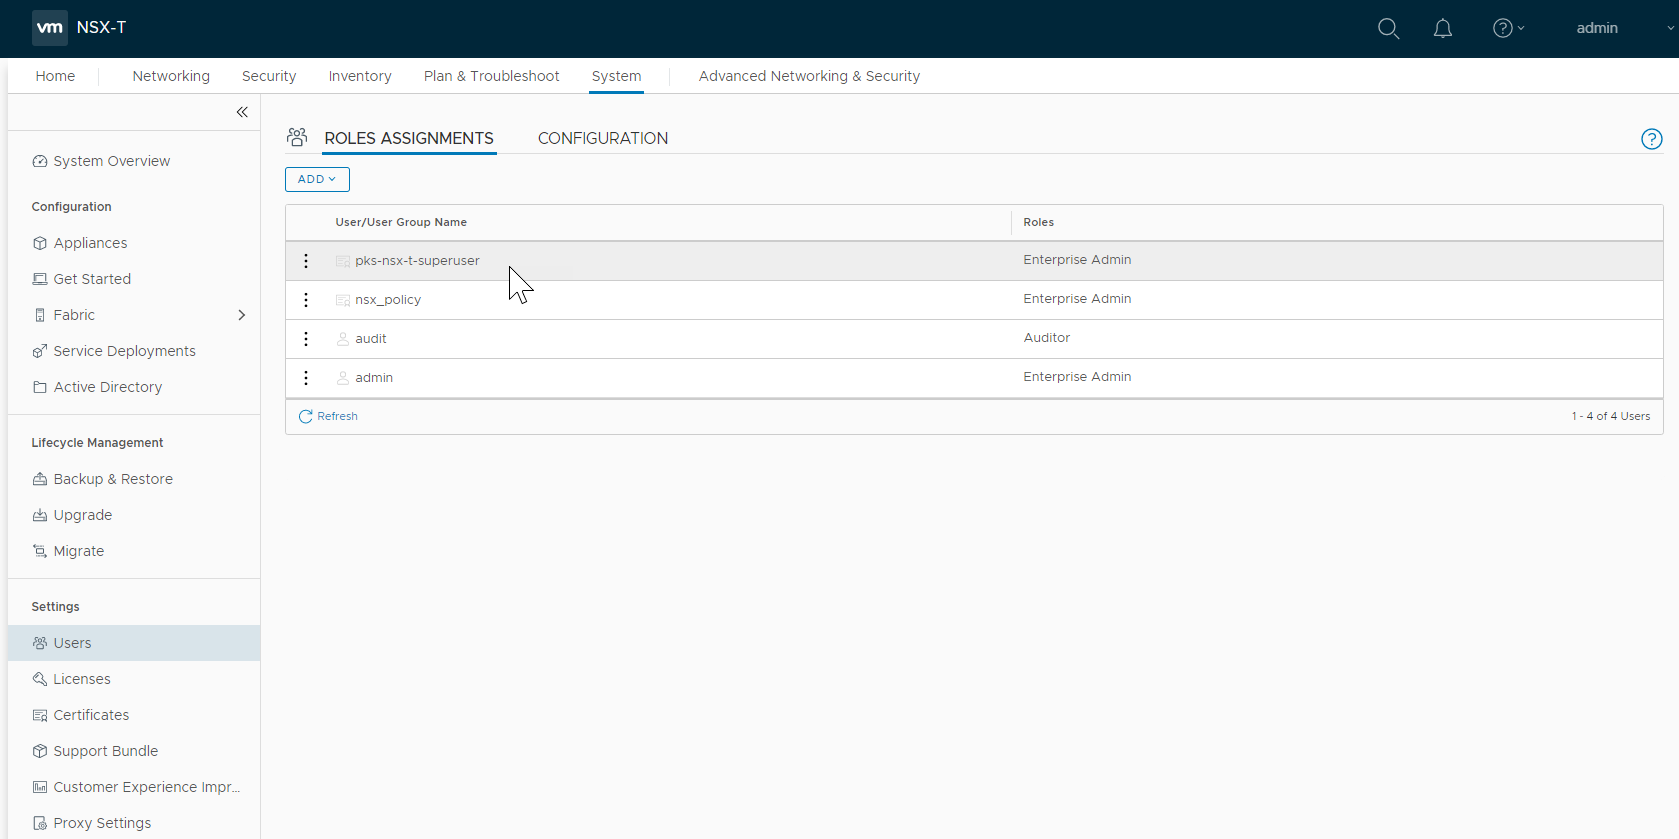
- Confirm the certificate,
Option B: Generate and Register the Certificate and Key Using the Tanzu Kubernetes Grid Integrated Edition Tile
Step 1: Generate the Certificate and Key
To generate the certificate and key automatically in the Networking pane in the Tanzu Kubernetes Grid Integrated Edition tile, follow the steps below:
- Navigate to the Networking pane in the Tanzu Kubernetes Grid Integrated Edition tile. For more information, see Networking in Installing Tanzu Kubernetes Grid Integrated Edition on vSphere with NSX Integration.
- Click Generate RSA Certificate and provide a wildcard domain. For example,
*.nsx.tkgi.vmware.local.
Step 2: Copy the Certificate and Key to the Linux VM
To copy the certificate and key you generated to a Linux VM, follow the steps below:
Note: The Linux VM must have OpenSSL installed and have network access to the NSX Manager. For example, you can use the TKGI client VM where you install the TKGI CLI.
- On the Linux VM you want to use to register the certificate, create a file named
pks-nsx-t-superuser.crt. Copy the generated certificate into the file. - On the Linux VM you want to use to register the key, create a file named
pks-nsx-t-superuser.key. Copy the generated private key into the file. - Save both files.
Step 3: Export Environment Variables
On the Linux VM where you created the certificate and key files, export the environment variables below. Change the NSX_MANAGER_IP, NSX_MANAGER_USERNAME, and NSX_MANAGER_PASSWORD values to match your environment. Use the NSX Management Cluster VIP or load balancer for the NSX_MANAGER_IP.
export NSX_MANAGER="NSX_MANAGER_IP"
export NSX_USER="NSX_MANAGER_USERNAME"
export NSX_PASSWORD='NSX_MANAGER_PASSWORD'
export PI_NAME="pks-nsx-t-superuser"
export NSX_SUPERUSER_CERT_FILE="pks-nsx-t-superuser.crt"
export NSX_SUPERUSER_KEY_FILE="pks-nsx-t-superuser.key"
export NODE_ID=$(cat /proc/sys/kernel/random/uuid)
Step 4: Register the Certificate
-
On the same Linux VM, run the following commands to register the principal identity with NSX Manager:
$ pi_request=$(cat <<END
  {
    "display_name": "$PI_NAME",
    "name": "$PI_NAME",
         "role": "enterprise_admin",
         "certificate_pem": "$(awk 'NF {sub(/\r/, ""); printf "%s\\n",$0;}' ./"$NSX_SUPERUSER_CERT_FILE" )",
         "node_id": "$NODE_ID"
  }
END
)
$ curl -k -X POST \ "https://${NSX_MANAGER}/api/v1/trust-management/principal-identities/with-certificate" \ -u "$NSX_USER:$NSX_PASSWORD" \ -H 'content-type: application/json' \ -d "$pi_request"
Step 6: Verify the Certificate and Key
To verify that the certificate and key can be used with NSX, run the following command:
$ curl -k -X GET \
"https://${NSX_MANAGER}/api/v1/trust-management/principal-identities" \
--cert $(pwd)/"$NSX_SUPERUSER_CERT_FILE" \
--key $(pwd)/"$NSX_SUPERUSER_KEY_FILE"
Rotate the Principal Identity Certificate and Key
To rotate the NSX Principal Identity super user certificate, see How to renew the nsx-t-superuser-certificate used by Principal Identity user in the VMware Knowledge Base.
Next Installation Step
If you have completed this procedure as part of installing TKGI for the first time, proceed to Installing TKGI on vSphere with NSX.
