This topic describes how to deploy an NSX load balancer for the VMware Tanzu Kubernetes Grid Integrated Edition (TKGI) API Server.
About the NSX Load Balancer for the TKGI API Server
If you deploy Tanzu Kubernetes Grid Integrated Edition on vSphere with NSX with the TKGI API in high-availability mode, you must configure an NSX load balancer for the TKGI API traffic. For more information, see Load Balancers in Tanzu Kubernetes Grid Integrated Edition Deployments on vSphere with NSX‑T.
To provision an NSX load balancer for the TKGI API Server VM, complete the following steps.
Step 1: Create NSGroup
If you are using a Dynamic Server Pool, create an NSGroup as described in this step. If you are using a Static Server Pool, skip this step and proceed to Step 2.
- Log in to an NSX Manager Node.
Note: You can connect to any NSX Manager Node in the management cluster to provision the load balancer.
- Select the Advanced Networking & Security tab.
Note: You must use the Advanced Networking and Security tab in NSX Manager to create, read, update, and delete all NSX networking objects used for Tanzu Kubernetes Grid Integrated Edition.
- Select Inventory > Groups.
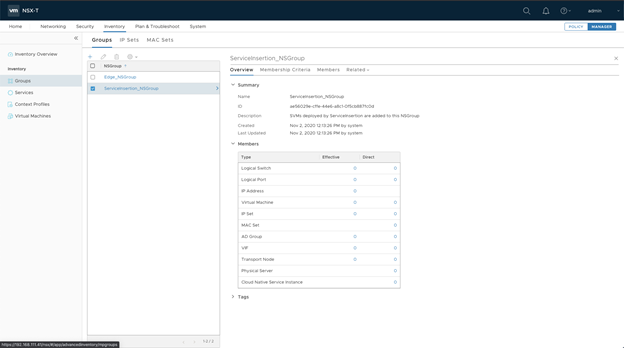
- Click +ADD to add an new NSGroup.
- Enter a name for the NSGroup, for example
tkgi-api.
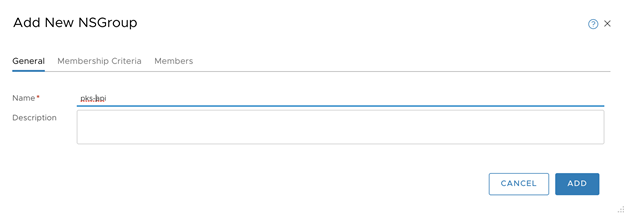
- Click ADD.
Step 2: Create Two Virtual Servers
The TKGI API Sever virtual machine hosts two server processes and exposes two ports: the TKGI API Server on port 9021, and the UAA server on port 8443. Each NSX Virtual Server listens on one port. Thus, you need two Virtual Servers, one for the TKGI API server and the other for UAA.
If you deploy your Tanzu Kubernetes Grid Integrated Edition using No-NAT with Virtual Switch (VSS/VDS) Topology, You only need to deploy ONE virtual Server
Create a Virtual Server for the TKGI API Server
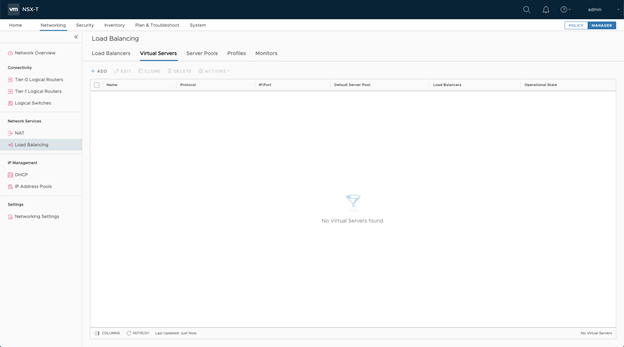
- In NSX Manager, select Networking > Load Balancing > Virtual Servers.
- Click Add.
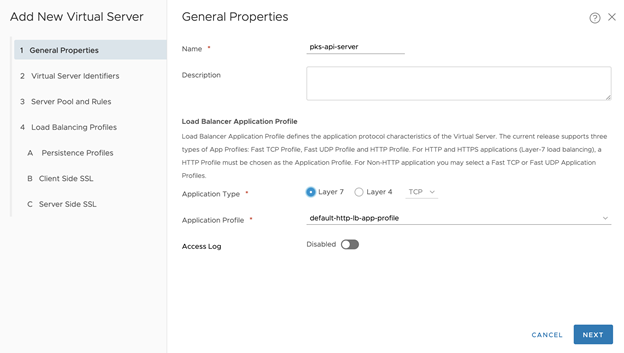
- Configure General Properties for the Virtual Server.
- Name:
tkgi-api-server, for example - Application Types: Choose Layer 7 TCP. Or, you can choose Layer 4, in which case you don’t have to configure SSL for the virtual server. For No-NAT with Virtual Switch (VSS/VDS) Topology, Choose Layer 4
- Application Profile:
default-http-lb-app-profile - Access Log:
Disabled - Click Next
- Name:
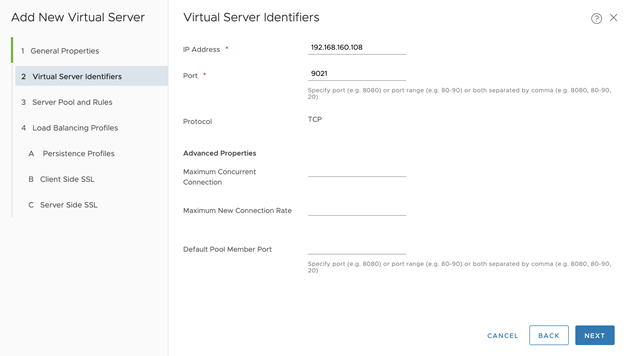
- Configure Virtual Server Identifiers.
- IP Address: Enter an IP address from the floating pool, such as
192/168.160.108 - Port: 9021 (for the TKGS API Server). For No-NAT with Virtual Switch (VSS/VDS) Topology, Set Port: 9021,8443*
- Click Next
- IP Address: Enter an IP address from the floating pool, such as
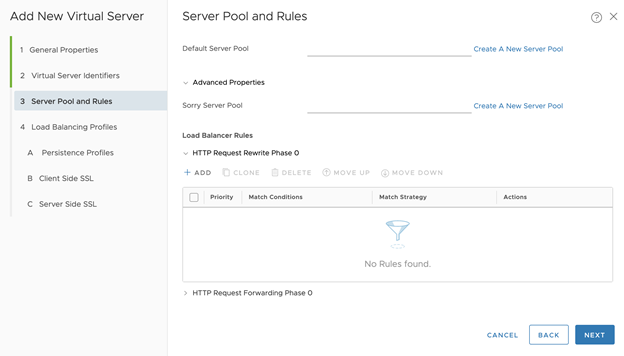
- Configure Server Pool and Rules.
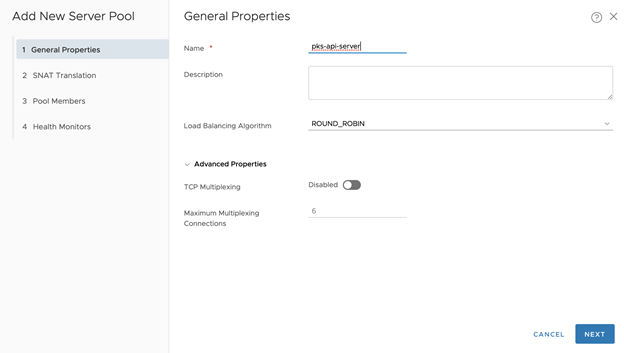
- Click Create a New Server Pool
- Name the server pool, for example tkgi-api-server
- Load Balancing Algorithm: ROUND_ROBIN (for example)
- Click Next
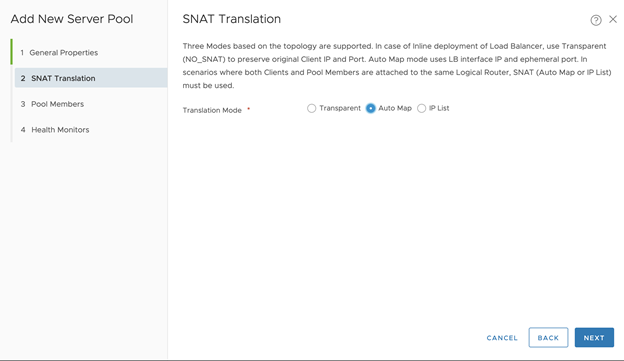
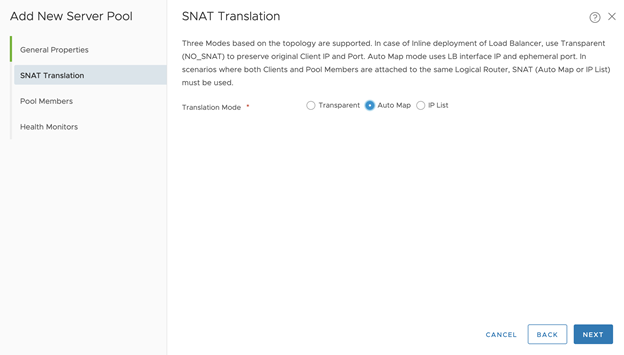
- Configure SNAT Translation for the Server Pool:
- Translation Mode: Auto Map. For No-NAT with Virtual Switch (VSS/VDS) Topology, Translation Mode: IP List. IP Address: Same IP address entered inside Virtual Server Identifiers.
- Click Next
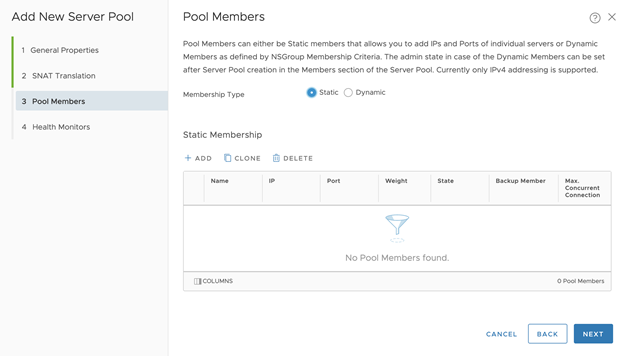
- OPTION 1: Configure Pool Members for the Static Server Pool:
- Membership Type: Static
- Leave members empty. This will be added automatically later when you apply changes in Ops Manager.
- Click Next
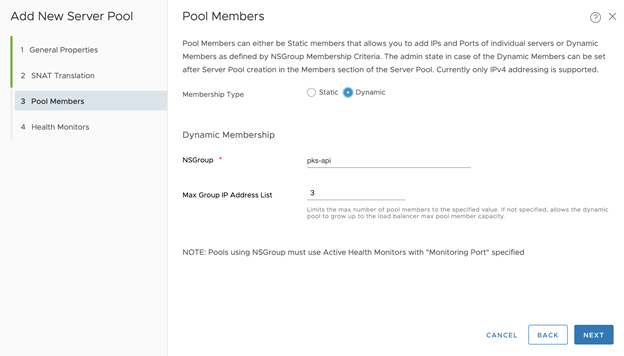
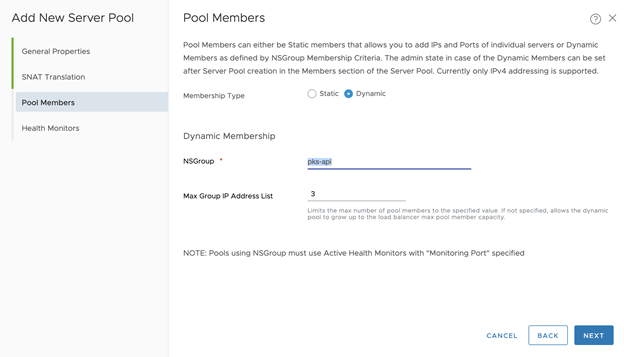
- OPTION 2: Configure Pool Members for the Dynamic Server Pool:
- Membership Type: Dynamic
- Set NSGroup as the NSGroup name created in Step 1, such as tkgi-api
- Set Max Group IP Address List to 3, since we can only have up to 3 TKGI API instances
- Click Next For No-NAT with Virtual Switch (VSS/VDS) Topology,
- Membership Type: Static
- Static Membership: Add your Tanzu Kubernetes Grid Integrated Edition API Server one by one, leave port column empty
- Click Next
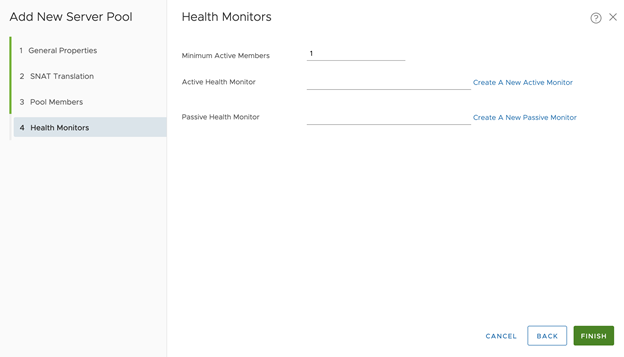
- Configure Health Monitors for the virtual server:
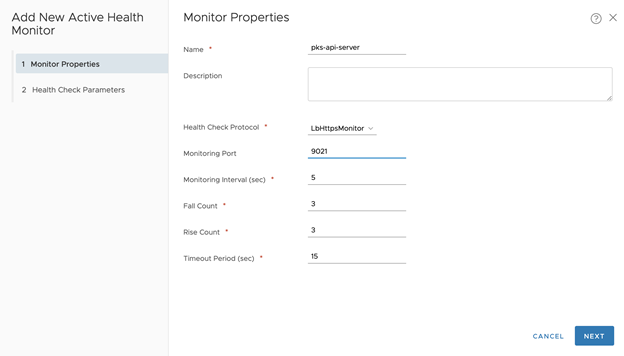
- Click Create A New Active Monitor
- Set Name, for example tkgi-api-server
- Set Health Check Protocol LBHttpsMonitor
- Set the port as 9021
- Leave other fields as default
- Click Next
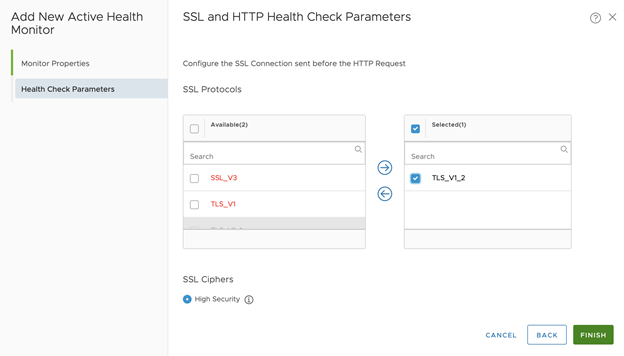
- Configure Health Check Parameters:
- Choose High Security for SSL Ciphers
- Select TLS_V1_2 as SSL Protocols
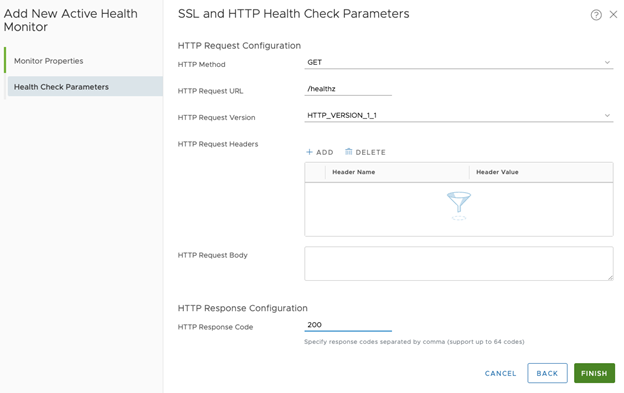
- Set HTTP Method as GET
- Set HTTP Request URL as /actuator/health
- Set HTTP Request Header as 200
- Click Finish
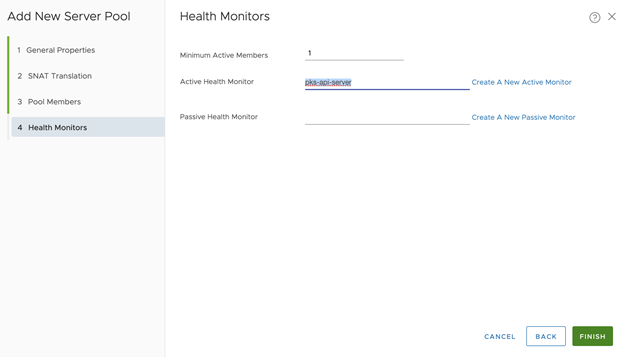
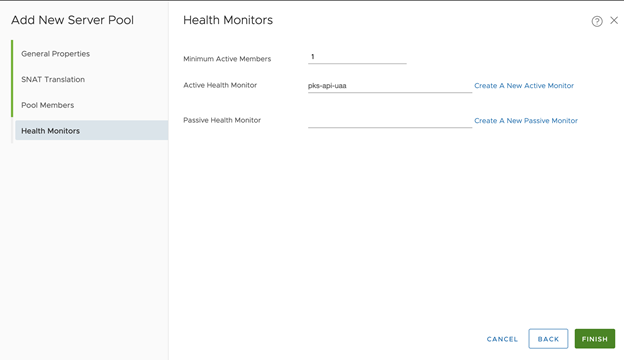
- Configure New Server Pool > Health Monitors:
- Set Active Health Monitor as the what was created: tkgi-api-server
- Click Finish
- Configure the Virtual Server:
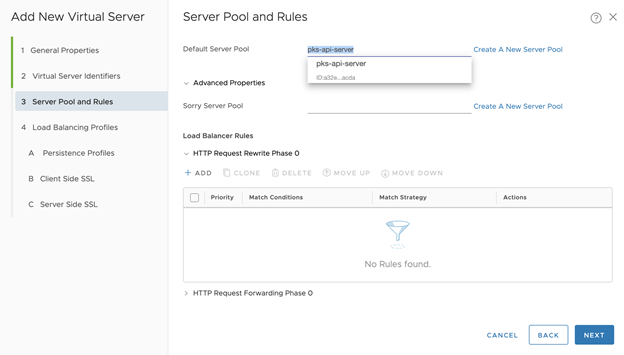
- Set the Default Server Pool to what you just created: tkgi-api-server
- Click Next
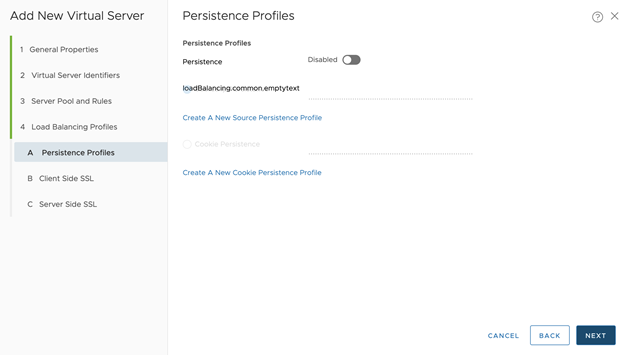
- Persistence Profiles is optional. Click Next.
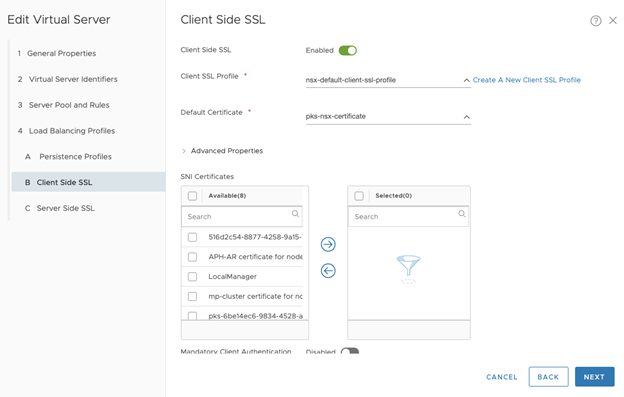
- Configure Client Side SSL (only if L7 Application Type is selected). Use the default certificates. Click Next.
-
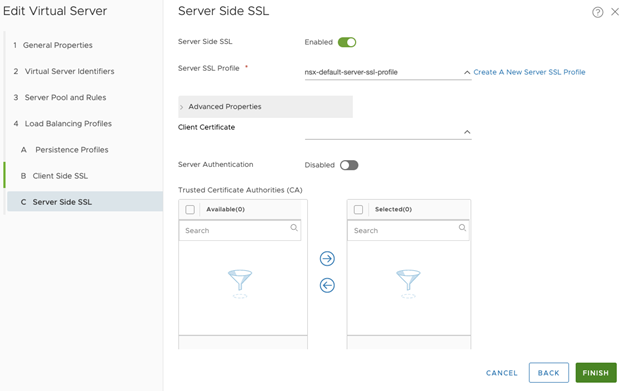
Configure Server Side SSL (only if L7 Application Type is selected). Use the default certificates. Click Finish.


Create a Virtual Server for the UAA Server
Skip this if you deploy as No-NAT with Virtual Switch (VSS/VDS) Topology
- Select the
tkgi-api-serverVirtual Server you created and and click Clone. - Click Edit to change the content and configure the virtual server for UAA.
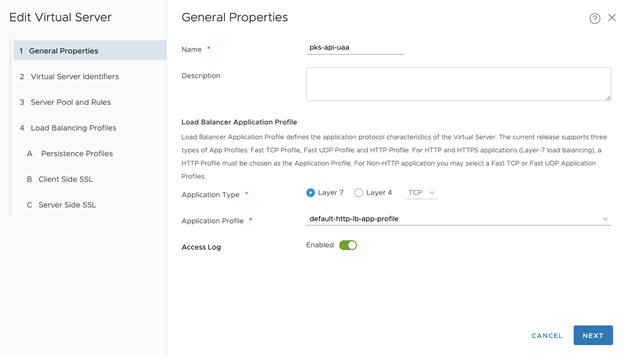
- Configure General Properties
- Set the Name as tkgi-api-uaa
- Click Next
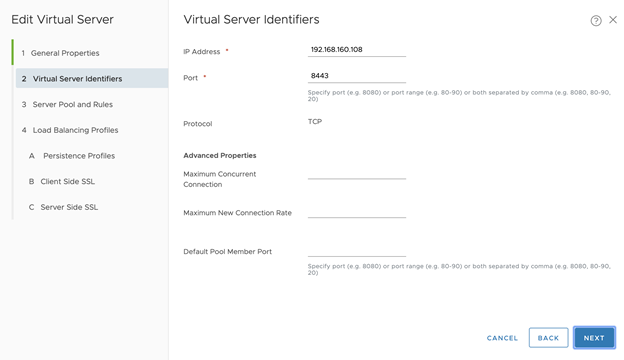
- Configure Virtual Server Identifiers
- Set the Port to 8443
- Click Next
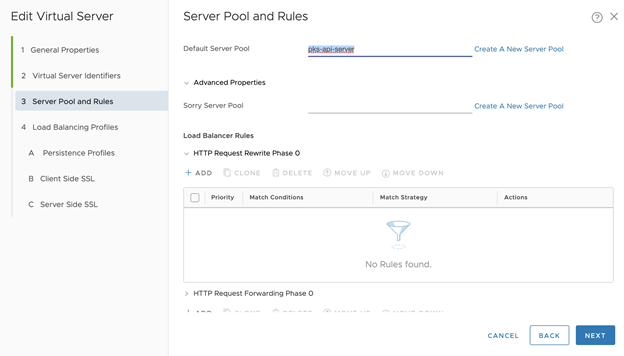
- Configure Server Pool and Rules
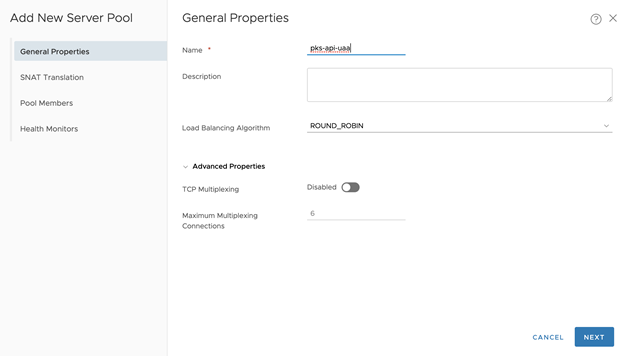
- Click Create A New Server Pool
- Set name to tkgi-api-uaa
- Click Next
- Configure SNAT Translation for the Server Pool
- Configure Pool Members to be the same as you configured for the
tkgi-api-serverVirtual Server - Click Next
- Configure Pool Members to be the same as you configured for the
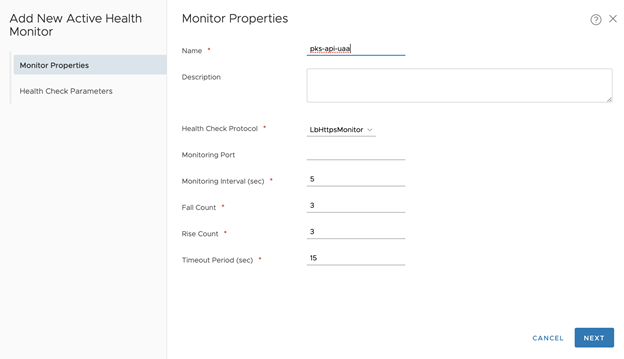
- Configure Health Monitors:
- Click Create A New Active Monitor
- Set Name, for example tkgi-api-uaa
- Set Health Check Protocol LBHttpsMonitor
- Set port as 8443
- Leave other fields as default
- Click Next
- Configure Health Check Parameters:
- Choose High Security for SSL Ciphers
- Select TLS_V1_2 as SSL Protocols
- Set HTTP Request URL as /healthz
- Set HTTP Request Header as 200
- Click Finish
- Configure a New Server Pool
- Set Active Health Monitor to tkgi-api-uaa
- Click Finish
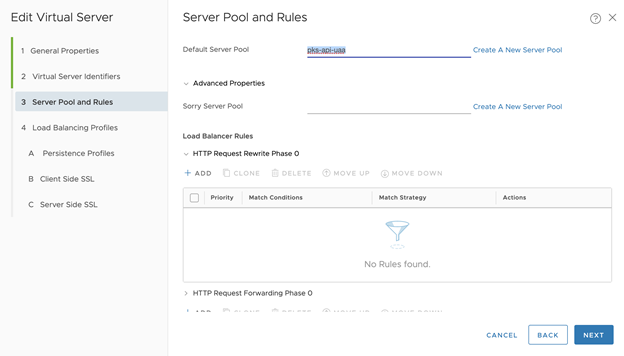
- Edit Virtual Server
- Set Default Server Pool as tkgi-api-uaa
- Click Next
- Persistence Profiles is optional. Click Next.
- Configure Client Side SSL (only if L7 Application Type is selected). Use the default certificates. Click Next.
-
Configure Server Side SSL (only if L7 Application Type is selected). Use the default certificates. Click Finish.
Step 3: Create Load Balancer
- In NSX Manager, select Networking > Load Balancing > Load Balancers.

- Click Add.
- Set the Name. For example
tkgi-api. - Choose the Load Balancer Size. The default SMALL is sufficient for most TKGI deployments. For large-scale deployments, use are larger size load balancer.
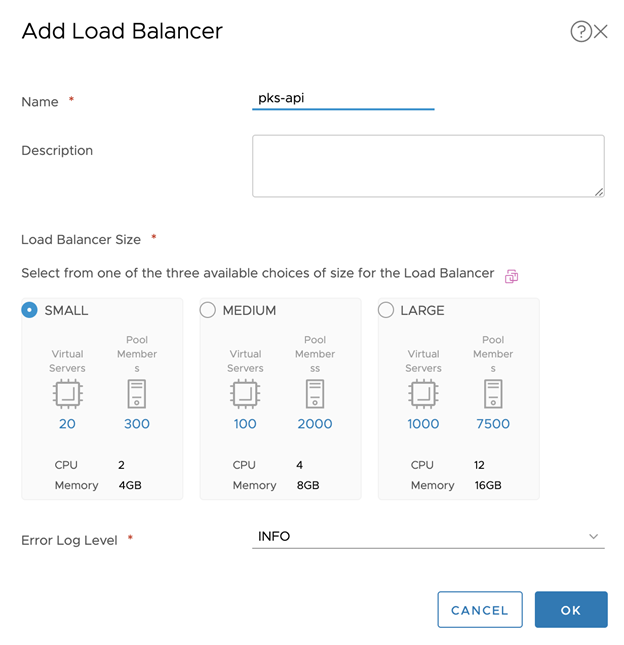
- Click OK.
Step 4: Attach the Load Balancer to a Logical Router
- In NSX Manager, select Networking > Load Balancing > Load Balancers.

- Choose the
tkgs-apiload balancer you just created. - Click the gear icon and select Attach to a Logical Router.
- Choose a Tier-1 logical router that is attached to TKGI API VMs.
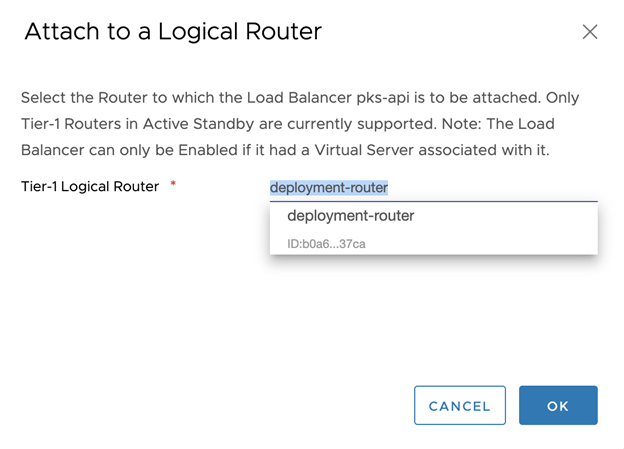
- Click OK.
Troubleshooting LB-Router Attachment
If your logical router does not have an associated edge cluster, you will see an error similar to the following:
<img src="images/nsxt/api-lb/nsxt-lb-tkgi-api-35.png">
When this occurs, you must create a Logical Router that is associated with the Edge Cluster.
To create and configure a new Tier-1 router:
- Select Networking > Tier-1 Logical Routers.
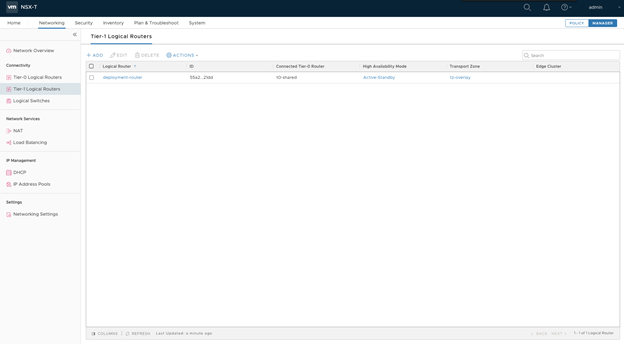
- Click Add.
- Configure Tier-1 Router:
- Set the Name. For example;
tkgi-api. - Set Tier-0 Router.
- Set Edge Cluster.
- Set Edge Cluster member.
- Click Add.
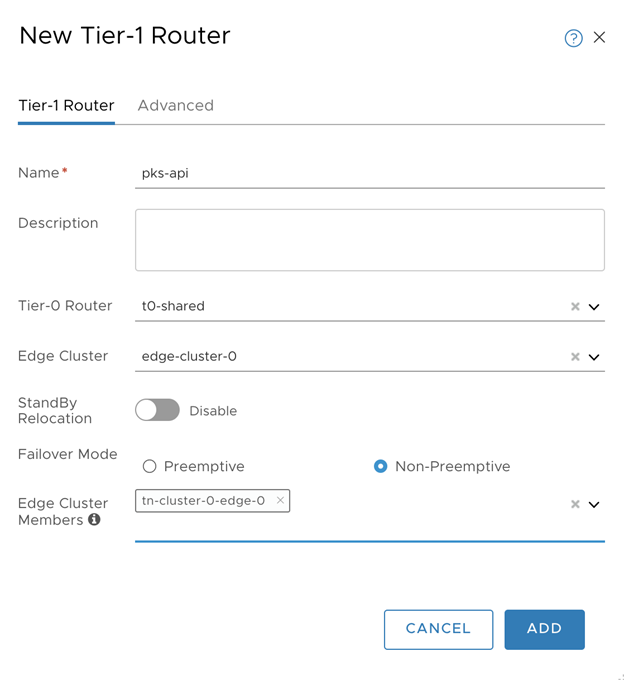
- Set the Name. For example;
- Configure Route Advertisement for the Tier-1 Router.
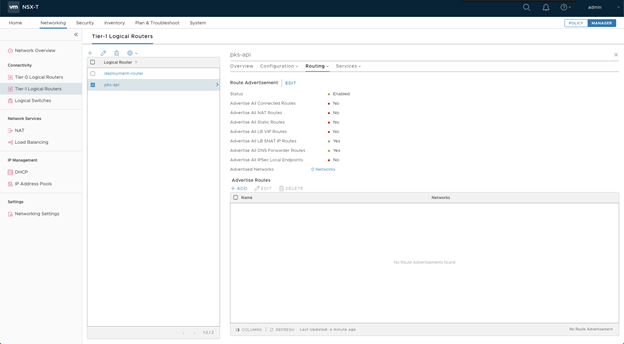
- Select the Tier-1 Router.
- Select the Routing tab.
- Select Route Advertisement > Edit.
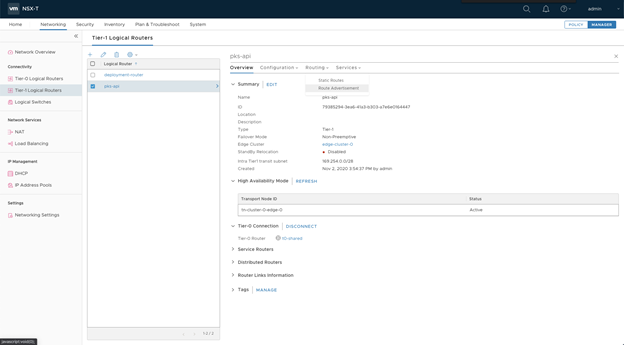
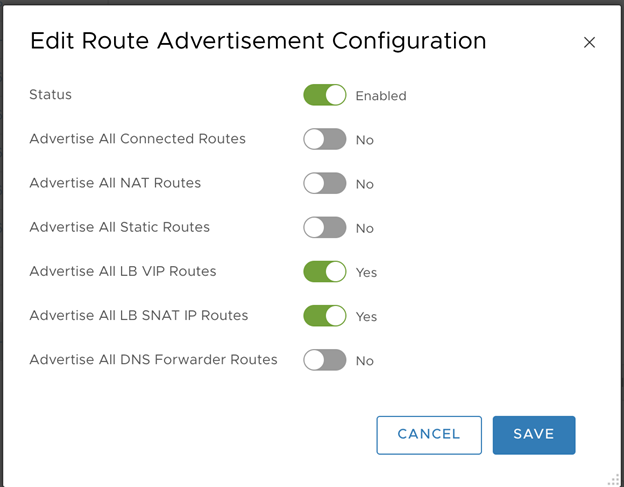
- Enable Route Advertisement for all load balancer VIP routes for the Tier-1 Router:
- Status:
Enabled. - Advertise all LB VIP routes:
Yes. - Advertise all LB SNAT IP routes:
Yes. - Click Save.
- Status:
-
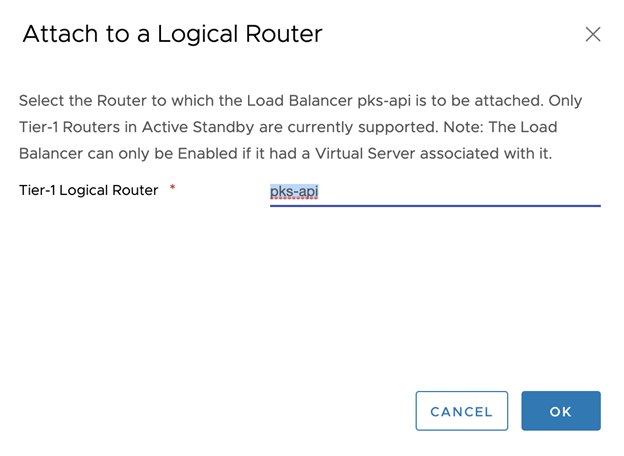
Attach the Logical Router to Load Balancer.
-
Click OK to complete the operation.
Step 5: Attach the Load Balancer to the Virtual Servers
- Select the Load Balancer.
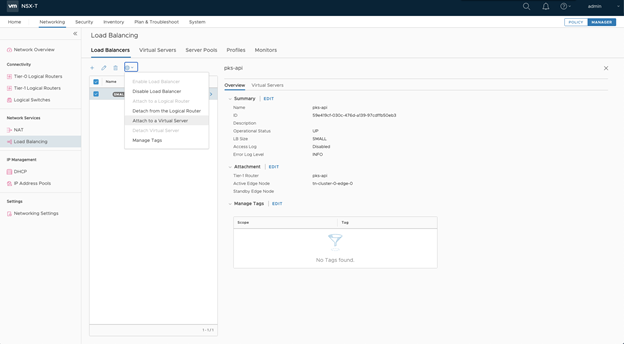
- Click the Settings icon.
- Select Attach to a Virtual Server.
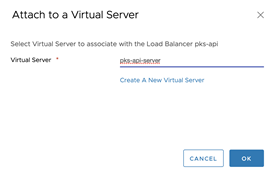
- Attach the load balancer to the
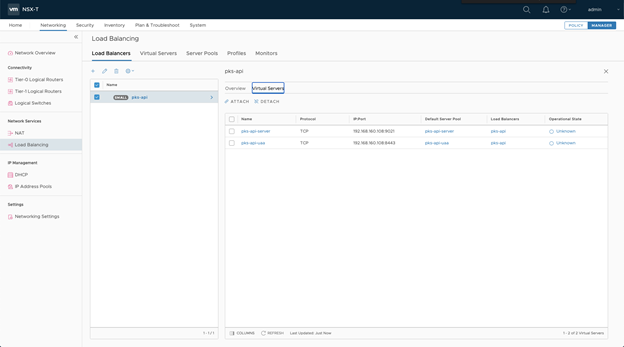
tkgi-api-servervirtual server. Confirm it is included inside the Virtual Servers tab. - Click Ok.
- Click Settings.
- Select Attach to a Virtual Server.
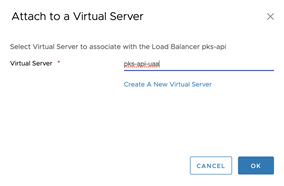
- Attach to the
tkgi-api-uaavirtual server. Confirm it is included inside the Virtual Servers tab. - Click Ok.
Step 6: Configure TKGI to Use the Load Balancer
Skip this if you deployed as No-NAT with Virtual Switch (VSS/VDS) Topology
Now that the load balancer for the TKGI API control plane is configured, update the TKGI tile to point to the load balancer.
- Log in to Ops Manager.
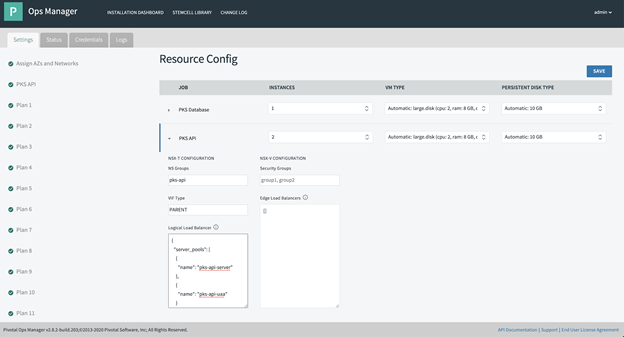
- Go to Tanzu Kubernetes Grid Integrated Edition Tile Resource Config.
- Click TKGI API. You will see a drop down for TKGI API config.
- Change the TKGI API Instances Number to
2or3. We recommend3for quorum. - Set the NSGroup if you configured Dynamic Server Pool. Otherwise leave it empty.
- Set VIF Type to
PARENTor leave it empty. -
Set the Logical Load Balancer as follows:
{ "server_pools": [ { "name": "tkgi-api-server", "port": 9021 }, { "name": "tkgi-api-uaa", "port": 8443 } ] } - Click Save.
-
Click apply-changes and wait for Ops Manager to finish saving the settings.
- For static server pools, this operation will add the VM as server pool member.
- For dynamic server pools, this operation will add the VM to the corresponding NSGroup.
Step 7: Test the Load Balancer
To validate your Load Balancer configuration:
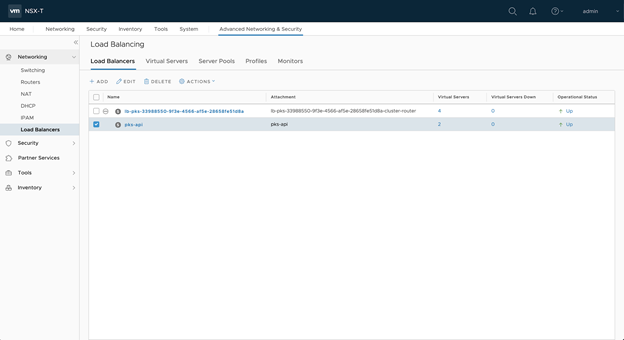
- In NSX Manager, verify that the operational status of the load balancer is up.
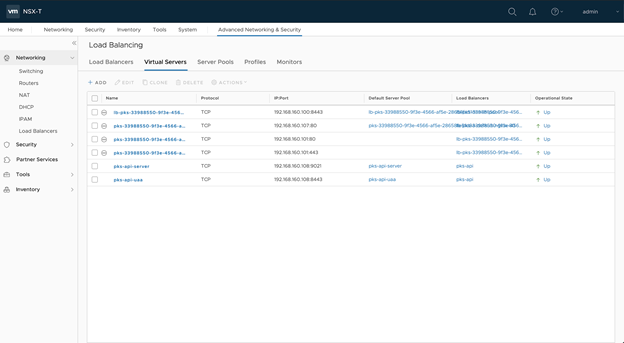
- Make sure the Virtual Servers are up.
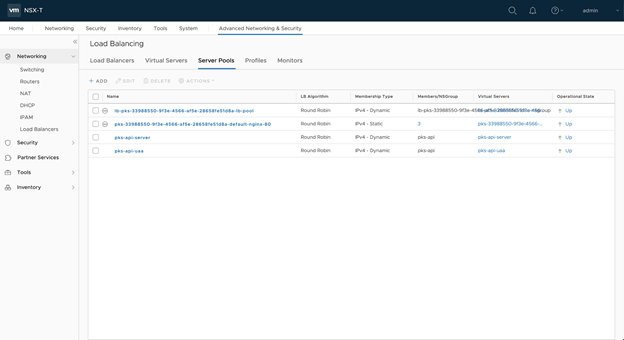
- Make sure the Server Pools are up.
-
To test the load balancer:
-
Using your TKGI client jump host, change the TKGI API hostname to resolve to the Load Balancer IP.
For example, you can use192.168.160.108as the IP address of the load balancer:kubo@jumper:~$ cat /etc/hosts 127.0.0.1 localhost 127.0.1.1 jumper.localdomain jumper # The following lines are desirable for IPv6 capable hosts ::1 localhost ip6-localhost ip6-loopback ff02::1 ip6-allnodes ff02::2 ip6-allrouters 192.168.111.93 vxlan-vm-111-93.vmware.com 192.168.111.109 nsxmanager.tkgi.vmware.local 192.168.160.108 tkgi.tkgi-api.cf-app.com -
Log in to the TKGI API Server via the load balancer.
For example:kubo@jumper:~$ tkgi login -a tkgi.tkgi-api.cf-app.com -u lana -p password -k && tkgi clusters API Endpoint: tkgi.tkgi-api.cf-app.com User: lana Login successful. TKGI Version Name k8s Version Plan Name UUID Status Action 1.19.2-build.10 test_one 1.28.11 Plan 1 33988550-...-28658fe51d8a succeeded UPDATE
-