


Create GPU Clusters (Beta)
This page explains how to create TKGI clusters on vSphere that run NVIDIA GPU worker nodes. Applications hosted on the GPU clusters access GPU functionality via Compute Unified Device Architecture (CUDA).
VMware ESXi hosts let VMs directly access plugged-in GPU devices via PCI passthrough as described in GPU Device in PCI Passthrough in the VMware Edge documentation.
Overview
To create a CUDA-enabled GPU cluster with TKGI on vSphere, you:
- Plug compatible GPU cards into your ESXi hosts.
- Configure PCI passthrough for the cards, and retrieve the
vendor_idanddevice_idthat identify them. - Configure a BOSH VM Extension for a VM instance group that uses the GPUs, as set by
pci_passthroughs. - (Optional) To enable the cluster to run workloads on either non-GPU or GPU processors, configure a compute profile that defines both non-GPU and GPU node pools.
- Create the cluster.
- Install the NVIDIA GPU Operator on the cluster to integrate the GPU with Kubernetes.
- By default, the NVIDIA GPU Operator installs a default GPU driver on worker nodes, but you can also customize the GPU driver image.
Prerequisites
- TKGI v1.20 or later.
- NVIDIA GPU cards from G8x series or later, such as GeForce, Quadro, or Tesla
- These cards support CUDA.
- ESXi hosts running vSphere 7.0 Update 3 or later.
- For ESXi I/O requirements, see vSphere VMDirectPath I/O and Dynamic DirectPath I/O: Requirements for Platforms and Devices in the Broadcom Support Knowledge Base.
- Listed below are the builds for 7.0u3, which is the minimum required to support GPU clusters.
Prepare the Hardware
To prepare GPU hardware for supporting TKGI clusters with CUDA:
-
Plug the GPU cards into your ESXi hosts.
- To simplify management, VMware recommends grouping the hosts that have GPUs into the same vSphere cluster, so they run within a single availability zone (AZ).
-
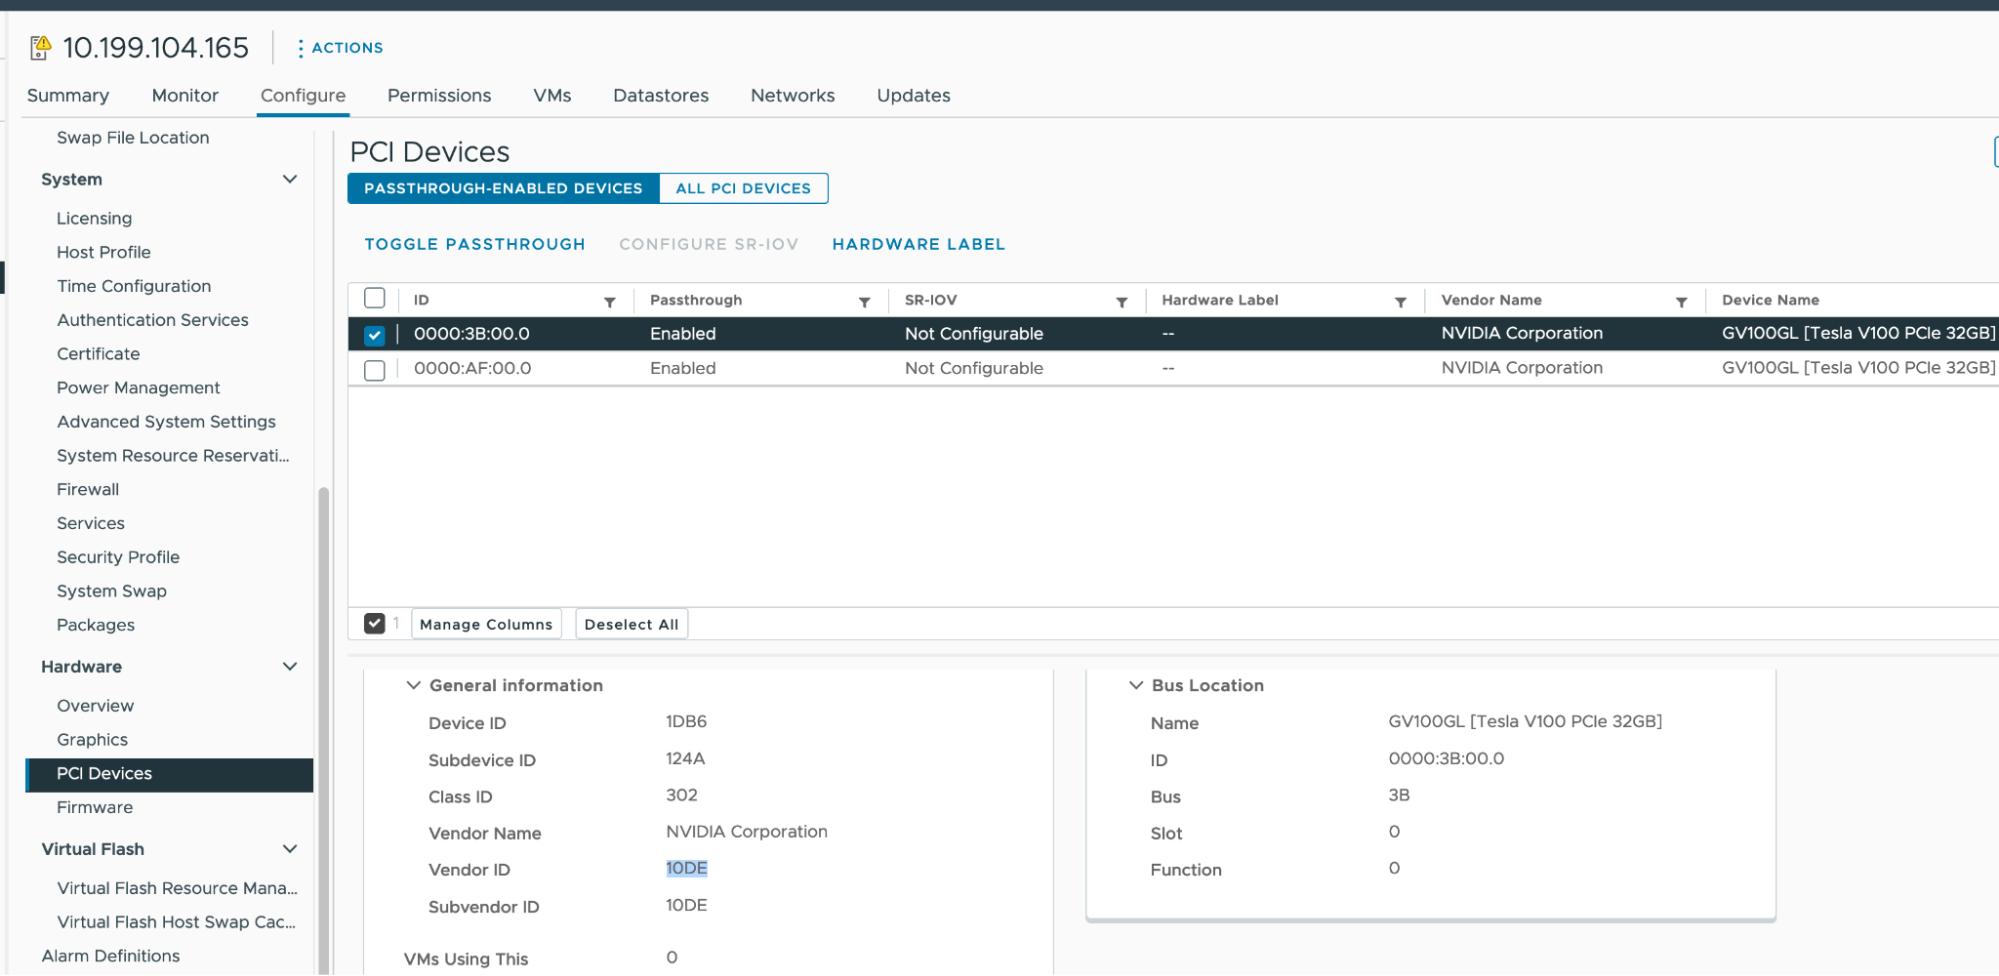
Enable PCI passthrough and record the GPU IDs:
- In your vSphere Client, select the target ESXi host in the
GPUcluster. - Select Configure > Hardware > PCI Devices.
- Select the All PCI Devices tab.
-
For each target GPU:
- Select the GPU from the list.
- Click Toggle Passthrough.
- Under General Information, record the Vendor ID and Device ID. Both IDs are the same for identical GPU cards.
- In your vSphere Client, select the target ESXi host in the
Configure the BOSH VM Extension
You configure a Kubernetes cluster to have GPU-based workers by defining an instance group with VM extensions vm_extensions.pci_passthroughs.vendor_id and .device_id set to your GPU’s vendor and device ID values. See Using BOSH VM Extensions for how to create the VM extension.
The instance group’s name value must start with worker-, to specify that it applies to worker nodes.
You can define the instance groups using either YAML or JSON format. The formats differ in how you set the ID values:
- YAML: Hexadecimal, e.g.
0x10de; prepend0xto the vSphere client listing - JSON: Decimal, e.g.
4318; convert from the vSphere client listing
For example:
-
YAML:
--- instance_groups: - name: master vm_extension: vmx_options: disk.enableUUID: '1' - name: worker-gpu-pool vm_extension: cpu: 8 ram: 16384 pci_passthroughs: - vendor_id: 0x10de device_id: 0x1db6 vmx_options: disk.enableUUID: '1' pciPassthru.use64bitMMIO: 'TRUE' pciPassthru.64bitMMIOSizeGB: 128 -
JSON:
{
  "instance_groups": [
      {
          "name": "master",
          "vm_extension": {
              "vmx_options": {
                  "disk.enableUUID": "1"
              }
          }
      },
      {
          "name": "worker-gpu-pool",
          "vm_extension": {
              "cpu": 8,
              "ram": 16384,
              "pci_passthroughs": [
                  {
                      "vendor_id": 4318,
                      "device_id": 7606
                  }
              ],
              "vmx_options": {
                  "disk.enableUUID": "1",
                  "pciPassthru.use64bitMMIO": "TRUE",
                  "pciPassthru.64bitMMIOSizeGB": 128
              }
          }
      }
  ]
}
Configure the pci_passthroughs and vmx_options sections as described below.
pci_passthroughs
To support the GPU worker nodes, you need a sufficient number of GPUs:
Total GPUs needed = Number of GPUs in the vm_extension * Number of workers in the GPU node pool
For example, if you have two GPUs on every ESXi host that is hosting GPU workers, you can set pci_passthroughs to specify both of them, using the vendor and device ID for each:
    pci_passthroughs:
    - vendor_id: 0x10de
      device_id: 0x1db6
    - vendor_id: 0x10de
      device_id: 0x1db6
The IDs are the same for identical GPU boards, but you need to list them by the correct count.
vmx_options
The vmx_options sets extra properties for the GPU worker, for example:
pciPassthru.use64bitMMIO: ‘TRUE’- set this for GPUs that require 16GB or more of memory mappingpciPassthru.64bitMMIOSizeGB: 128- set this option to the total amount of memory mapped I/O (MMIO) needed by your GPU cards, which is at minimum their combined framebuffer memory.- For example, if all attached GPUs use 120GB total, set
64bitMMIOSizeGBto128GB. - See Requirements for Using vGPU on GPUs Requiring 64 GB or More of MMIO Space with Large-Memory VMs in the NVIDIA documentation.
- For one person’s approach to determining the
64bitMMIOSizeGBsetting, see Calculating the value for 64bitMMIOSizeGB.
- For example, if all attached GPUs use 120GB total, set
(Optional) Configure Compute Profile
To create a Kubernetes cluster with both GPU and non-GPU worker nodes, configure a compute profile and custom AZs that define separate node pools, one for each worker type, as described in Create a Compute Profile.
Without a compute profile, the cluster you create will only have GPU workers.
For example, to use a node pool gpu-pool in AZ gpu-az, create a compute profile spec gpu-compute-profile.json with:
{
    "name": "gpu-compute-profile",
    "description": "gpu-compute-profile",
    "parameters": {
        "azs": [{
            "name": "gpu-az",
              [...]
              }]
            }
          }
        ],
        "cluster_customization": {
            "node_pools": [
                {
                    "name": "normal-pool",
                    "instances": 3,
                    "max_worker_instances": 5
                },
                {
                    "name": "gpu-pool",
                    "az_names": ["gpu-az"],
                    "instances": 3,
                    "max_worker_instances": 5
                }
            ]
        }
    }
}
Where the node_pools.name value is the name of the VM extension without the worker- prefix.
Create the Cluster
How you create the cluster depends on whether you defined a compute profile:
-
With compute profile:
-
Create the compute profile:
tkgi create-compute-profile ~/work/x/tkgi-gpu/src/tkgi/gpu-compute-profile.json -
Create the cluster with the profile:
tkgi create-cluster my-gpu-cluster \
--external-hostname my-gpu-cluster.example.com \
--plan small \
--compute-profile < compute profile defined above > \
--config-file < path to the vm_extension file save above >
-
-
No compute profile:
-
Create the GPU-only cluster:
tkgi create-cluster my-gpu-cluster \
--external-hostname my-gpu-cluster.example.com \
--plan small \
--config-file < path to the vm_extension file save above >
-
Install the GPU Operator
To enable GPU integration with the Kubernetes environment, NVIDIA provides a GPU Operator Helm chart for managing GPUs. This Kubernetes operator handles GPU driver lifecycle management, node labeling, container-toolkit installation, etc.
See Supported NVIDIA Data Center GPUs and Systems in the NVIDIA documentation to determine whether the GPU Operator supports your hardware and environment.
NoteBroadcom does not support NVIDIA software.
To install the GPU Operator in your TKGI GPU cluster, see Installing the NVIDIA GPU Operator in the NVIDIA documentation.
For Helm chart customization options, see Common Chart Customization Options.
In a typical installation for example, you might run the following on the local workstation where you have kubectl installed:
-
Install Helm, if not already installed:
curl -fsSL -o get_helm.sh https://raw.githubusercontent.com/helm/helm/master/scripts/get-helm-3 \ && chmod 700 get_helm.sh \ && ./get_helm.sh -
Add the NVIDIA Helm repository:
helm repo add nvidia https://helm.ngc.nvidia.com/nvidia \ && helm repo update -
Install the GPU Operator:
helm install --wait --generate-name \
-n gpu-operator --create-namespace \
nvidia/gpu-operator \
  --set driver.enabled=true \
  --set toolkit.enabled=true \
  --set toolkit.env[0].name=CONTAINERD_CONFIG \
  --set toolkit.env[0].value=/var/vcap/jobs/containerd/config/config.toml \
  --set toolkit.env[1].name=CONTAINERD_SOCKET \
  --set toolkit.env[1].value=/var/vcap/sys/run/containerd/containerd.sock \
  --set toolkit.env[2].name=CONTAINERD_RUNTIME_CLASS \
  --set toolkit.env[2].value=nvidia \
  --set toolkit.env[3].name=CONTAINERD_SET_AS_DEFAULT \
  --set-string toolkit.env[3].value="true"
The values
/var/vcap/jobs/containerd/config/config.tomland/var/vcap/sys/run/containerd/containerd.sockare specific to TKGI.
Customize the Driver Image
If the default GPU driver does not work or suit your needs, you can install custom one as described in Running a Custom Driver Image in the NVIDIA documentation.
If you use a custom driver, you need to add the driver.repository and driver.version options you install the gpu-operator.
