Install and Configure NSX Advanced Load Balancer
NSX Advanced Load Balancer Deployment Topology
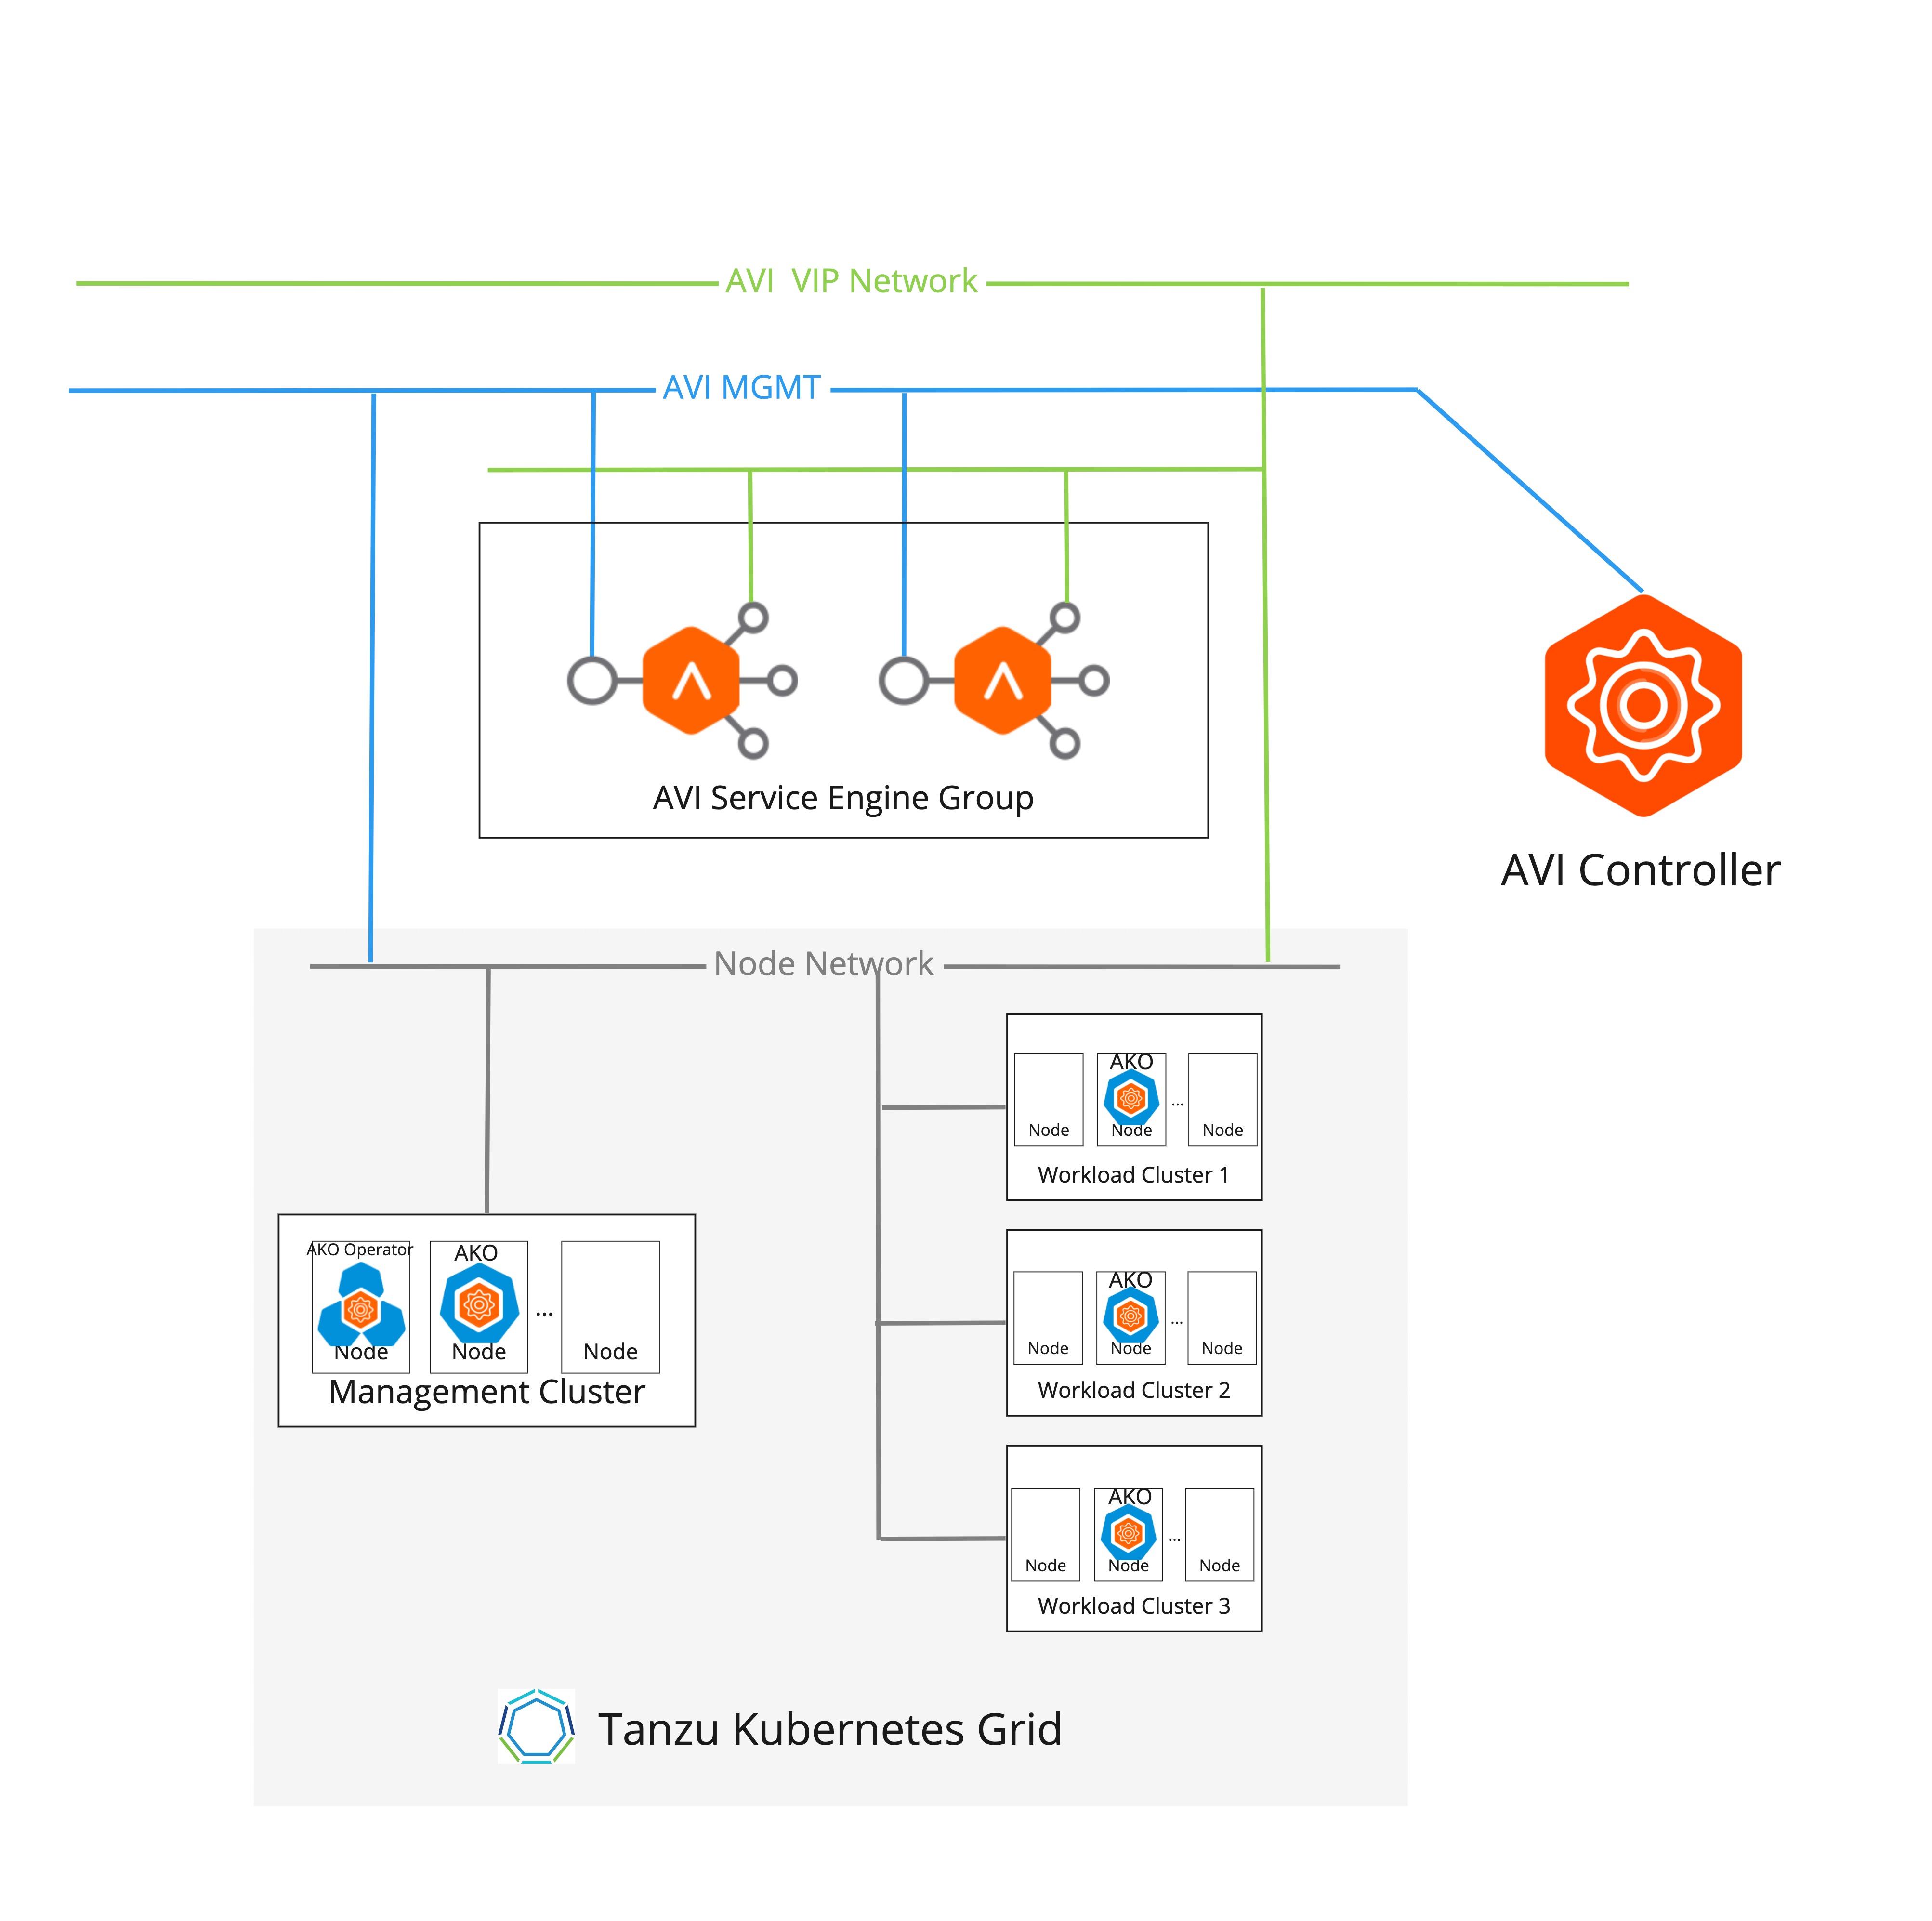
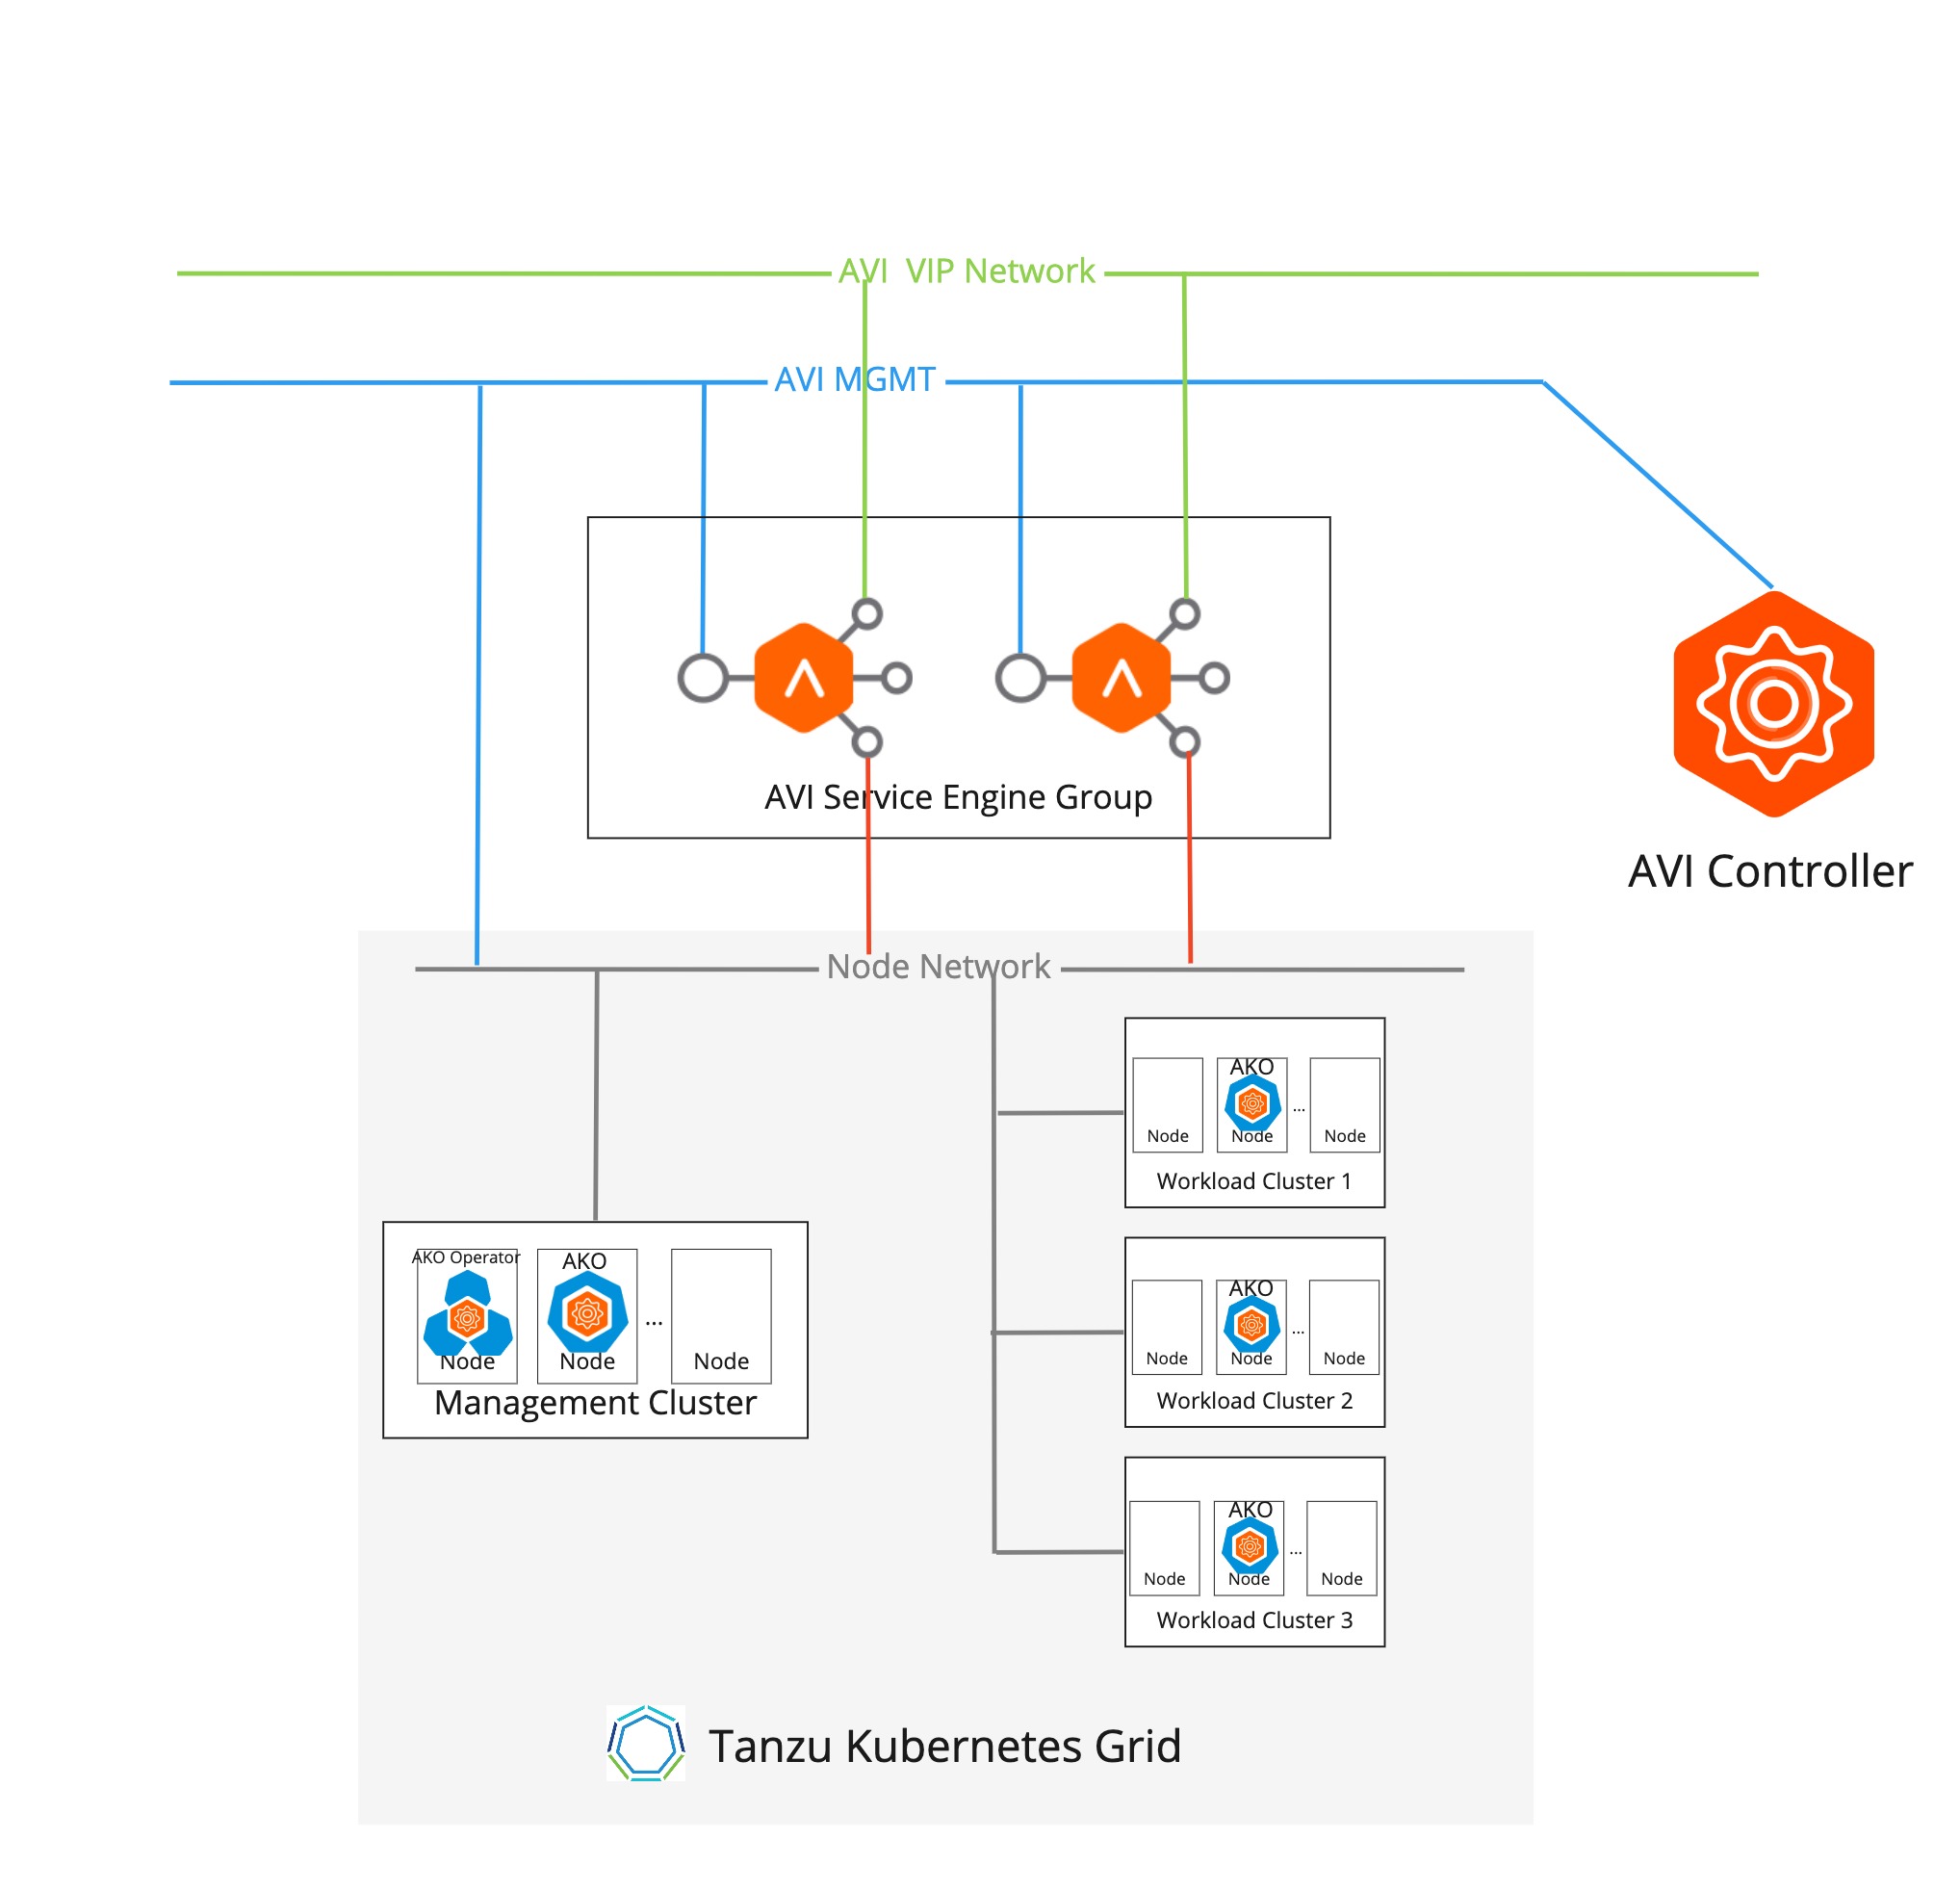
In Tanzu Kubernetes Grid, NSX Advanced Load Balancer includes the following components:
- Avi Kubernetes Operator (AKO) provides L4-L7 load balancing for applications that are deployed in a Kubernetes cluster for north-south traffic. It listens to Kubernetes Ingress and Service Type
LoadBalancerobjects and interacts with the Avi Controller APIs to createVirtualServiceobjects. - AKO Operator is an application that enables the communication between AKO and the cluster API. It manages the lifecycle of AKO and provides a generic interface to the load balancer for the cluster control plane nodes. AKO operator is deployed only on the management cluster.
- Service Engines (SE) implement the data plane in a VM form factor.
- Service Engine Groups provide a unit of isolation in the form of a set of Service Engines, for example a dedicated SE group for specific important namespaces. This offers control in the form of the flavor of SEs (CPU, Memory, and so on) that needs to be created and also the limits on the maximum number of SEs that are permitted.
- Avi Controller manages
VirtualServiceobjects and interacts with the vCenter Server infrastructure to manage the lifecycle of the service engines (SEs). It is the portal for viewing the health ofVirtualServicesand SEs and the associated analytics that NSX Advanced Load Balancer provides. It is also the point of control for monitoring and maintenance operations such as backup and restore.
Tanzu Kubernetes Grid supports NSX Advanced Load Balancer deployed in one-arm and multi-arm network topologies.
NoteIf you want to deploy NSX ALB Essentials Edition in a multi-arm network topology, ensure that you have not configured any firewall or network policies in the networks that are configured for the communication between the Avi SE and the Kubernetes cluster nodes. To configure any firewall or network policies in a multi-arm network topology where NSX ALB is deployed, you require NSX Advanced Load Balancer Enterprise Edition with the auto-gateway feature enabled.
The following diagram represents a one-arm NSX ALB deployment:
The following diagram represents a multi-arm NSX ALB deployment:
Networking
- SEs can be deployed in a one-arm or a dual-arm mode in relation to the data path, with connectivity both to the VIP network and to the workload cluster node network. If you want to deploy SEs in a dual-armed network topology by using NSX ALB Essentials Edition, ensure that you have not configured any firewall or network policies in the networks that you want to use.
- The VIP network and the workload networks must be discoverable in the same vCenter Cloud so Avi Controller could create SEs attached to both networks.
- VIP and SE data interface IP addresses are allocated from the VIP network.
IPAM
- If DHCP is not available, IPAM for the VIP and SE Interface IP address is managed by Avi Controller.
- The IPAM profile in Avi Controller is configured with a Cloud and a set of Usable Networks.
- If DHCP is not configured for the VIP network, at least one static pool must be created for the target network.
Resource Isolation
- Data plane isolation across workload clusters can be provided by using SE Groups. The vSphere admin can configure a dedicated SE Group and configure that for a set of workload clusters that need isolation.
- SE Groups offer the ability to control the resource characteristics of the SEs created by the Avi Controller, for example, CPU, memory, and so on.
Tenancy
With NSX Advanced Load Balancer Essentials, all workload cluster users are associated with the single admin tenant.
Avi Kubernetes Operator
Avi Kubernetes Operator is installed on workload clusters. It is configured with the Avi Controller IP address and the user credentials that Avi Kubernetes Operator uses to communicate with the Avi Controller. A dedicated user per workload is created with the admin tenant and a customized role. This role has limited access, as defined in https://github.com/avinetworks/avi-helm-charts/blob/master/docs/AKO/roles/ako-essential.json.
Install Avi Controller on vCenter Server
To install Avi on vCenter Server, see Installing Avi Vantage for VMware vCenter in the Avi documentation.
To install Avi on vCenter with VMware NSX, see Installing Avi Vantage for VMware vCenter with NSX in the Avi documentation.
NoteSee the Tanzu Kubernetes Grid v2.5.x Release Notes for the Avi Controller version that is supported in this release. To upgrade the Avi Controller, see Flexible Upgrades for Avi Vantage.
Prerequisites for Installing and Configuring NSX ALB
To enable the Tanzu Kubernetes Grid NSX - Advanced Load Balancer integration solution, you must deploy and configure the Avi Controller. Currently, Tanzu Kubernetes Grid supports deploying the Avi Controller in vCenter cloud and NSX-T cloud.
To ensure that the Tanzu Kubernetes Grid - NSX Advanced Load Balancer integration solution work, your environment network topology must satisfy the following requirements:
- Avi Controller should be reachable from vCenter, the management cluster, and the workload cluster.
- The AKO in the Management cluster and the workload clusters must be reachable to Avi Controller to request the Avi Controller to implement the data plane of Load Balancer type of service and ingress.
- The Avi Service Engine (SE) must be reachable from the Kubernetes clusters to which the SE provides load balancing data plane.
- The Avi Service Engine needs to route traffic to the cluster to which it provides load balancing functionality.
NSX Cloud
Integrating Tanzu Kubernetes Grid with NSX and NSX Advanced Load Balancer (Avi) is supported in the following versions:
| NSX | Avi Controller | Tanzu Kubernetes Grid |
|---|---|---|
| 3.0+ | 20.1.1+ | 1.5.2+ |
Avi Controller Setup: IPAM and DNS
There are additional settings to configure in the Controller UI before you can use NSX Advanced Load Balancer.
-
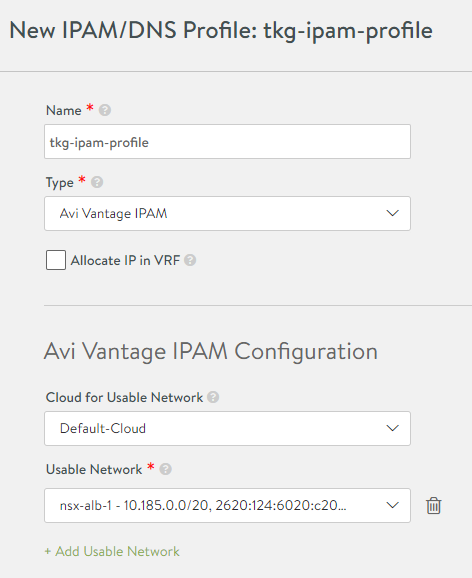
In the Controller UI, go to Templates > Profiles > IPAM/DNS Profiles, click Create and select IPAM Profile.
- Enter a name for the profile, for example,
tkg-ipam-profile. - Leave the Type set to Avi Vantage IPAM.
- Leave Allocate IP in VRF unchecked.
- Click Add Usable Network.
- Select Default-Cloud.
- For Usable Network, select the network where you want the virtual IPs to be allocated. If you are using a flat network topology, this can be the same network (management network) that you selected in the preceding procedure. For a different network topology, select a separate port group network for the virtual IPs.
- (Optional) Click Add Usable Network to configure additional VIP networks.
- Click Save.
- Enter a name for the profile, for example,
-
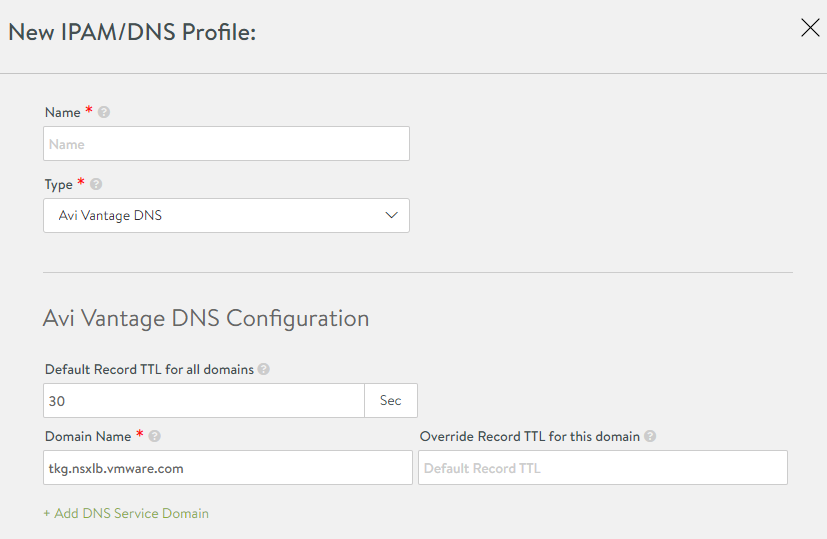
In the IPAM/DNS Profiles view, click Create again and select DNS Profile.
Note
The DNS Profile is optional for using Service type
LoadBalancer.- Enter a name for the profile, for example,
tkg-dns-profile. - For Type, select AVI Vantage DNS
- Click Add DNS Service Domain and enter at least one Domain Name entry, for example
tkg.nsxlb.vmware.com.- This should be from a DNS domain that you can manage.
- This is more important for the L7 Ingress configurations for workload clusters, in which the Controller bases the logic to route traffic on hostnames.
- Ingress resources that the Controller manages should use host names that belong to the domain name that you select here.
- This domain name is also used for Services of type
LoadBalancer, but it is mostly relevant if you use AVI DNS VS as your Name Server. - Each Virtual Service will create an entry in the AVI DNS configuration. For example,
service.namespace.tkg-lab.vmware.com.
- Click Save.
- Enter a name for the profile, for example,
-
Click the menu in the top left corner and select Infrastructure > Clouds.
-
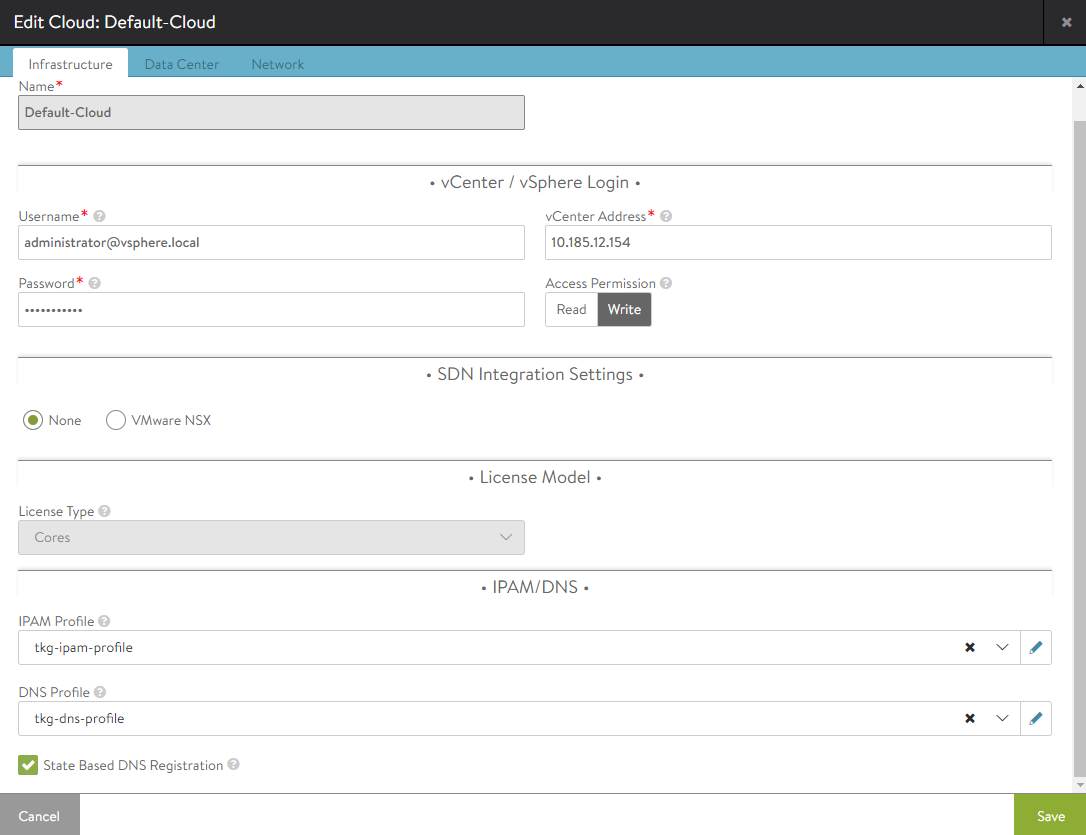
For Default-Cloud, click the edit icon and under IPAM Profile and DNS Profile, select the IPAM and DNS profiles that you created above.
-
Select the DataCenter tab.
- Leave DHCP enabled. This is set per network.
- Leave the IPv6… and Static Routes… checkboxes unchecked.
-
Do not update the Network section yet.
- Save the cloud configuration.
-
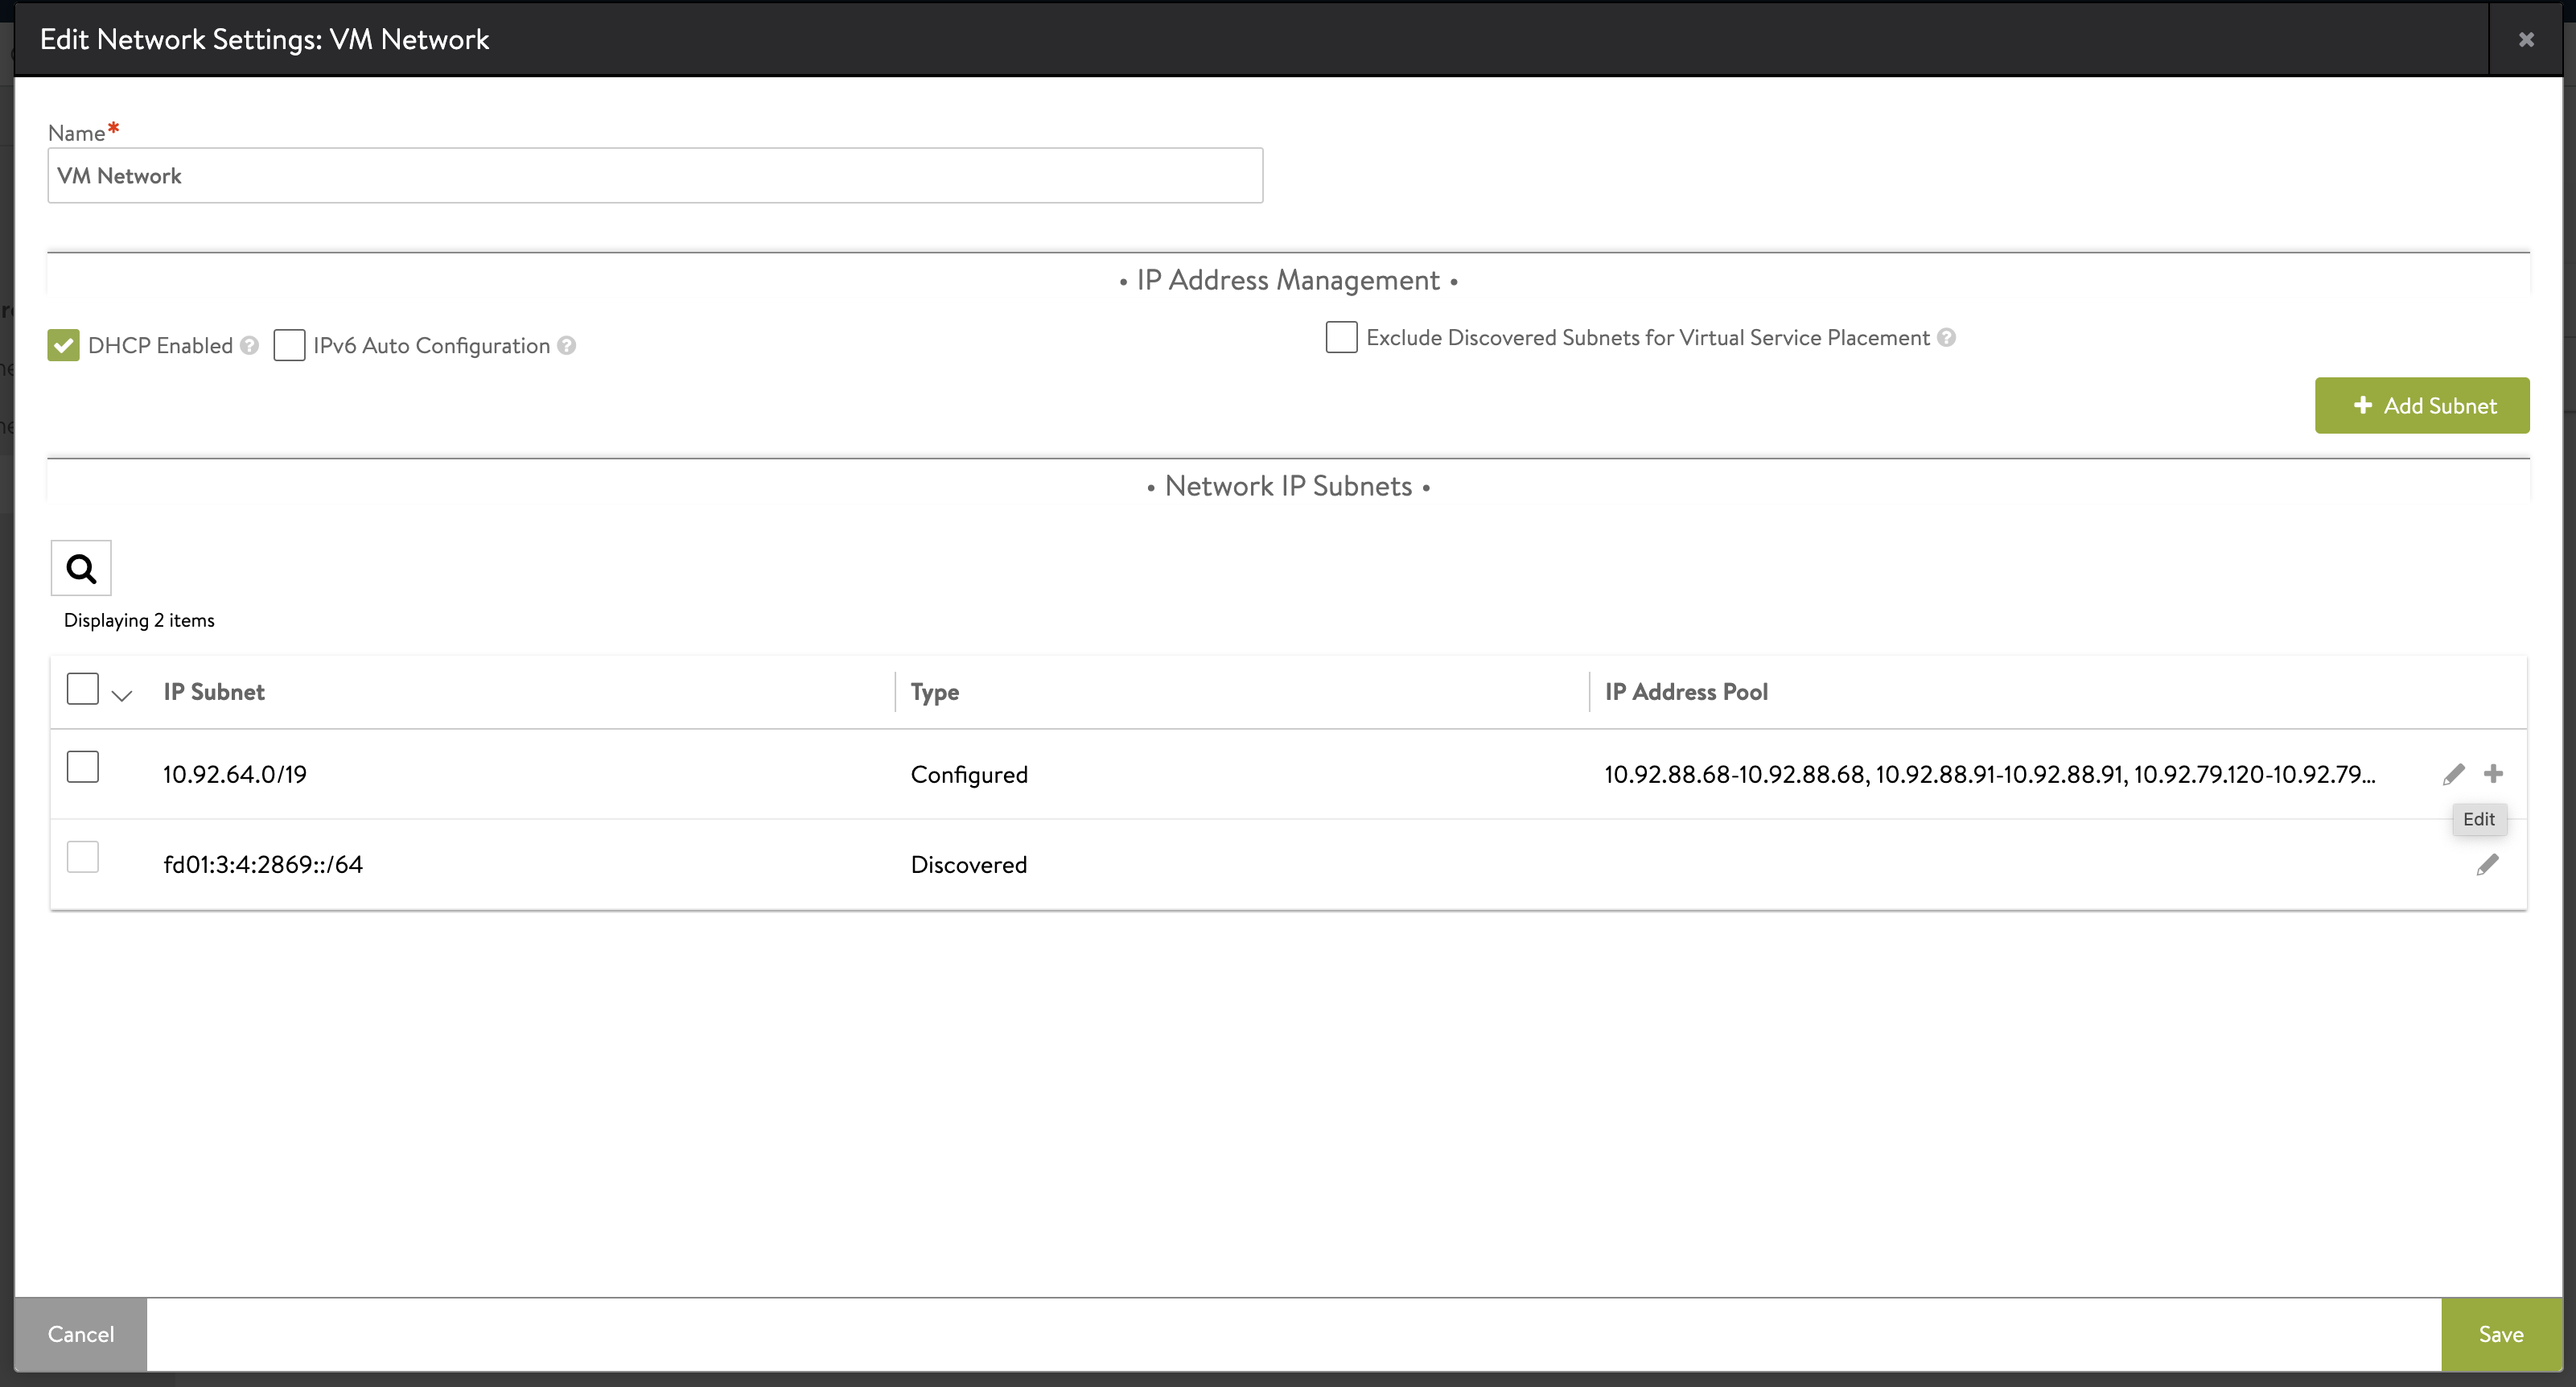
Open Infrastructure > Cloud Resources > Networks and click the edit icon for the network that you are using as the VIP network.
-
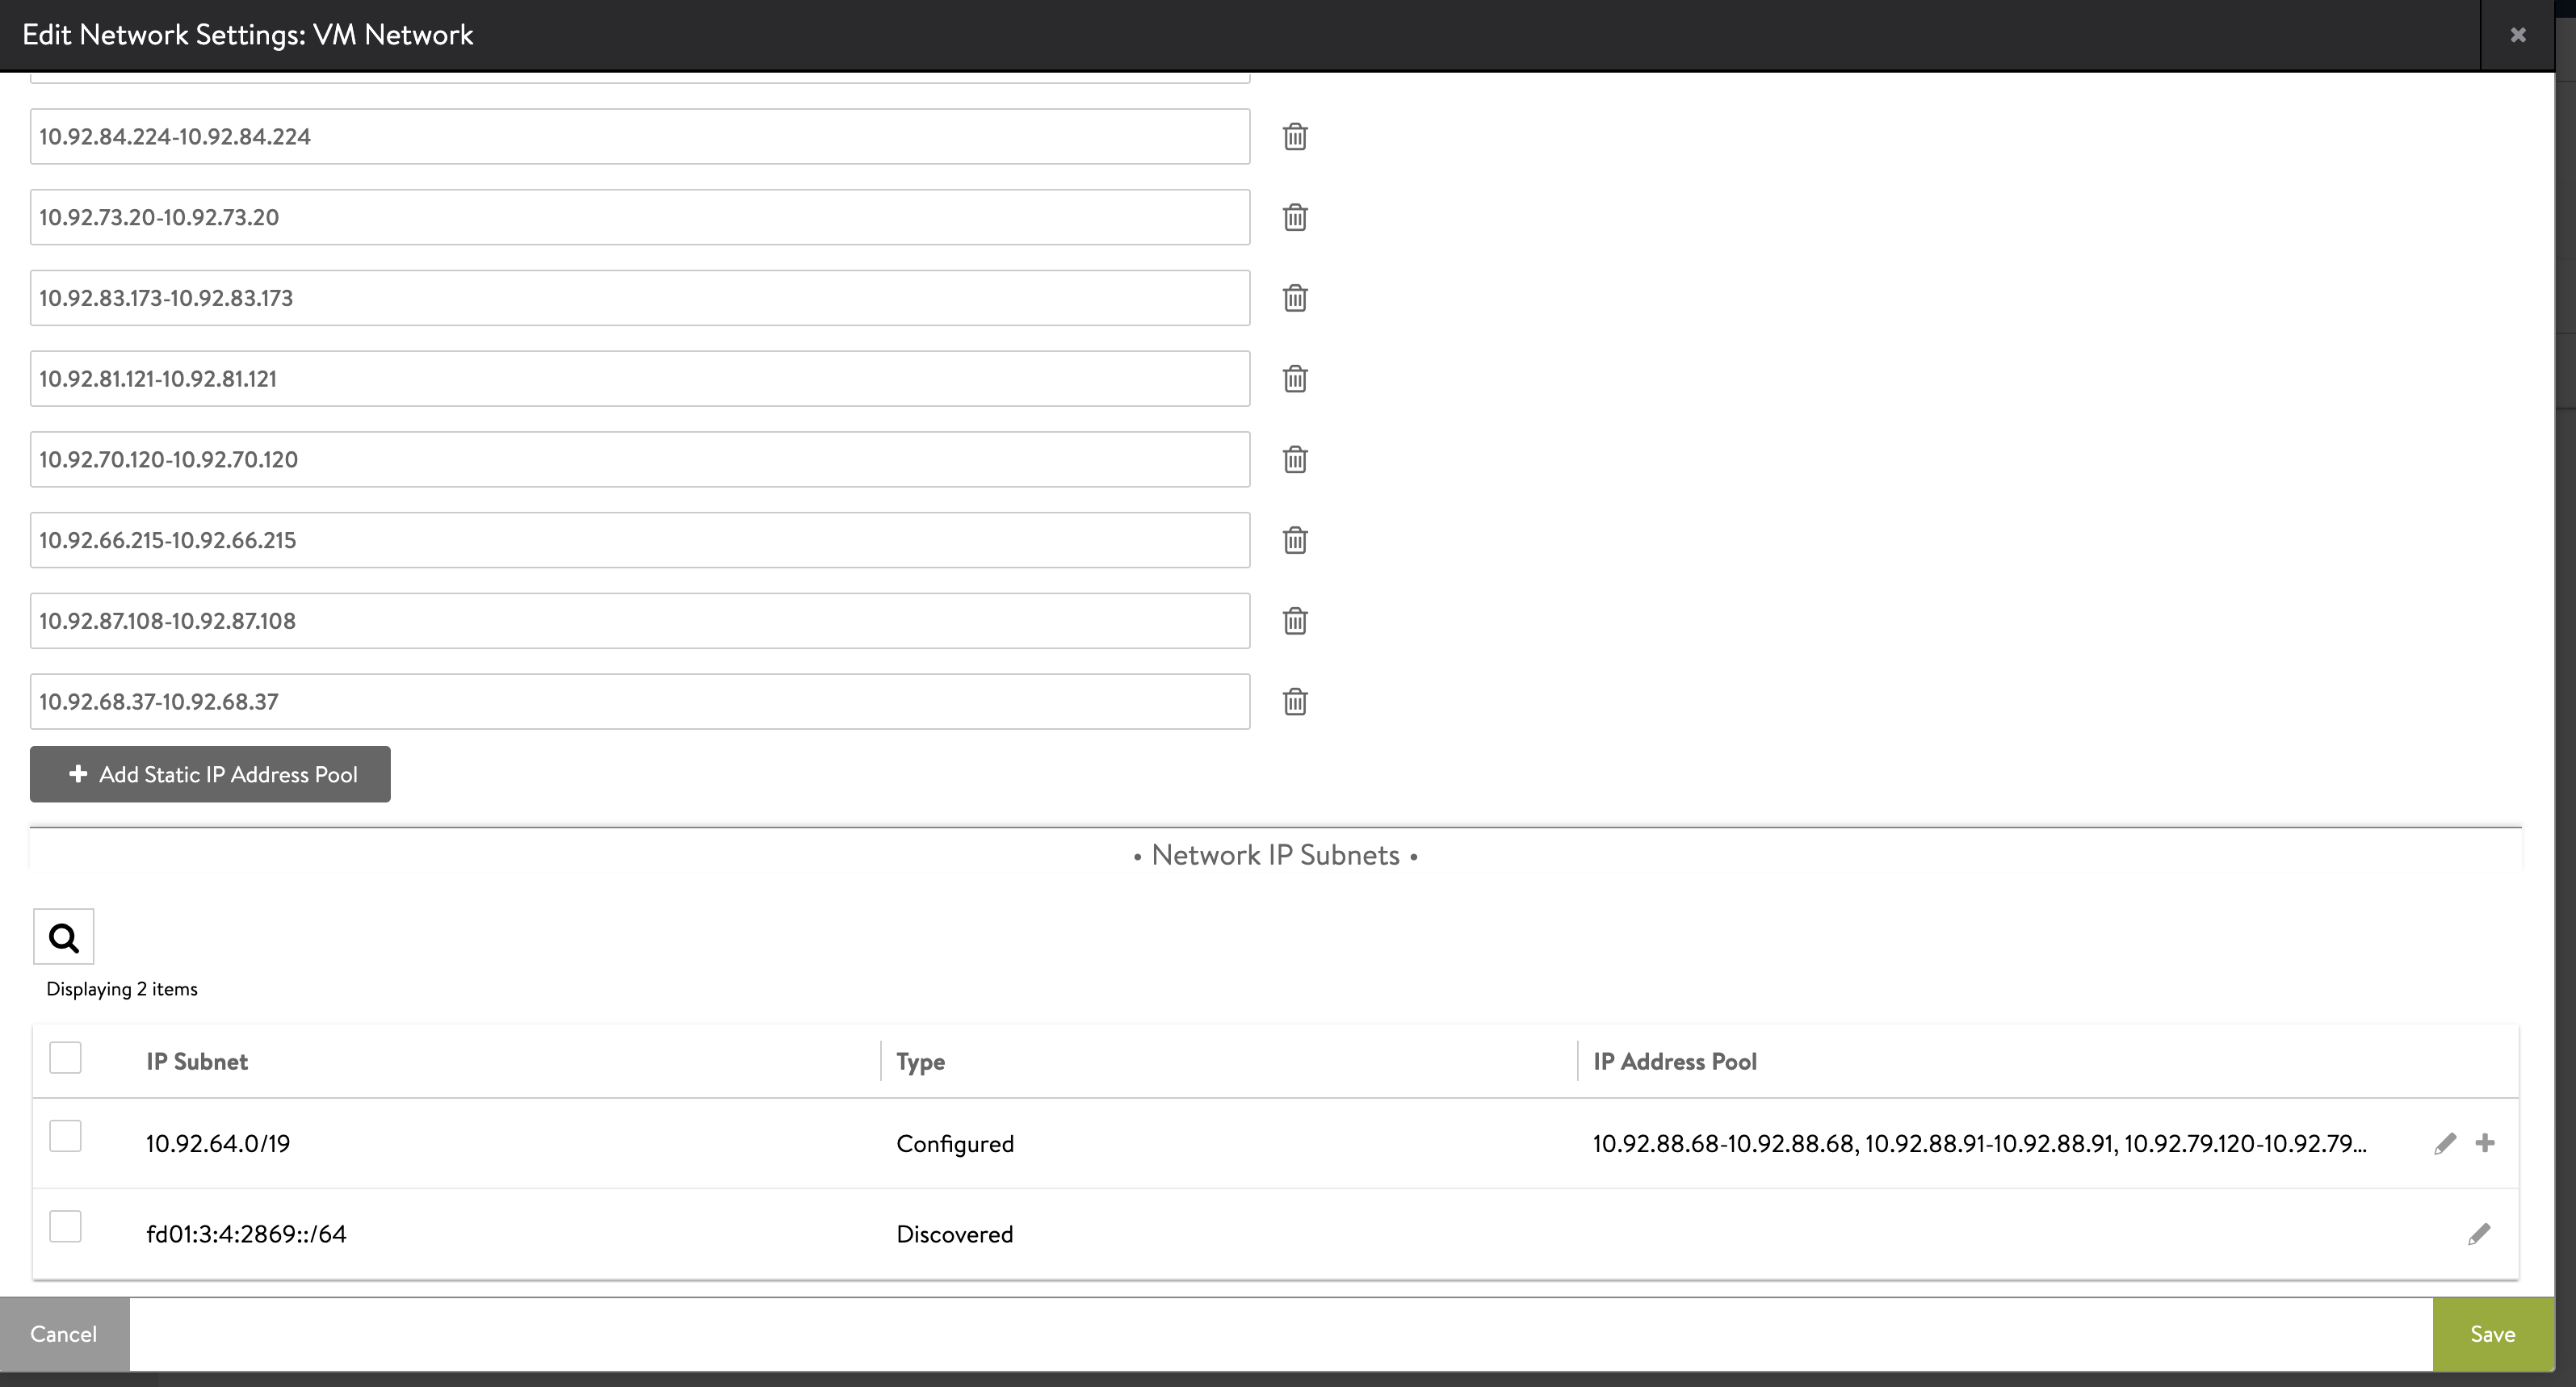
An editable list of IP ranges in the IP address pool appears. Click Add Static IP Address Pool.
-
Enter an IP address range within the subnet boundaries for the pool of static IP addresses to use as the VIP network, for example
192.168.14.210-192.168.14.219. Click Save.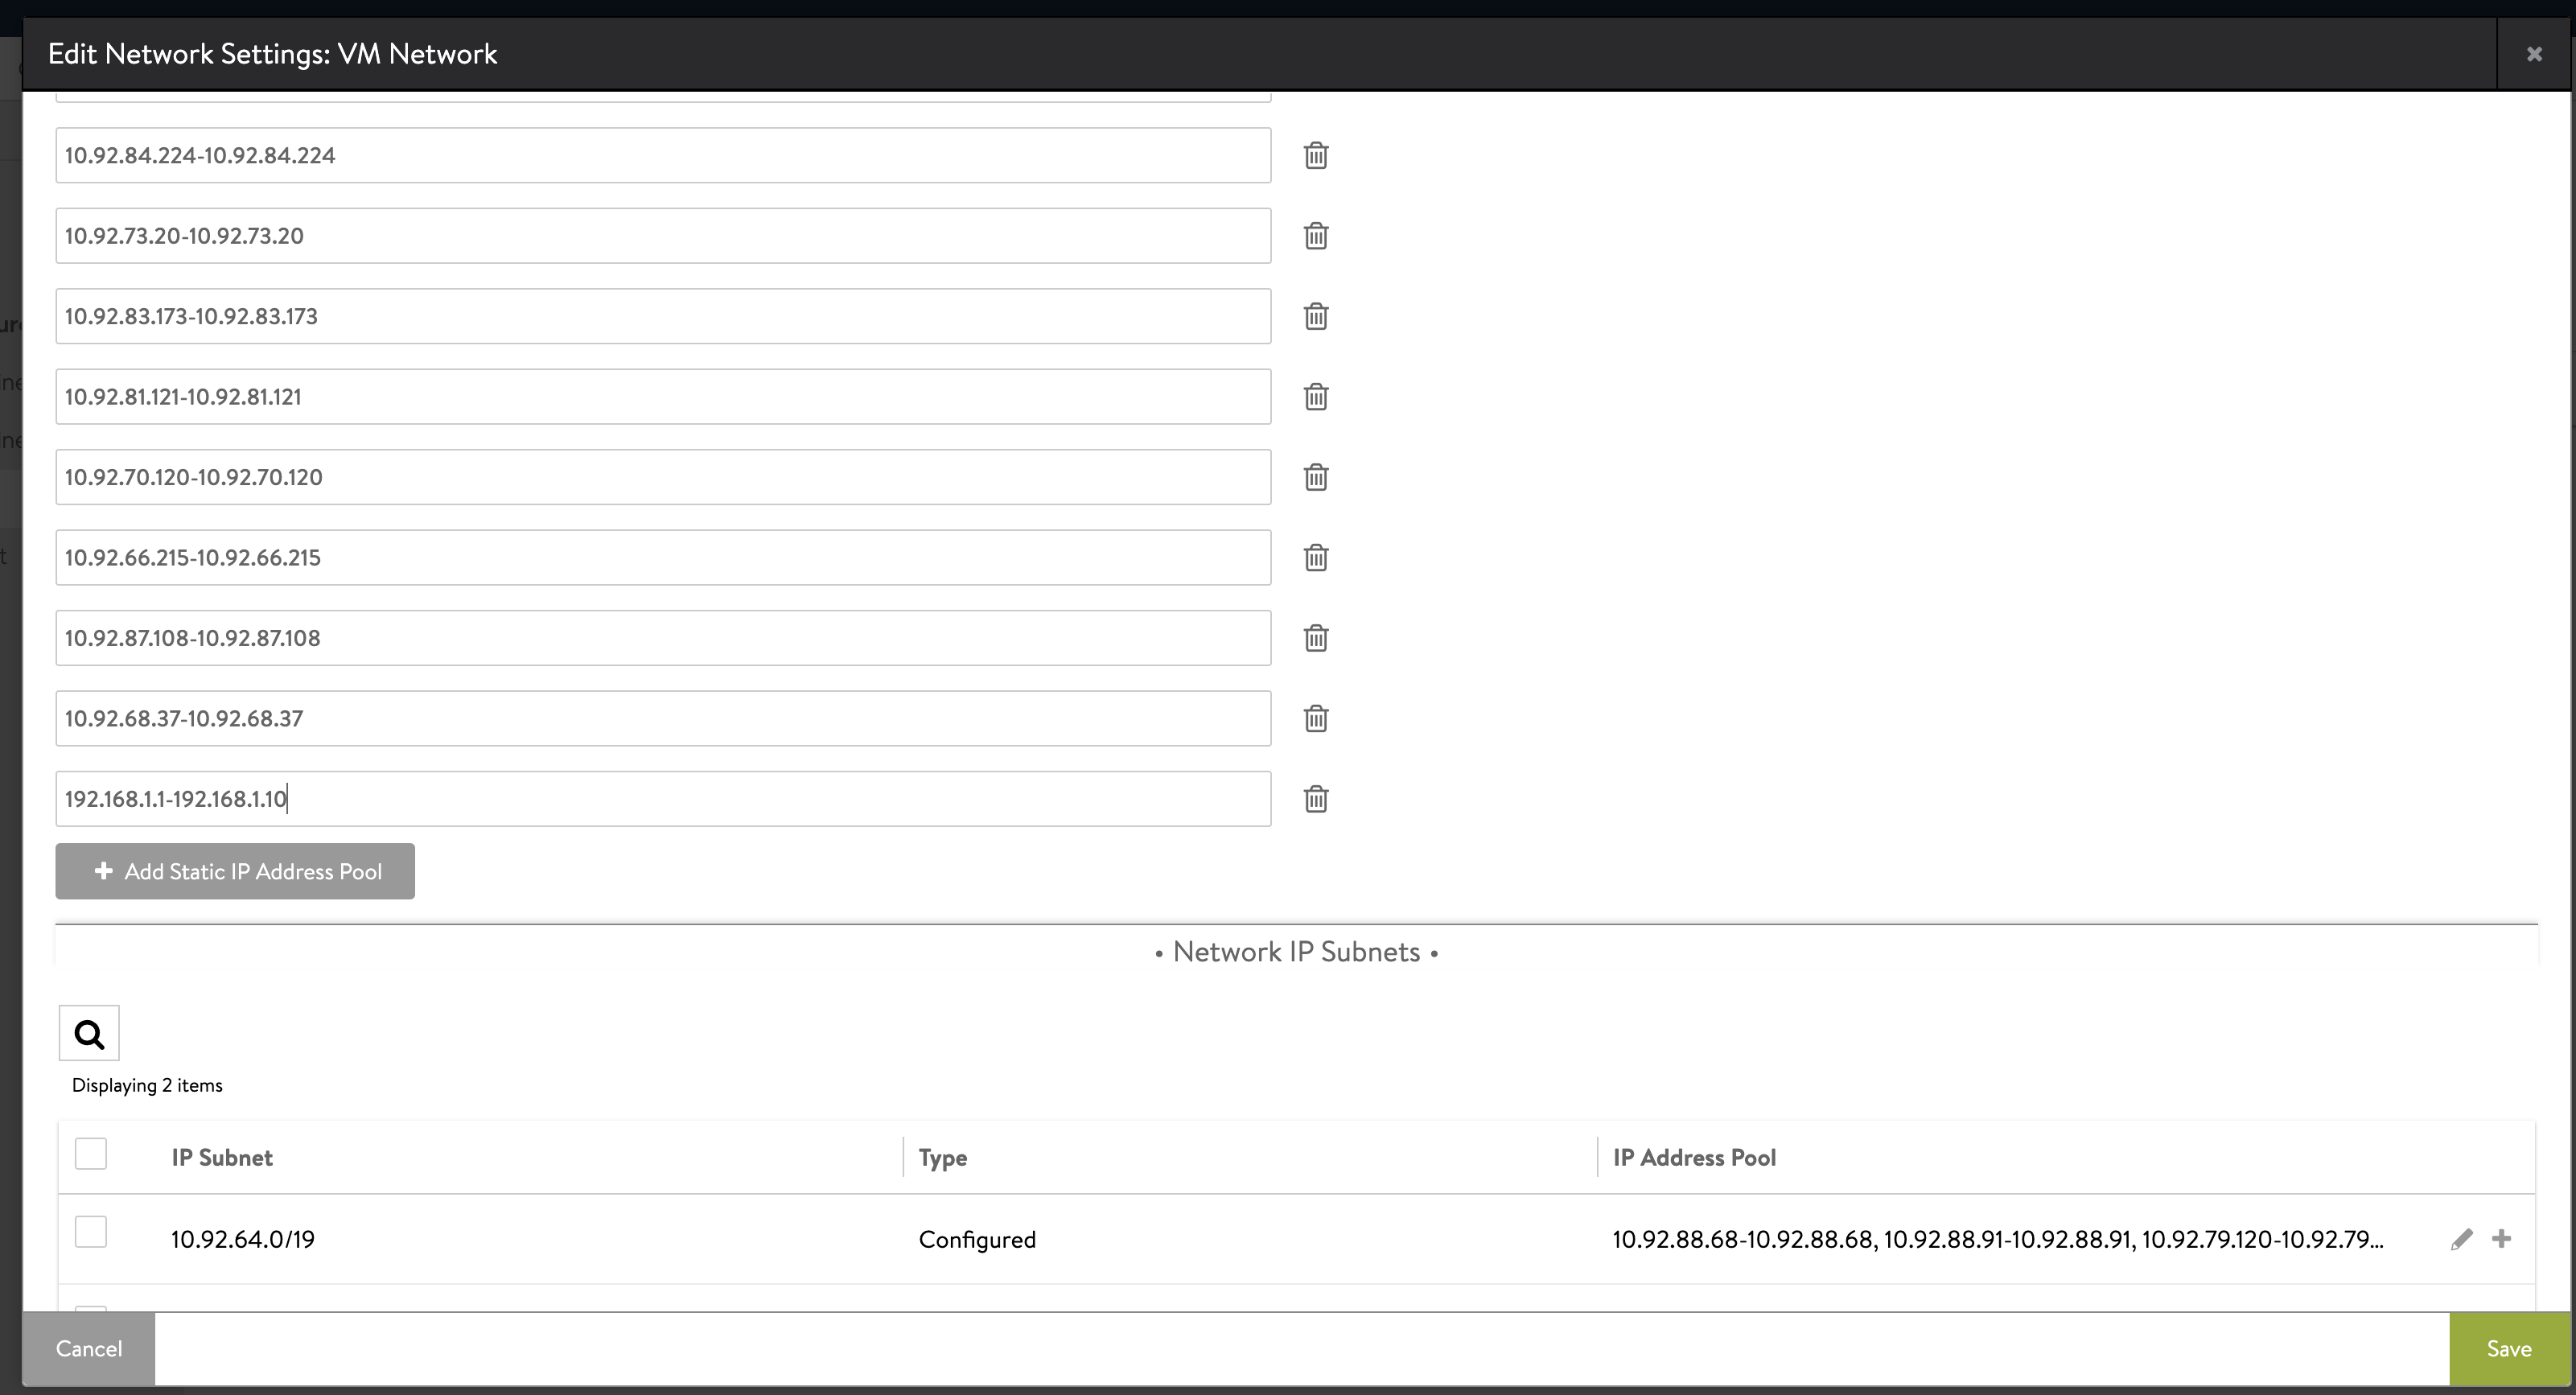
(Recommended) Avi Controller Setup: Virtual Service
If the SE Group that you want to use with the management cluster does not have a Virtual Service, it can suggest that there are no service engines that are running for that SE Group. Hence, the management cluster deployment process will have to wait for a service engine to be created. The creation of a Service Engine is time-consuming because it requires a new VM to be deployed. In poor networking conditions, this can cause an internal timeout that prevents the management cluster deployment process to finish successfully.
To prevent this issue, it is recommended to create a dummy Virtual Service through the Avi Controller UI to trigger the creation of a service engine before deploying the management cluster.
To verify that the SE group has a virtual service assigned to it, in the Controller UI, go to Infrastructure > Service Engine Group, and view the details of the SE group. If the SE group does not have a virtual service assigned to it, create a dummy virtual service:
-
In the Controller UI, go to Applications > Virtual Service.
-
Click Create Virtual Service and select Basic Setup.
-
Configure the VIP:
- Select Auto-Allocate.
- Select the VIP Network and VIP Subnet configured for your IPAM profile in Avi Controller Setup: IPAM and DNS.
- Click Save.
NoteYou can delete the dummy virtual service after the management cluster is deployed successfully.
For complete information about creating a virtual service, more than needed to create a dummy service, see Create a Virtual Service in the Avi Networks documentation.
Avi Controller Setup: Custom Certificate
The default NSX Advanced Load Balancer certificate does not contain the Controller’s IP or FQDN in the Subject Alternate Names (SAN), however valid SANs must be defined in Avi Controller’s certificate. You consequently must create a custom certificate to provide when you deploy management clusters.
- In the Controller UI, click the menu in the top left corner and select Templates > Security > SSL/TLS Certificates, click Create, and select Controller Certificate.
- Enter the same name in the Name and Common Name text boxes.
- Select Self-Signed.
-
For Subject Alternate Name (SAN), enter either the IP address or FQDN, or both, of the Controller VM.
If only the IP address or FQDN is used, it must match the value that you use for Controller Host when you Configure VMware NSX Advanced Load Balancer, or specify in the
AVI_CONTROLLERvariable in the management cluster configuration file. - Leave the other fields empty and click Save.
- In the menu in the top left corner, select Administration > Settings > Access Settings, and click the edit icon in System Access Settings.
- Delete all of the certificates in SSL/TLS Certificate.
- Use the SSL/TLS Certificate drop-down menu to add the custom certificate that you created above.
- In the menu in the top left corner, select Templates > Security > SSL/TLS Certificates, select the certificate you create and click the export icon.
-
Copy the certificate contents.
You will need the certificate contents when you deploy management clusters