


Deploy a Workload Cluster to Specialized Hardware
Tanzu Kubernetes Grid supports deploying workload clusters to specific types of GPU-enabled hosts on vSphere 7.0 or later.
Deploy a GPU-Enabled Workload Cluster
To use a node with a GPU in a vSphere workload cluster, you must enable PCI passthrough mode. This allows the cluster to access the GPU directly, bypassing the ESXi hypervisor, which provides a level of performance that is similar to the performance of the GPU on a native system. When using PCI passthrough mode, each GPU device is dedicated to a virtual machine (VM) in the vSphere workload cluster.
NoteTo add GPU enabled nodes to existing clusters, use the
tanzu cluster node-pool setcommand.
Prerequisites
- ESXi host with NVIDIA V100 or NVIDIA Tesla T4 GPU card.
- vSphere 7.0 Update 3 and above. Listed below are the builds for 7.0u3 which is the minimum required to support this.
- Tanzu Kubernetes Grid v1.6+.
- Helm, the Kubernetes package manager. To install, see Installing Helm in the Helm documentation.
Procedure
To create a workload cluster of GPU-enabled hosts, follow these steps to enable PCI passthrough, build a custom machine image, create a cluster configuration file and Tanzu Kubernetes release, deploy the workload cluster, and install a GPU operator using Helm.
-
Add the ESXi hosts with the GPU cards to your vSphere Client.
-
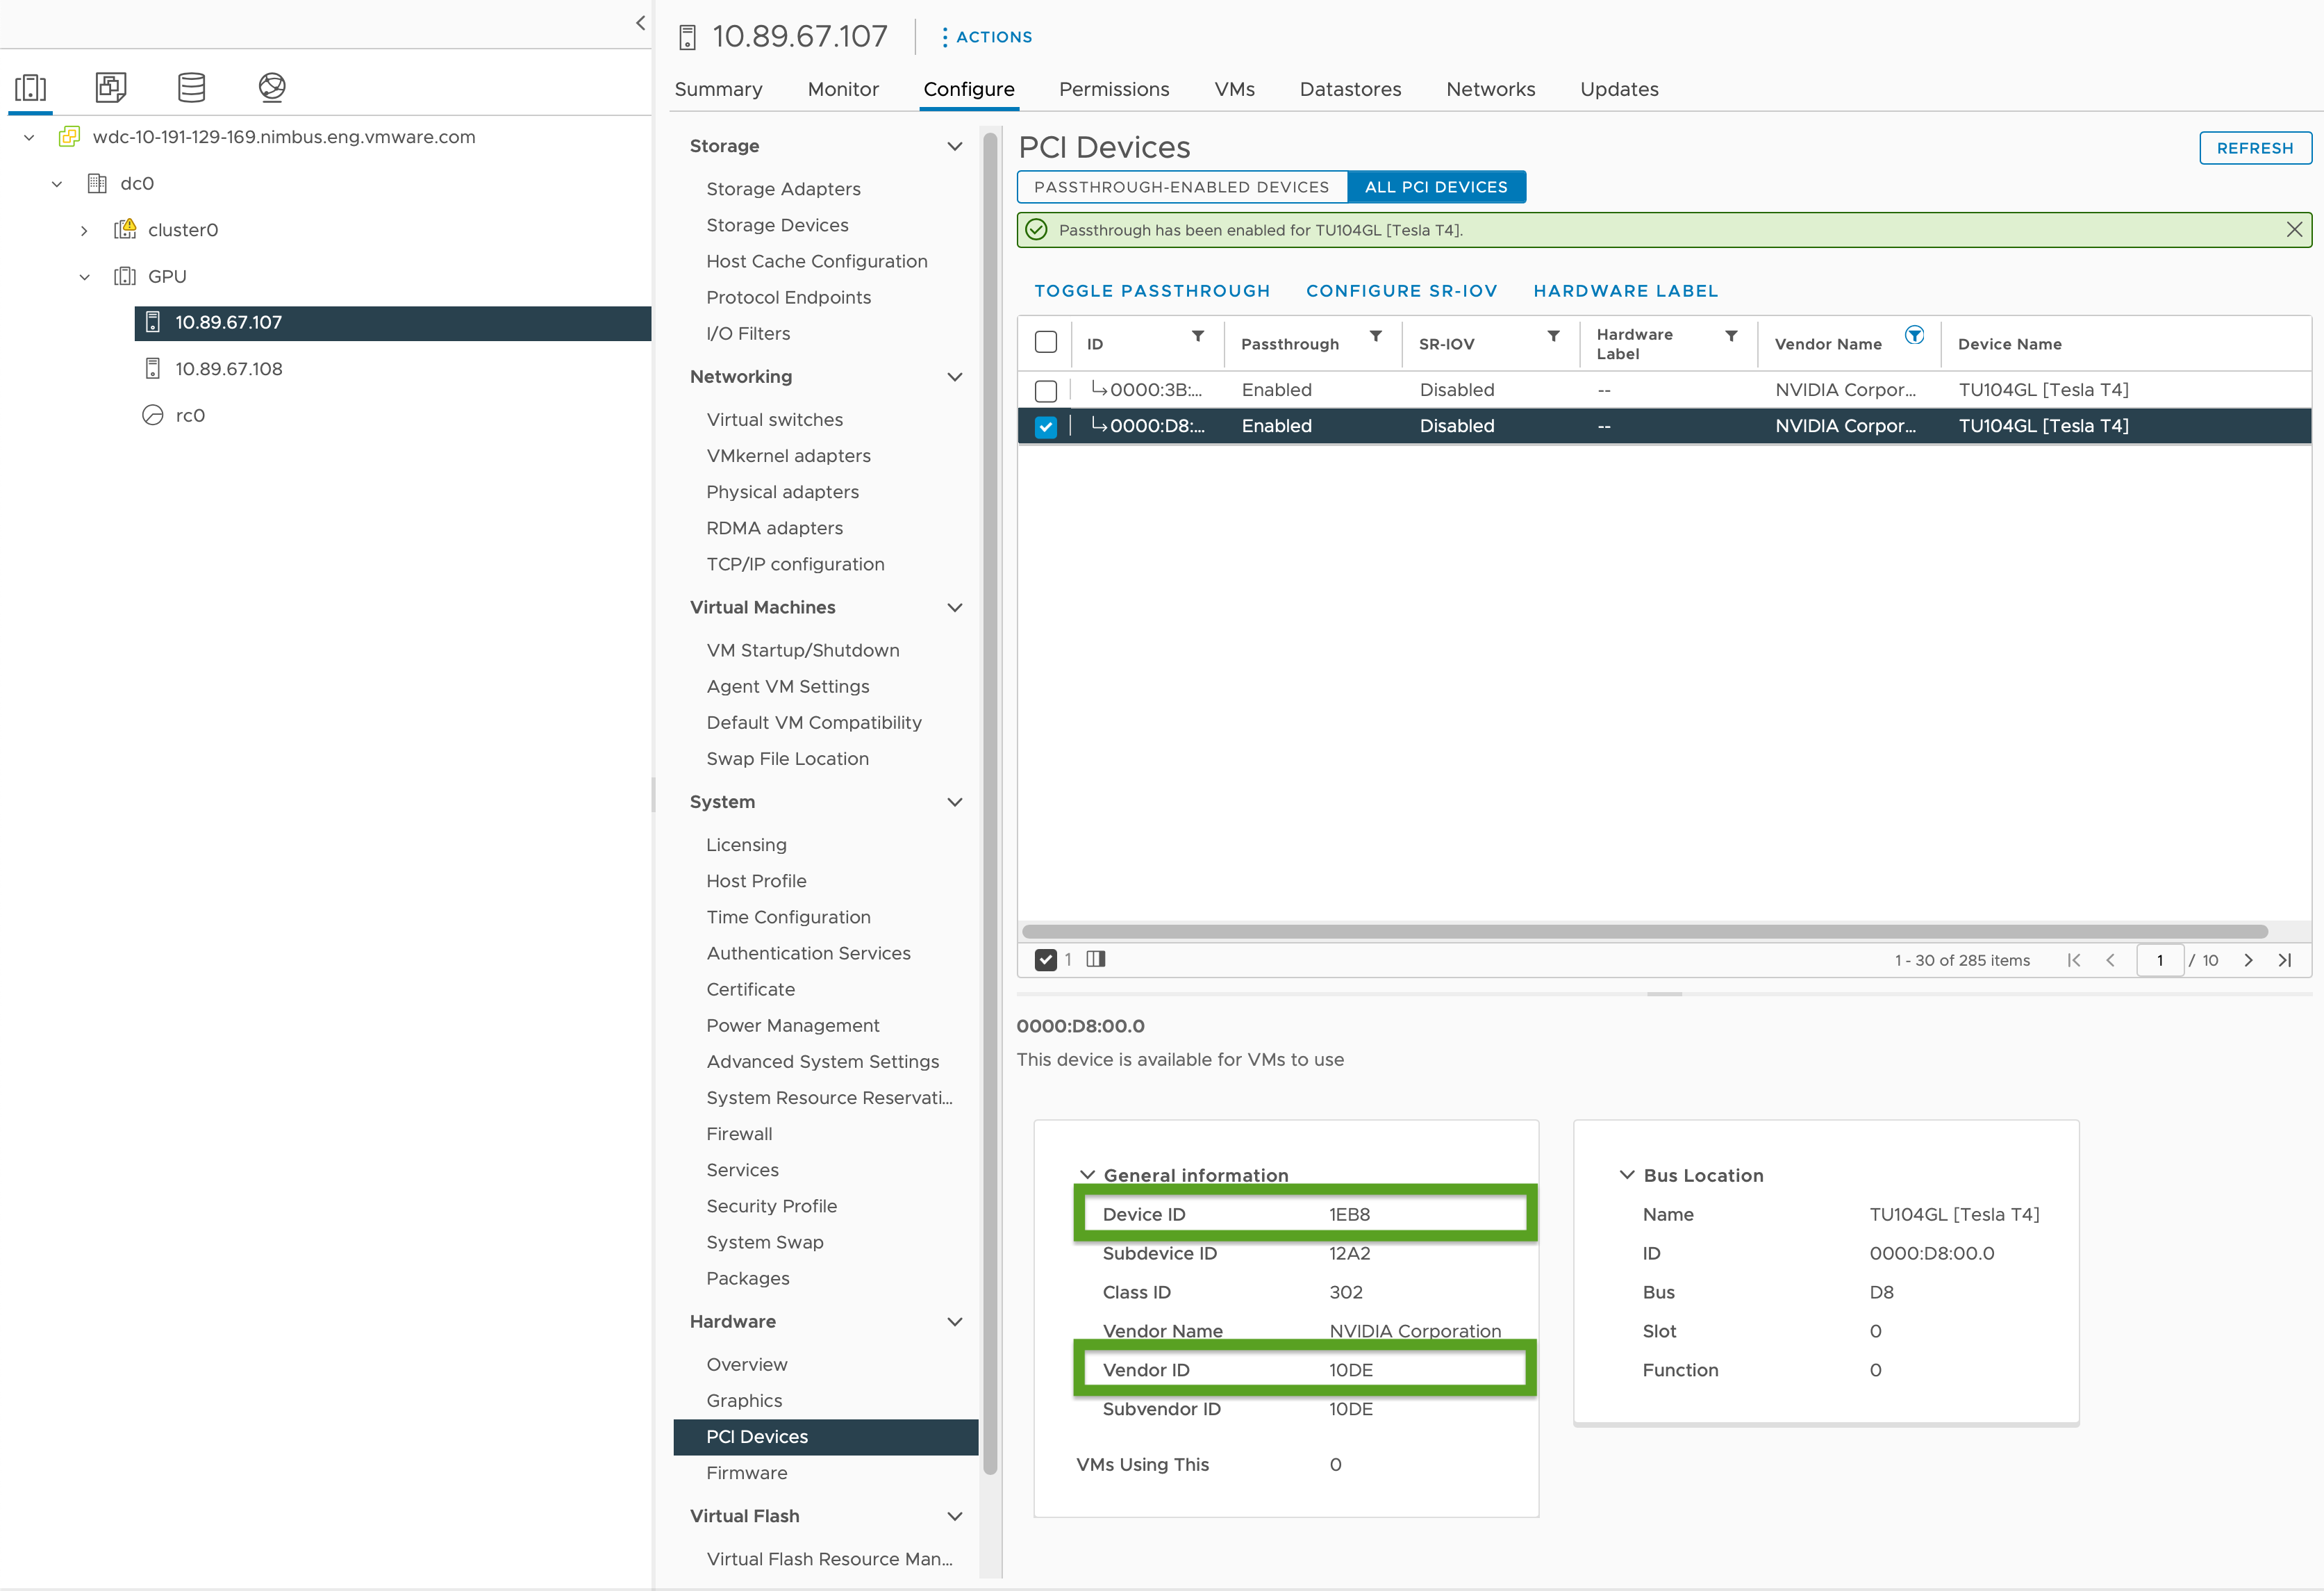
Enable PCI passthrough and record the GPU IDs as follows:
- In your vSphere Client, select the target ESXi host in the
GPUcluster. - Select Configure > Hardware > PCI Devices.
- Select the All PCI Devices tab.
- Select the target GPU from the list.
- Click Toggle Passthrough.
- Under General Information, record the Device ID and Vendor ID (highlighted in green in the image below). The IDs are the same for identical GPU cards. You will need these for the cluster configuration file.
- In your vSphere Client, select the target ESXi host in the
-
Create a workload cluster configuration file using the template in Workload Cluster Template and include the following variables:
...
VSPHERE_WORKER_PCI_DEVICES: "0x<VENDOR-ID>:0x<DEVICE-ID>"
VSPHERE_WORKER_CUSTOM_VMX_KEYS: 'pciPassthru.allowP2P=true,pciPassthru.RelaxACSforP2P=true,pciPassthru.use64bitMMIO=true,pciPassthru.64bitMMIOSizeGB=<GPU-SIZE>'
VSPHERE_IGNORE_PCI_DEVICES_ALLOW_LIST: "<BOOLEAN>"
VSPHERE_WORKER_HARDWARE_VERSION: vmx-17
WORKER_ROLLOUT_STRATEGY: "RollingUpdate"
Where:
<VENDOR-ID>and<DEVICE-ID>is the Vendor ID and Device ID you recorded in a previous step. For example, if the Vendor ID is10DEand the Device ID is1EB8, the value is"0x10DE:0x1EB8".<GPU-SIZE>is the total GB of framebuffer memory of all GPUs in the cluster rounded up to the next higher power of two.- For example with two 40GB GPUs the total is 80GB, which rounds up to 128GB; so you would set the value to
pciPassthru.64bitMMIOSizeGB=128. - To find GPU card required memory, consult the documentation for your specific NVIDIA GPU card. See the table Requirements for Using vGPU on GPUs Requiring 64 GB or More of MMIO Space with Large-Memory VMs in the NVIDIA documentation.
- Also see:
- For example with two 40GB GPUs the total is 80GB, which rounds up to 128GB; so you would set the value to
<BOOLEAN>isfalseif you are using the NVIDIA Tesla T4 GPU andtrueif you are using the NVIDIA V100 GPU.<VSPHERE_WORKER_HARDWARE_VERSION>is the virtual machine hardware version we want the VM to upgrade to. The minimum version required for GPU nodes should be 17.WORKER_ROLLOUT_STRATEGYisRollingUpdateif you have extra PCI devices which can be used by the worker nodes during upgrades, otherwise useOnDelete.
Note
You can only use one type of GPU per VM. For example, you cannot use both the NVIDIA V100 and NVIDIA Tesla T4 on a single VM, but you can use multiple GPU instances with the same Vendor ID and Device ID.
The
tanzuCLI does not allow updating theWORKER_ROLLOUT_STRATEGYspec on theMachineDeployment. If the cluster upgrade is stuck due to unavailable PCI devices, VMware suggests editing theMachineDeploymentstrategy using thekubectlCLI. The rollout strategy is defined atspec.strategy.type.For a complete list of variables you can configure for GPU-enabled clusters, see GPU-Enabled Clusters in Configuration File Variable Reference.
-
Create the workload cluster by running:
tanzu cluster create -f CLUSTER-CONFIG-NAMEWhere
CLUSTER-CONFIG-NAMEis the name of the cluster configuration file you created in the previous steps. -
Add the NVIDIA Helm repository:
helm repo add nvidia https://helm.ngc.nvidia.com/nvidia \ && helm repo update -
Install the NVIDIA GPU Operator:
helm install --kubeconfig=./KUBECONFIG --wait --generate-name -n gpu-operator --create-namespace nvidia/gpu-operatorWhere
KUBECONFIGis the name and location of thekubeconfigfor your workload cluster. For more information, see Retrieve Workload Clusterkubeconfig.For information about the parameters in this command, see Install the GPU Operator in the NVIDIA documentation.
-
Ensure the NVIDIA GPU Operator is running:
kubectl --kubeconfig=./KUBECONFIG get pods -AThe output is similar to:
NAMESPACE         NAME                                                              READY   STATUS     RESTARTS   AGE
gpu-operator      gpu-feature-discovery-szzkr                                       1/1     Running     0         6m18s
gpu-operator      gpu-operator-1676396573-node-feature-discovery-master-7795vgdnd   1/1     Running     0         7m7s
gpu-operator      gpu-operator-1676396573-node-feature-discovery-worker-bq6ct       1/1     Running     0         7m7s
gpu-operator      gpu-operator-84dfbbfd8-jd98f                                      1/1     Running     0         7m7s
gpu-operator      nvidia-container-toolkit-daemonset-6zncv                          1/1     Running     0         6m18s
gpu-operator      nvidia-cuda-validator-2rz4m                                       0/1     Completed   0         98s
gpu-operator      nvidia-dcgm-exporter-vgw7p                                        1/1     Running     0         6m18s
gpu-operator      nvidia-device-plugin-daemonset-mln6z                              1/1     Running     0         6m18s
gpu-operator      nvidia-device-plugin-validator-sczdk                              0/1     Completed   0         22s
gpu-operator      nvidia-driver-daemonset-b7flb                                     1/1     Running     0         6m38s
gpu-operator      nvidia-operator-validator-2v8zk                                   1/1     Running     0         6m18s
Testing Your GPU Cluster
To test your GPU-enabled cluster, create a pod manifest for the cuda-vector-add example from the Kubernetes documentation and deploy it. The container will download, run, and perform a CUDA calculation with the GPU.
-
Create a file named
cuda-vector-add.yamland add the following:apiVersion: v1 kind: Pod metadata: name: cuda-vector-add spec: restartPolicy: OnFailure containers: - name: cuda-vector-add # https://github.com/kubernetes/kubernetes/blob/v1.7.11/test/images/nvidia-cuda/Dockerfile image: "registry.k8s.io/cuda-vector-add:v0.1" resources: limits: nvidia.com/gpu: 1 # requesting 1 GPU -
Apply the file:
kubectl apply -f cuda-vector-add.yaml -
Run:
kubectl get po cuda-vector-addThe output is similar to:
cuda-vector-add 0/1 Completed 0 91s -
Run:
kubectl logs cuda-vector-addThe output is similar to:
[Vector addition of 50000 elements]
Copy input data from the host memory to the CUDA device
CUDA kernel launch with 196 blocks of 256 threads
Copy output data from the CUDA device to the host memory
Test PASSED
Done
Deploy a Workload Cluster to an Edge Site
Tanzu Kubernetes Grid v1.6+ supports deploying workload clusters to edge VMware ESXi hosts. You can use this approach of you want to run many Kubernetes clusters in different locations that are all managed by a central management cluster.
Topology: You can run edge workload clusters in production with a single control plane node and just one or two hosts. However, while this uses less CPU, memory, and network bandwidth, you do not have the same resiliency and recovery characteristics of standard production Tanzu Kubernetes Grid clusters. For more information, see VMware Tanzu Edge Solution Reference Architecture 1.0.
Local Registry: To minimize communication delays and maximize resilience, each edge cluster should have its own local Harbor container registry. For an overview of this architecture, see Container Registry in Architecture Overview. To install a local Harbor registry, see Deploy an Offline Harbor Registry on vSphere.
Timeouts: In addition, when an edge workload cluster has its management cluster remote in a main datacenter, you may need to adjust certain timeouts to allow the management cluster enough time to connect with the workload cluster machines. To adjust these timeouts, see Extending Timeouts for Edge Clusters to Handle Higher Latency below.
Specifying a Local VM Template
If your edge workload clusters use their own isolated storage rather than shared vCenter storage you must configure them to retrieve node VM template images, as OVA files, from local storage.
NoteYou cannot use
tanzu cluster upgradeto upgrade the Kubernetes version of an edge workload cluster that uses a local VM template. Instead, upgrade the cluster by following Upgrade an Edge Cluster with a Local VM Template in the Upgrade Workload Clusters topic.
To specify a single VM template for the cluster, or different templates specific to worker and control plane machine deployments:
-
Create the cluster configuration file and generate the cluster manifest as step 1 of the two-step process described in Create a Class-Based Cluster.
-
Make sure that the VM templates for the cluster:
- Have a valid Kubernetes version for TKG.
- Have a valid OVA version that matches the
spec.osImagesproperty of a TKr. - Are uploaded to local vCenter and have a valid inventory path, for example
/dc0/vm/ubuntu-2204-kube-v1.28.11+vmware.1-tkg.1.
-
Edit the
Clusterobject spec in the manifest as follows depending on whether you are defining a cluster-wide VM template or multiple VM templates:-
Cluster-wide VM template:
- Under
annotations, setrun.tanzu.vmware.com/resolve-vsphere-template-from-pathto the empty string. - In the
vcenterblock underspec.topology.variables, settemplateto the inventory path for the VM template. -
For example:
annotations:
  run.tanzu.vmware.com/resolve-vsphere-template-from-path: ""
...
spec:
 topology:
   class: tkg-vsphere-default-v1.0.0
   variables:
   - name: vcenter
     value:
       cloneMode: fullClone
       datacenter: /dc0
       datastore: /dc0/datastore/sharedVmfs-0
       folder: /dc0/vm/folder0
       network: /dc0/network/VM Network
       resourcePool: /dc0/host/cluster0/Resources/rp0
       ...
       template: VM-TEMPLATE
       ...
Where
VM-TEMPLATEis the path to the VM template for the cluster.
- Under
-
Multiple VM templates per
machineDeployment:- Under
annotations, setrun.tanzu.vmware.com/resolve-vsphere-template-from-pathto the empty string. - In the in
variables.overridesfor eachmachineDeploymentsblock underspec.topology.workerandcontrolplane, add a line forvcenterthat setstemplateto the inventory path for the VM template. -
For example:
annotations:
  run.tanzu.vmware.com/resolve-vsphere-template-from-path: ""
...
spec:
 workers:
   machineDeployments:
   - class: tkg-worker
     metadata:
       annotations:
         run.tanzu.vmware.com/resolve-os-image: image-type=ova,os-name=ubuntu
     name: md-1
     replicas: 2
     variables:
       overrides:
       - name: vcenter
         value:
           ...
           datacenter: /dco
           template: VM-TEMPLATE
           ...
Where
VM-TEMPLATEis the path to the VM template for themachineDeployment.
- Under
-
-
Use the modified configuration file to create the cluster as step 2 of process described in Create a Class-Based Cluster.
Extending Timeouts for Edge Clusters to Handle Higher Latency
If your management cluster is remotely managing workload clusters running on edge sites or managing more than 20 workload clusters, you can adjust specific timeouts so the Cluster API does not block or prune machines that may be temporarily offline or taking longer than 12 minutes to communicate with their remote management cluster, particularly if your infrastructure is underprovisioned.
There are three settings you can adjust to give your edge clusters additional time to communicate with their control plane:
-
MHC_FALSE_STATUS_TIMEOUT: Extend the default12mto, for example,40mto prevent theMachineHealthCheckcontroller from recreating the machine if itsReadycondition remainsFalsefor more than 12 minutes. For more information about machine health checks, see Configure Machine Health Checks for Tanzu Kubernetes Clusters. -
NODE_STARTUP_TIMEOUT: Extend the default20mto, for example,60mto prevent theMachineHealthCheckcontroller from blocking new machines from joining the cluster because they took longer than 20 minutes to start up, which it considers unhealthy. -
etcd-dial-timeout-duration: Extend the default10mto, for example,40sin thecapi-kubeadm-control-plane-controller-managermanifest to preventetcdclients on the management cluster from prematurely failing while scanning the health ofetcdon the workload clusters. The management cluster uses its ability to connect withetcdas a yardstick for machine health. For example:-
In a terminal, run:
kubectl edit capi-kubeadm-control-plane-controller-manager -n capi-system -
Change the value for
--etcd-dial-timeout-duration:- args: - --leader-elect - --metrics-bind-addr=localhost:8080 - --feature-gates=ClusterTopology=false - --etcd-dial-timeout-duration=40s command: - /manager image: projects.registry.vmware.com/tkg/cluster-api/kubeadm-control-plane-controller:v1.0.1_vmware.1
-
Additionally, you’ll want to note:
-
capi-kubedm-control-plane-manager : If it becomes “split off” from the workload clusters somehow, you may need to bounce it to a new node, so that it can monitor
etcdin workload clusters properly. -
Pinniped configurations in TKG all assume that your workload clusters are connected to your management cluster. In cases of disconnection, you should ensure that workload pods are using administrative or service accounts to talk to the API Server on your edge sites. Otherwise, disconnection from the Management cluster will interfere with your edge sites being able to authenticate via Pinniped to their local workload API servers.
