


This topic describes how to install and configure VMware Tanzu Observability by Wavefront Nozzle.
Create a Wavefront Account
The VMware Tanzu Observability by Wavefront Nozzle requires that you have a Wavefront account with an API access token. If you need an account, contact Wavefront Sales.
Create a UAA User Account
Create a UAA user with access to the Firehose and Cloud Controller:
- Target your system with the UAA CLI (UAAC):
$ uaac target https://uaa.YOUR-SYSTEM-DOMAINYOUR-SYSTEM-DOMAIN can be found in the Opsman TAS tile on ‘Domains’ page.
- Run the following command to authenticate and obtain an access token for the admin client from the UAA server.
$ uaac token client get admin -s ADMIN-CLIENT-CREDENTIALS-SECRETADMIN-CLIENT-CREDENTIALS-SECRET can be found in the Opsman TAS tile, on the Credentials tab under ‘UAA’, in “Admin Client Credentials”
- Create a Wavefront Nozzle user with the password of your choosing.
$ uaac -t user add wavefront-nozzle --password PASSWORD --emails na - Add the user to the Cloud Controller Admin Read-Only group.
uaac -t member add cloud_controller.admin_read_only wavefront-nozzle - Add the user to the Doppler Firehose group.
$ uaac -t member add doppler.firehose wavefront-nozzle
For information about creating a UAA user, see Creating and Managing Users with the UAA CLI.
Install and Configure VMware Tanzu Observability by Wavefront Nozzle in Ops Manager
-
Download the product file from Pivotal Network.
-
Navigate to the Ops Manager Installation Dashboard and click Import a Product to upload the product file.
-
Under the Import a Product button, click + next to the version number of VMware Tanzu Observability by Wavefront Nozzle. This adds the tile to your staging area.
-
Click the newly added VMware Tanzu Observability by Wavefront Nozzle tile.
-
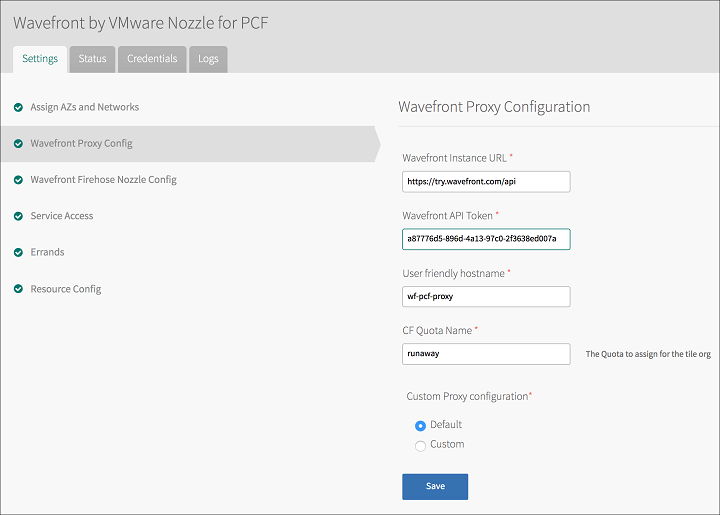
Click Wavefront Proxy Config.
-
Enter the following in the Wavefront Proxy Config pane:
- Wavefront Instance URL: A URL such as
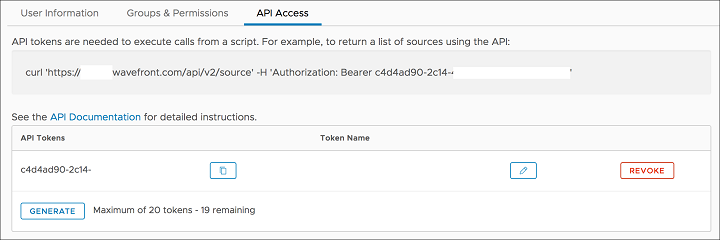
https://YOUR_INSTANCE.wavefront.com/api - Wavefront API Token: An API access token from the profile page on your Wavefront instance.
- Click the gear icon on the top right in Wavefront
- Click your username
- Click the API Access tab for the API Token:
- User friendly hostname: A unique hostname for the proxy such as
DOMAIN-pcf-proxy - CF Quota Name: A CF org quota with at least 20 GB memory and a route and port available.
- Custom Proxy Configuration: Choose
Defaultfor the default proxy settings. You can optionally override the proxy configuration and preprocessor rules underCustomsettings.
- Wavefront Instance URL: A URL such as
-
Click Save.
-
Click Wavefront Firehose Nozzle Config.

-
Enter the following information on the Wavefront Firehose Nozzle Config page:
- CF API Hostname: The VMware Tanzu API Hostname such as
api.YOUR-SYSTEM-DOMAIN. - CF UAA Username/CF UAA Password: The username and password that you created in the Create a UAA Admin User step.
- CF API log stream URL: The CF API log stream URL such as
https://log-stream.YOUR-SYSTEM-DOMAIN. Required for the v2 Nozzle API. - VMware Tanzu foundation name: A user-friendly foundation name. This is included as a point tag on the metrics sent to Wavefront.
- Skip SSL Verification: Select to skip SSL validation. Use this option in non-production environments.
- Advanced Nozzle Options:
- Select
Nofor the default nozzle settings. - Optionally, selecy
Yesand configure the advanced nozzle options such as filters, v1 API mode, number of nozzle instances etc.
- Select
- CF API Hostname: The VMware Tanzu API Hostname such as
-
Click Save.
-
Return to the Ops Manager Installation Dashboard and click Apply changes to install VMware Tanzu Observability by Wavefront Nozzle tile.
Configure Service Instance for Wavefront Service Broker for VMware Tanzu
Follow the steps below to enable developers to send app metrics to the Wavefront Proxy:
- To provision a wavefront-proxy service instance:
cf create-service wavefront-proxy standard SERVICE_INSTANCE_NAME. - To bind apps to the service instance:
cf bind-service APP_NAME SERVICE_INSTANCE_NAME. - For information about how apps can send metrics to the Wavefront Proxy, see the cloud-foundry-sampleapp.
