


You can use the Tile Generator tool to develop, package, test, and deploy services and other add-ons to Tanzu Operations Manager.
Tiles are the installation package format used by Tanzu Operations Manager to deploy services and other add-ons to both public and private cloud deployments. Tile Generator uses templates and patterns that are based on years of experience integrating third-party services into Cloud Foundry and eliminates much of the need for you to have intimate knowledge of all the tools involved.
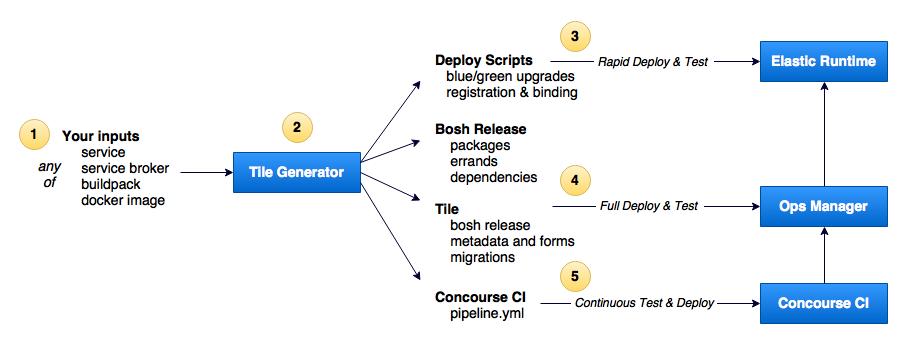
Tile Generator uses your software components and a simple configuration file that provides the minimum amount of information needed to describe and customize your tile.
Tile Generator creates everything that is required to deploy your software into Tanzu Operations Manager:
- BOSH errands to deploy and delete your software, including blue/green deployments for zero-downtime upgrades.
- BOSH release suitable for deploying your software to VMware Tanzu Application Service for VMs (TAS for VMs) or open-source Cloud Foundry.
- Tanzu Operations Manager Tile that can be imported into Tanzu Operations Manager, installed, configured, and deployed, including UI forms and automatic upgrades from previous versions.
- Concourse pipeline configuration to activate Continuous Integration (CI) of your software with the latest versions of Tanzu Operations Manager.
Use Tile Generator in combination with the pcf utility to enable rapid deploy and test cycles of your software.
The current release of Tile Generator supports tiles that have any combination of the following package types:
- Cloud Foundry Applications
- Cloud Foundry Buildpacks
- Cloud Foundry Service Brokers (both inside and outside TAS for VMs)
- Docker images (both inside and outside TAS for VMs)
Legacy tiles and OSS-Compatible service brokers
Many tile authors, in both VMware-internal teams and at external partner companies, built Tanzu Operations Manager tiles before Tile Generator existed.
Many other tile authors serve two markets with their service integrations, offering both a Cloud Foundry-compatible service broker to open-source users and corresponding Tanzu Operations Manager tile for TAS for VMs users.
All of these tile authors now use Tile Generator to simplify and speed up their development. Tile Generator generates an OSS-compatible BOSH release service broker BOSH release in addition to a VMware Tanzu-ready Tanzu Operations Manager tile.
Using the Tile Generator
-
Install the Tile Generator by doing one of the following:
-
Download the Tile Generator binary for your platform from GitHub, and make it an executable file and available by running the following commands:
chmod +x TILE-BINARY
mv TILE-BINARY /usr/local/bin/tile
Where
TILE-BINARYis the name of the tile binary file.For example:
chmod +x tile_darwin-64bit
mv tile_darwin-64bit /usr/local/bin/tile
-
Use Python 2 and Virtualenv. VMware recommends using a Virtualenv environment to avoid conflicts with other Python packages.
A virtualenv is a directory containing dependencies for a project. When a virtual environment is active, packages install into the virtualenv instead of into the system-wide Python installation.
To use this method, run the following commands:virtualenv -p python2 tile-generator-env source tile-generator-env/bin/activate pip install tile-generatorThis puts the
tileandpcfcommands in yourPATHwhen the virtualenv is active. To deactivate the virtualenv, run the commanddeactivate.To upgrade Tile Generator, run
pip install tile-generator –upgradewith the virtualenv activated.
-
-
Install the BOSH documentation.
-
From within the root directory of the project for which you want to create a tile, initialize the directory as a tile repository by running the following commands. VMware recommends that you use a git repository.
cd YOUR-PROD-DIRECTORY tile init -
Edit the generated
tile.ymlfile to define your tile. -
Build your tile by running:
tile build
The generator creates a BOSH release in the release subdirectory, and wraps that release into a tile in the product subdirectory. If required for the installation, it automatically gets the latest release version of the Cloud Foundry CLI.
Tile Generator is also available pre-installed in a Docker image on Docker Hub.
This image contains the tile-generator tile and pcf commands, the necessary Python dependencies, and the BOSH CLI.
You can use this in Concourse pipelines by specifying it as the base image for your tasks:
  - task: tile-build
    config:
      platform: linux
      image: cfplatformeng/tile-generator
Or, you can derive your own Docker images from this one by using it as the base image in your Dockerfile:
FROM cfplatformeng/tile-generator
Build the sample
The Tile-Generator repository includes a sample tile that exercises most of the features of Tile Generator. This sample tile is used by Tile Generator’s CI pipeline to verify that things work correctly.
You can build this sample using the following steps:
-
Download the Redis BOSH release and save it to
sample/resources/redis-13.1.2.tgz. -
Run these commands:
cd sample
src/build.sh
tile build
The sample tile includes a Python app that is used again in several packages, sometimes as an app, sometimes as a service broker. One of the deployments (app3) uses the sample app inside a Docker image that is modified by the CI pipeline. If you edit the sample app, you can build your own Docker image using the provided Dockerfile, and change the image name in sample/tile.yml to include the modified code in app3.
Define your tile in a tile.yml file
All required configuration for your tile is in the file called tile.yml. The tile init command creates an initial version for you that can serve as a template.
Branding
The first section in the file describes the branding of your tile:
name: tile-name # Match Broadcom Support portal product name, lowercase with dashes
icon_file: resources/icon.png
label: Brief Text for the Tile Icon
description: Longer description of the tile's purpose
-
The
namemust be informative. For example, use a name composed of your company and product names such asacme-anvil. The name must also match your product slug on the Broadcom Support portal, which enables update notifications for customers. Coordinate with your product team to agree on a name. Marketing teams often care about the name because it appears in Broadcom Support portal URLs. -
The
icon_filemust be a 128 x 128 pixel image that appears on your tile in the Tanzu Operations Manager UI. By convention, place any resources used by the tile in theresourcessub-directory of your repository. -
The
labeltext appears on the tile under your icon. This must match your product name on the Broadcom Support portal. Coordinate with your product team to agree on a product name. Marketing teams often care about the product name because it appears on the Broadcom Support portal. -
The
descriptionmust contain a description of the product. This is not currently used, but might be displayed in a future version of Tanzu Operations Manager.
Packages
Next, you can specify the packages to be in your tile. The format of each package entry depends on the type of package you are adding.
Pushed apps
Apps (including service brokers) that are being cf pushed into the TAS for VMs use the following format:
- name: my-application
  type: app # or app-broker
  manifest:
    # any options that you might normally specify in a cf manifest.yml, including</i>
    buildpack: # required
    command:
    domain:
    host:
    instances:
    memory:
    path:
    env:
    services:
  health_check: none                 # optional
  configurable_persistence: true     # optional
  needs_cf_credentials: true         # optional
  auto_services:                     # optional
  - name: p-mysql
    plan: 100MB
  - name: p-redis
    plan: shared-vm
  consumes:                          # optional
    redis:
      from: redis
For apps that are normally pushed as multiple files (node.js for example), zip up the project files and all dependencies into a single ZIP file, and edit tile.yml to point to the zipped file:
cd <your project dir>
zip -r resources/<your project name>.zip <list of file and dirs to include in the zip>
You can specify your app type:
-
If your app is a service broker, use
app-brokeras the type instead ofapp. The app is automatically registered as a broker on install, and deleted on uninstall. -
The
health_checktype lets you configure the value of the cf CLI--health_check_typeoption. Expect this option to move into the manifest as soon as Cloud Foundry supports it there. The only valid options arenoneandport. -
The
configurable_persistence: truevariable lets you select a backing service for data persistence. If there is a specific broker you want to use, you can use theauto-servicesfeature to bind to an already existing service instance, and use theservicesproperty of themanifestinstead. -
The
needs_cf_credentialstype causes the app to receive two additional environment variables namedCF_ADMIN_USERandCF_ADMIN_PASSWORDwith the admin credentials for the TAS for VMs into which they are being deployed. This allows apps and services to interact with the Cloud Controller. -
The
consumestype specifies the BOSH documentation to consume, and presents the hosts and properties from the links as environment variables on the app:<LINK>_HOST: The address of the first instance of the link<LINK>_HOSTS: A JSON array of the addresses of all instances of the link<LINK>_PROPERTIES: A JSON object of the properties on the link
Service brokers
Most modern service brokers are pushed into TAS for VMs as normal Cloud Foundry apps. For these types of brokers, use the Pushed Application format specified, but set the type to app-broker or docker-app-broker instead of app or docker-app:
- name: my-broker
  type: app-broker
  manifest:
    buildpack: # required
    command:
    domain:
    path:
    # ...
  needs_cf_credentials: true           # optional
  auto_services:                       # optional
  - name: p-mysql
    plan: 100MB
  - name: p-redis
    plan: shared-vm
  enable_global_access_to_plans: true  # optional
Important You must specify the enable_global_access_to_plans: true option; if you don't, your broker's services do not appear in the user's Marketplaces. You have to use the cf enable-service-access command to allow specific users, orgs, and spaces to access your services.
Your broker is automatically registered with the Cloud Controller. The Cloud Controller calls your broker’s endpoints, and it uses basic authentication to secure those API calls.
The credentials it uses are passed to your broker in two environment variables:
SECURITY_USER_NAME
SECURITY_USER_PASSWORD
Your broker is expected to accept those credentials. If it does not, automatic broker registration fails.
Some service brokers support operator-defined service plans, for instance when the plans reflect customer license keys. To allow operators to add plans from the tile configuration, add the following section at the top level of your tile.yml:
service_plan_forms:
- name: service_plans_1
  label: Service 1 Plans
  description: Specify the plans you want Service 1 to offer
  properties:
  - name: description
    type: string
    description: "Some Description"
    configurable: true
  - name: license_key1
    type: string
    configurable: true
    description: The license key for this plan
  - name: num_seats1
    type: integer
    configurable: true
    description: The number of available seats for this license
    default: 1
    constraints:
      min: 1
      max: 500
Name and GUID text boxes are supplied by default for each plan, but all other text boxes are optional and customizable. Multiple forms are supported. The operator-configured plans are passed to your service broker in JSON format in an environment variable named after your form but in ALL CAPS (in this case SERVICE_PLANS_1).
For an external service broker, use:
- name: my-application
  type: external-broker
  uri: http://broker3.example.com
  user name: user
  password: #secret
  internal_service_names: 'service1,service2'
BOSH releases
You can include BOSH releases in your tile with the bosh-release package type.
For example, here is a package definition for including a Redis BOSH release:
- name: redis
  type: bosh-release
  path: resources/redis-13.1.2.tgz
  jobs:
  - name: redis
    templates:
    - name: redis
      release: redis
    memory: 512
    ephemeral_disk: 4096
    persistent_disk: 4096
    instances: 2
    cpu: 2
    static_ip: 0
    dynamic_ip: 1
    default_internet_connected: false
    max_in_flight: 1
    properties:
      password: red!s
  - name: sanity-tests
    templates:
    - name: sanity-tests
      release: redis
    lifecycle: errand
    post_deploy: true
    run_post_deploy_errand_default: when-changed
    memory: 512
    ephemeral_disk: 4096
    persistent_disk: 0
    cpu: 2
    dynamic_ip: 1
To include BOSH documentation in your bosh-release package’s deployment manifest, you can include the consumes and provides declarations as strings in the templates section of the job. For example:
# ...
  jobs:
  - name: job_name
    templates:
    - name: template_name
      consumes:
        consumed_link: {from: foo}
      provides:
        provided_link: {as: bar}
Buildpacks
Here is an example of setting up a buildpack.
- name: my-buildpack
  type: buildpack
  path: resources/buildpack.zip
  buildpack_order: 99     # optional, 99 means end of the list
Docker images
Apps packaged as Docker images can be deployed inside or outside TAS for VMs. To push a Docker image as a Cloud Foundry app, use the Pushed Application format, but use the docker-app or docker-app-broker type instead of app or app-broker.
The Docker image to be used is a specified using the image property:
- name: app1
  type: docker-app
  image: test/dockerimage
  manifest:
    ...
If this app is also a service broker, use docker-app-broker instead of docker-app. This option is appropriate for Docker-wrapped 12-factor apps that delegate their persistence to bound services.
Docker apps that require persistent storage cannot be deployed into TAS for VMs.
These can be deployed to separate BOSH-managed VMs instead by using the docker-bosh type:
- name: docker-bosh1
  type: docker-bosh
  cpu: 5
  memory: 4096
  ephemeral_disk: 4096
  persistent_disk: 2048
  instances: 1
  manifest: |
    containers:
    - name: redis
      image: "redis"
      command: "--dir /var/lib/redis/ --appendonly yes"
      bind_ports:
      - "6379:6379"
      bind_volumes:
      - "/var/lib/redis"
      entrypoint: "redis-server"
      memory: "256m"
      env_vars:
      - "EXAMPLE_VAR=1"
    - name: mysql
      image: "google/mysql"
      bind_ports:
      - "3306:3306"
      bind_volumes:
      - "/mysql"
    - name: elasticsearch
      image: "bosh/elasticsearch"
      links:
      - mysql:db
      depends_on:
      - mysql
      bind_ports:
      - "9200:9200"
If a Docker image cannot be downloaded by BOSH dynamically, provide a ready-made Docker image and package it as part of the BOSH release. In that case, specify the image as a local file. This file must be a .tgz.
- name: docker-bosh2
  type: docker-bosh
  files:
  - path: resources/cfplatformeng-docker-tile-example.tgz
  cpu: 5
  memory: 4096
  ephemeral_disk: 4096
  persistent_disk: 2048
  instances: 1
  manifest: |
    containers:
    - name: test_docker_image
      image: "cfplatformeng/docker-tile-example"
      env_vars:
      - "EXAMPLE_VAR=1"
      # See below on custom forms/variables and binding it to the Docker env variable
      - "custom_variable_name=((.properties.customer_name.value))"
To expose a container through the TAS for VMs Routing Architecture, for example, one of the Docker containers hosts an admin webapp interface, use the routes property of the apps manifest to choose a port and prefix. The external URL is [prefix]-[package.name].[system-domain]. In this case, the URL is https://admin-docker-bosh3.sys.example.com, where sys.example.com is the TAS for VMs system domain. routes is a list, so multiple containers can be exposed.
- name: docker-bosh3
  type: docker-bosh
  docker_images:
  - "cfplatformeng/database"
  - "cfplatformeng/admin_ui"
  routes:
    - prefix: admin
      port: 8080
  cpu: 5
  memory: 4096
  ephemeral_disk: 4096
  instances: 1
  manifest: |
    containers:
    - name: database
      image: "cfplatformeng/database"
      bind_ports:
      - "5432:5432"
    - name: admin_ui
      image: "cfplatformeng/admin_ui"
      bind_ports:
      - "8080:8080"
Custom forms and properties
You can pass custom properties to all apps deployed by your tile by adding the to the properties section of the tile.yml file:
properties:
- name: author
  type: string
  label: Author
  value: Tile Ninja
To make these properties configurable by the tile installer, place them on a custom form instead:
forms:
- name: custom-form1
  label: Test Tile
  description: Custom Properties for Test Tile
  properties:
  - name: customer_name
    type: string
    label: Full Name
  - name: street_address
    type: string
    label: Street Address
    description: Address to use for junk mail
  - name: city
    type: string
    label: City
  - name: zip_code
    type: string
    label: ZIP+4
    default: '90310'
  - name: country
    type: dropdown_select
    label: Country
    default: country_us
    options:
    - name: country_us
      label: US
    - name: country_elsewhere
      label: Elsewhere
- name: account-info-1
  label: Account Info
  description: Example Account Information Form
  properties:
  - name: username
    type: string
    label: Username
  - name: password
    type: secret
    label: Password
Properties defined in either section are passed to all pushed apps as environment variables (the name of the environment variable is the same as the property name but in ALL_CAPS). They can also be referenced in other parts of the configuration file by using (( .properties.<property-name> )) instead of a hardcoded value.
All properties supported by Tanzu Operations Manager can be used. The syntax is the same as used by Tanzu Operations Manager, except that for simplicity, property blueprints for form fields do not need to be declared separately. Instead, the declaration is included in the form itself. For a complete list of supported property types and syntax, see the Property and Template References.
Tanzu Operations Manager supports text areas for any type of multi-line credential. If you want a secret property to use a text area instead of the default single-line text field, you must set display_type to text_area in the property_inputs section of your property blueprint, as in the example below.
property_inputs:
  - reference: secret_meaning
    label: 'Secret Meaning'
    description: 'If you play it backwards...'
    display_type: 'text_area'
Automatic provisioning of services
Tile Generator automates the provisioning of services. Any app (including service brokers and Docker-based apps) that are being pushed into TAS for VMs can automatically be bound to services through the auto_services feature:
- name: app1
  type: app
  auto_services:
  - name: p-mysql
    plan: 100mb-dev
  - name: p-redis
You can specify any number of service names by defining a specific plan. During deployment, the generated tile creates an instance of each service if one does not already exist and bind that instance to your package.
Service instances provisioned this way survive updates, but are deleted when the tile is uninstalled.
Important The name variable is the name of the provided service, not the broker. In many cases these are not the same, and a single broker might even offer multiple services. Use cf service-access to see the services and plans offered by installed service brokers.
If you do not specify a plan, Tile Generator uses the first plan listed for the service in the broker catalog. It is a good idea to always specify a service plan. If you change the plan between versions of your tile, Tile Generator attempts to update the plan while preserving the service (preventing data loss during upgrade). If the service does not support plan changes, the upgrade fails.
The configurable_persistence type is really a special case of auto_services, letting the user choose between some standard brokers.
Declaring product dependencies
When your product has dependencies on others, you can have Tanzu Operations Manager enforce that dependency by declaring it in your tile.yml file as follows:
requires_product_versions:
- name: p-mysql
  version: '~> 1.7'
If the required product is not present in the Tanzu Operations Manager installation, Tanzu Operations Manager displays a message saying <your-tile> requires 'p-mysql' version '~> 1.7' as a dependency and does not install your tile until that dependency is satisfied.
When you use automatic provisioning of services, it is often appropriate to add those products as a dependency. Tile Generator can not do this automatically as it can’t always determine which product provides the requested service.
Orgs and spaces
By default, Tile Generator creates a single new org and space for any packages that install into TAS for VMs, using the name of the tile and appending -org and -space, respectively. The default memory quota for a newly created org is 1024 (1 G).
You can change any of these defaults by specifying the following properties in tile.yml file:
org: test-org
org_quota: 4096
space: test-space
Security
If your cf packages need outbound access (including access to other packages within the same tile), you must apply an appropriate security group.
The following option removes all constraints on outbound traffic:
apply_open_security_group: true
Stemcells
Tile Generator defaults to a recent stemcell supported by Tanzu Operations Manager. In most cases, the default is fine because the stemcell is used only to execute CF command lines and/or the Docker daemon.
If you have specific stemcell requirements, you can override the defaults in your tile.yml file by including a stemcell-criteria section and replacing the appropriate values:
stemcell_criteria:
  os: 'ubuntu-trusty'
  version: '3146.5'     #NOTE: You must quote the version to force the type to be string
Important You must quote the version to force the type to be a string.
Custom errands
Tile Generator supplies standard errands to deploy and delete CF-type packages. You can replace or augment those errands by specifying errand shell commands in your tile.yml file.
Here is an example of a custom deploy errand to install a buildpack, only if a newer version of that same buildpack is not already present:
packages:
- name: my-buildpack
  type: buildpack
  buildpack_order: 0 # Go to head of list
  path: my_buildpack.zip
  deploy: |
    cp my_buildpack.zip my_buildpack-v{{context.version}}.zip
    existing=`cf buildpacks | grep '^my_buildpack'`
    if [ -z "$existing" ]; then
      cf create-buildpack my_buildpack my_buildpack-v{{context.version}}.zip 0
    else
      semver=`echo "$existing" | sed 's/.* my_buildpack-v\(.*\)\.zip/\1/'`
      if is_newer "{{context.version}}" "$semver"; then
        cf update-buildpack my_buildpack -p my_buildpack-v{{context.version}}.zip
      else
        echo "Newer version ($semver) of my_buildpack is already present"
      fi
      cf update-buildpack my_buildpack -i 0
    fi
  delete: |
    # Intentional no-op, as others may have a dependency on this
Important deploy and delete completely replace the standard errand commands for the package in which you include them. To keep the standard commands, but add commands to run before or after the standard errand, use pre_deploy, post_deploy, pre_delete, and post_delete instead.
Versioning
Tile Generator uses semver versioning. By default, tile build generates the next patch release. Major and minor releases can be generated by explicitly specifying tile build major or tile build minor. Or to override the version number completely, specify a valid semver version on the build command; for example, tile build 3.4.5.
No-op content migration rules are generated for every release prior to the current release, so Tanzu Operations Manager allows tile upgrades from any version to any newer version. This depends on the existence of the tile-history.yml file.
If you need to be able to upgrade from a random old version to a new one, you can edit that file, or you can run:
tile build <old-version>
tile build <new-version>
The new tile supports upgrades from old-version.
Upgrades
By default, Tile Generator produces all code necessary to do a blue/green, zero-downtime deployment of all tile components when installing a newer version over an older one. For most tile versions, this is all that is needed.
Tanzu Operations Manager has support for performing upgrade actions, such as database migrations, during a tile upgrade, but this capability is not yet exposed through Tile Generator.
For example:
$ tile build
name: tibco-bwce
icon: icon.png
label: TIBCO BusinessWorks Container Edition
description: BusinessWorks edition that supports deploying to Cloud Foundry
version: 0.0.2

bosh init-release --dir=cf
bosh generate-package cf_cli
bosh generate-package bwce_buildpack
bosh generate-job install_bwce_buildpack
bosh generate-job remove_bwce_buildpack
bosh create-release --final --tarball=cf_incubator --version 0.0.2

tile generate release
tile generate metadata
tile generate errand install_bwce_buildpack
tile generate errand remove_bwce_buildpack
tile generate content-migrations

created tile tibco-bwce-0.0.2.pivotal
This tile includes a single large buildpack and takes less than 15 seconds to build, including the CF CLI download and the BOSH release generation.
Supported commands
tile init [<tile-name>]
tile build [patch|minor|major|<version>]
