


Add alert notifications in Tanzu Platform hub
Rather than constantly monitoring your resources in Tanzu Platform hub, you can configure notifications to let you and other resource owners or stakeholders know when particular resources need their attention. You configure the communication method and you define the rules that trigger alerts that are relevant to you and other users.
Notification communication methods and sources
Tanzu Platform hub provides information that you might consider important enough to require notifying resources owner. You select the communication method and define the criteria that lets them know that resources need their attention even when they are not actively monitoring the resources in Tanzu Platform hub.
You can configure one or more of the following communication methods that are most useful to you and your stakeholders.
- Slack
- Jira (Security Posture only)
- Webhook (Security Posture only)
The notifications are helpful for monitoring the issues from the following sources.
- Insights
- Security Posture findings
Before you begin
-
For Slack notifications.
- Add at least one Slack channel. For example,
#tanzu-hub-insights-notificationorß. - Add the users who need to receive the notifications to the channel.
- Add the Tanzu Platform hub Notifications application to the channel.
- Add at least one Slack channel. For example,
-
For Jira notifications.
- Create an API token for your Jira project and copy the value for later use.
-
For Jira notifications.
- Create an API token for your Jira project and copy the value for later use.
How to configure notification communication targets
You must configure the communication methods so that you can provide one or more targets when you configure the rules that trigger the notifications.
Email is configured by default. You do not need to configure email as a target. You specify the users who receive the notifications and the criteria that triggers a notification in the notification rules.
To use Slack as a communication method, configure one or more channels. You specify the users who receive the notifications in the Slack channel. You specify the criteria that triggers a notification in the notification rules.
To use Jira as a communication method, you must already have a project configured for your organization. You specify the criteria that triggers a notification in the notification rules.
To use Webhook as a communication method, you must already have a destination URL configured to receive requests. You specify the criteria that triggers a notification in the notification rules.
Select the tab for the notification target you want to configure.
- Slack
-
This workflow describes how to configure notifications for Slack.
- Select Setup & Configuration > Notification Management.
-
Select the Notifications Targets tab.
-
Choose a Slack notification source and click Add New.
-
Enter a Target name. For example, Insights Notifications Slack.
- If you intend the notification target to begin receiving immediately, click the Active slider to turn on the notification process.
-
Click Next.
-
Select whether the target configuration is available to all the users in your organization or only to project members.
If you select Projects, select one or more projects. When you later define the rules based on the projects, only project members are listed as potential recipients. If you select Projects, select one or more projects. When you later define the rules based on the projects, only project members are listed as potential recipients.
-
Click Get Auth Code.
In the Slack window that appears, you must click Allow to give the Tanzu Platform hub Notifications application permission to send notifications to your Slack instance. In the Slack window that appears, you must click Allow to give the Tanzu Platform hub Notifications application permission to send notifications to your Slack instance.
-
Enter the name of one or more Slack channels that you want Tanzu Platform hub to send notifications to. and click Test.
For example, tanzu-hub-insights-notification.

If the Test button is not active, Tanzu Platform hub could not locate the channel in your Slack instance. Verify the name. If the Test button is not active, Tanzu Platform hub could not locate the channel in your Slack instance. Verify the name.
-
When a test message is successfully sent, click Save.
- To see your new Slack notification target and any existing targets, click View on the target type card.
-
To add notification rules, select Setup & Configuration > Notifications.
Additional information is provided in the next section. Additional information is provided in the next section.
- Jira
-
This workflow describes how to configure notifications for Jira.
-
Locate the Jira for Security Posture Notifications tile and click Add new.
-
Enter the following information:
- Target name - Choose a name for your notification target. An example would be Guardails Jira Notification.
- Username - Enter the email address you use to log in to your Jira organization.
- API token - Click on the provided API token link to create a token with Jira. Copy the value into this field.
- Organization name - You can find the organization name in the URL for your Jira page, which should be yourcompany.atlassian.net. In this case, the organization name would be “yourcompany”.
- Project key - The project key is the prefix you have your issue IDs. For example, if “JRA-123” is how your organization assigns IDs, then JRA is the project key.
- Issue type - Your options for this field depend on which issue types your organization supports. See the Jira Issue Types documentation for more information.
- Fields Template - This field is optional, but allows you to customize the ticket template associated with this integration. See How to customize a Jira ticket template for more details on how to use this field.
-
If you intend the notification target to begin receiving immediately, click the Active slider to turn on the notification process.
-
Select whether the target configuration is available to all the users in your organization or only to project members.
If you select Projects, select one or more projects. When you later define the rules based on the projects, only project members are listed as potential recipients.
-
Click Test to verify a working connection, then click Save if it is successful.
-
To see your new Jira notification target and any existing targets, click View on the target type card.
-
To add notification rules, select Setup & Configuration > Notifications.
Additional information is provided in the next section.
-
- Webhook
-
Use Webhook to send governance findings to a URL destination in a custom format (JSON, XML, HTML, plain text, and so on). This lets applications that don’t have a specific integration for Tanzu Platform hub receive findings data as long as they can process the custom format.
-
Select Setup & Configuration > Notification management.
-
Select the Notifications Targets tab.
-
Locate the Webhook for Security Posture Notifications tile and click Add new.
-
Enter the following information:
- Target name - Choose a name for your notification target. An example would be Webhook Security Posture Notification.
- Headers - Any headers you need to include with your requests, such as authorization or content types, are entered here in key:value format. An example would be content-type:application/json.
- URL: - Enter the URL destination you want to send findings data to.
-
If you intend the notification target to begin receiving immediately, click the Active slider to turn on the notification process.
-
Select the template to use for your findings data. In addition to the standard template, you can also select templates for Microsoft Teams and PagerDuty if you use those products. All three templates can be further customized, see How to create a custom webhook template for more details.
Note
If implementing the Microsoft Teams template, you may want to review the supporting Microsoft Teams documentation for creating an incoming webhook.
-
Select whether the target configuration is available to all the users in your organization or only to project members.
If you select Projects, select one or more projects. When you later define the rules based on the projects, only project members are listed as potential recipients.
-
Click Test to verify a working connection, then click Save if it is successful.
-
To see your new Jira notification target and any existing targets, click View on the target type card.
-
To add notification rules, select Setup & Configuration > Notification Management.
Additional information is provided in the next section.
-
How to define the notification rules
You define the notification rules to the level of precision that you need to ensure that your resource owners know about resources that need attention while avoiding too much channel noise for your users.
You can define notifications for the following events.
-
Insights
For example, you want to limit the volume of the messages, you might configure a Slack rule that sends messages to the channel when critical insights from AWS and Azure are detected and you want your users to respond and evaluate quickly. While the managers only want to know when an insight status changes updated or resolved.
-
Findings
For example, you want a rule that sends notifications to select users when a particular policy is violated.
If you are using Slack, Jira, or Webhook you must first define a notification target for those services. The procedure is explained the previous section. For email, you specify the recipients in the rule you define here.
-
Select Setup & Configuration > Notifications Management.
-
Select Insights or Security Posture from the Source drop-down.
-
Click New.
-
Enter a Notification name.
For example, Insights Critical Notifications.
-
If you want the notification rule to begin sending immediately, click Active slider to turn on the notification process.
-
If you’re an organization administrator, select the Context at which others may view or edit this notification.
-
If you want the notification rule to begin sending immediately, click Active slider to turn on the notification process.
-
If you’re an organization administrator, select the Context at which others may view or edit this notification.
-
Click the Notification Targets drop-down to select the notification targets that send the messages.
-
Click the Notification Targets drop-down to select the notification targets that send the messages.
- For email, enter the email addresses for the users to be notified when the criteria are met.
- For Slack, select the defined Slack target and then enter the Slack channel name.
- For Jira, select the defined Jira target.
- For Webhook, select the defined Webhook target.
-
Define the Insights or Security Posture criteria that triggers a notification. For Insights, this may include one or more severity values, event or alert sources, and the current status, while Security Posture may include all or specific cloud accounts along with findings metadata like status, provider, and severity.
-
Click Next.
-
Review the notification rules and click Submit.
-
Continue configuring additional notification rules as needed.
How to customize a Jira ticket template
Here is an example of the default Jira ticket template you receive after successfully configuring a notification:
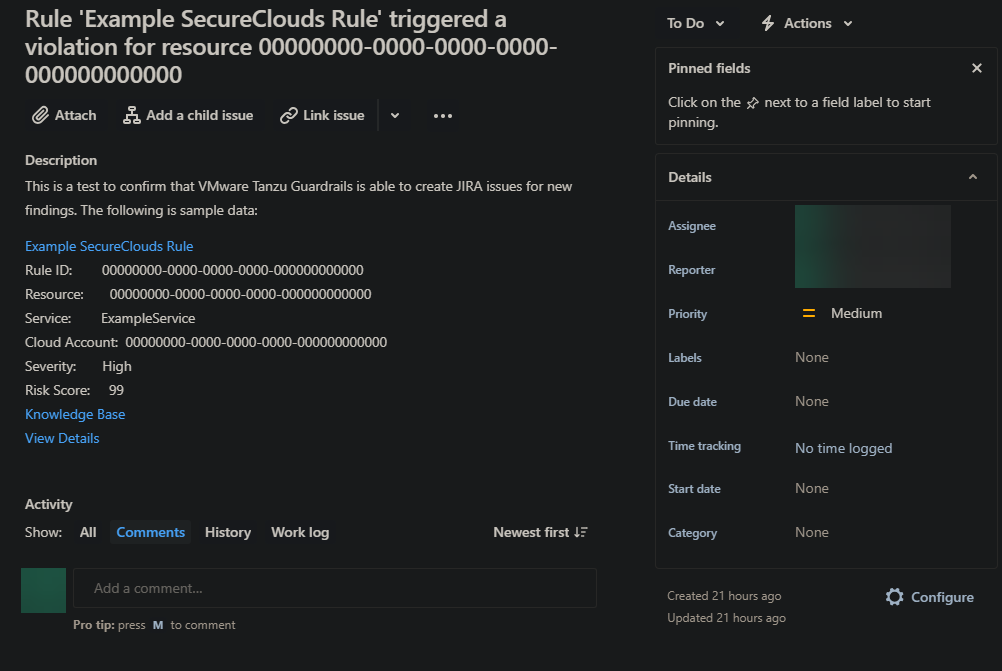
You can change this template by adding JSON content to the Fields Template during or after initial configuration that customizes the available fields in the Jira ticket. Examples of customization include:
- Overriding the default values in the summary and description fields.
- Adding default values for other common Jira ticket fields.
- Adding custom Jira ticket fields you’ve created for your project.
How to define values for standard Jira ticket fields
The summary and description fields are already defined for your tickets when you configure a Jira notification target. However, you can override both of these fields with your own preferred message if desired.
The following takes the previous JSON example and adds a new description:
{
  "description": "Please review and assign this issue for resolution within 24 hours."
}
You can also add more lines to create default values for standard Jira ticket fields that are currently empty. This example adds a label for SecOps:
{
  "description": "Please review and assign this issue for resolution within 24 hours.",
  "labels": ["SecOps"]
}
How to define values for custom Jira ticket fields
If you want to supply a pre-defined value for a custom Jira ticket field used by your project, you must supply the id for the custom field in the JSON body. You can obtain this by making an API call to https://your-domain.atlassian.net/rest/api/3/field. For readability, try making this call with an API testing tool like Postman, or copy the output into an online JSON formatter.
In this example, the custom field has an id of customfield_10811 in Jira and represents the team to which the ticket should be assigned. Here’s how you add it to the previous JSON content:
{
  "description": "Please review and assign this issue for resolution within 24 hours.",
  "labels": ["SecOps"],
  "customfield_10032" : {"value" : "Cybersecurity"}
}
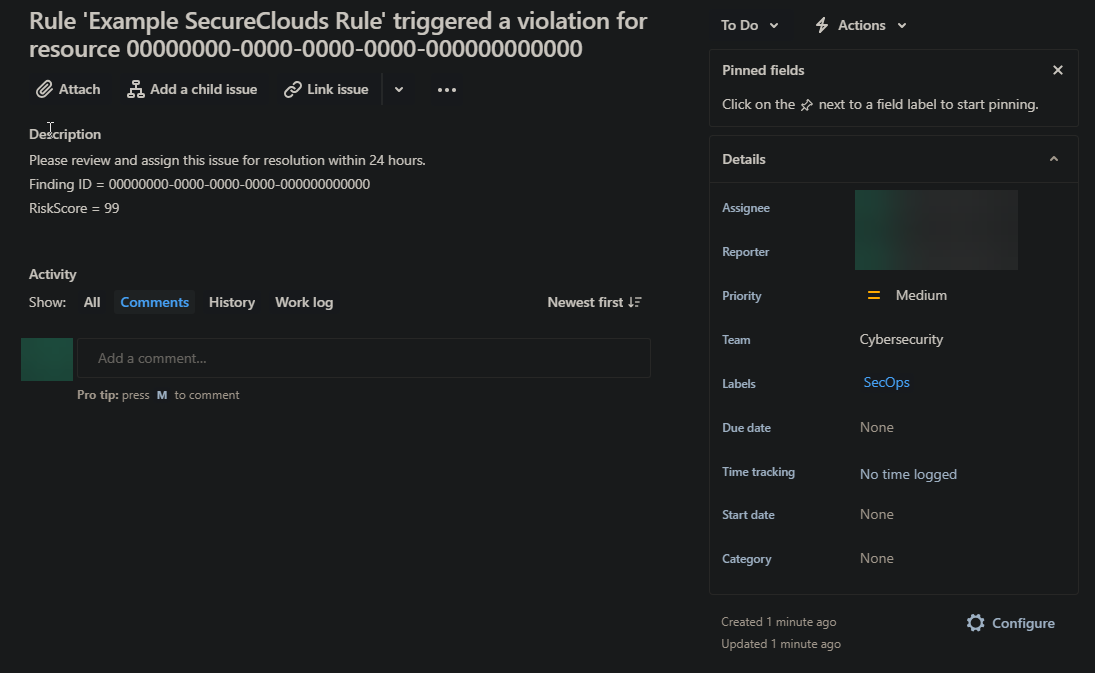
How to import data from a Security Posture finding into a Jira ticket
You can include attributes for a Security Posture finding (such as the ID, cloud account, region, and so on) in your Jira ticket template by adding Mustache variables to free text fields in the following format: {{ Finding.attribute }}.
The following takes the previous JSON example and adds the ID and risk score for a finding to the description:
{
  "description": "Please review and assign this issue for resolution within 24 hours. \nFinding ID = {{ Finding.ID }}\nRiskScore = {{ Finding.RiskScore }}",
  "labels": ["SecOps"],
  "customfield_10032" : {"value" : "Cybersecurity"}
}
Send a test ticket and see how the values are now updated in comparison in the original template.
You can refer to this table breakdown of the Jira Cloud alert JSON template for all the available findings attributes you can add as variables.
How to customize a webhook template
Tanzu Platform hub’s webhook templates are written in the Mustache format. When creating your own template, it may help to refer to the Mustache documentation in addition to these instructions.
To create your own template, you must write it in a valid JSON format and add it to the notification target as a custom template selection. Alternatively, you can modify one of the existing templates to automatically add it as custom entry.
NoteOnly one custom template is supported per individual webhook integration, and any change made in the Template field immediately overwrites previously saved custom content. To prevent losing information, save a copy of your custom template in a secure location.
You can add attributes from your notification target, findings, and tags to a webhook template as Mustache variables in the following format: {{ <attribute> }}. Review the JSON reference for a list of attributes you can add to your template.
The following JSON input and output demonstrate how these attributes are formatted in a webhook template.
- JSON input
-
Because findings data is part of an object array, all attributes must be added after
{{ #Findings }}and before{{ /Findings }}. Also note that{{ >comma }}is used to represent a comma to indicate the end of the object array.{ "alert": "{{ Name }}", "message": "{{ Message }}", "findings": [ {{ #Findings }} { "findingID": "{{ ID }}", {{ #Remediation }} "operation": "remediation", {{ /Remediation }} {{ ^Remediation }} "operation": "new-finding", {{ /Remediation }} "rule": { "name": "{{ RuleName }}", "severity": "{{ RuleSeverity }}" }, "account": "{{ CloudAccountName }}", "risk": {{ RiskScore }} }{{ >comma }} {{ /Findings }} ] } - JSON output
-
In the output data, all Mustache variables are replaced with findings data. Note where the
{{ >comma }}variable was placed in the input and compare.{ "alert": "Example Alert", "message": "This is an example of a realtime alert", "findings": [ { "findingID": "00000000-0000-0000-0000-000000000000", "operation": "new-finding", "rule": { "name": "example-rule-name", "severity": "High" }, "account": "Cloud Account 1", "risk": 99 } ] }
JSON reference for Jira and Webhook customizations
| Element | Description | Example |
|---|---|---|
| Name | Name of your alert. Only utilized in webhook templates. | My Alert |
| Message | Additional message sent to the recipient of the alert. Only utilized in webhook templates. | This is an alert for my cloud accounts. |
| Finding | A list of attributes for the finding that triggered the alert. | |
| ID | Unique ID for the finding. | 00000000-0000-0000-0000-000000000000 |
| RuleDisplayName | Public name of the rule for the triggered finding. | Azure AD group has administrator access |
| RuleName | Name of the cloud account where your affected resource resides. | Database name of the rule for the triggered finding. |
| RuleService | Service type of the triggered finding. | ActiveDirectory |
| RuleSeverity | Severity of the triggered finding (High, Medium, or Low). | Medium |
| CloudAccountID | ID of the cloud account where your affected resource resides. | 00000000-0000-0000-0000-000000000000 |
| CloudAccountName | Name of the cloud account where your affected resource resides. | Azure-Cloud-Dev |
| CloudAccountEnvironment | The environment type assigned to the cloud account. | development |
| CloudAccountProjectID | ID of the {{ vars.product_name_short }} project where the cloud account resides. | 00000000-0000-0000-0000-000000000000 |
| Finding Source | The service the finding originates from. | Tanzu Native |
| Provider | Provider associated with the cloud account where the affected resource resides. | azure |
| Service | Service type of the affected resource. | ActiveDirectory |
| Region | Region of the affected resource. | global |
| RiskScore | Risk score of the finding. | 40 |
| Timestamp | Timestamp from when the event was observed. | 2020-01-01T12:00:00.000Z |
| Tags | A list of tags associated with affected resource. | |
| Key | Name of the tag. | Owner |
| Value | Value of the tag. | [email protected] |
Parent topic:Setting up data connections in VMware Tanzu Platform hub
