


This topic tells you how to configure on-demand VMware Tanzu RabbitMQ for Tanzu Application Service to secure communication between nodes in a RabbitMQ cluster.
Overview
In Tanzu RabbitMQ for Tanzu Application Service, nodes in a cluster communicate with other nodes through Erlang distribution links. RabbitMQ CLI tools, such as rabbitmqctl, also establish connections to nodes in the cluster through distribution links.
For on-demand service instances, you can secure communication between nodes in the cluster with Tanzu RabbitMQ for Tanzu Application Service using mutual TLS to provide authentication and encryption for the traffic.
For more information about clustering with TLS in RabbitMQ, see the RabbitMQ documentation.
Note Internode communication is independent of communication between your apps and RabbitMQ. You can secure internode traffic without modifying your apps to communicate over TLS.
To configure internode TLS for on-demand service instances:
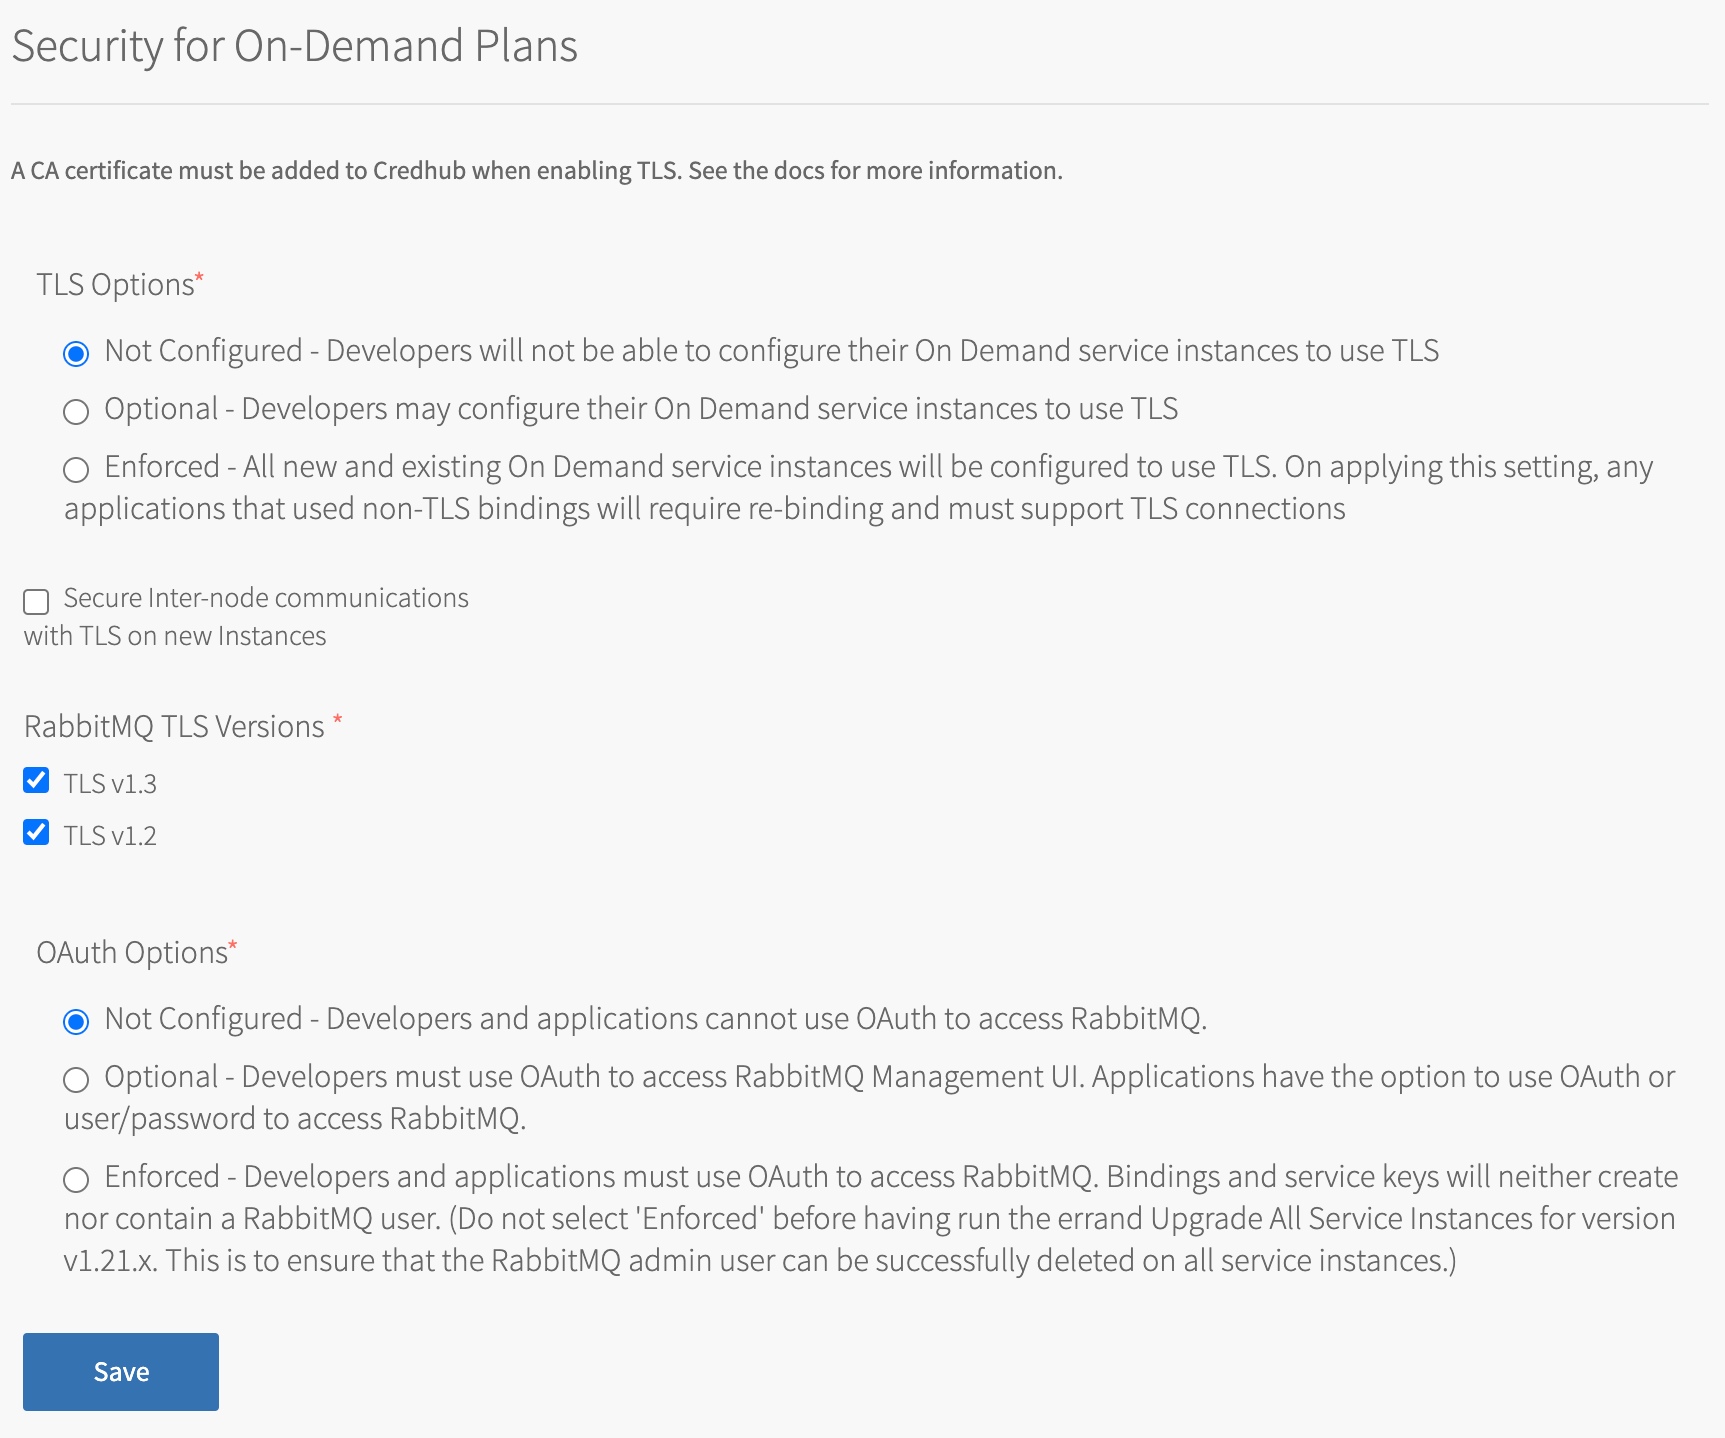
Configure Internode TLS
To configure internode mutual TLS in the Tanzu RabbitMQ for Tanzu Application Service tile:
-
Click the Security for On-Demand Plans tab.
-
Select the Secure Internode communications with TLS on new Instances checkbox.
-
Click Save.
-
Go back to Ops Manager Installation Dashboard > Review Pending Changes.
-
Click Apply Changes to apply the changes to the Tanzu RabbitMQ for Tanzu Application Service tile.
After applying changes, internode communication in new service instances is secured with mutual TLS.
Caution This option only affects service instances created after clicking Apply Changes. It has no effect on existing service instances. To migrate your app traffic to a cluster using internode TLS, see Migrate to a Secure Internode Cluster below.
Migrate to a Secure Internode Cluster
You cannot enable internode TLS communication on existing service instances. To use this feature, you must manually migrate apps to a new service instance which has Secure Internode communications with TLS enabled. This migration can involve less downtime if you use a blue-green deployment.
You must migrate because, when you click Apply changes, the rolling upgrade process that updates the cluster cannot update existing instances to use internode TLS communication. The rolling upgrade would fail because an Erlang distribution cannot contain a mix of nodes that communicate over TLS and nodes that do not.
Note This migration procedure assumes that you are familiar with RabbitMQ concepts, such as dynamic shovels and how to configure them. If you need help with this procedure, contact VMware Support.
You must manually create RabbitMQ objects. This might not be feasible if you have more than 100 queues. VMware Support can provide a script to perform some of these steps.
To migrate apps to a secure internode cluster using a blue-green deployment:
-
In the subnet of your original service instance, create a new service instance with the same plan and configuration as the original service instance by running:
cf create-service p.rabbitmq PLAN-NAME GREEN-INSTANCE-NAME -c PARAMETERS-AS-JSONWhere:
PLAN-NAMEis plan you used for the original service instanceGREEN-INSTANCE-NAMEis the name of the new service instancePARAMETERS-AS-JSONis the configuration you applied to the original service instance
For example, if your original instance has TLS enabled:
$ cf create-service p.rabbitmq my-rabbitmq-plan rabbitmq-green -c '{"tls": true}'Note In this procedure, this new service instance and its corresponding cluster are referred to as green. The original service instance and cluster are referred to as blue.
-
After the green service instance is deployed, run these commands to create admin credentials for both the blue and green service instances if they do not already have credentials:
cf create-service-key BLUE-INSTANCE-NAME admin-key -c '{"tags": "administrator"}'cf create-service-key GREEN-INSTANCE-NAME admin-key -c '{"tags": "administrator"}'Where:
BLUE-INSTANCE-NAMEis the name of your original service instanceGREEN-INSTANCE-NAMEis the name of the new service instance
-
Retrieve the service key for the blue and green instances by running these commands:
cf service-key BLUE-INSTANCE-NAME admin-keycf service-key GREEN-INSTANCE-NAME admin-keyFrom the output, record:
- The URL and admin credentials for the Management UI
- The AMQP or AMQPS URI listed in the service-key. You will need this to set up shovels between the two clusters. This is stored under the key
uri.
-
Log in to the Management UI on both the blue and green clusters.
-
Stop the apps bound to the blue service instance so that no new messages are sent and no new topology objects, such as queues or policies, are created. Do so by running:
cf stop APP-NAMEWhere
APP-NAMEis the name of your messaging app. -
In the Overview pane of the Management UI for the blue (original) cluster, navigate to Export Definitions and click Download broker definitions. This saves a JSON file to your local machine that contains the topology metadata you need to re-create the cluster on another service instance.
Note If you do not see the Export definitions section of the Overview pane, it is likely that the service-key you created did not contain the tag to enable admin permissions. Re-check the command you ran to create the key.
-
Modify the definitions file you downloaded in the previous step to remove anything you do not want on your new cluster. For example, the new cluster will create its own users, so you must remove any user credentials before importing the file onto the new cluster.
-
In the Overview pane of the Management UI for the green (new) cluster, navigate to Import Definitions and add the JSON file you downloaded from the blue cluster and click Upload broker definitions. This creates the topology required on the green cluster.
Note If you do not see the Import definitions section of the Overview pane, it is likely that the service-key you created did not contain the tag to enable admin permissions. Re-check the command you ran to create the key.
-
Configure a shovel on the green cluster to drain any messages from the blue cluster. Create a shovel for each queue that you want to drain to the green cluster.
If you have many queues, VMware recommends that you create these in batches and wait for them to complete before you create new shovels. This is to avoid overloading the system.- In the Management UI of the green cluster, navigate to Admin and go to Shovel Management in the sidebar.
- Click Add a new shovel.
-
Under Source:
-
Set URI to the URI you retrieved from the service key for the blue cluster. For example:
amqp://user:password@server-name
If you are using TLS for AMQP traffic, add the following query parameter onto the end of the URI:?cacertfile=/var/vcap/jobs/rabbitmq-server/etc/cacert.pem&certfile=/var/vcap/jobs/rabbitmq-server/etc/cert.pem&keyfile=/var/vcap/jobs/rabbitmq-server/etc/key.pem&verify=verify\_peerFor example, your shovel’s source URI will look similar to:
amqps://user:password@server-name?cacertfile=/var/vcap/jobs/rabbitmq-server/etc/cacert.pem&certfile=/var/vcap/jobs/rabbitmq-server/etc/cert.pem&keyfile=/var/vcap/jobs/rabbitmq-server/etc/key.pem&verify=verify\_peer
-
Set Queue to the name of a queue that you want to drain from the blue cluster.
- Set Auto-delete to After initial length transferred.
-
-
Wait for all of the shovels to disappear from the Management UI of the green cluster. This indicates that all messages have been drained from the blue cluster.
-
Unbind your apps from the blue cluster and bind them to the green cluster:
-
If your apps are running on the same foundation, re-bind your apps by running these commands:
cf unbind-service APP-NAME BLUE-INSTANCE-NAMEcf bind-service APP-NAME GREEN-INSTANCE-NAME -
If your apps are running off-foundation and communicate with RabbitMQ through the Service Gateway:
-
Create a new service key on the green cluster by running:
cf create-service-key GREEN-INSTANCE-NAME messaging-app-key - Supply the service key to your app so that it can communicate with the new cluster.
-
-
-
Restart your apps. If you know which of your apps are consumers and which are producers, VMware recommends that you restart the consumers first to avoid building up a backlog on the green cluster.
cf start APP-NAME -
Confirm in the Management UI for the blue cluster that the blue cluster has no messages in queues and no throughput.
-
Confirm in the Management UI for the green cluster that the green cluster has the expected throughput.
-
After confirming the green cluster is as expected, delete the blue cluster by running:
cf delete-service BLUE-INSTANCE-NAME
