


Tanzu RabbitMQ supports Warm Standby Replication, a strategy which replicates or copies data (continuous schema definitions and messages) from an upstream (primary) RabbitMQ cluster to a downstream (secondary) cluster. In the event of a failure on the upstream (primary) cluster, an administrator can quickly start the recovery process, which means putting the downstream (standby) cluster into service as the new upstream (primary) cluster with minimal downtime or data loss.
This information describes configuring Warm Standby Replication when you are using the Tanzu RabbitMQ OVA image. The Tanzu RabbitMQ Kubernetes Operators are not used.
NoteThis feature is only supported in Tanzu RabbitMQ. It is not supported in the Open Source RabbitMQ product.
Topics
- Getting familiar with the Terminology
- Why use Warm Standby Replication
- What is Replicated/What is not?
- How Warm Standby Replication Works
- Enabling the Continuous Schema Replication and Standby Message Replication Plugins
- Configuring the Continuous Schema Replication Plugin
- Configuring the Standby Message Replication Plugin
- Promoting the Downstream (Standby) Cluster for Disaster Recovery
- Post Promotion
- Running Diagnostics
- Other Useful Replication Commands
- Troubleshooting Warm Standby Replication
- How to get a license
Getting familiar with the Terminology
- Upstream Cluster: The primary active cluster is most often called the “upstream” cluster. The “upstream” cluster reference is used in the configuration files, which you will come across when you are configuring the Warm Standby Replication feature. For the remainder of this documentation, it is referred to as the upstream (primary) cluster.
- Downstream Cluster: The standby remote cluster is most often called the “downstream” cluster. The “downstream” cluster reference is used in the configuration files, which you will come across when you are configuring the Warm Standby Replication feature. For the remainder of this documentation, it is referred to as the downstream (standby) cluster.
- Schema: Nodes and clusters store information that can be referred to as schema, metadata or topology. Users, vhosts, queues, exchanges, bindings, runtime parameters are all included in this category. This metadata is called definitions in RabbitMQ.
- Sync Request: A sync request carries a payload that allows the upstream (primary) side to compute the difference between the schemas on the upstream (primary) and downstream (standby) clusters.
- Sync Response: A sync response carries the difference plus all the definitions that are only present on the upstream (primary) side or conflict. The downstream (standby) side uses this information to apply the definitions. Any entities only present on the downstream are deleted, which ensures that downstreams follow their upstream's schema as closely as possible.
- Sync Operation: A sync operation is a request/response sequence that involves a sync request sent by the downstream (standby) cluster and a sync response that is sent back by the upstream (primary) cluster.
- Schema Replication: The automated process of continually replicating schema definitions from an upstream (primary) cluster to one or more downstream (standby) clusters.
- Message Replication: The automated process of continually replicating published messages from an upstream (primary) cluster to one or more downstream (standby) clusters.
- Loose Coupling: The upstream and its followers (downstreams) are loosely connected. If one end of the schema replication connection fails, the delta between clusters' schema will grow but neither will be affected in any other way. (This applies to the message replication connection as well.) If an upstream is under too much load to serve a definition request, or the sync plugin is unintentionally disabled, the downstream won't receive responses for sync requests for a period of time. If a downstream fails to apply definitions, the upstream is not affected and neither are its downstream peers. Therefore, availability of both sides are independent of each other. When multiple downstreams are syncing from a shared upstream, they do not interfere or coordinate with each other. Both sides have to do a little bit more work. On the upstream side, this load is shared between all cluster nodes. On the downstream side, the load should be minimal in practice, assuming that sync operations are applied successfully, so the delta does not accumulate.
- Downstream Promotion: Promoting the downstream (standby) cluster to the Upstream (primary) cluster.
Why use Warm Standby Replication
The Continuous Schema Replication plugin and the Standby Message Replication plugin are used to implement Warm Standby Replication. With the Warm Standby Replication feature, you get:
- A disaster recovery strategy that continually replicates or copies schema definitions and automatically replicates enqueued messages from the upstream (primary) cluster to the downstream (standby) cluster. If a disaster occurs on the upstream (primary) cluster, an administrator can quickly start the recovery process with minimal downtime or data loss.
- With the Continuous Schema Replication plugin, schema definitions can be transferred in a compressed binary format which reduces bandwidth usage.
- With the Continuous Schema replication plugin, cluster co-dependencies are avoided because all communication between the sides is completely asynchronous. For example, a downstream (standby) cluster can run a different version of RabbitMQ.
- Links to other clusters are easy to configure, which is important for disaster recovery (for example, if you are setting up more than one downstream (standby) cluster).
- With the Standby Message Replication plugin replication model:
- There is low overhead for message collection (duplication): all messages in offsite replicated queues are stored in a local stream, a special version of stream client is used to transfer the stream state.
- Messages in a data center can be replicated to more than one data center. There is one connection per replicated virtual host, allowing for some connection parallelism.
- Connections are authenticated the same way clients would be
- Connections support TLS.
What is Replicated?
- Schema definitions such as vhosts, queues, users, exchanges, bindings, runtime parameters, and so on.
- Messages that are published to quorum queues, classic queues, and streams.
How Warm Standby Replication Works
Before setting up Warm Standby Replication, you must:
- Have a minimum of two RabbitMQ clusters configured: one upstream (primary) cluster and one downstream (standby) cluster.
- Stream protocol ports (usually TCP ports 6000-6500) must be open on the host firewall and published on the container.
- To use Warm Standby Replication when you are running VMware's RabbitMQ OVA image, ensure the Continuous Schema Replication plugin and Standby Message Replication plugin are configured separately. To do this, first, ensure the plugins are enabled, go to Enabling the Continuous Schema Replication and Standby Message Replication Plugins, next complete the steps in Configuring the Continuous Schema Replication Plugin and then go to Configuring the Standby Message Replication Plugin. Note, if you are using TLS secured communication, then the certificate used by both plugins must be a client certificate, which is generated with client authentication usage. A certificate that is not the same as the rabbitmq server certificate should be used so that there are separate keys for different components for added security.
Continuous Schema Replication Plugin
The Continuous Schema Replication plugin connects the upstream (primary) cluster to the downstream (standby) cluster via a schema replication link. The downstream (standby) clusters connect to their upstream (primary) cluster and initiate sync operations. These operations synchronize the schema definition on the downstream side with the same schema definition of that which is on the upstream side. A node running in the downstream mode (a follower) can be converted to an upstream (leader) on the fly. This will make the node disconnect from its original source, therefore stopping all syncing. The node will then continue operating as a member of an independent cluster, no longer associated with its original upstream. Such conversion is called a downstream promotion and should be completed in case of a disaster recovery event.
Standby Message Replication Plugin
To ensure improved data safety and reduce the risk of data loss, it is not enough to automate the replication of RabbitMQ entities (schema objects). The Warm Standby Replication feature implements a hybrid replication model. In addition to schema definitions, it also manages the automated and continuous replication of enqueued messages from the upstream (primary) cluster. During the setup process, a replication policy is configured at the vhost level in the upstream (primary) cluster indicating the downstream queues that should be matched and targeted for message replication. Messages and relevant metrics from the upstream queues are then pushed to the downstream queues via a streaming log which the downstream(s) subscribe to. Currently, quorum queues, classic queues, and stream queues are supported for message replication.
ImportantFor quorum and classic queues, it is important to know that RabbitMQ clusters replicate messages in the queues to the downstream (standby) cluster but these messages are not replicated to any downstream queue until the downstream (standby) cluster is promoted to the upstream (primary) cluster. The messages are written into a stream log that is not visible with standard rabbitmq tools (it is stream data without the stream process on top). The replicated data includes the messages and a log that records information about the message state such as a record of acknowledgements. This way, when a disaster recovery event occurs and the downstream (standby) cluster is promoted to the upstream (primary) cluster, it uses the replicated log to filter out only those messages that are not already processed by the upsteam (primary) cluster. Streams work differently, messages are replicated directly to streams on the downstream (standby) cluster. However, you cannot publish new messages to streams on the downstream (standby) cluster until the downstream (standby) cluster is promoted to the upstream (primary) cluster.
Message Collection
On the upstream (primary) side, the plugin enables message collection to a local outgoing stream. This stream collects all messages that should be transferred to one or more downstream (standby) clusters.
Collected messages are retained for a configurable period of time. As they are transferred to downstreams, the log is truncated.
The outgoing message stream can be replicated. Whether enabling outgoing stream replication for Warm Standby Replication makes sense depends on the data safety requirements of the system.
Remote Cluster Transfer
Downstream clusters connect to their configured upstream and begin transferring the messages collected upstream. Every virtual host with Warm Standby Replication enabled gets a connection from downstream to upstream. Similarly to the Federation plugin, those connections are often referred to as links.
In clusters with multiple nodes, each node is responsible for the data of a particular virtual host. For example, in a cluster of three nodes A, B and C, and ten virtual hosts, the nodes will own, transfer and recover data for four, three and three more virtual hosts, respectively. This spreads the load on the downstream cluster in terms of bandwidth, disk space, disk I/O and CPU resources, in particular at the time of promotion (recovery).
As nodes are added and removed from the downstream clusters, transfer links will be stopped and started again to keep their distribution reasonably even across all nodes.
Links
A link uses a RabbitMQ stream binary protocol client operating in a special "raw" mode. In this mode, all stream events are transferred with little encoding and decoding involved.
Links acting as stream protocol clients has a few benefits:
- All communication is asynchronous, there is no coupling, a standby can run a different version of RabbitMQ
- Authentication is identical to that of applications
- No additional ports need to be open
Warm Standby Replication links authenticate the same way any RabbitMQ stream client would. Most environments should use a separate user that has adequate permissions for the virtual hosts involved in offsite replication. Warm Standby Replication links can and typically will use TLS.
When multiple nodes have the Standby Message Replication plugin enabled, each virtual host will be "owned" by only one downstream node. This means that for a given virtual host, only one downstream node will start a link and only one node will complete message recovery at promotion time. Both outgoing and incoming message streams can be replicated to any number of nodes.
Once the stream of collected messages is transferred, it is stored on the downstream (standby) cluster waiting for it to be promoted (a recovery event).
A downstream can be temporarily disconnected and reconnected to its upstream:
# disconnects downstream nodes from the upstream
rabbitmqctl disconnect_standby_replication_downstream

# some time passes..

# reconnects
rabbitmqctl connect_standby_replication_downstream
Enabling the Continuous Schema Replication and Standby Message Replication Plugins
The Continuous Schema Replication and Standby Message Replication plugins must be enabled. Run the following commands to check whether the plugins are enabled:
rabbitmq-plugins list rabbitmq_schema_definition_sync
rabbitmq-plugins list rabbitmq_standby_replications
If the following output is returned (example output here is for Continuous Schema Replication plugin), then the plugins are enabled:
rabbitmq [ ~ ]$ rabbitmq-plugins list rabbitmq_schema_definition_sync
    Listing plugins with pattern "rabbitmq_schema_definition_sync" ...
     Configured: E = explicitly enabled; e = implicitly enabled
     | Status: * = running on rabbit@6b4e8ac05412
     |/
    [E*] rabbitmq_schema_definition_sync
To enable the Continuous Schema Replication (SchemaReplication) and Standby Message Replication (StandbyReplication) plugins at the same time, run the following command:
rabbitmqctl enable_warm_standby
Configuring the Continuous Schema Replication Plugin
The Continuous Schema Replication plugin is used for WAN-friendly replication of schema between RabbitMQ clusters.
NoteThere can be multiple downstream (standby) clusters linked to one upstream (primary) cluster. This setup describes one upstream (primary) cluster and one downstream (standby) cluster.
Configuring the Upstream (Primary) Cluster
A node participating in schema definition syncing must include the following configuration:
- What mode it operates in,
upstream(primary) ordownstream(standby) - Upstream connection endpoints
Include the mode in the
rabbitmq.confconfiguration file. Supported values areupstreamanddownstream, respectively:# source cluster cluster_name = eu.1 # this node will run as an upstream (source) for # schema replication schema_definition_sync.operating_mode = upstreamUpstream (primary) nodes must also include a list of connection endpoints. An upstream (primary) node connects to the first reachable node. Providing a list makes schema replication more resilient to node failures on the upstream side. Connection endpoints and credentials are configured using runtime parameters, which makes it possible to reconfigure them without a node restart:
# Create vhost - This virtual host will be used for schema replication
rabbitmqctl add_vhost rabbitmq_schema_definition_sync

# Create a user and grant it permissions to the virtual host that will be used for schema replication.
# This command is similar to 'rabbitmqctl add_user' but also grants full permissions to the virtual host used for definition sync.
rabbitmqctl add_schema_replication_user "schema-replicator" "s3kRe7"

# create endpoints - specify local (upstream cluster) nodes and credentials to be used for schema replication
rabbitmqctl set_schema_replication_upstream_endpoints '{"endpoints": ["a.rabbitmq.eu-1.local:5672","b.rabbitmq.eu-1.local:5672","c.rabbitmq.eu-1.local:5672"], "username": "schema-replicator", "password": "s3kRe7"}'
Instead of using the two previous commands, you can configure the endpoints and the schema replication user in the
rabbitmq.confconfiguration file during the first boot. Refer to the following example for the configuration details. The plugin takes care of creating the user for the schema replication that is provided.schema_definition_sync.downstream.endpoints.one = a.rabbitmq.eu-1.local:5672 schema_definition_sync.downstream.endpoints.two = b.rabbitmq.eu-1.local:5672 schema_definition_sync.downstream.endpoints.three = c.rabbitmq.eu-1.local:5672 schema_definition_sync.downstream.username = schema-replicator schema_definition_sync.downstream.password = s3kRe7Restart the upstream services on all nodes:
sudo systemctl restart bitnami.vmware-tanzu-rabbitmqTo verify the replication status of a running node (to verify the Continuous Schema Replication plugin is configured successfully), run:
rabbitmqctl schema_replication_status
Configuring the Downstream (Standby) Cluster
Downstream configuration is similar to upstream configuration.
Include the mode in the
rabbitmq.confconfiguration file.# follower cluster cluster_name = eu.2 # this node will run as a downstream (follower) for # schema replication schema_definition_sync.operating_mode = downstreamInclude a list of upstream hosts and connection credentials (which is similiar to the upstream (primary) node):
# specify upstream cluster nodes and credentials to be used # for schema replication rabbitmqctl set_schema_replication_upstream_endpoints '{"endpoints": ["a.rabbitmq.eu-1.local:5672","b.rabbitmq.eu-1.local:5672","c.rabbitmq.eu-1.local:5672"], "username": "schema-replicator", "password": "s3kRe7"}'Instead of using the previous command, the endpoints can also be configured during the first boot using the
rabbitmq.confconfiguration file:schema_definition_sync.downstream.endpoints.one = a.rabbitmq.eu-1.local:5672 schema_definition_sync.downstream.endpoints.two = b.rabbitmq.eu-1.local:5672 schema_definition_sync.downstream.endpoints.three = c.rabbitmq.eu-1.local:5672 schema_definition_sync.downstream.username = schema-replicator schema_definition_sync.downstream.password = s3kRe7Optional: For the downstream (standby) node, there is an additional sync operation interval setting that can be configured. The interval is in seconds and controls how often the downstream (standby) node initiates sync operations. To configure this setting:
# follower cluster cluster_name = eu.2 # this node will run as a downstream (follower) for # schema replication schema_definition_sync.operating_mode = downstream # initiate sync operations every 30 seconds schema_definition_sync.downstream.minimum_sync_interval = 30Depending on the accumulated delta between the two sides, a sync operation can take some time to complete.
If the actual amount of time taken exceeds the configured minimum, the greater value of the two is used. This ensures that in the scenario where a large volume of data needs to be imported, sync operations are not consistently initiated more frequently than it takes to import them, which conserves resources on both sides.
Restart the downstream services on all nodes:
sudo systemctl restart bitnami.vmware-tanzu-rabbitmqTo verify replication status of a running node (to verify the Continuous Schema Replication plugin is configured successfully), run:
rabbitmqctl schema_replication_statusOptional (This step is important if you want to exclude certain entities): The downstream (standby) node can be configured to exclude certain entities (queues, exchanges, users, and so on) from the synchronisation process. For example, you can filter the user
local-adminfrom the synchronisation process; this can be useful if you want to include certain entities in the downstream (standby), even if they do not exist in the upstream (primary). Keep in mind that any entity not present in the upstream (primary) will be deleted by the downstream (standby) synchronisation process.# to filter users using regex schema_definition_sync.downstream.locals.users = ^my-user$ # to filter vhosts using regex schema_definition_sync.downstream.locals.vhosts = ^vhost-test.* # to filter policies using regex schema_definition_sync.downstream.locals.policies = ^example$ # to filter global parameters schema_definition_sync.downstream.locals.global_parameters = ^some-param # to filter parameters schema_definition_sync.downstream.locals.parameters = example$ # to filter queues schema_definition_sync.downstream.locals.queues = ^leave-this-q$ # to filter exchanges schema_definition_sync.downstream.locals.exchanges = ^important-exchange-[a-z]+
Optional: Configuring Schema Synchronization over TLS
You can configure the upstream (primary) and downstream (standby) clusters to complete continuous schema synchronization through TLS-secured communication.
To do this, include the schema sync configuration parameters in the same format as the ssl_options, which are detailed in Enabling TLS Support in RabbitMQ. On both the upstream (primary) and downstream (standby) clusters, set the schema_definition_sync.ssl_options configuration parameters in the rabbitmq.conf configuration file to the following values. You must also set the AMQP protocol port to use TLS.
listeners.tcp                                            = none
listeners.ssl.default                                    = 5671
schema_definition_sync.ssl_options.cacertfile            = /path/to/ca.crt
schema_definition_sync.ssl_options.certfile              = /path/to/tls.crt
schema_definition_sync.ssl_options.keyfile               = /path/to/tls.key
schema_definition_sync.ssl_options.verify                = verify_none
schema_definition_sync.ssl_options.fail_if_no_peer_cert  = false
ImportantPeer verification (normally configured by setting
ssl_options.verifytoverify_peer) is not supported for schema sync.schema_definition_sync.ssl_options.verifymust be set toverify_none.
Optional: Using OAuth 2.0 Authentication/Authorization
You can configure the upstream (primary) and downstream (standby) clusters to authenticate using OAuth 2.0 tokens.
Activate the
rabbitmq_auth_backend_oauth2plugin. For instructions, refer to the OAuth 2.0 Plugin information.Configure the
rabbitmq_auth_backend_oauth2plugin. The following example configures a single OAuth resource calledrabbitmqwith a single OAuth provider whose issuer URL is https://keycloak:8443/realms/test.auth_backends.1 = rabbit_auth_backend_oauth2 auth_oauth2.resource_server_id = rabbitmq auth_oauth2.issuer = https://keycloak:8443/realms/test auth_oauth2.https.verify = verify_peer auth_oauth2.https.cacertfile = /mnt/certs/ca_certificate.pem auth_oauth2.preferred_username_claims.1 = preferred_username auth_oauth2.preferred_username_claims.2 = user_name auth_oauth2.preferred_username_claims.3 = emailImportant
If the OAuth provider has a certificate issued by a certificate authority that is already trusted by the clusters, you do not need to configure the
https.cacertfilevariable.Configure the schema replication's upstream endpoints in the upstream and downstream clusters as follows:
# specify upstream cluster nodes and OAuth settings to be used
# for schema replication
rabbitmqctl set_schema_replication_upstream_endpoints \
    '{"endpoints": ["a.rabbitmq.eu-1.local:5672","b.rabbitmq.eu-1.local:5672","c.rabbitmq.eu-1.local:5672"],
    "oauth2_access_token_request": {
        "client_id": "schema-sync",
        "client_secret": "schema-sync-pwd"
    }
    }'
The previous configuration assumes you have declared an OAuth client in your OAuth provider with username
schema-syncand secretschema-sync-pwd. This OAuth 2 client must have full permissions (read, write and configure) on the virtual host that is being used for schema replication.Your schema synchronization set up is now complete, however, if your environment requires more than one OAuth provider you must complete the following steps.
If you want to define more than once Oauth provider, an example configuration of two Oauth providers is included below. One provider is called
dev, which is used by RabbitMQ to authenticate management users and client applications. The other provider is calledprod, which is only used by the schema synchronization and standby replication plugins.auth_oauth2.oauth_providers.prod.issuer = https://keycloak:8443/realms/prod auth_oauth2.oauth_providers.prod.https.verify = verify_peer auth_oauth2.oauth_providers.prod.https.cacertfile = /mnt/certs/ca_certificate.pem auth_oauth2.oauth_providers.dev.issuer = https://keycloak:8443/realms/dev auth_oauth2.oauth_providers.dev.https.verify = verify_peer auth_oauth2.oauth_providers.dev.https.cacertfile = /mnt/certs/ca_certificate.pem auth_oauth2.default_aouth2_provider = devThe final line in the previous configuration configures
devas the default provider, which means RabbitMQ usesdevwhen it needs to find the current Oauth provider'sissueror any other variable relative to the Oauth provider.The following configuration configures schema-sync with the
prodOAuth provider. If you are using another Oauth provider, then you would use the same configuration again with a different name, for exampledev:# specify upstream cluster nodes and OAuth settings to be used # for schema replication. Because the OAuth provider `prod` is also the default # oauth provider, you can omit it. However, here it is explicitly set. rabbitmqctl set_schema_replication_upstream_endpoints \ '{"endpoints": ["a.rabbitmq.eu-1.local:5672","b.rabbitmq.eu-1.local:5672","c.rabbitmq.eu-1.local:5672"], "oauth2_access_token_request": { "client_id": "schema-sync", "client_secret": "schema-sync-pwd", "oauth2_provider": "prod" } }'The configuration variable
aouth2_providerin theoauth2_access_token_requestattribute specifies which Oauth provider the schema-synchronization plugin uses to request a token so that it can authenticate with the upstream endpoint.
Stopping and Starting Replication
Replication can be stopped at either end by running:
rabbitmqctl disable_schema_replication
The node disconnects from the upstream (primary) cluster and stops initiating (if it is a downstream (standby)) or serving (if it is an upstream (primary)) sync operation requests.
To restart synchronisation, run:
rabbitmqctl enable_schema_replication
To restart schema replication, for example, after an upstream endpoint or credential change, run
rabbitmqctl restart_schema_replication
This is the same as disabling and immediately re-enabling replication using the previous commands.
Configuring the Standby Message Replication Plugin
Configuring the Upstream (Primary) Cluster
Every node in a Warm Standby Replication setup must include the following information. This information then determines what the node does:
- What mode it operates in,
upstream(primary) ordownstream(standby) - For downstreams, a set of upstream connection endpoints
- Using a policy, what queues in a particular virtual host should be replicated offsite
Include the mode in the
rabbitmq.confconfiguration file. Supported values areupstreamanddownstream, respectively:# active (source) cluster name cluster_name = eu.1 # this node will run as an upstream (active, source) for # warm standby queue and stream replication (WSR) standby.replication.operating_mode = upstream # total size message stream limit in bytes # 5 GB - adjust if needed standby.replication.retention.size_limit.messages = 5000000000Create the vhost. The messaged collection feature is enabled for specific queues in a virtual host using a policy. Hosts that enable offsite replication should be tagged with
standby_replication:rabbitmqctl add_vhost "vhost1" --tags "standby_replication"Virtual hosts tagged this way on the upstream cluster will have an outgoing stream declared by the Standby Message Replication plugin. Tagging also makes it easy for operators to spot what virtual hosts have Warm Standby Replication enabled.
Authorize access to the vhost:
sudo rabbitmqctl set_permissions -p vhost1 replicator ". *" ". *" ". *"
sudo rabbitmqctl set_permissions -p vhost1 vmware ". *" ". *" ". *"
Check the vhost tags:
sudo rabbitmqctl list_vhosts name tagsAfter declaring or marking an existing virtual host, add a policy to match the queues that will be replicated to a downstream (standby) cluster. Similiar to other policy-driven features, only one policy applies at a time, therefore Warm Standby Replication key(s) might have to be merged with other policy keys.
rabbitmqctl set_policy --vhost "vhost1" osr "^.*" '{"remote-dc-replicate": true}' --apply-to "queues"Create a test queue:
rabbitmqadmin declare queue name=q1.quorum --vhost=vhost1 durable=true arguments='{"x-queue-type": "quorum"}'To verify the replication status of a running node (to verify the Standby Message Replication plugin is configured successfully), run:
rabbitmqctl standby_replication_status
Configuring the Downstream (Standby) Cluster
Include the
downstreammode in therabbitmq.confconfiguration file.# passive (standby) cluster name cluster_name = eu.2 # this node will run as a downstream (passive) for # warm standby queue and stream replication (WSR) standby.replication.operating_mode = downstream # total size message stream limit in bytes # 5 GB - adjust if needed standby.replication.retention.size_limit.messages = 5000000000 # this is IMPORTANT, otherwise schema sync plugin # can interfere with the local state of the warm standby replication schema_definition_sync.downstream.locals.global_parameters = ^standbyDownstream nodes must include a list of connection endpoints. Connection endpoints and credentials are configured using runtime parameters, which make it possible to reconfigure these nodes without a node restart:
# Specify local (upstream cluster) nodes and credentials to be used
# for WSR.
#
# Note that the target port is that of the RabbitMQ Stream protocol, *not* AMQP 1.0.
rabbitmqctl set_standby_replication_upstream_endpoints '{"endpoints": ["a.rabbitmq.eu-1.local:5552","b.rabbitmq.eu-1.local:5552","c.rabbitmq.eu-1.local:5552"], "username": "offsite-replicator", "password": "s3kRe7"}'
If a list of endpoints is included, a downstream node connects to the first reachable node. Including a list makes schema replication more resilient to node failures on the upstream side.
Instead of using a
rabbitmqctlcommand, the endpoints can also be configured during the first boot using therabbitmq.confconfiguration file:standby.replication.downstream.endpoints.one = a.rabbitmq.eu-1.local:5552 standby.replication.downstream.endpoints.two = b.rabbitmq.eu-1.local:5552 standby.replication.downstream.endpoints.three = c.rabbitmq.eu-1.local:5552 standby.replication.downstream.username = offsite-replicator standby.replication.downstream.password = s3kRe7To verify the replication status of a running node (to verify the Standby Message Replication plugin is configured successfully), run:
rabbitmqctl standby_replication_status
Configuration Settings
Warm Standby Replication streams can be configured to adjust the retention of the data in the local streams. The following configuration keys can be set in the rabbitmq.conf configuration file to configure various Warm Standby Replication settings:
# Accepted values are upstream and downstream
standby.replication.operating_mode = upstream

# The location of stream data files can be customised
# For example, to use replicated storage
standby.replication.downstream.data_dir = /some/location

# The maximum amount of data to keep inside a stream in bytes
# This limit is applied per vhost. In other words, each stream can use up to
standby.replication.retention.size_limit.messages = 10000000000

# Retention based on time
standby.replication.retention.time_limit.messages = 12h

# TLS options for downstream worker connection to the upstream
# Set these options if upstream is configured to use TLS
# Same options ssl_options documented here: https://rabbitmq.com/ssl.html#enabling-tls
standby.replication.downstream.ssl_options.*
Optional: Configuring Replication over TLS
You can configure the downstream cluster to complete Warm Standby Replication through TLS-secured communication.
To do this, include the configuration parameters in the same format as the ssl_options, which are detailed in Enabling TLS Support in RabbitMQ. On the downstream cluster, set the standby.replication.downstream.ssl_options configuration parameters in the rabbitmq.conf configuration file to the following values:
standby.replication.downstream.ssl_options.cacertfile            = /path/to/ca.crt
standby.replication.downstream.ssl_options.certfile              = /path/to/tls.crt
standby.replication.downstream.ssl_options.keyfile               = /path/to/tls.key
standby.replication.downstream.ssl_options.verify                = verify_none
standby.replication.downstream.ssl_options.fail_if_no_peer_cert  = false
On the upstream cluster, configure the stream protocol port to use TLS by setting the following configuration parameters to these values:
stream.listeners.tcp                                             = none
stream.listeners.ssl.1                                           = 5551
ImportantPeer verification (normally configured by setting
ssl_options.verifytoverify_peer) is not supported for Warm Standby Replication.standby.replication.downstream.ssl_options.verifymust be set toverify_none.
Optional: Using OAuth 2.0 Authentication/Authorization
You can configure the upstream (primary) and downstream (standby) clusters to authenticate using OAuth 2.0 tokens.
Configure OAuth 2.0 in both clusters as it is explained in step 1 in Configuring the Upstream (Primary) Cluster in the Configuring the Standby Message Replication Plugin section.
Configure the standby replication's upstream endpoints in the downstream cluster as follows:
# specify upstream cluster nodes and OAuth settings to be used
# for standby replication
rabbitmqctl set_standby_replication_upstream_endpoints \
    '{"endpoints": ["a.rabbitmq.eu-1.local:5672","b.rabbitmq.eu-1.local:5672","c.rabbitmq.eu-1.local:5672"],
    "oauth2_access_token_request": {
        "client_id": "schema-sync",
        "client_secret": "schema-sync-pwd"
    }
    }'
The previous configuration assumes you have declared an OAuth client in your OAuth provider with username
schema-syncand secretschema-sync-pwd. This OAuth 2 client must have full permission (read, write and configure) on the virtual host that is being used for schema replication.Your standby replication set up is now complete, however, if your environment requires more than one OAuth provider you must complete the following steps.
If you want to define more than once Oauth provider, an example configuration of two Oauth providers is included below. One provider is called
dev, which is used by RabbitMQ to authenticate management users and client applications. The other provider is calledprod, which is only used by the schema synchronization and standby replication plugins.auth_oauth2.oauth_providers.prod.issuer = https://keycloak:8443/realms/prod auth_oauth2.oauth_providers.prod.https.verify = verify_peer auth_oauth2.oauth_providers.prod.https.cacertfile = /mnt/certs/ca_certificate.pem auth_oauth2.oauth_providers.dev.issuer = https://keycloak:8443/realms/dev auth_oauth2.oauth_providers.dev.https.verify = verify_peer auth_oauth2.oauth_providers.dev.https.cacertfile = /mnt/certs/ca_certificate.pem auth_oauth2.default_aouth2_provider = devThe final line in the previous configuration configures
devas the default provider, which means RabbitMQ usesdevwhen it needs to find the current Oauth provider'sissueror any other variable relative to the Oauth provider.The following configuration configures standby-replication with the
prodOAuth provider. If you are using another Oauth provider, then you would use the same configuration again with a different name, for exampledev.# specify upstream cluster nodes and OAuth settings to be used # for schema replication. Because the OAuth provider `prod` is also the default # oauth provider, you can omit it. However, here it is explicitly set. rabbitmqctl set_standby_replication_upstream_endpoints \ '{"endpoints": ["a.rabbitmq.eu-1.local:5672","b.rabbitmq.eu-1.local:5672","c.rabbitmq.eu-1.local:5672"], "oauth2_access_token_request": { "client_id": "schema-sync", "client_secret": "schema-sync-pwd", "oauth2_provider": "prod" } }'The configuration variable
aouth2_providerin theoauth2_access_token_requestattribute specifies which Oauth provider the standby-replication plugin uses to request a token so that it can authenticate with the upstream endpoint.
Verifying the Replication Status on a Node
Upstream
To observe information regarding messages collected for replication in the upstream, run:
rabbitmq-diagnostics inspect_standby_upstream_metrics
# Inspecting standby upstream metrics related to recovery...
# queue   timestamp       vhost
# myqueue 1638363684843   vhost1
In the upstream, you should also observe a stream type connection from the downstream.
Downstream
To observe information regarding messages transferred to the downstream for recovery, run:
rabbitmq-diagnostics inspect_standby_downstream_metrics
# Inspecting standby downstream metrics related to recovery...
# queue   timestamp       vhost
# myqueue 1638363684843   vhost1

rabbitmqctl display_disk_space_used_by_standby_replication_data
# Listing disk space (in gb) used by multi-DC replication
# node    size    unit    vhost
# rabbit@eac27b7ff55c     0.0012  gb      vhost1
Relevant metrics are also exposed via the Prometheus metrics endpoint.
Promoting the Downstream (Standby) Cluster for Disaster Recovery
A downstream (standby) cluster with virtual hosts, users, permissions, topologies, and synchronised schema and messages is only useful if it can be turned into a new upstream (primary) cluster in case of a disaster event. This process is known as “downstream promotion”.
When “downstream promotion” happens, a promoted downstream (standby) cluster is detached from its original upstream (primary) cluster. It then operates as an independent cluster which can (if needed) be used as an upstream (primary) cluster. It does not sync from its original upstream but it can be configured to serve sync operation requests and collect messages for offsite replication to another datacenter.
Downstream Promotion - Continuous Schema Replication Plugin
Downstream promotion includes the following steps on the downstream side:
- Replication is stopped.
- An upstream setup is completed.
- Node mode is switched to upstream.
- Replication is restarted.
The previous steps are completed using CLI tools and do not require a node restart:
# stop replication
rabbitmqctl disable_schema_replication

# this upstream setup has to be performed just once, not for every upstream cluster node
rabbitmqctl add_vhost rabbitmq_schema_definition_sync
# similar to 'rabbitmqctl add_user' but also grants full permissions
# to the virtual host used for definition sync
rabbitmqctl add_schema_replication_user "schema-replicator" "s3kRe7"

# connect to the local (promoted) nodes
rabbitmqctl set_schema_replication_upstream_endpoints '{"endpoints": ["a.rabbitmq.eu-2.local:5672","b.rabbitmq.eu-2.local:5672","c.rabbitmq.eu-2.local:5672"], "username": "schema-replicator", "password": "s3kRe7"}'

# act as an upstream
rabbitmqctl set_schema_replication_mode upstream

# restart replication
rabbitmqctl enable_schema_replication
The promoted cluster can then be used by applications and as an upstream (primary) cluster for other clusters. It no longer has any connection to its original upstream (primary) cluster.
Downtream Promotion - Standby Message Replication Plugin
When a cluster is promoted, the following occurs:
- All upstream links are closed.
- For every virtual host, all messages that were collected (and not consumed) before the disaster event are re-published to their original destination queues. This just applies to messages belonging to classic and quorum queues, streams are already stored in the target stream on the downstream (standby) cluster.
The promotion process takes time. The amount of time it takes will be proportional to the retention period used. This operation is only CPU and disk I/O intensive when queues are used. It is not for streams because streams are just restarted, messages are already stored in the target streams.
Every downstream node will be responsible for recovering the virtual hosts it "owns". This helps distribute the load between cluster members.
To list virtual hosts available for promotion, that is the hosts that have local data to recover, run:
rabbitmqctl list_vhosts_available_for_standby_replication_recovery
ImportantThe easiest way to promote a downstream (standby) cluster is to use the HTTP API. The API does not accept any arguments. It is a HTTP POST request to
http://<i>{node-hostname}</i>:15672/api/tanzu/osr/downstream/promote. Other ways to complete the promotion process include running one of the following commands. If you have existing deployments that use therabbitmqctl promote_standby_replication_downstream_clustercommand, then continue to use this command, and then complete the steps in the following Post Promotion section. Alternatively, if you have new deployments, you can run therabbitmqctl promote_warm_standbycommand, which completes all promotion tasks in one step. You do not need to complete the post promotion steps after running this command apart from the step to erase the replicated data on the old downstream (standby) cluster but completing this step is optional. The--start-from-scratch, --all-available, and --exclude-virtual-hostsarguments are applicable to both commands for quorum and classic queues.
To promote a downstream (standby) cluster, that is, start the disaster recovery process, run the following command:
rabbitmqctl promote_standby_replication_downstream_cluster [--start-from-scratch][--all-available] [--exclude-virtual-hosts \"<vhost1>,<vhost2>,<...>\"]
Alternatively, you can run the this command to complete the promotion:
rabbitmqctl promote_warm_standby
[--start-from-scratch][--all-available] [--exclude-virtual-hosts \"<vhost1>,<vhost2>,<...>\"]
Where:
--start-from-scratchrecovers messages from the earliest available data instead of the last timestamp recovered previously, even if information about the last recovery is available.--all-availableforces the recovery of all messages that are available if neither the last cutoff nor the last recovery information is available.--exclude-virtual-hostsvirtual hosts can be excluded from promotion with this flag.
The --start-from-scratch, --all-available, and --exclude-virtual-hosts arguments do not apply to streams because messages are replicated automatically to the streams on the downstream cluster. So if you are replicating from streams only, you only need to run the rabbitmqctl promote_standby_replication_downstream_cluster command to complete the promotion.
To display promotion summary (in case a promotion was attempted):
rabbitmqctl display_standby_promotion_summary
The recovery process stores a summary on disk indicating what was the last timestamp recovered. This allows for idempotent recovery that avoids recovering the same set of messages twice.
During promotion of the downstream cluster, Tanzu RabbitMQ Standby Replication does not support the recovery of messages that are routed to target queues by the AMQP 0.9.1 BCC header.
After the recovery process completes, the cluster can be used as usual.
Post Promotion
Complete the following steps if you need to after promoting the downstream (standby) cluster to be the upstream (primary) cluster for disaster recovery.
After the downstream (standby) cluster is promoted, if you need to restart the promoted cluster, you must change the
operatingMode: "downstream"tooperatingMode: "upstream"because this modification does not happen automatically when the cluster is restarted. If you don't change it, the promoted downstream (standby) cluster (which is now the upstream (primary) cluster) will run in the downstream mode because it is still a downstream cluster in its definition file .What happens to the original upstream (primary) cluster that experienced a disaster event? It can be brought back as a downstream (standby) cluster for the newly promoted upstream (primary) cluster, refer to Scenario - Original Upstream (Primary) Cluster survives Disaster Event - Convert it to Downstream (Standby) Cluster. It can be promoted back as the upstream (primary) cluster, or it may not be used at all.
After promotion, the replicated data on the old downstream (which is effectively the new promoted upstream) can be erased from disk. To explain this point in more detail, an example is: a cluster in Dublin is the upstream (primary) cluster, a cluster in London is the downstream (standby) cluster. The cluster in London gets promoted to be the upstream (primary) cluster. After promotion, you can now remove previous downstream-related data from the cluster in London (as it is now promoted and running as the upstream (primary) cluster) by running the following command:
rabbitmqctl delete_all_data_on_standby_replication_cluster
Scenario - Original Upstream (Primary) Cluster survives Disaster Event - Convert it to Downstream (Standby) Cluster
ImportantThe steps for this scenario are based on the assumption that the former upstream (primary) cluster survived the disaster event and is now available for use. The following steps detail how to convert this original upstream (primary) cluster to a downstream (standby) cluster.
- Complete the steps in Configuring the downstream (Standby) Cluster for the Continuous Schema Replication Plugin.
- Complete the steps in Configuring the downstream (Standby) Cluster for the Standby Message Replication Plugin.
- Recreate the OSR policy on the new upstream (primary) cluster.
Running Diagnostics
ImportantRunning diagnostics is a very time consuming operation as it reads and parses all data on disk, it should be used with care. This operation can take a substantial time to run even for medium data sizes.
If you published messages to classic queues or quorum in the vhosts that are tagged with "standby_replication", you can list the number of messages replicated for each virtual host, exchange, and routing key. You can do this in two ways either by logging into the RabbitMQ Management UI (go to Admin and open the replication and promotion tabs) or running the following command. This operation (using either way) returns the number of replicated messages that can be published to a specific exchange with a specific routing key. If the exchange is empty or missing, it means that the message was published to the default exchange. It is important to note that the routing key might not be the same as the name of the queue. If does not return messages per queue. The routing of messages to their destination queue and the consumption of these messages does happen until promotion is initiated which must be taken into consideration when you are interpreting these numbers. If you set up replication a short time ago, the number of available messages should be small so this operation (using either way) should run quickly. If the amount of available data is substantial, this operation can take longer.
Method 1
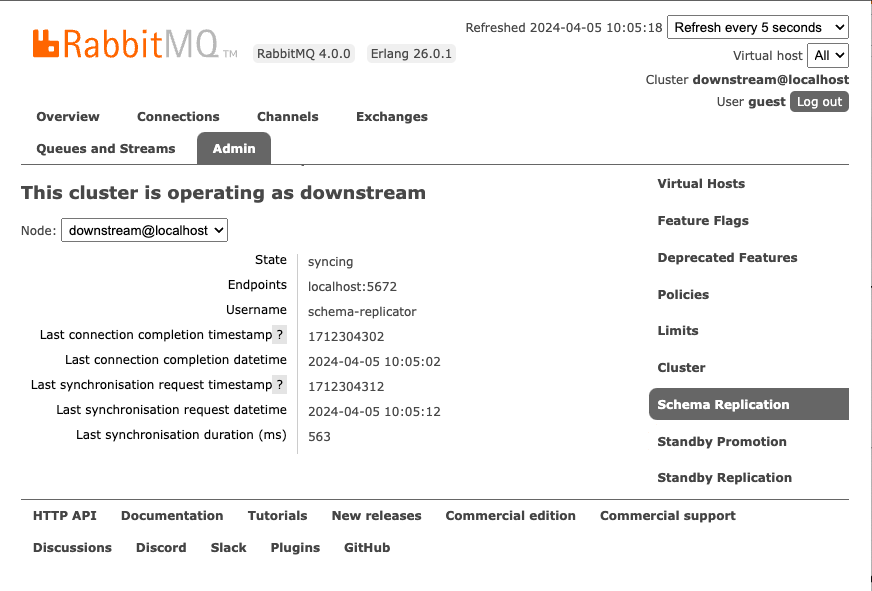
Access the RabbitMQ Management UI to visualise the replication information. A link to the RabbitMQ management interface can be found on the details page for your hosted RabbitMQ solution. If you have RabbitMQ installed on localhost, go to http://localhost:15672/ to find the management page.
Select the Admin tab, you can then access the Schema Replication, Standby Replication, and Standby Promotion tabs in the Admin section. The following figure displays the Schema Replication tab.
Method 2
Run the following command:
rabbitmq-diagnostics inspect_local_data_available_for_standby_replication_recovery
# Inspecting local data replicated for multi-DC recovery
# exchange	messages	routing_key	vhost
# myexchange	2	demo	/
# 	2	ha.qq	/
When using streams, you can inspect the number of messages replicated for each virtual host and stream. Again, you can do this in two ways, either by logging into the RabbitMQ Management UI and following the instructions in the previous Method 1 or running the following command:
rabbitmq-diagnostics inspect_local_stream_data_available_for_standby_replication_recovery
Other Useful Replication Commands
To start, stop, or restart replication in both the Schema Replication (SchemaReplication) and Standby Replication (StandbyReplication) plugins at the same time, run the following commands as required:
rabbitmqctl enable_warm_standby
rabbitmqctl disable_warm_standby
rabbitmqctl restart_warm_standby
If the cluster size changes, the virtual hosts "owned" by every node might change. To delete the data for the virtual hosts that nodes no longer own, run the following command:
rabbitmqctl delete_orphaned_data_on_standby_replication_downstream_clusterTo delete the internal streams on the upstream (primary) cluster, run the following command:
rabbitmqctl delete_internal_streams_on_standby_replication_upstream_clusterTo inspect the size of the data replicated, run the following command:
rabbitmqctl display_disk_space_used_by_standby_replication_dataTo disconnect the downstream to stop message replication, run the following command:
rabbitmqctl disconnect_standby_replication_downstreamTo (re)connect the downstream, to start/resume message replication, run:
rabbitmqctl connect_standby_replication_downstreamAfter promotion, replicated data on the old downstream (standby) cluster (which is now effectively the newly promoted upstream (primary) cluster) can be erased from disk with:
rabbitmqctl delete_all_data_on_standby_replication_clusterIf the previous command is run on an active downstream (standby) cluster, it deletes all transferred data until the time of deletion, it might also stop the replication process. To ensure it continues, the downstream must be disconnected and connected again using the commands listed above.
Troubleshooting Warm Standby Replication
Learn how to isolate and resolve problems with Warm Standby Replication using the following information.
Messages are collected in the Upstream (Primary) Cluster but are not delivered to the Downstream (Standby) Cluster
Messages and message acknowledgements are continually stored in the upstream (primary) cluster. The downstream (standby) cluster connects to the upstream (primary) cluster. The downstream (standby) cluster reads from the internal stream on the upstream (primary) cluster where the messages are stored, and then stores these messages in an internal stream in the downstream (standby) cluster. Messages transferred to the downstream (standby) cluster for streams are visible in RabbitMQ Management UI automatically (before promotion). You can also see them by running the rabbitmqctl list_queues command.
To inspect the information about the stored messages in the downstream (standby) cluster, run the following command:
rabbitmq-diagnostics inspect_standby_downstream_metrics
# Inspecting standby downstream metrics related to recovery...
# queue	timestamp	vhost
# ha.qq	1668785252768	/
If the previous command returns the name of a queue called example, it means that the downstream (standby) cluster has messages for queue example ready to be re-published, in the event of Promoting the Downstream (Standby) Cluster for Disaster Recovery.
If the queue you are searching for is not displayed in the list, verify the following items in the upstream (primary) cluster:
Does the effective policy for the queue have the definition
remote-dc-replicate: true?Is the queue type
QuorumorClassic?Can the replicator user for Warm Standby Replication authenticate? Run the following command to verify:
rabbitmqctl authenticate_user some-user some-password
If previous checks are correct, next, check the downstream (standby) cluster RabbitMQ logs for any related errors.
Verify that the Downstream (Standby) Cluster has received the Replicated Messages before Promotion
ImportantAccessing the replication information can be resource intensive. The following operations can take a long time to complete when the amount of data to be recovered is substantial.
Before running the promotion command (for more information, refer to Promoting the Downstream (Standby) Cluster for Disaster Recovery), it is possible to verify which classic and quorum queues have messages and acknowledgements recovered. The exact number of messages that are collected can also be verified.
To verify which classic and quorum queues have messages available for recovery, run the following command in the downstream (standby) cluster:
rabbitmq-diagnostics inspect_standby_downstream_metrics
# Inspecting standby downstream metrics related to recovery...
# queue	timestamp	vhost
# ha.qq	1668785252768	/
For quorum and classic queues, you can inspect the number of messages, their routing key, and the vhost from the RabbitMQ Management UI. Refer to Method 1 in the Running Diagnostics section for details.
Alternatively, you can access the same information by running the following command in the downstream (standby) cluster:
rabbitmq-diagnostics inspect_local_data_available_for_standby_replication_recovery
# Inspecting local data replicated for multi-DC recovery
# exchange	messages	routing_key	vhost
# myexchange	2	demo	/
# 	2	ha.qq	/
The previous command reports how many messages can be published to a specific exchange, with a specific routing key. If the exchange is empty or missing, it means that the message was published to the default exchange. It is important to note that the routing key might not be the same as the name of the queue.
The same applies to streams, you can inspect the number of messages, the stream, and the vhost from the RabbitMQ Management UI. Refer to Method 1 in the Running Diagnostics section for details. Alternatively, you can run the following command in the downstream (standby) cluster:
rabbitmq-diagnostics inspect_local_stream_data_available_for_standby_replication_recovery
# Inspecting local stream data replicated for multi-DC recovery
# messages	name    	vhost
#        7	stream.1	/
How to get a License
For more information or to get a quote, visit the Tanzu RabbitMQ product page.
