This topic tells you how to install VMware Tanzu Service Broker for AWS by configuring your AWS account and importing the product file into Tanzu Operations Manager.
Installation prerequisites
- VMware Tanzu Application Service for VMs (TAS for VMs) v2.3 to v2.9
- An Amazon Web Services (AWS) account
- VMware Tanzu SQL with MySQL for VMs, or an existing MySQL or PostgreSQL database
Tanzu Operations Manager products and tiles released after July 2018 require Ubuntu Xenial stemcells instead of Ubuntu Trusty stemcells.
Step 1: Setting up AWS
In this step, you configure your AWS account to allow the Service Broker for AWS to create and manage AWS resources.
Create a new IAM user for the TAS for VMs cluster in the AWS Identity & Access Management console by following the procedure below.
Note If you have more than one TAS for VMs deployment, you must create an IAM user for each deployment. Create a new IAM user in your AWS account. Do not use the same IAM user that installed TAS for VMs on AWS becuase it has different policy restrictions.
-
Select Policies and click Create Policy.
-
Click the JSON tab.
-
Copy the following text into the field:
{ "Version": "2012-10-17", "Statement": [ { "Action": [ "s3:CreateBucket", "s3:DeleteBucket", "s3:PutBucketAcl", "s3:PutBucketLogging", "s3:PutBucketPolicy", "s3:PutBucketTagging", "s3:GetObject", "s3:ListBucket", "iam:CreateAccessKey", "iam:CreateUser", "iam:GetUser", "iam:DeleteAccessKey", "iam:DeleteUser", "iam:DeleteUserPolicy", "iam:ListAccessKeys", "iam:ListAttachedUserPolicies", "iam:ListUserPolicies", "iam:ListPolicies", "iam:PutUserPolicy", "iam:GetPolicy", "iam:GetAccountAuthorizationDetails", "rds:AddTagsToResource", "rds:CreateDBCluster", "rds:CreateDBInstance", "rds:DeleteDBCluster", "rds:DeleteDBInstance", "rds:DescribeDBClusters", "rds:DescribeDBInstances", "rds:DescribeDBSnapshots", "rds:DeleteDBSnapshot", "rds:CreateDBParameterGroup", "rds:ModifyDBParameterGroup", "rds:DeleteDBParameterGroup", "dynamodb:ListTables", "dynamodb:DeleteTable", "dynamodb:DescribeTable", "sqs:CreateQueue", "sqs:DeleteQueue" ], "Effect": "Allow", "Resource": "*" } ] } -
Click Review Policy to check for errors.
-
Enter
PCFInstallationPolicyfor Policy Name andInstallation Policy for PCFfor Description. -
Click Create Policy. This creates an AWS policy that you must apply to every IAM user you create for the Service Broker for AWS.
-
For each IAM user, do the following:
- Click the username.
- Click Add permissions.
- Click Attach existing policies directly and select PCFInstallationPolicy.
-
Record the AWS Access Key ID and Secret Access Key for each of your PCF IAM accounts for later use.
The Service Broker for AWS also allows a custom name for the PCFInstallationPolicy.
• To use the default name: Follow the previous steps for configuring the PCFInstallationPolicy policy.
• To use a custom name: In the previous steps, use a custom name instead of PCFInstallationPolicy. You need to enter this custom name later during Broker Config, RDS Config, S3 Config, and SQS Config.
Service Key policies
The Service Broker for AWS allows app developers to create service keys for their service instances. Creating a service key creates an IAM user with a templated policy, and provides the app developer with Access Key credentials to the actions listed in the policies below.
The service key Policy names are configurable. You can choose your own policy name and configure that name in each service by updating the Service Key Policy Name field. The default names are used below.
To create the policy templates for each service that you enable, log in to the AWS console and do the following:
-
Select Policies and click Create Policy.
-
Click the JSON tab.
-
Copy the following text into the field or create your own policy template:
{ "Version": "2012-10-17", "Statement": [ { "Sid": "allowtagging", "Effect": "Allow", "Action": [ "s3:GetBucketTagging", "s3:PutBucketTagging" ], "Resource": [ "arn:aws:broker:resource::*" ] } ] } -
Click Review Policy to check for errors.
-
Enter
PCFAppDeveloperPolicy-s3for Policy Name andService Broker for AWS Service Key policy for S3for Description. -
Click Create Policy. This creates an AWS policy that you must apply to every IAM user you create for the Service Broker for AWS.
-
Repeat steps 1 through 6 for
PCFAppDeveloperPolicy-sqs,PCFAppDeveloperPolicy-dynamodb, andPCFAppDeveloperPolicy-rds, using or modifying the examples below.Example:
PCFAppDeveloperPolicy-sqs{ "Version": "2012-10-17", "Statement": [ { "Sid": "Stmt1471890189000", "Effect": "Allow", "Action": [ "sqs:ListQueues", "sqs:PurgeQueue", "sqs:ReceiveMessage", "sqs:SendMessage" ], "Resource": [ "arn:aws:broker:resource::*" ] } ] }Example:
PCFAppDeveloperPolicy-dynamodb{ "Version": "2012-10-17", "Statement": [ { "Sid": "Stmt1471873911000", "Effect": "Allow", "Action": [ "dynamodb:*" ], "Resource": [ "arn:aws:broker:resource::*" ] } ] }Example:
PCFAppDeveloperPolicy-rds{ "Version": "2012-10-17", "Statement": [ { "Sid": "Stmt1471636048000", "Effect": "Allow", "Action": [ "rds:ListTagsForResource", "rds:DescribeDbInstances" ], "Resource": [ "arn:aws:broker:resource::*" ] } ] }
Step 2: Create Service Broker Database
To store its configuration information, the Service Broker for AWS requires access to a MySQL or PostgreSQL database that is highly available and regularly backed up. Loss of this data severely impacts the ability of the service broker to manage the configured service instances. However, the AWS resources are not be affected.
The database can be VMware Tanzu SQL with MySQL for VMs or an external MySQL or PostgreSQL database, including an AWS RDS database.
If you choose to use a VMware Tanzu SQL with MySQL for VMs database, the service broker automatically provisions the database.
If you choose to use an RDS MySQL or RDS PostgreSQL database, do the following:
-
In the AWS RDS console, create the appropriate database:
- Choose the smallest database instance class,
db.t2.micro. - Select
yesfor Multi-AZ Deployment. - Choose
Provisioned IOPS (SSD)for Storage Type. For a non-production database, you can chooseGeneral Purpose (SSD). - Enter the minimum accepted value ‘5’ to ‘100’ GB of Allocated Storage.
- Leave Provisioned IOPS at the default value.
- Enter
pcf-aws-servicesfor the DB Instance Identifier. - Enter suitable values for the Master username and Master password.
- Choose the smallest database instance class,
-
Record the Database IP, Database Port, Admin User, Admin Password, and Database Name. The Service Broker for AWS stores configuration information in this database.
-
Ensure that the Service Broker for AWS is able to connect to your database. If necessary for your deployment, modify your AWS VPC settings to allow access to the RDS database from an external IP address. For more information, see Accessing a DB Instance in a VPC in the AWS documentation.`
Step 3: Application Security Groups
To allow this service to have network access, you must create Application Security Groups (ASGs).
Without Application Security Groups, the service cannot be used.
Service Container network connections
This service is deployed as an application to the iaas-brokers space in the system org, and requires the following outbound network connections:
| Destination | Ports | Protocol | Reason |
|---|---|---|---|
AWS_IP_RANGE |
443, 5432, 1521, 1433, 3306 | tcp | This service accesses RDS/S3 |
Note The AWS IP range is available from Amazon. You might choose to use curl and jq to convert the IP range as downloaded from Amazon into ASG rules:
    curl -s https://ip-ranges.amazonaws.com/ip-ranges.json | \
    jq '[
      {
        ports: "443, 5432, 1521, 1433, 3306",
        protocol: "tcp",
        destination: .prefixes | map(select(.service == "AMAZON")) | .[] | .ip_prefix
      }
    ] | .' > aws-service-broker.json
Note This creates a configuration which allows traffic for all AWS Regions. You can further filter the list of entries in the Application Security Group config to a specific set of AWS Regions by adding additional jq map(select(.region == "REGION_NAME")) statements for each region.
Log in as an admin and create an ASG called aws-service-broker, binding it to the iaas-brokers space in the system org:
$ cf create-security-group aws-service-broker aws-service-broker.json
$ cf bind-security-group aws-service-broker system iaas-brokers
Application Container Network Connections
Application containers that use instances of this service require the following outbound network connections:
| Destination | Ports | Protocol | Reason |
|---|---|---|---|
AWS_IP_RANGE |
443, 5432, 1521, 1433, 3306 | tcp | Application containers can access S3/RDS |
Create an ASG called aws-service-broker-app-containers with the above configuration and bind it to the appropriate space or, to give all started apps access, the default-running ASG set. For example:
[
  {
      "ports": "443, 5432, 1521, 1433, 3306",
      "protocol": "all",
      "destination": "192.0.2.0/14"
  },
  {
      "ports": "443, 5432, 1521, 1433, 3306",
      "protocol": "all",
      "destination": "198.51.100.0/22"
  },
  ...rest of AWS IPs elided...
]
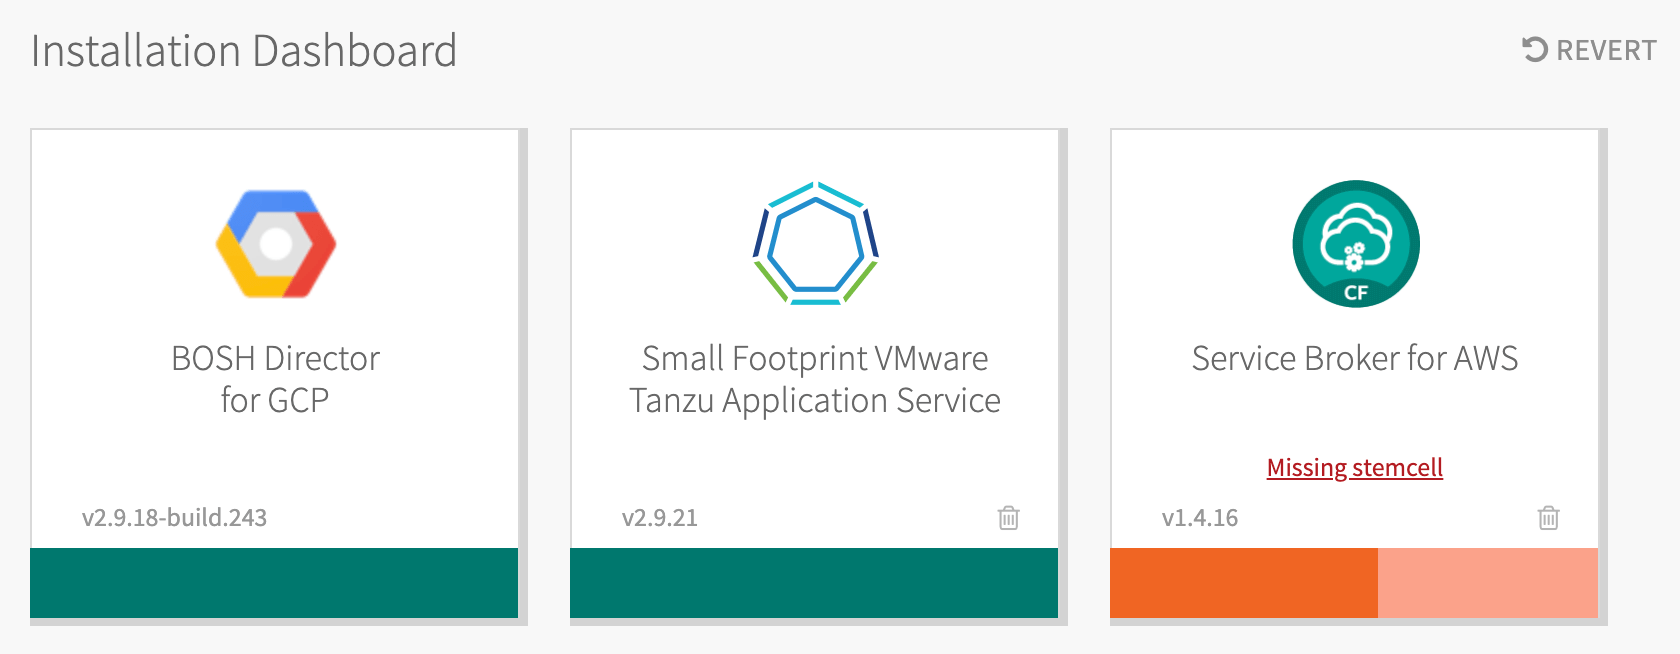
Step 4: Install in Tanzu Operations Manager
To install the Service Broker for AWS tile in Tanzu Operations Manager, do the following:
-
Download the Service Broker for AWS product file from Broadcom Support.
-
From the Tanzu Operations Manager Installation Dashboard, click Import a Product to upload the product file.
-
Click Add next to the uploaded product description in the Available Products view to add this product to your staging area.
-
Click on the newly added tile to configure the sections as described below.
AWS Config
The setup in Step 1 must be successfully completed before beginning this configuration. You need the AWS and database parameters from that step to successfully configure the broker.
-
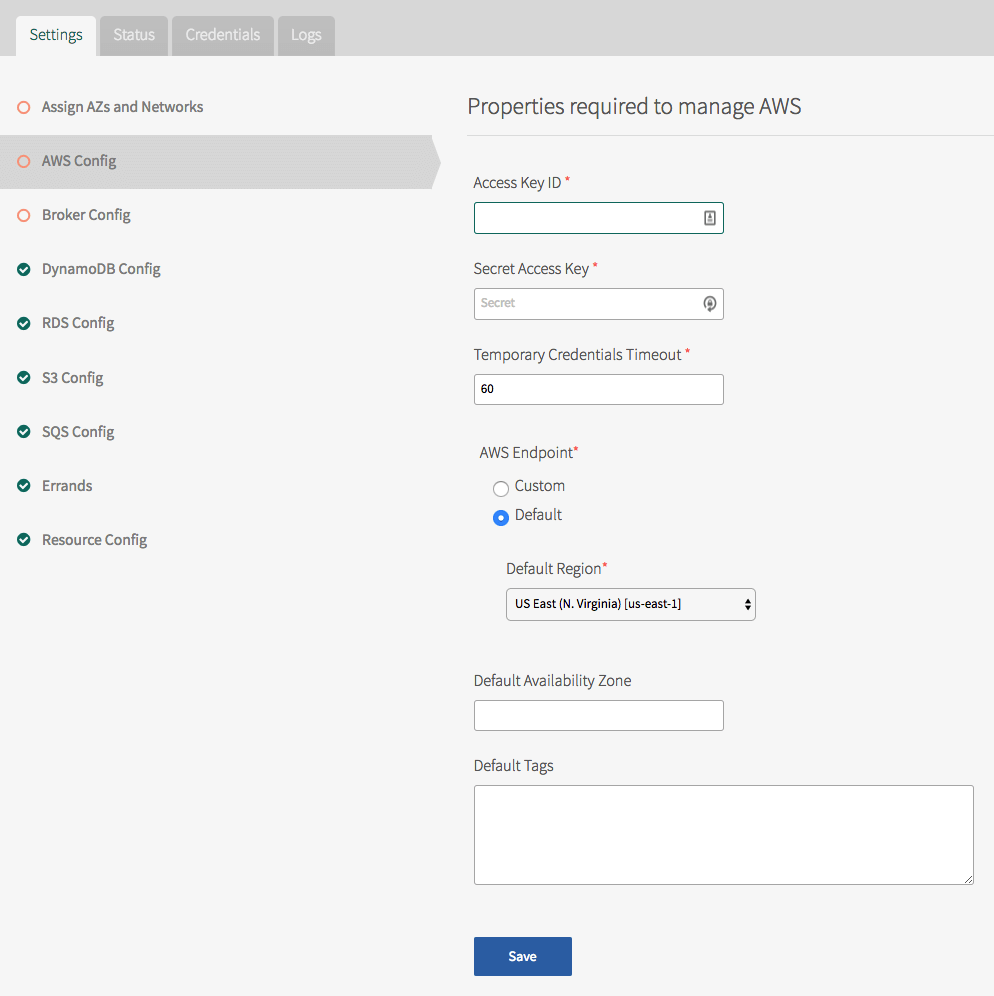
Click AWS Config.
-
Enter the AWS Access Key ID and the Secret Access Key from Step 1.
-
Enter the Temporary Credentials Timeout value in minutes. This is the time after which service key credentials expire. To deactivate expiry of the credentials, enter
0. -
Modify the AWS Endpoint only if you are using Amazon’s Commercial Cloud Service. Otherwise, leave it set to the default.
-
For Default Region, enter the AWS region to use as the default. You can change this later for a particular service.
-
For Default Availability Zone, enter the AWS Availability Zone to use as the default. This default Availability Zone is only used where Multi-AZ is not selected.
-
The broker automatically creates AWS tags for the service plan GUID and the org-space GUID. You can also configure default tags to add for each AWS resource by entering them in the Default Tags field, separated by a space. For example,
owner=operations env=production app=payroll. -
Click Save.
Broker Config
-
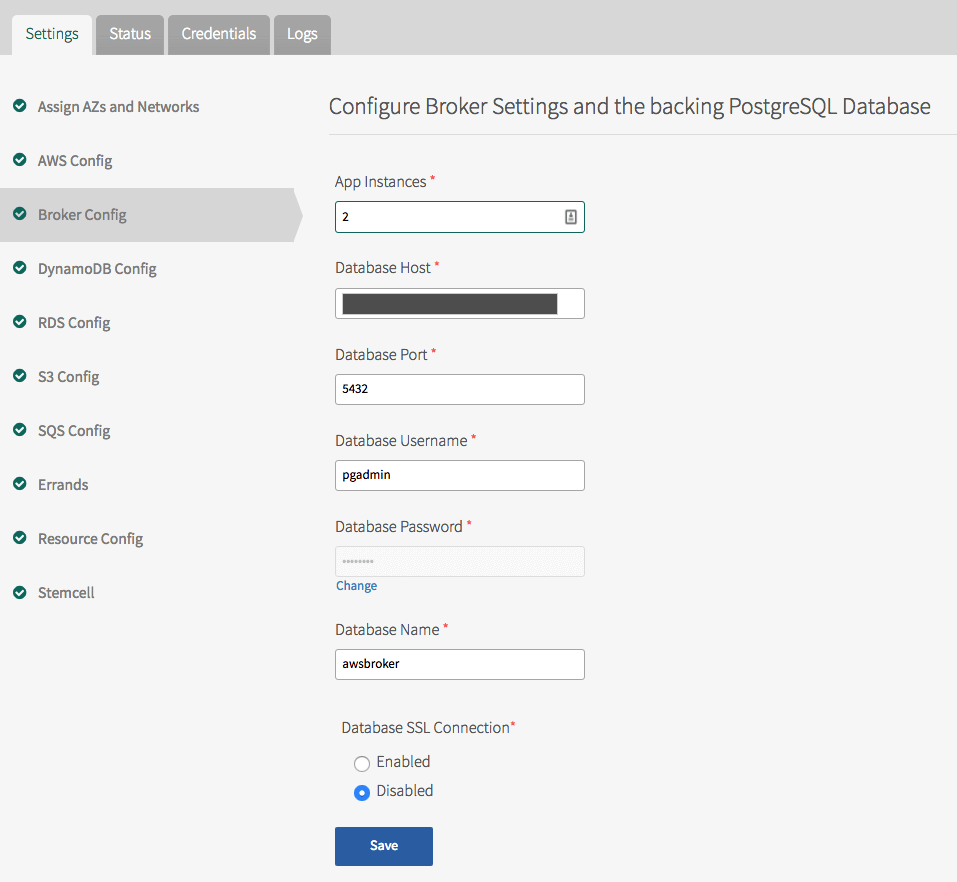
Click Broker Config.
-
For App Instances, enter the number of instances of the service broker you want to run. The default is
2. -
Do not change the Broker IAM Policy Name unless you configured a custom policy name earlier.
-
For Backing Database, select the database type for the Service Broker Configuration.
-
If you select Pivotal MySQL (v2), enter the Plan Name to be used (e.g.
db-small) and a unique database name. The database is created during deployment if it does not already exist. -
If you chose External MySQL or External Postgres:
- For Database Host enter the IP address of the database where the Service Broker for AWS stores configuration information. You can use the database you created in the AWS RDS console in Step 1, or choose to use an existing database.
- For Database Port, enter the port number of your database. The default for PostgreSQL is
5432, and the default for MySQL is3306. - For Database Username and Database Password, enter your database credentials.
- For Database Name, enter the name of the database.
-
Under Database SSL Connection, select Enabled if you want to encrypt traffic to your database and add your custom root certificate in the Root Certificate field. Otherwise, select Disabled.
-
Click Save.
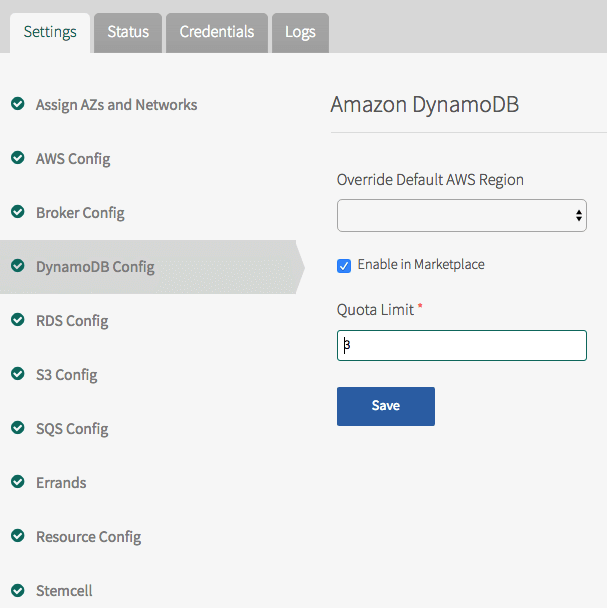
In the following sections that configure AWS Services, if you do not want to offer that specific service in your TAS for VMs Marketplace, clear the Enable in Marketplace checkbox.
DynamoDB Config
-
Click DynamoDB Config.
-
Under Override Default AWS Region, select the default AWS region.
RDS Config
-
Click RDS Config.
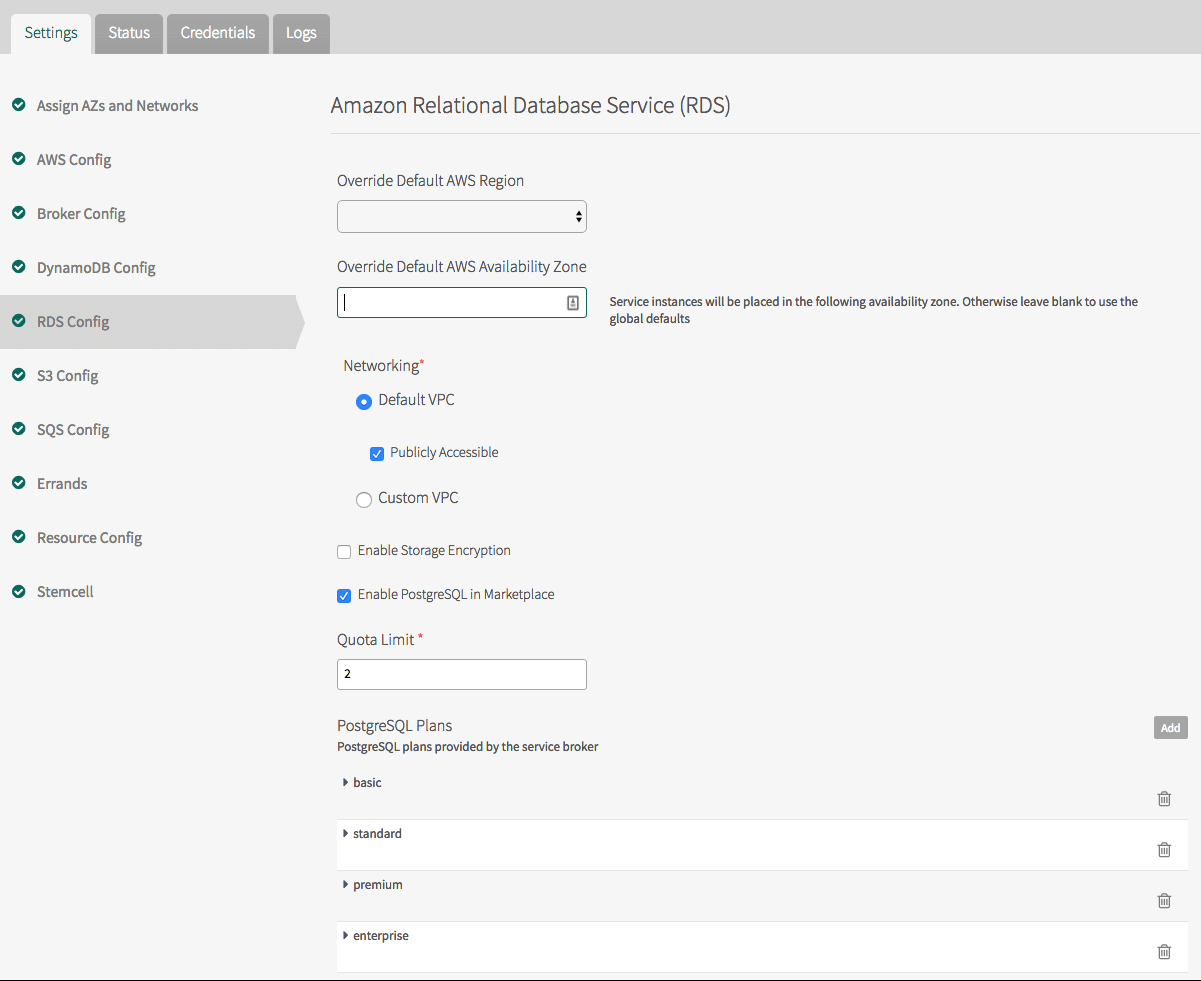
-
Under Override Default AWS Region, select the default AWS region.
-
Under Override Default AWS Availability Zone, select the default Availability Zone for RDS database instances.
-
The RDS Instance Prefix is set to
cfby default. This is the prefix for creating RDS database instances. -
The Service Key Policy Name has a default setting. Do not change this unless you created a custom policy earlier in Set Up AWS.
-
The Networking section allows you to configure whether to use the Default VPC or a Custom VPC, and whether the instance is publicly accessible. For a Custom VPC, enter the DB Subnet Group Name and the VPC Security Group(s).
-
The Enable Storage Encryption setting is deactivated by default. You can enable RDS encryption for a database instance. However, not all regions and database instance classes support encryption. If you enable this setting, you must change the default plans to remove those that do not support encryption. For more information, see http://docs.aws.amazon.com/AmazonRDS/latest/UserGuide/Overview.Encryption.html#d0e21710.
-
Select the check boxes of the RDS Services you want to show in the Marketplace.
-
Under Plans, for each RDS Database, the Service Broker for AWS includes several default plans for use.
- basic: For small projects and during development.
- standard: For a small production database (multi-AZ, 2vCPU, 7.5 GB).
- premium: For a mid-sized database (multi-AZ, 4 vCPU, 15 GB).
- enterprise: For a large database (multi-AZ, 8 vCPU, 32 GB).
-
You can view and edit the configuration of existing plans by clicking the arrow next to their names.

Note If you edit an existing service plan, only future instances of that services plan are changed. Ask your admin to modify existing instances.
-
You can also create a new custom plan by clicking Add and completing the following fields:
- Plan Name: The name of the plan in the Marketplace.
- Plan Description: The description of the plan in the Marketplace.
- Plan Features: The list of features displayed in Apps Manager.
- Engine: You usually do not have to edit this field. The field defaults to the RDS database you are configuring. However, for Aurora MySQL v5.7 and later, you must change this field to
aurora-mysql. - Engine Version: The version that your database uses.
- DB Instance Class: The hardware that runs the database.
- Allocated Storage (GB): The amount of storage allocated to the database.
- Storage Type: This can be Magnetic, SSD, or Provisioned IOPS (
io1). - IOPS: The IOPS rate for the database instance. Only required if your Storage Type is
io1. - Backup Retention Period: How long to retain backups (typically 7 days).
- Preferred Backup Window: When to back up. Must be at least a 30-minute window (e.g. 13:00-14:00).
- Copy Tags to Snapshot: Whether to tag the database snapshots.
- Multi AZ: Whether to automatically run in multiple Availability Zones.
- The Enable Storage Encryption setting is deactivated by default. If you have not enabled it globally, you can configure it per service plan.
- For flexibility, the User Privileges allows configuration of database user privileges by service plan. Use this to secure the privileges you want for your developers or apps.
- Require SSL for communication: Select this checkbox to reject connections without TLS.
- Additional custom query params on binding URI: A comma separated list of additional key-value pairs that are added to binding credentials. This feature is useful to provide hints to application database connector libraries, such as
enabledTLSProtocols=TLSv1.2. - DB Parameter Group Name allows you to associate an existing DB Parameter Group Name with this service plan. Use the AWS Console to create the DB Parameter Group.

-
Click Save.
S3 Config
-
Click S3 Config.

-
Under Override Default AWS Region, select the default AWS region for this service.
-
Select Enable in Marketplace to enable the service in the Marketplace.
-
The Service Key Policy Name has a default setting. Do not change this unless you created a custom policy earlier in Set Up AWS.
-
The Quota Limit limits the total number of instances. Setting it to
0deactivates it. -
Enter the Bucket Prefix, a short name to prefix all bucket names.
-
S3 has one default plan called
standard, but in Service Broker for AWS v1.4 and later, you can add more. A service plan can require an S3 bucket to be encrypted by creating an AWS KMS Key (see AWS SSE-KMS) and entering the KMS key ARN in the service plan configuration.
-
Click Save to store the changed settings.
SQS Config
-
Click SQS Config.
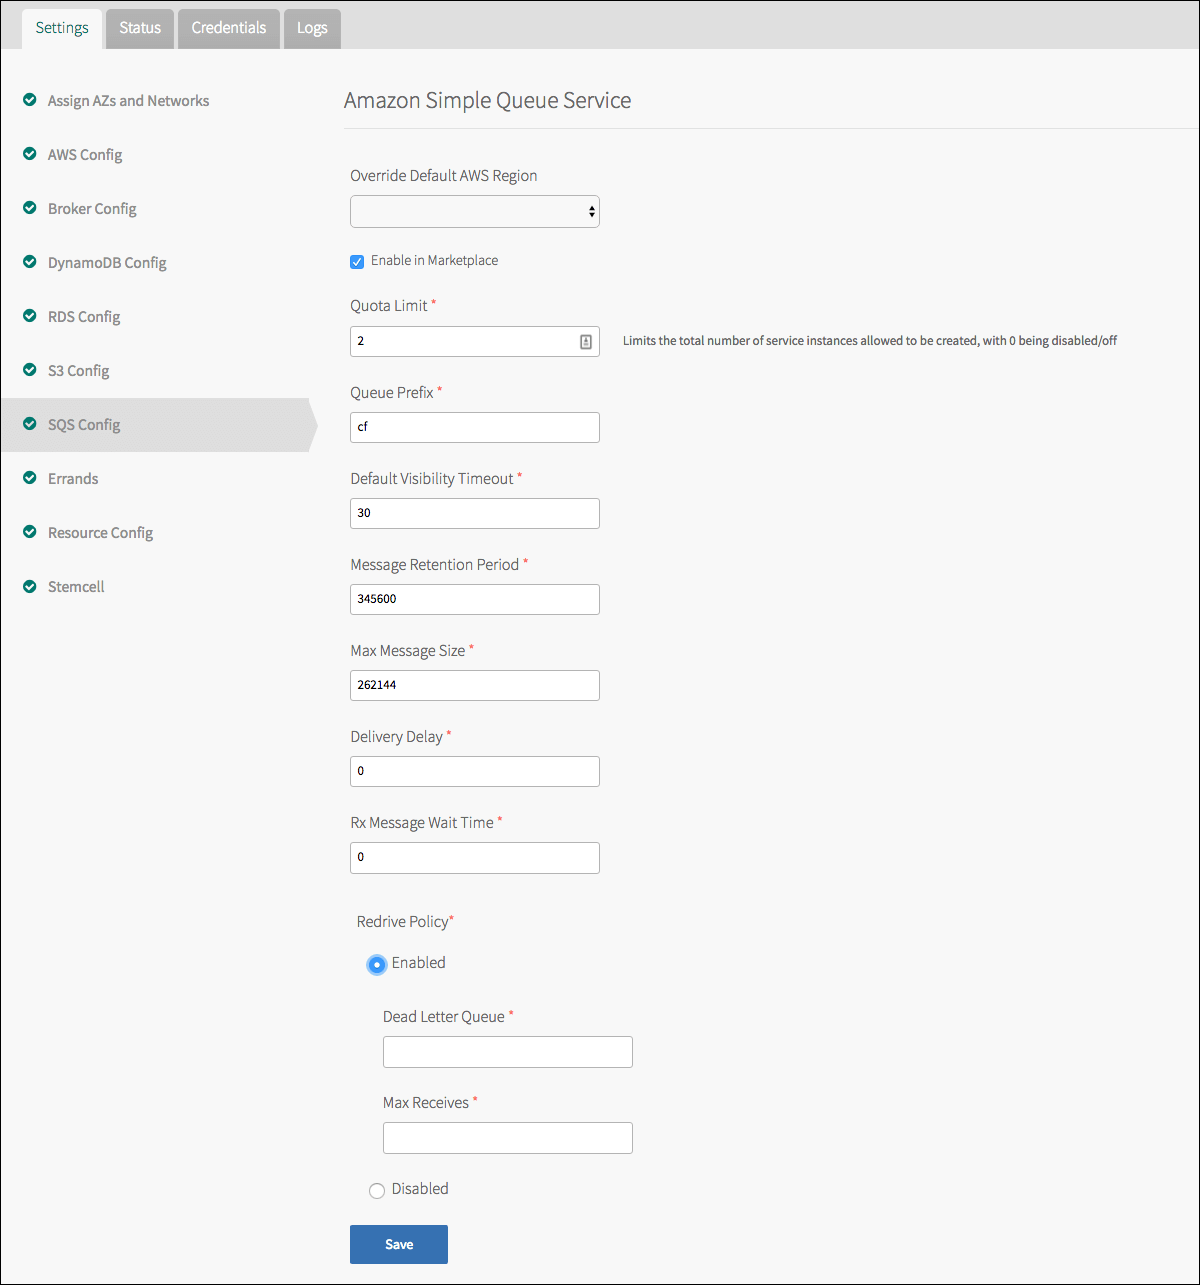
-
Under Override Default AWS Region, select the default AWS region for this service.
-
Select Enable in Marketplace to enable the service in the Marketplace.
-
The Service Key Policy Name has a default setting. Do not change this unless you created a custom policy earlier in Set Up AWS.
-
The Quota Limit limits the total number of instances. Setting it to
0deactivates it. -
For Queue Prefix, enter the queue name prefix that is used for filtering list results.
-
For Default Visibility Timeout, enter the length of time during which the queue is unavailable once a message is delivered from the queue.
-
For Message Retention Period, enter the number of seconds Amazon SQS retains a message.
-
For Max Message Size, enter the limit of how many bytes a message can contain before Amazon SQS rejects it.
-
For Delivery Delay, enter the time in seconds that the delivery of all messages in the queue are delayed.
-
For Rx Message Wait Time, enter the duration, in seconds, that the receiver action waits until a message is in the queue.
-
The Redrive Policy specifies an existing dead letter queue to receive messages after the source queue fails to process a message a specified number of times. If enabled, this policy includes the following properties:
- Dead Letter Queue: The Amazon Resource Name (ARN) of the dead letter queue.
- Max Receives: The maximum number of times a message is delivered to the source queue before being sent to the dead letter queue.
-
Click Installation Dashboard to return to the Tanzu Operations Manager Installation Dashboard.
-
If you are using Tanzu Operations Manager v2.3 or later, click Review Pending Changes. For more information about this Tanzu Operations Manager page, see [Reviewing pending product changes]https://docs.vmware.com/en/VMware-Tanzu-Operations-Manager/3.0/vmware-tanzu-ops-manager/install-review-pending-changes.html).
-
Click Apply Changes to install the product.
For more information about AWS SQS queue properties, see AWS::SQS::Queue in the AWS documentation. For more information about SQS Redrive Policy, see Using Amazon SQS Dead Letter Queues in the AWS documentation.
Step 5: Confirm installation
The Service Broker for AWS installs an app named aws-services-broker in the iaas-brokers space of the system org. Like other Cloud Foundry apps, you can view the application logs through the cf CLI by connecting to that org and space with the correct permissions.
-
After Tanzu Operations Manager finishes the installation, the Service Broker for AWS appears as a green tile in the Installation Dashboard.
-
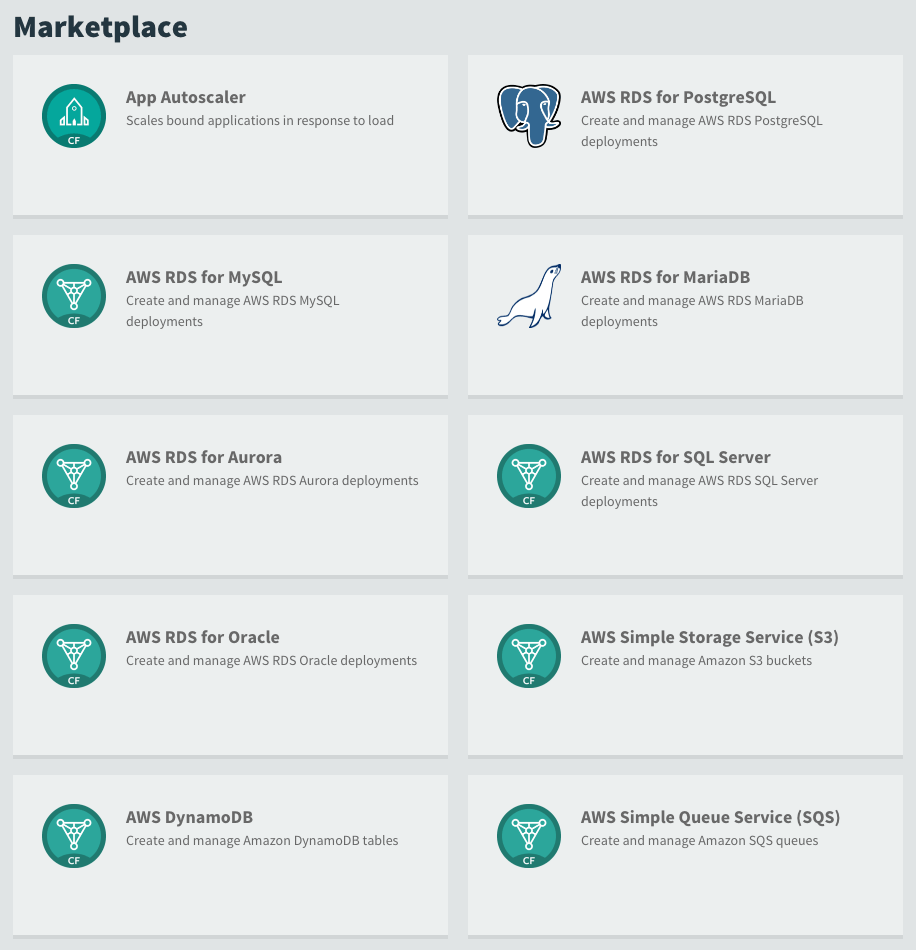
In Apps Manager, all orgs and spaces show the new services in the Marketplace. You can create instances of these services through Apps Manager or through the cf CLI. For more information, see Creating and Managing Service Instances.