


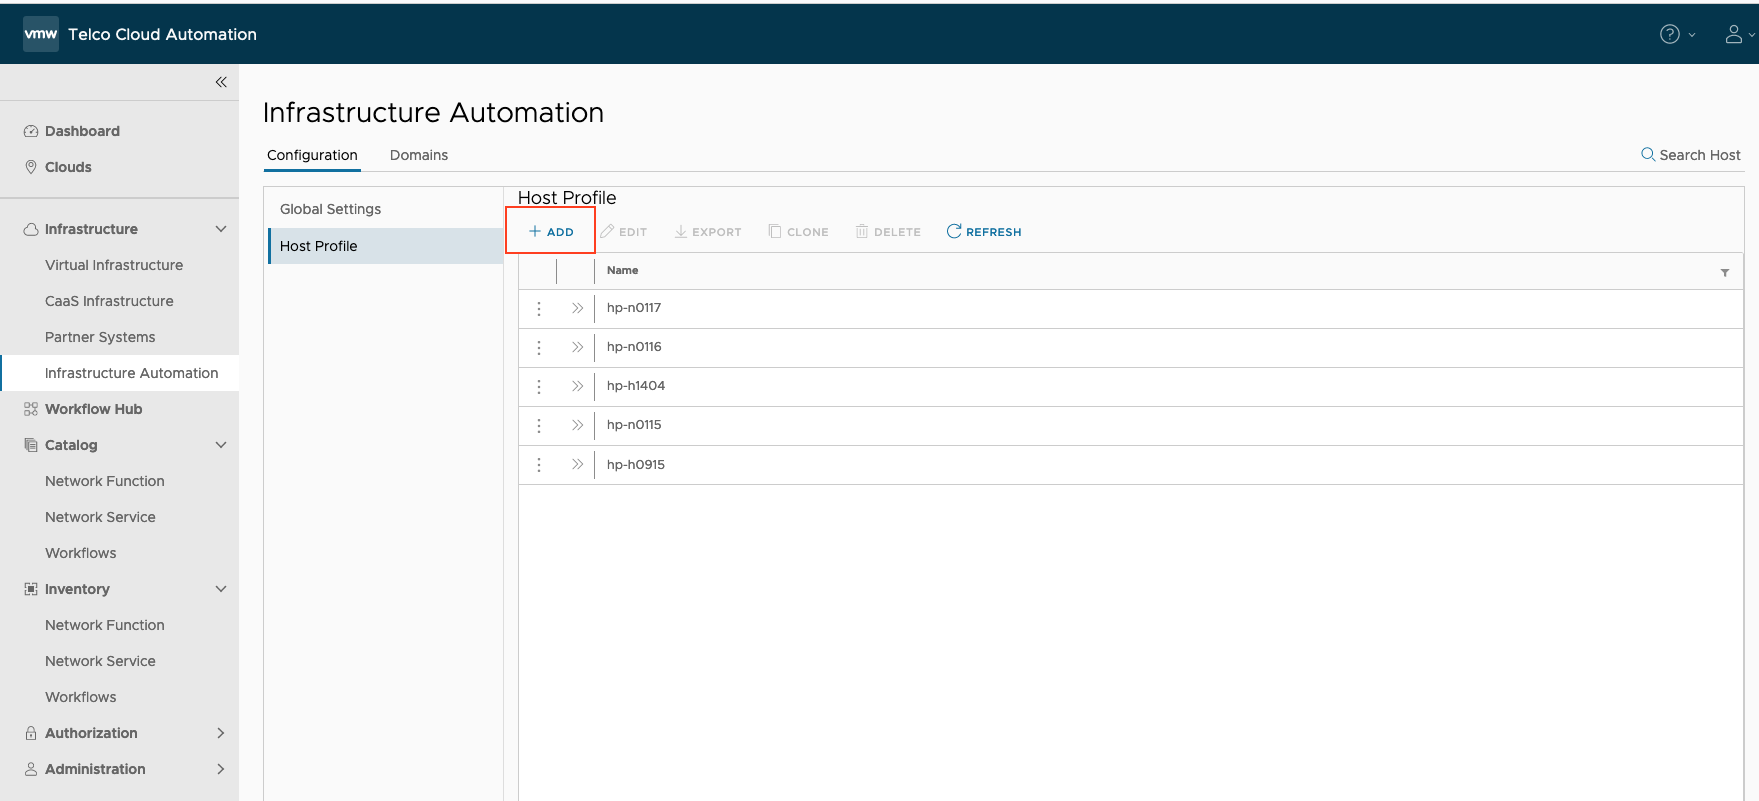
Create a host profile with PCI devices enabled in SR-IOV and CUSTOM modes and PCI device group added for each vmnic you want to use for PTP. After creating the host profile, apply it to a cell site group.
Use the following sections of the Host profile for PTP configuration:
PCI Device Settings: Helps configure PCI devices in Passthrough, SRIOV, or Custom mode. For example, if the host has a 4-port E810 card, you can use PCI Device settings to configure PF0 in Passthrough Active mode and PF[1-3] in SRIOV mode.
PCI Device Groups: Helps define filters for selecting a specific PF for PTP. For example, if PF0 and PF1 are in Passthrough Active mode and the PTP switch is connected to PF0, use filters in PCI Device Group to select PF0 for PTP.
Sample codes used in this topic are for reference purposes only. We recommend that you modify the values according to your deployment environment.
Procedure
- Add a host profile:
- Click ADD.
- Enter a Profile Name. Example: llsc1-ptp-accelerator-hostprofile.
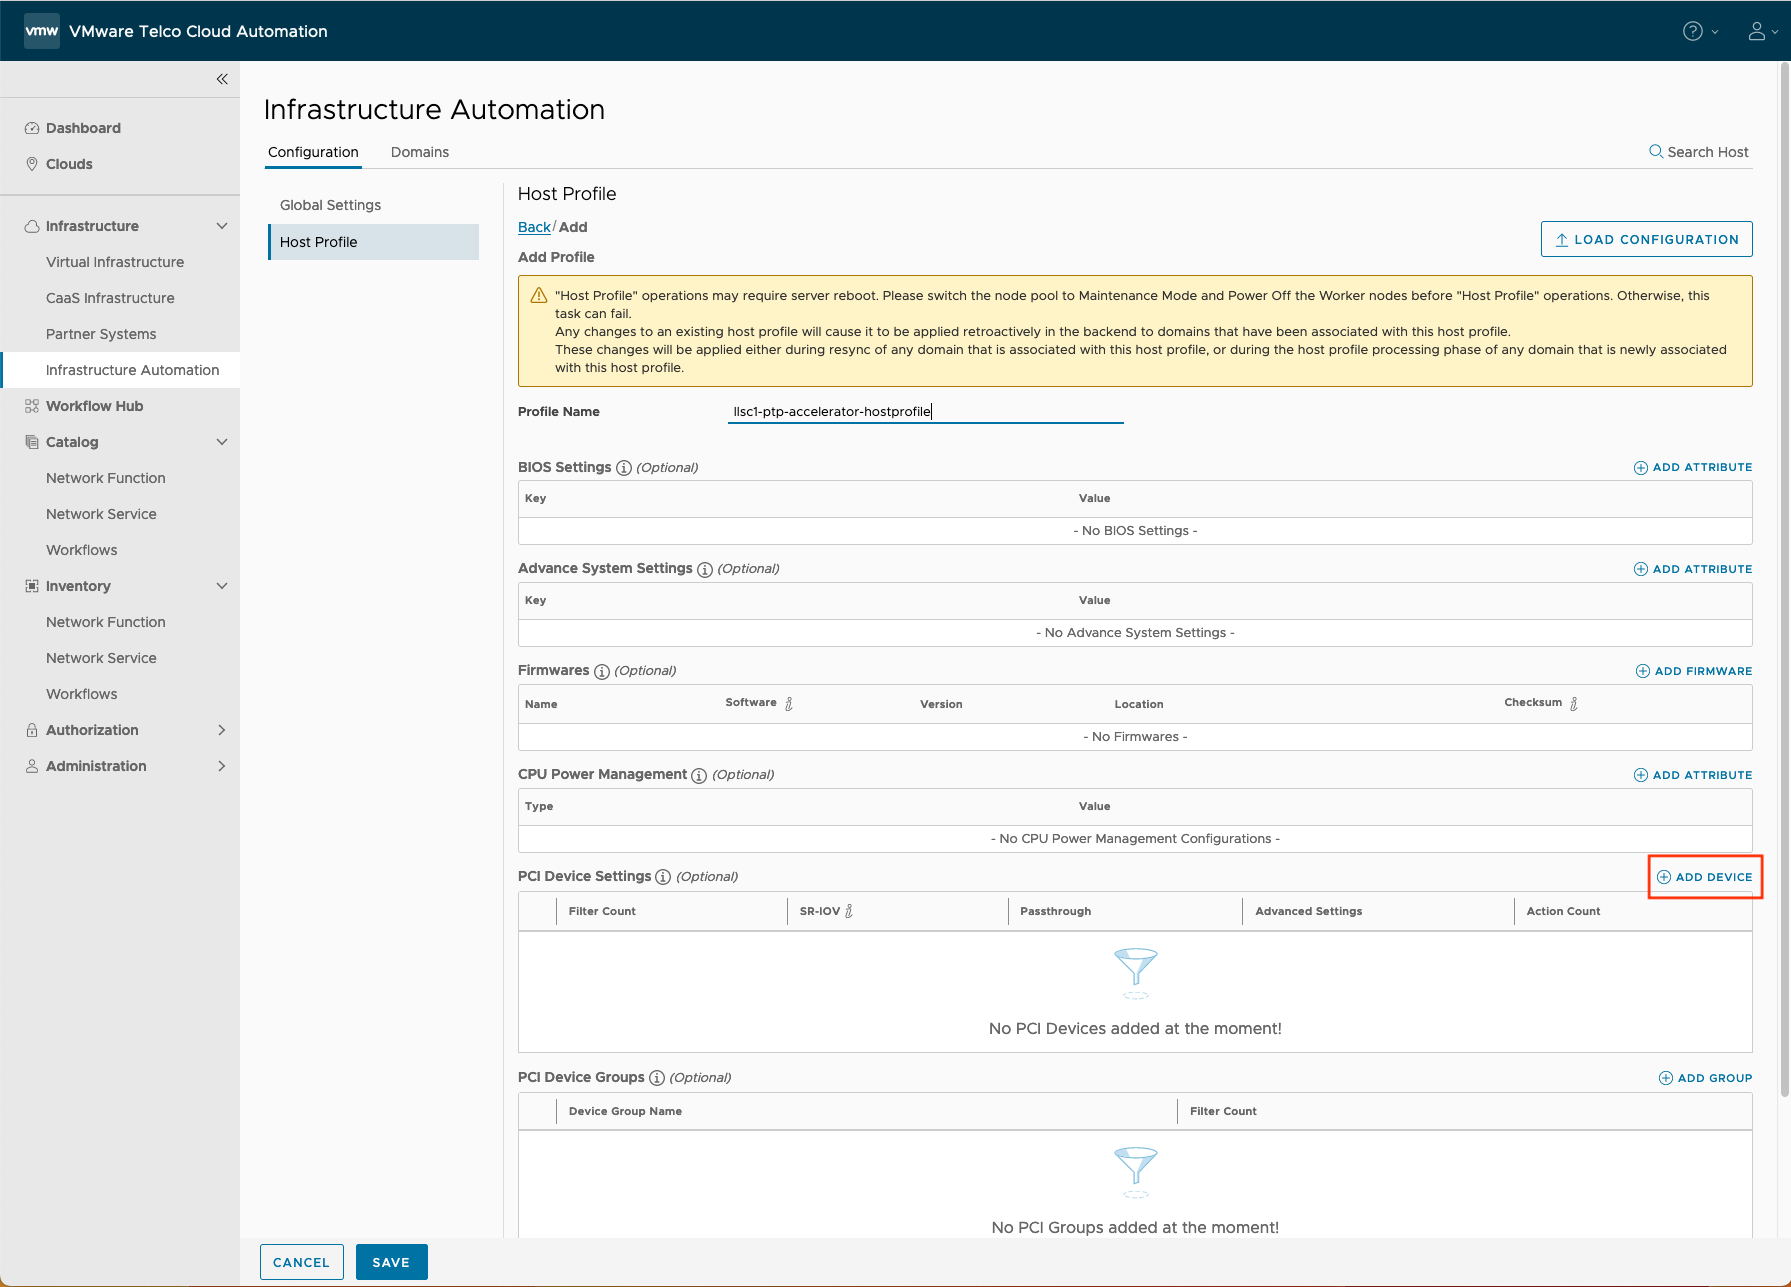
- Click ADD.
- In the PCI Device Settings of the host profile, add a PCI device of SR-IOV type:
- Click ADD DEVICE.
- In the Device Details section, add the following details for the PCI device:
Click ADD CONFIGURATION.
Select SR-IOV in the Type drop-down list.
In the Number of Virtual Functions field, enter the number of virtual functions for each port (PF) of the PCI device. Example: 8
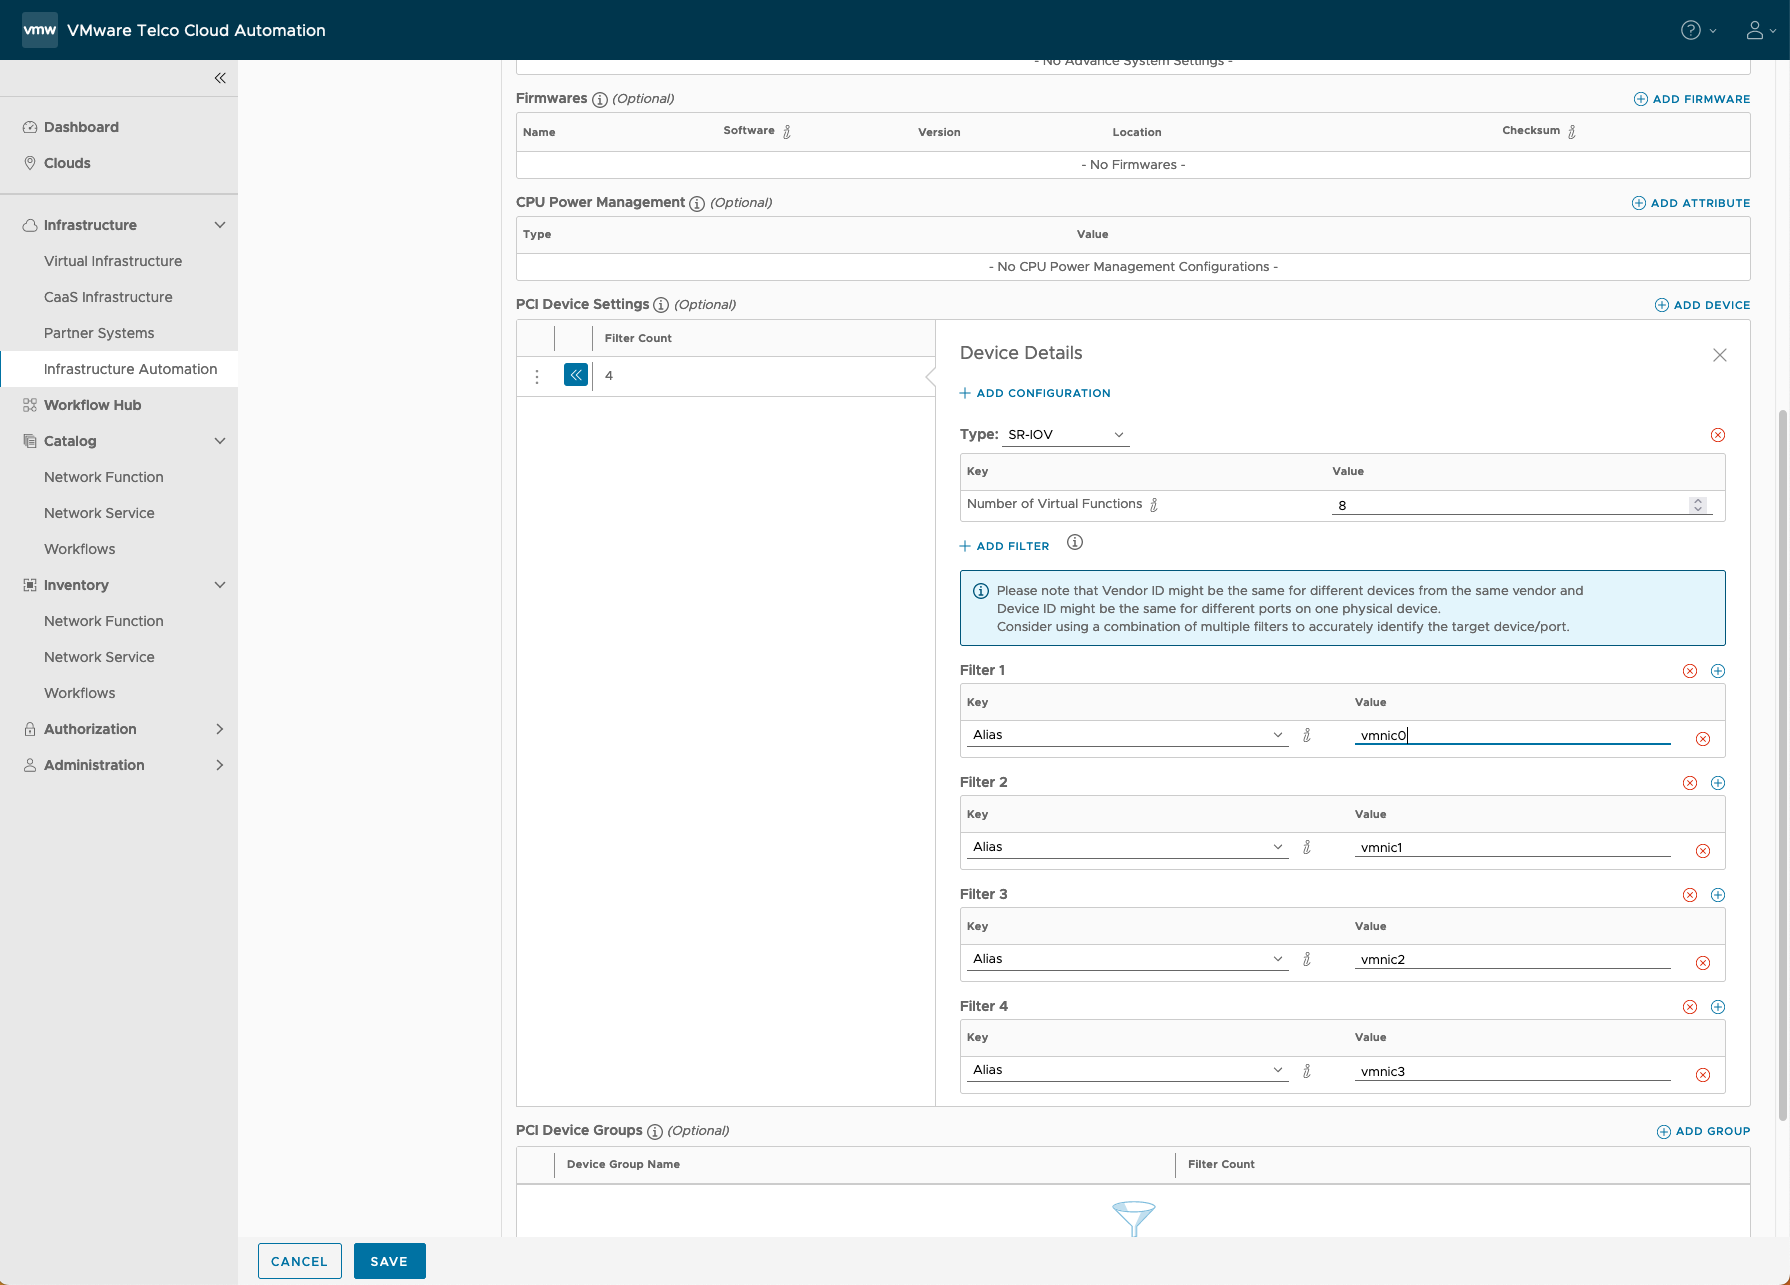
- Add the details of the ports (PFs) to be enabled with SR-IOV:
Click ADD FILTER.
Enter the port name in the Key field. Example: Alias.
Enter the port value in the Value field. Example: vmnic0
Repeat the above steps for each port.
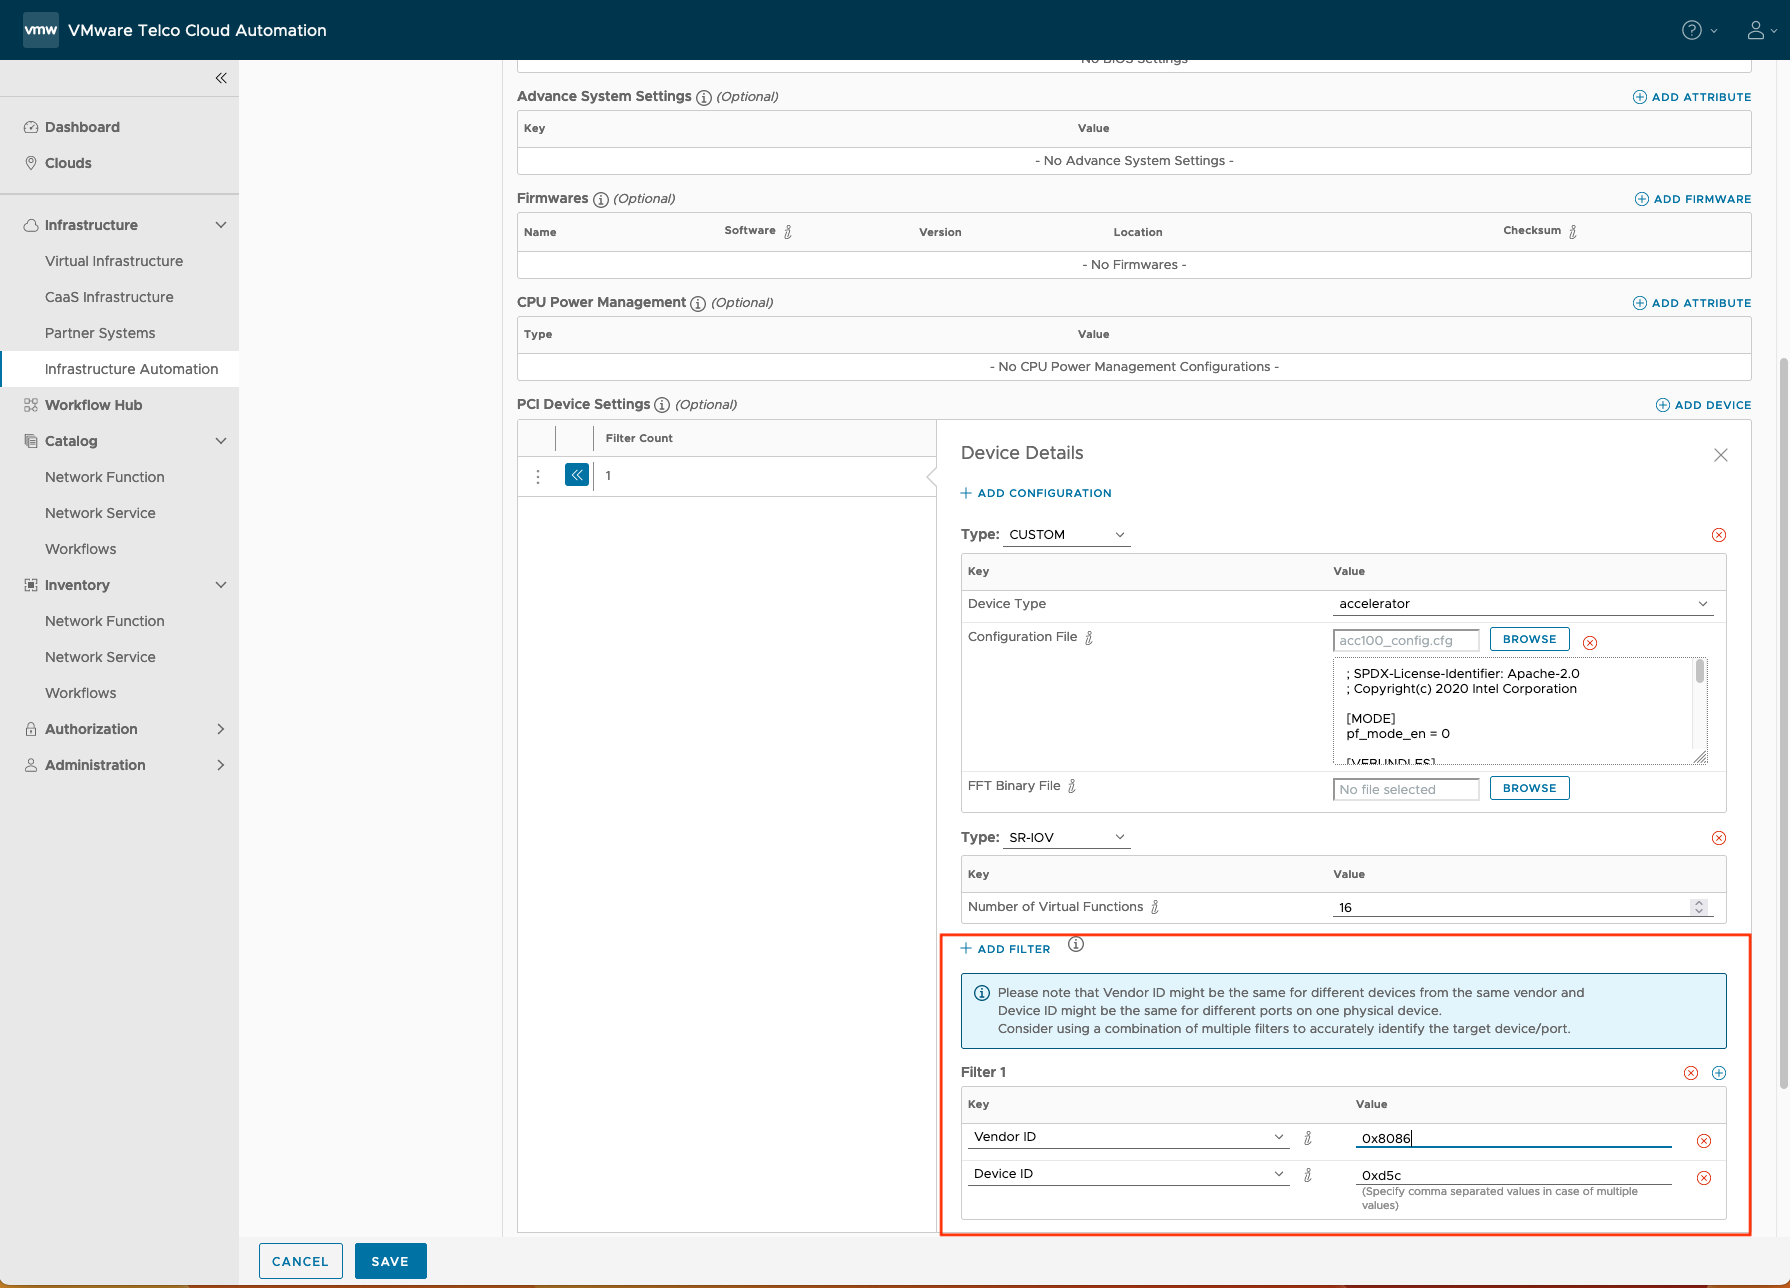
- (Optional) If you are using Accelerator, you can add and configure the PCI device of both SR-IOV and CUSTOM (accelerator) types.

For custom configuration content, obtain the configuration file using the following steps:
Browse and select a configuration file from the Intel Github repository.
Note: Intel provides sample configuration files that can be used with ACC100 and vRAN Boost accelerator cards.
Intel ACC100 Accelerator cards: https://github.com/intel/pf-bb-config/tree/master/acc100
Example:
acc100_config_vf_5g.cfgSPDX-License-Identifier: Apache-2.0 ; Copyright(c) 2020 Intel Corporation [MODE] pf_mode_en = 0 [VFBUNDLES] num_vf_bundles = 16 [MAXQSIZE] max_queue_size = 1024 [QUL4G] num_qgroups = 0 num_aqs_per_groups = 16 aq_depth_log2 = 4 [QDL4G] num_qgroups = 0 num_aqs_per_groups = 16 aq_depth_log2 = 4 [QUL5G] num_qgroups = 4 num_aqs_per_groups = 16 aq_depth_log2 = 4 [QDL5G] num_qgroups = 4 num_aqs_per_groups = 16 aq_depth_log2 = 4
Intel vRAN Boost Accelerator cards: https://github.com/intel/pf-bb-config/tree/master/vrb1
Example:
vrb1_config_vf_5g.cfg; SPDX-License-Identifier: Apache-2.0 ; Copyright(c) 2020 Intel Corporation [MODE] pf_mode_en = 0 [VFBUNDLES] num_vf_bundles = 16 [MAXQSIZE] max_queue_size = 1024 [QUL4G] num_qgroups = 0 num_aqs_per_groups = 16 aq_depth_log2 = 4 [QDL4G] num_qgroups = 0 num_aqs_per_groups = 16 aq_depth_log2 = 4 [QUL5G] num_qgroups = 4 num_aqs_per_groups = 16 aq_depth_log2 = 4 [QDL5G] num_qgroups = 4 num_aqs_per_groups = 16 aq_depth_log2 = 4 [QFFT] num_qgroups = 4 num_aqs_per_groups = 16 aq_depth_log2 = 4
Save the configuration file to the local system.
Add the following filters.
Intel ACC100 accelerator cards:
Key: vendorId
Value: 0x8086
Key: deviceIds
Value: 0xd5c
Intel vRAN Boost accelerator cards:
Key: vendorId
Value: 0x8086
Key: deviceIds
Value: 0x57c0
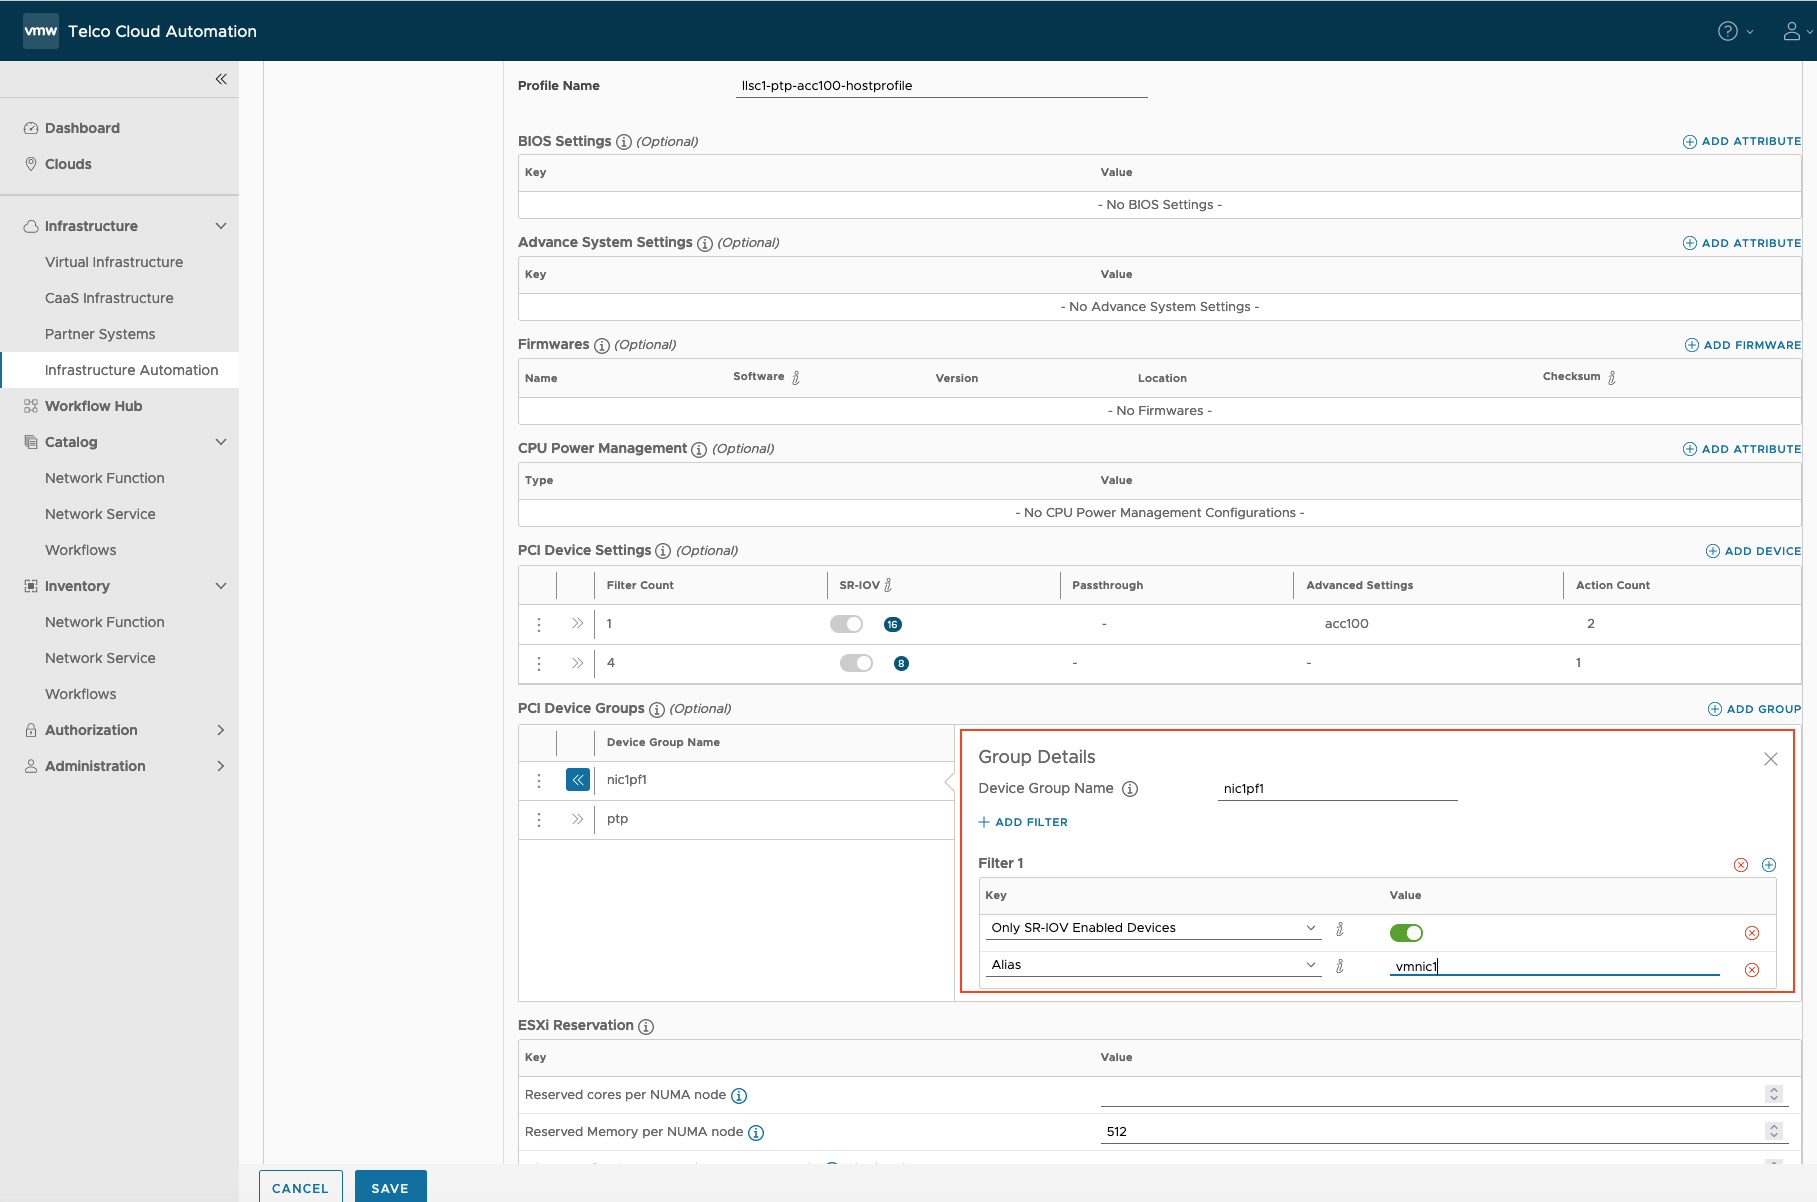
- In the PCI Device Groups section, add a PCI device group for each port you want to use for PTP:
Note: For LLS-C1 modes of deployment, multiple PTP devices are required. PCI Device Groups in the host profile define the vmnics (ports) from which PTP devices (VFs) are allocated. Only one VF from each vmnic can be used for PTP.
- Click ADD GROUP.

- Enter ptp in the Device Group Name field.
- Add a filter with the following values for the PCI Device Group:
Key: Only SR-IOV Enabled Devices
Value (radio button): Enable
Key: Alias
Value: vmnic1 (the name of the physical interface used for PTP)
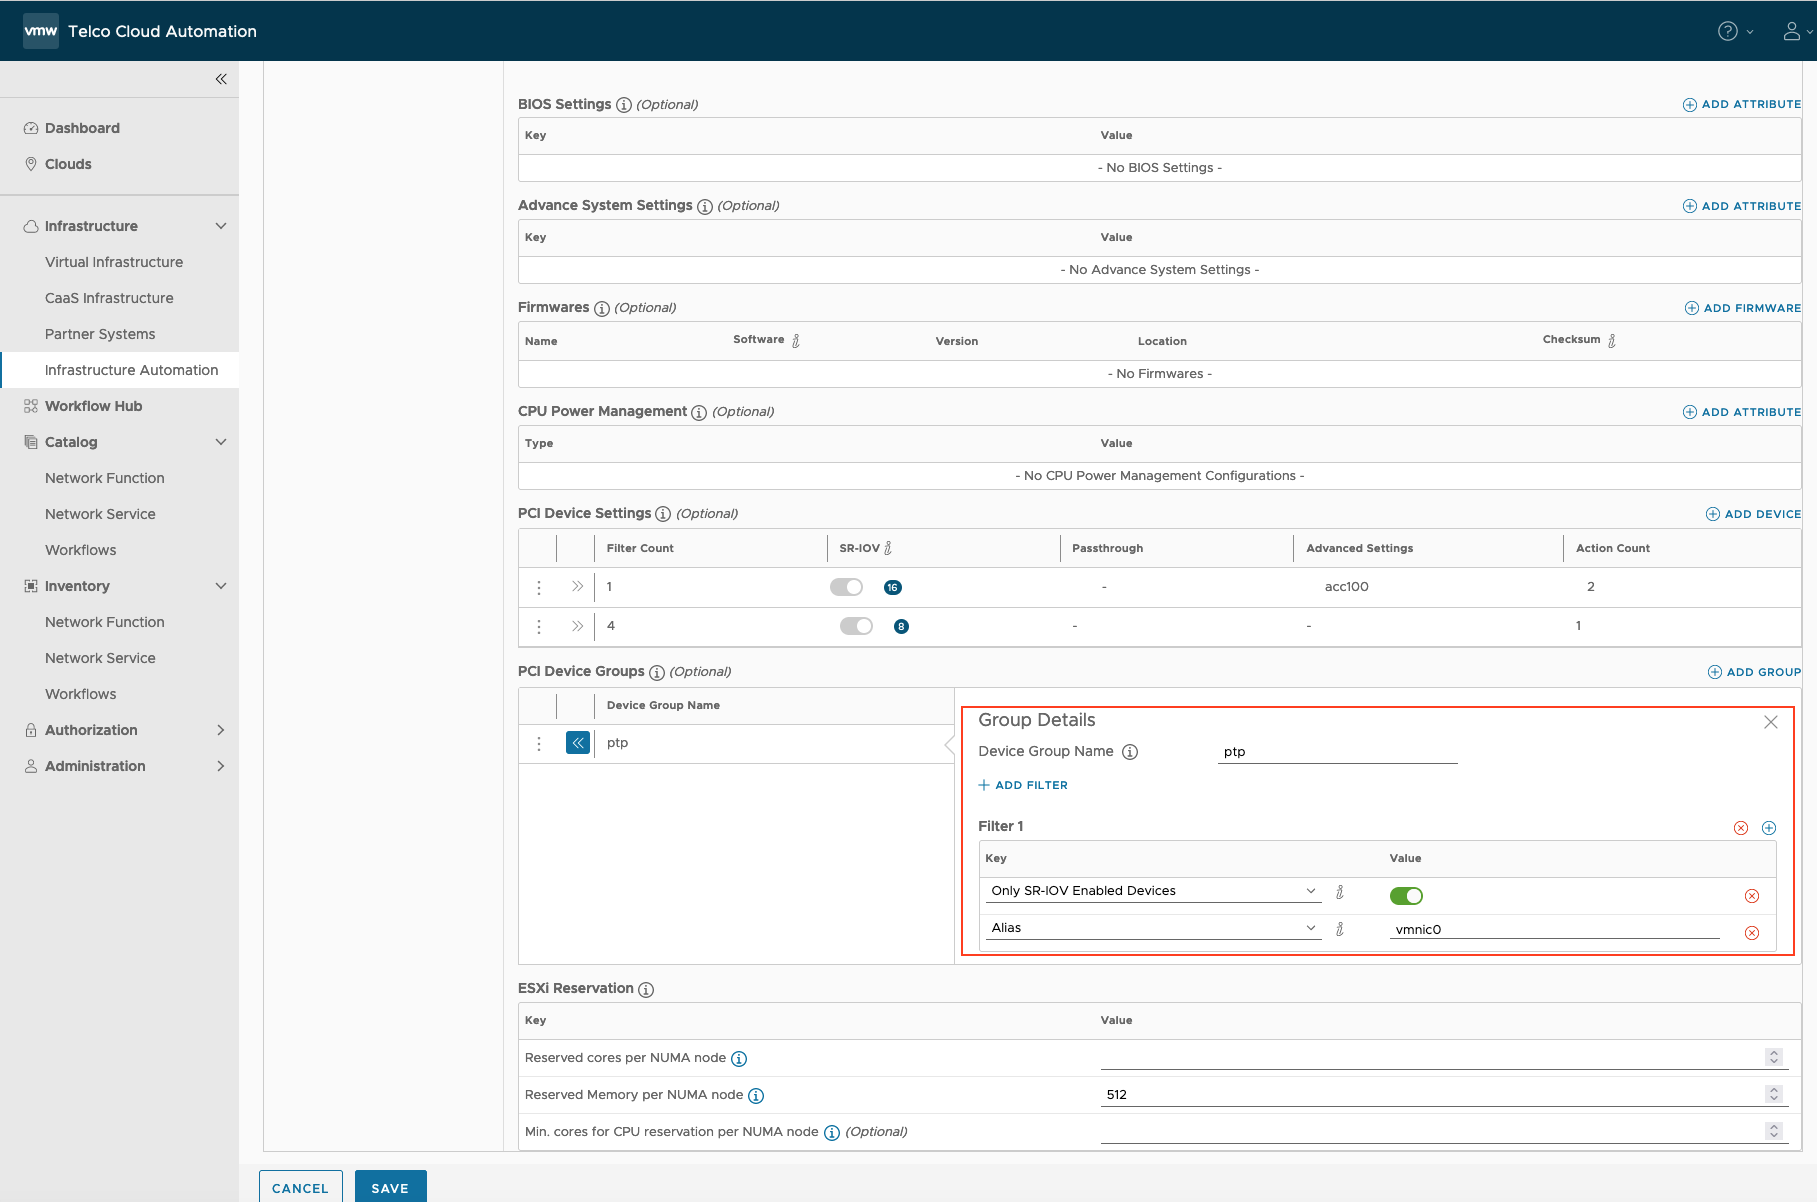
- Repeat Steps a-c for each vmnic you want to use for PTP.
- Click ADD GROUP.
- (vRAN Boost Accelerator only) In the PCI Device Groups section, add a PCI device group for vRAN Boost Accelerator device.
Click ADD GROUP.
Enter the device group name (example: vrb1) in the Device Group Name field.
Add a filter with the following values for the PCI Device Group:
Key: Only SR-IOV Enabled Devices
Value (radio button): Enable
Key: Device ID
Value: 0x57c0 (device id of Intel vRAN Boost Accelerator)
Key: Vendor ID
Value: 0x8086 (vendor id of Intel)

- Apply the host profile to a cell site group:
- Navigate to Infrastructure Automation > Domains > Cell Site Group.
- Click the name of the Cell Site Group to which you want to apply the host profile.
- Select the host profile from the Host Profile drop-down list.
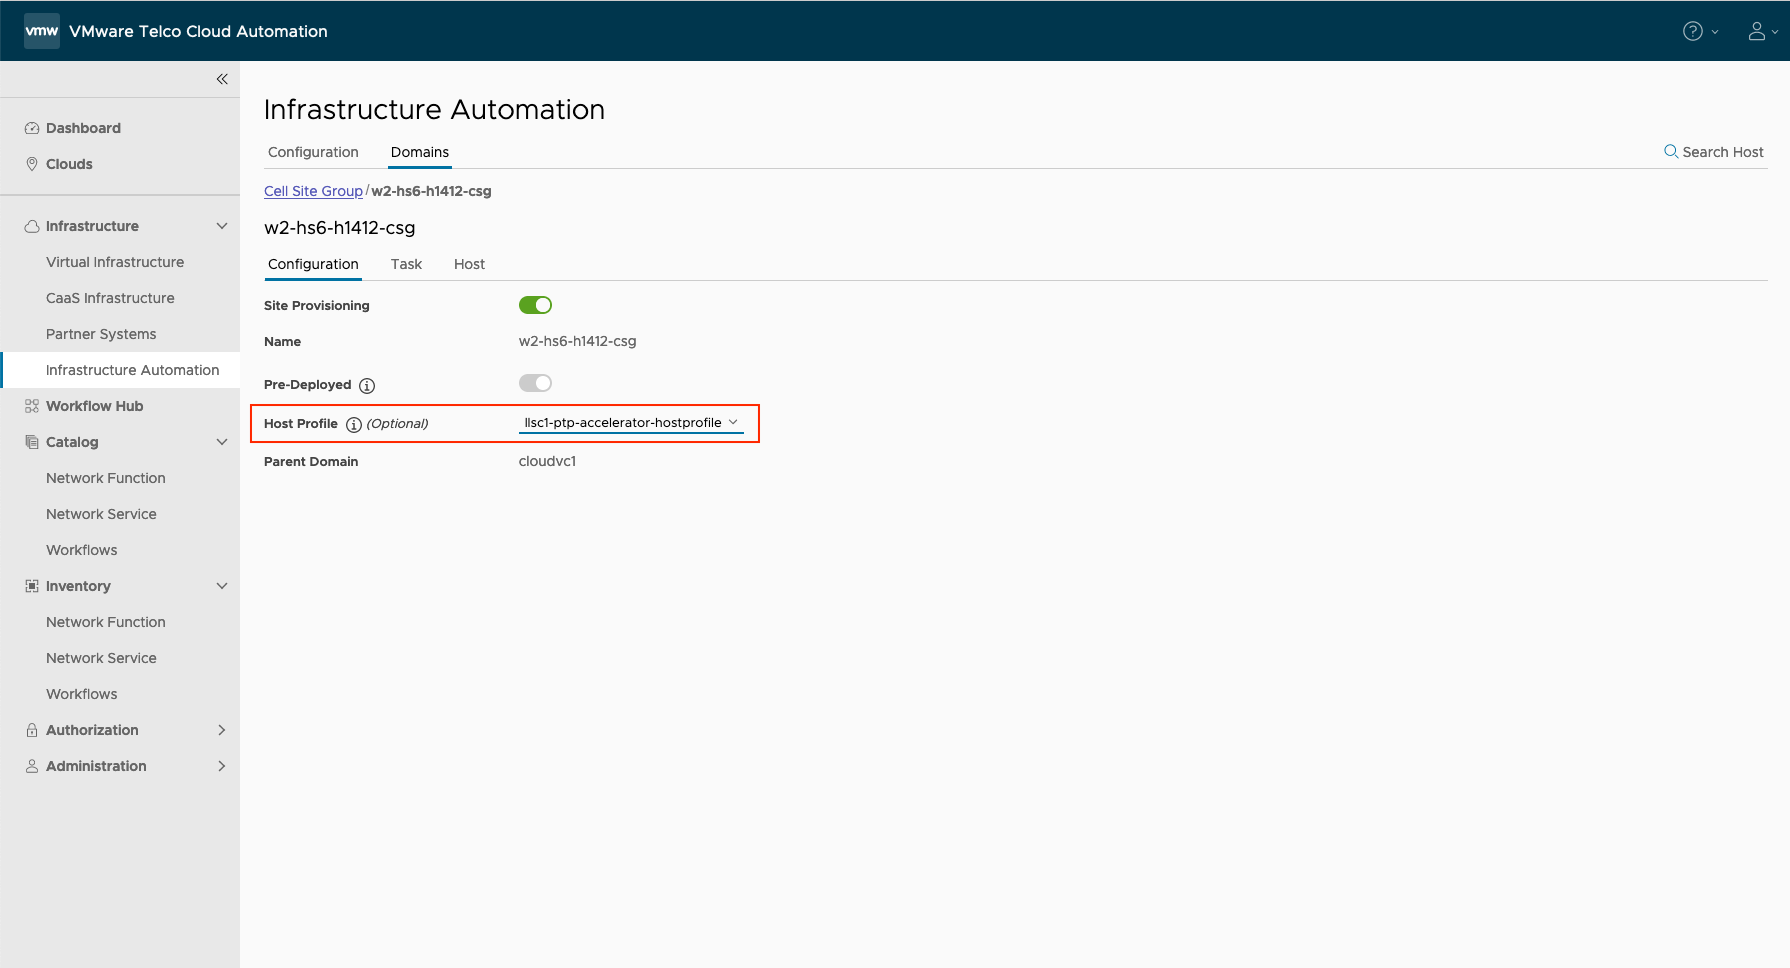
- Save the cell site group configuration.
- Click RESYNC.

