


When you install the Service Assurance Manager version 9.2, NOTIF is not enabled by default; you must start NOTIF by performing the following steps:
-
Set an environment variable in the BASEDIR directory path to ensure that Java can be successfully started for NOTIF.
-
In BASEDIR/smarts/local/conf/runenv_cmd.sh, add the following line:
SM_JAVA_ENABLED=YES
-
If your setup contains SNMPv3 devices, create a seedfile with the device information using the seedfile template in the IP Manager installation area.
To use the seedfile template to create a seed file:
-
Go to the BASEDIR/smarts/bin directory in the IP Manager installation area and type the following command to open the seedfile template:
sm_edit conf/seedfile -
Press Enter.
-
Add the seed entries for the systems to be discovered.
-
Save and close the file.
-
Configure the SNMP Trap Adapter to use the Notif-trap_mgr_parse.asl script instead of the default trap_mgr_parse.asl script in order for NOTIF to process SNMP traps.
For example:
./sm_trapd --name=TRAP-OI --server=INCHARGE-OI --config=icoi
--port=9013 --model=sm_actions --output
--rules=icoi-trapd/Notif-trap_mgr_parse.asl --daemon
-
To process SNMPv3 traps, use the --seed option when starting the SNMP Trap Adapter to point to the seed file you have created, as mentioned in step 2 .
For example:
./sm_trapd -n TRAP-INCHARGE-OI --server=INCHARGE-OI
--config=icoi --port=162
--model=sm_actions
--seed=C:\InCharge\SAM\smarts\local\conf\icoi\seedfile
--rules=icoi-trapd\trap_mgr_parse.asl --traceSNMP --output
-
Configure the Notif Trap Receiver as a service to automatically the SNMP Trap Adapter on system restart.
For example:
sm_service install --force  --unmanaged  --startmode=runonce \
'--name=ic-notif-trap' \
'--description=Notif Trap Receiver' \
'/opt/InCharge/SAM/smarts/bin/sm_trapd' \
'--name=NOTIF-TRAP' \
'--server=INCHARGE-OI' \
'--output' \
'--config=icoi' \
'--port=1162' \
'--model=sm_actions' \
'--rules=icoi-trapd/Notif-trap_mgr_parse.asl'
-
Configure the Syslog Adapter to use the Notif-SysLog_mgr.asl script instead of the default SysLog_mgr.asl script in order for NOTIF to process Cisco system log files.
For example:
./sm_adapter.exe --NTsErViCeNaMe=ic-syslog-adapter --name=SYSLOG-OI --server=INCHARGE-OI --tail=/var/log/syslog --model=sm_system --model=sm_actions --output icoi-syslog/Notif-SysLog_mgr.asl
-
Configure the Notif Syslog Adapter as a service to automatically the Syslog Adapter on system restart.
For example:
sm_service install --force  --unmanaged  --startmode=runonce \
'--name=ic-notif-syslog' \
'--description=Notif Syslog Adapter' \
'/opt/InCharge/SAM/smarts/bin/sm_adapter' \
'--name=NOTIF-SYSLOG' \
'--server=INCHARGE-OI' \
'--output' \
'--config=icoi' \
'--port=1162' \
'--model=sm_actions' \
'--model=sm_system'\
'--tail=/opt/InCharge/SAM/smarts/local/logs/sample.txt'\
'icoi-syslog/Notif-SysLog_mgr.asl'
-
Launch the NOTIF Editor by selecting Start > Programs > InCharge >NOTIF Editor.
Note:You can also launch the editor by double-clicking the NotifGui.sh file (for UNIX systems) in the BASEDIR/smarts/notif/editor directory.
-
Use the NOTIF Editor to connect to the running Adapter Platform or SAM server. Select Remote > Edit a server's settings… in the NOTIF Editor.
-
The Connect to a Server dialog box appears that shows the list of available Adapter Platform or SAM server connections, as shown in Connect to a Server dialog box. Choose a server in the Connect to a Server dialog box and click OK.
Note:Manage connections... on page 88 describes how to populate the list of server connections. Clicking More... in the Connect to a Server dialog box launches the Manage Connections dialog box where you can add additional server connections, if desired.
Figure 1. Connect to a Server dialog box 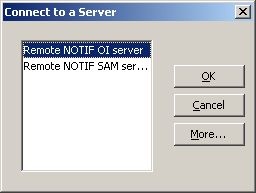
-
Type the password to connect to the VMware Telco Cloud Service Assurance server and click OK.
Note:The first time you connect to a given server when you use the NOTIF Editor during a given work session, you will be prompted for a password. After that, you are not prompted for a password on that server for the remainder of your work session. If you restart the NOTIF Editor, you must type the password again the first time you use a connection.
Figure 2. Server connection Password dialog box 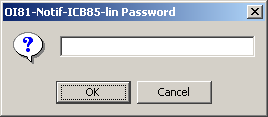
-
The Remote Server Settings dialog box appears that shows the server's current settings as shown in Remote Server Settings dialog box. In the Remote Server Settings dialog box, select the Activate NOTIF checkbox, and then click OK. You can also change other server settings in the Remote Server Settings dialog box, if desired.
Note:Edit a server™s settings... on page 87 provides more information on remote server settings.
Figure 3. Remote Server Settings dialog box 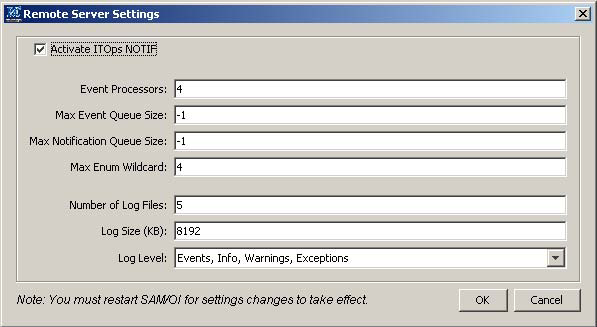
-
Restart the Adapter Platform/SAM server. NOTIF is now activated on the Adapter Platform/SAM server.
Note:Server setting changes made in the Remote Server Settings dialog box are persistent. When you change server settings in the Remote Server Settings dialog box and click OK, the changes are saved to the Notif_Settings.import file that is generated and saved to the BASEDIR/smarts/local/conf/<icoi or ics> directory in the Adapter Platform or SAM server where NOTIF is running.
Server setting changes made in the NOTIF Editor are preserved even if the repository is deleted. For example, if the repository was erased because you used the --norestore option for server startup, the server would still use the last saved settings from the NOTIF Editor saved in BASEDIR/smarts/local/conf/<icoi or ics>/Notif_Settings.import.
