


You can deploy the patch by using the CLI, VMware Telco Cloud Automation UI, or the VM based deployment.
Deployment of Patch on VMware Tanzu Kubernetes Grid
- Login to the Deployment Host and create a directory called patch under /root directory.
- Download the patch bundle in the Deployment Host under the /root/patch directory.
- Extract the downloaded patch bundle. Then set the workspace to the following directory path:
export TCSA_WORK_SPACE=/root/patch
- Navigate to the values.yaml file.
$TCSA_WORK_SPACE/tcx-deployer/product-helm-charts/tcsa
- Update the required parameters in the values.yaml file.
Note: The values.yaml file in the patch must be updated with the values from the values.yaml file which was used to deploy the base VMware Telco Cloud Service Assurance deployment.
- Set Harbor registry URL.
# Default values for tcsa.
# This is a YAML-formatted file.
# Customize your TCSA deployment here by configuring the parameters that are exposed.
# Uncomment the relevant lines and configure them according to your environment.
.
.
# (string) registryRootUrl is the FQDN of the registry that has the artifacts.
registryRootUrl: <harbor-registry-fqdn>/<project-name>
- Set the footprint value.
# (string) footprint is the number of devices monitored by TCSA.
# allowed values for footprint "demo", "25k", "50k", "75k", "100k", "125k", "150k", "175k", "200k"
footprint:
- Set the dashboardStaticAccessIp and edgeServicesAccessIp parameters to the IP address of your cluster.
# (string) Set dashboardStaticAccessIp to the IP address used to access the TCSA dashboard. Leave empty or commented out for EKS private network deployments.
dashboardStaticAccessIp: <ClusterIP>

# (string) Set edgeServicesAccessIp to the IP address to be used to access kafka-edge. Leave empty for EKS public networks.
edgeServicesAccessIp: <ClusterIP>
- Set privateNetwork to false.
# ----IaaS configuration----
# (bool) privateNetwork indicates if TCSA is being deployed on a private EKS or AKS network
privateNetwork: false
- Set cloud provider as tkg for deploying VMware Telco Cloud Service Assurance on TKG.
# (string) cloud indicates the cloud/K8s provider. Valid values are "tkg", "aws", "azure" and "on-prem"
cloud: tkg
- If the base footprint has the Backup and Restore configured with AWS or vSAN, then same values must be updated in the patch values.yaml file.
If you have configured the Metrics Retention Interval in the base deployment, then use the same values in the patch values.yaml file.
- Set Harbor registry URL.
- Trigger deployment using
tcxctlCLI.root [ ~ ]# cd $TCSA_WORK_SPACE/tcx-deployer/clis root [ ~/patch/tcx-deployer/clis ]# ./tcxctl deploy all --bundle-path $TCSA_WORK_SPACE/tcx-deployer --kubeconfig <your-kubeconfig-location> --registry <harbor-registry-fqdn>/<project-name> --registry-password <harbor-registry-password> --registry-username <harbor-registry-username> --timeout <time-in-mins>
Note:- The
--registry <harbor-registry-fqdn>/<project-name>must be configured with the same value that is used during the base VMware Telco Cloud Service Assurance deployment. - The --registry-cert is an optional parameter and must be provided in the above
tcxctlCLI if the Harbor certificate is not a public certificate. - If you do not want to specify the registry username and password in the installation script, perform Docker login. To login to Docker, run the following command:
docker login <harbor-fqdn>
Ensure that the--registry-passworddoes not have the comma character in it. If the comma is used, escape it using the backslash.
Manually check the VMware Telco Cloud Service Assurance patch deployment status using the following command:root [ ~/patch/tcx-deployer/scripts ]# kubectl get tcxproduct
Alternatively, you can run the following command to check the patch deployment status:root [ ~/patch/tcx-deployer/scripts ]# kubectl get apps
For all the apps, the reconcilation status must be successful.
- The
Deployment of Patch on AKS
- Login to the Deployment Host and create a directory called patch under /root directory.
- Download the patch bundle in the Deployment Host under the /root/patch directory.
- Extract the downloaded patch bundle. Then set the workspace to the following directory path:
export TCSA_WORK_SPACE=/root/patch
- Navigate to the values.yaml file.
$TCSA_WORK_SPACE/tcx-deployer/product-helm-charts/tcsa
- Update the required parameters in the values.yaml file present in the extracted patch bundle. To update the values for the parameters in the values.yaml file, see the Deployment Configuration for Azure topic.
Note: The values.yaml file in the patch must be updated with the values from the values.yaml file which was used to deploy the base VMware Telco Cloud Service Assurance deployment.
- If the base footprint has the Backup and Restore configured with AWS or vSAN, then same values must be updated in the patch values.yaml file.
If you have configured the Metrics Retention Interval in the base deployment, then use the same values in the patch values.yaml file.
- If the base footprint has the Backup and Restore configured with AWS or vSAN, then same values must be updated in the patch values.yaml file.
- Trigger deployment using
tcxctlCLI.root [ ~ ]# cd $TCSA_WORK_SPACE/tcx-deployer/clis root [ ~/patch/tcx-deployer/clis ]# ./tcxctl deploy all --bundle-path $TCSA_WORK_SPACE/tcx-deployer --kubeconfig <your-kubeconfig-location> --registry <acr-registry-fqdn>/<project-name> --registry-password <acr-registry-password> --registry-username <acr-registry-username> --timeout <time-in-mins>
Manually check the VMware Telco Cloud Service Assurance patch deployment status using the following command:root [ ~/patch/tcx-deployer/scripts ]# kubectl get tcxproduct
Alternatively, you can run the following command to check the patch deployment status:root [ ~/patch/tcx-deployer/scripts ]# kubectl get apps
For all the apps, the reconcilation status must be successful.
Deployment of Patch through VMware Telco Cloud Automation
- For VMware Telco Cloud Automation 2.2 or 2.3, navigate to .
- For VMware Telco Cloud Automation 2.1.1, .
- Download the patch bundle in the Deployment Host under the /root/patch directory.
- Extract the downloaded patch bundle. Then set the workspace to the following directory path:
export TCSA_WORK_SPACE=/root/patch
- Set the following variable to true for VMware Telco Cloud Automation based deployment.
export TCA_BASED_DEPLOYMENT=true
- Push artifacts to the registry.
root [ ~/patch/tcx-deployer/clis ]# ./tcxctl push --artifacts-path /<$TCSA_WORK_SPACE>/tcx-deployer/ --registry <harbor-registry-fqdn>/<project-name> --registry-password <your-registry-password> --registry-username <your-registry-username> --registry-cert <path-to-your-registry-ca-certificate-file>
Note:- The
--registry <harbor-registry-fqdn>/<project-name>must be configured with the same value that is used during the base VMware Telco Cloud Service Assurance deployment. - The --registry-cert is an optional parameter and must be provided in the above
tcxctlCLI if the Harbor certificate is not a public certificate. - If you do not want to specify the registry username and password in the installation script, perform Docker login. To login to Docker, run the following command:
docker login <harbor-fqdn>
Ensure that the--registry-passworddoes not have the comma character in it. If the comma is used, escape it using the backslash.
- The
- Copy the tcsa.csar from the CSAR directory of the unpacked deployer package to your local machine used to access VMware Telco Cloud Automation.
root [ ~ ]# cd /root/patch/tcx-deployer/csars/
root [ ~ ]# pwd
/root/patch/tcx-deployer/csars
root [ ~ ]# ls
admin-operator.csar  tcsa.csar  tcsa-init.csar
root [ ~ ]#
- After the CSAR is copied, launch VMware Telco Cloud Automation, navigate to and click Onboard Network Function. Onboard the CSAR files that are copied. Provide a name while onbarding the CSAR. The same CSAR name must be selected during patch upgrade.
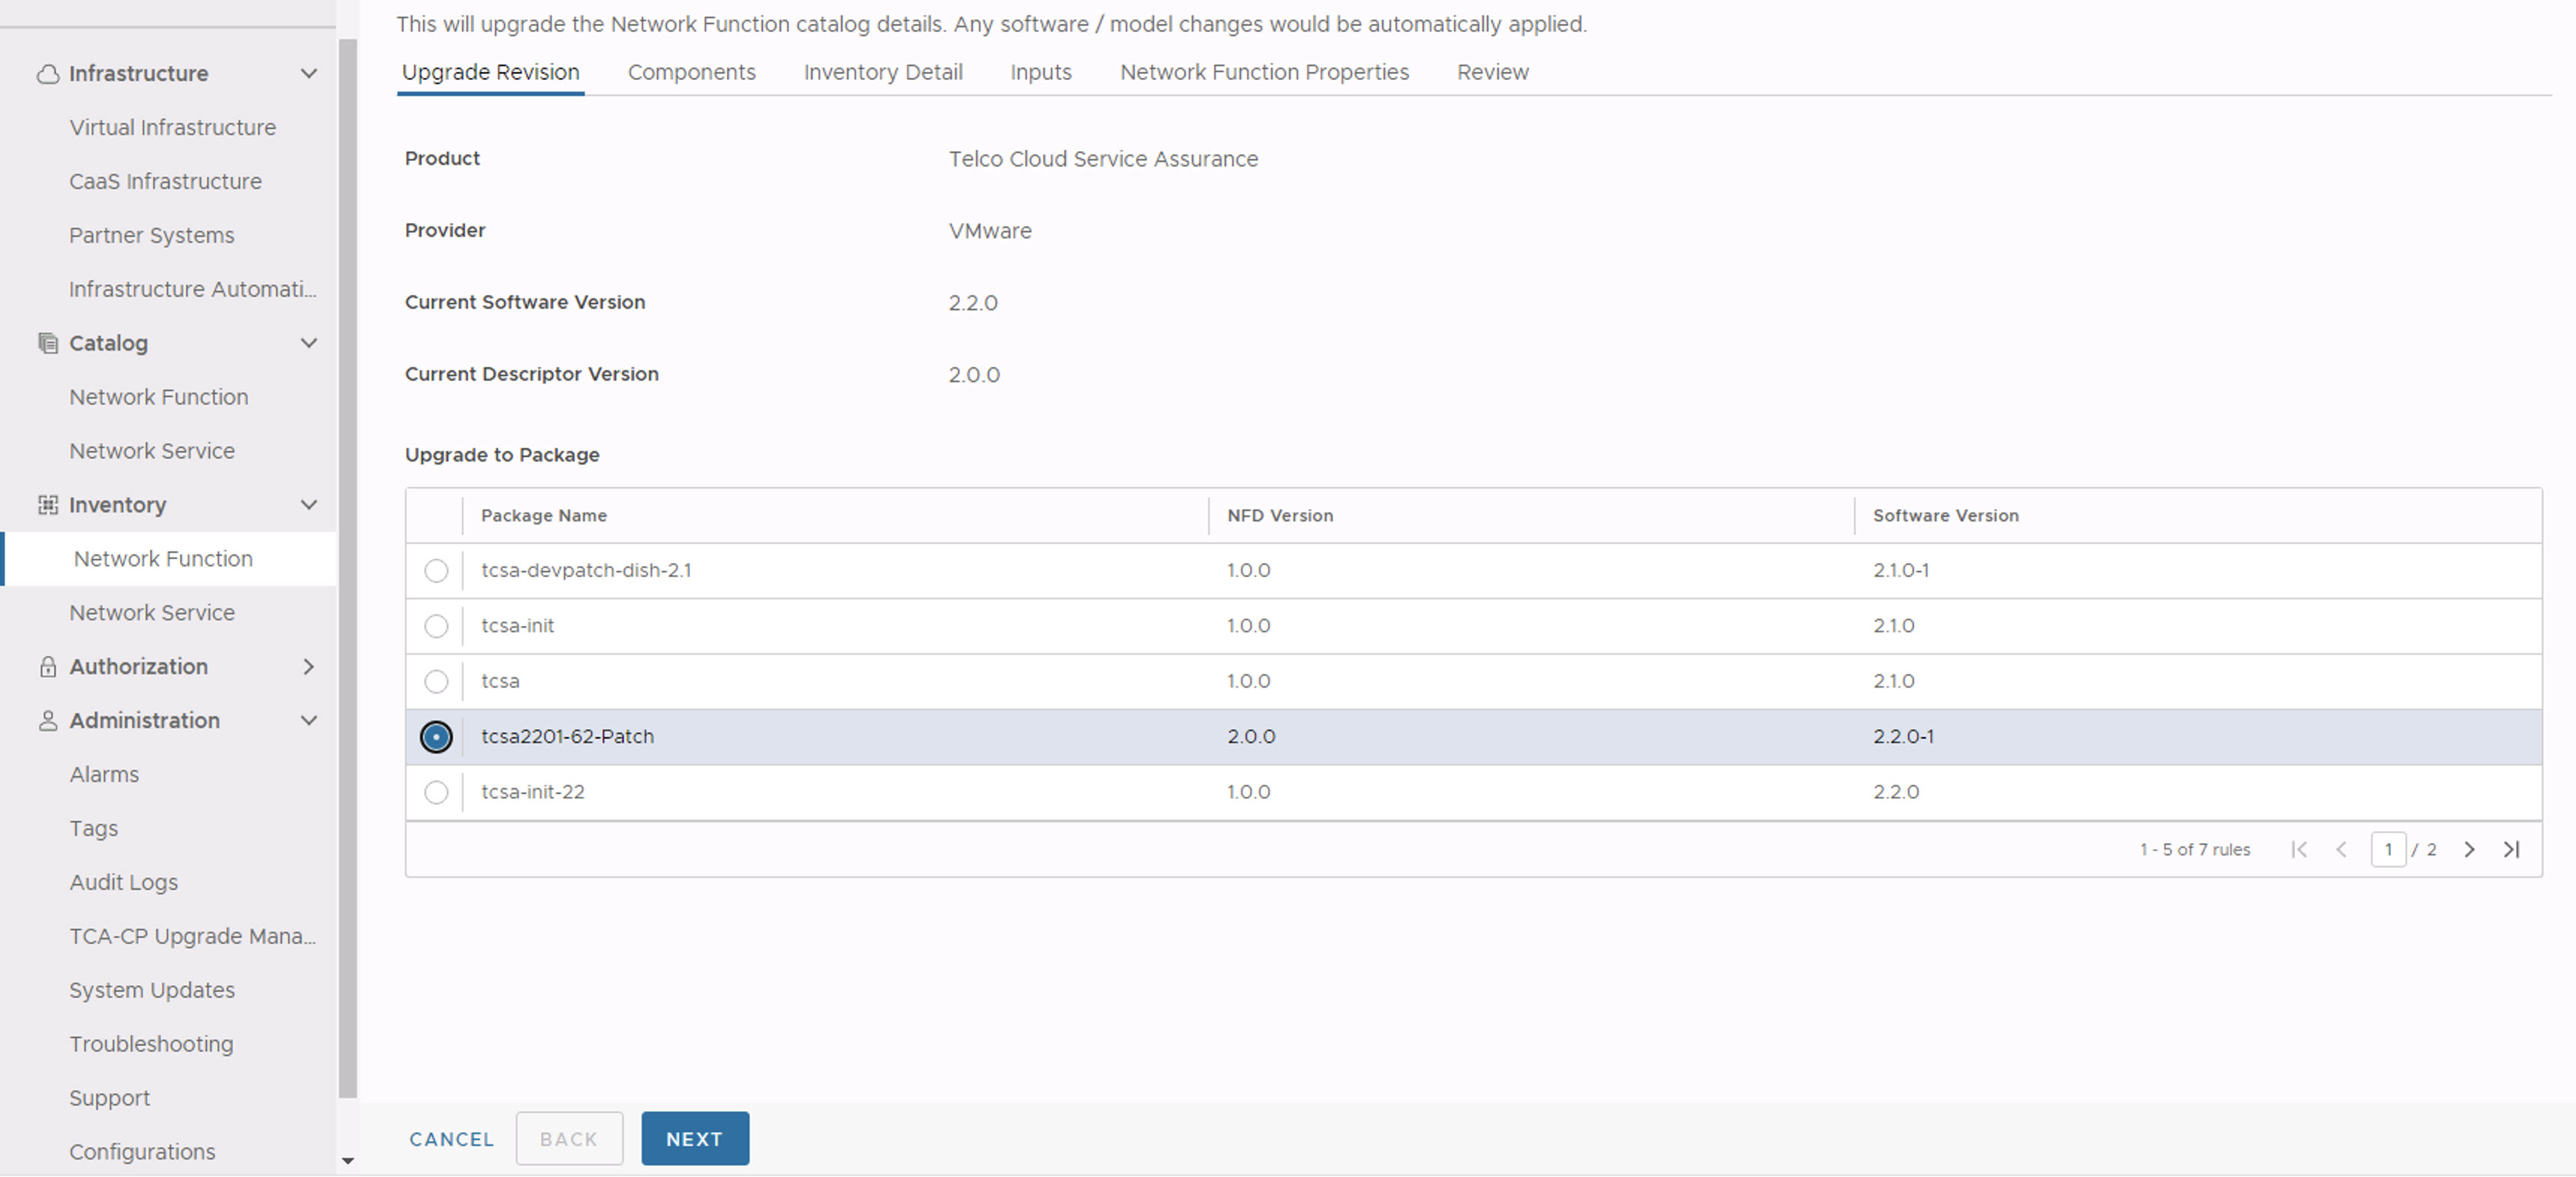
- Navigate to , click the three dots against the CNF to upgrade as part of the patch, and select Upgrade.
- In the Upgrade Revision section, select the new CSAR file that you onboarded. Click Next.
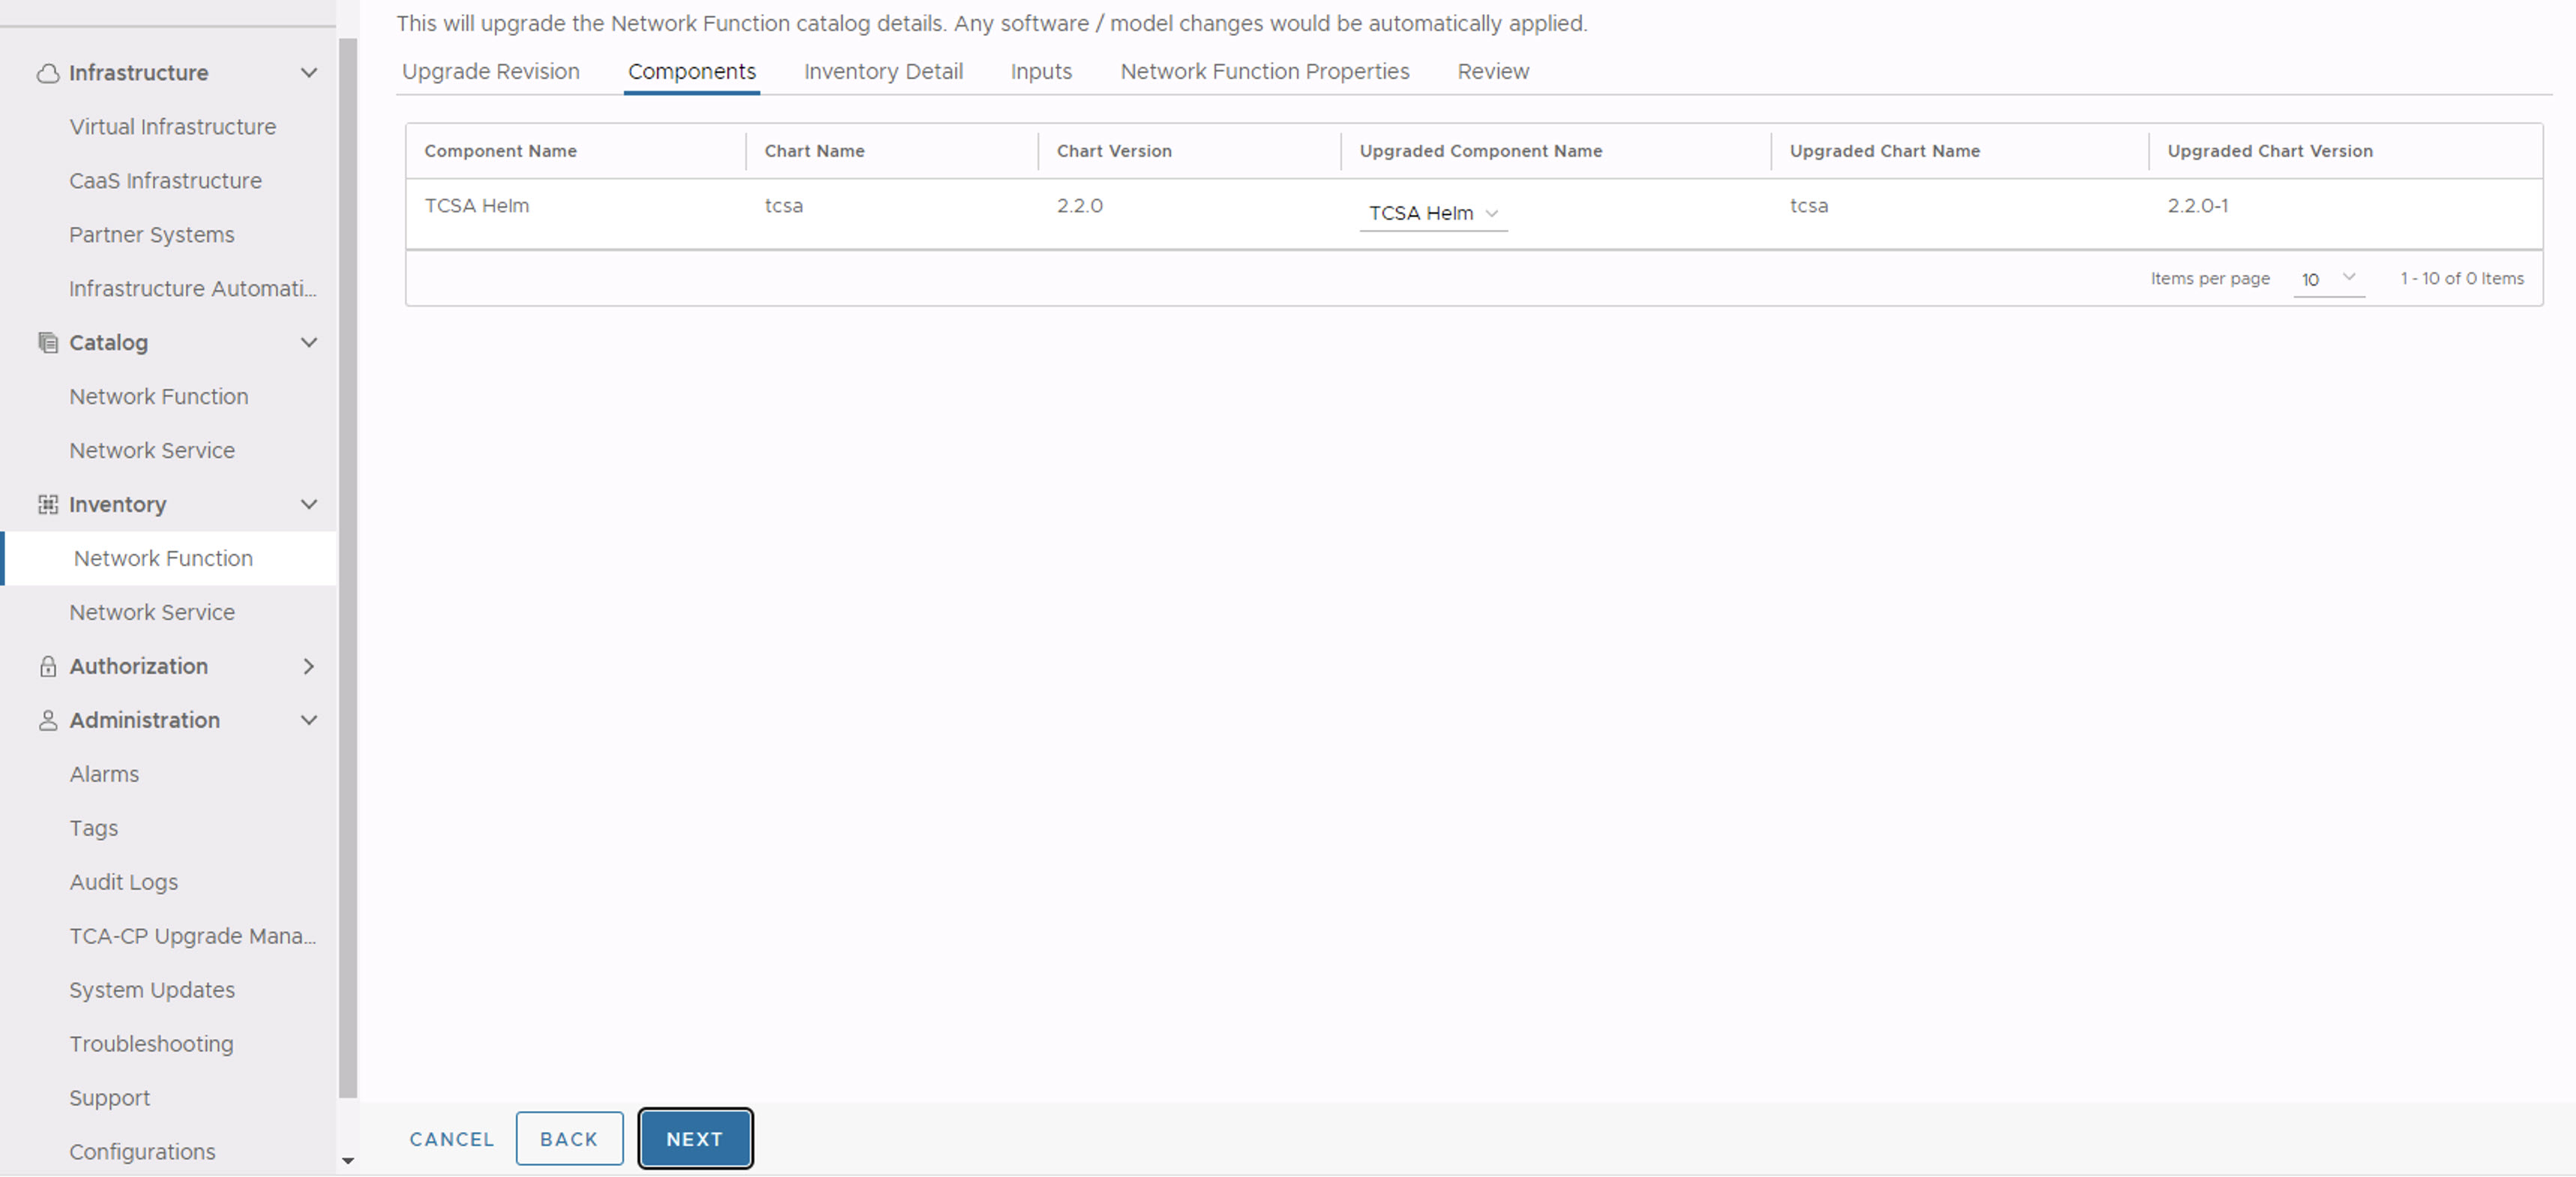
- In the Components section, click Next.
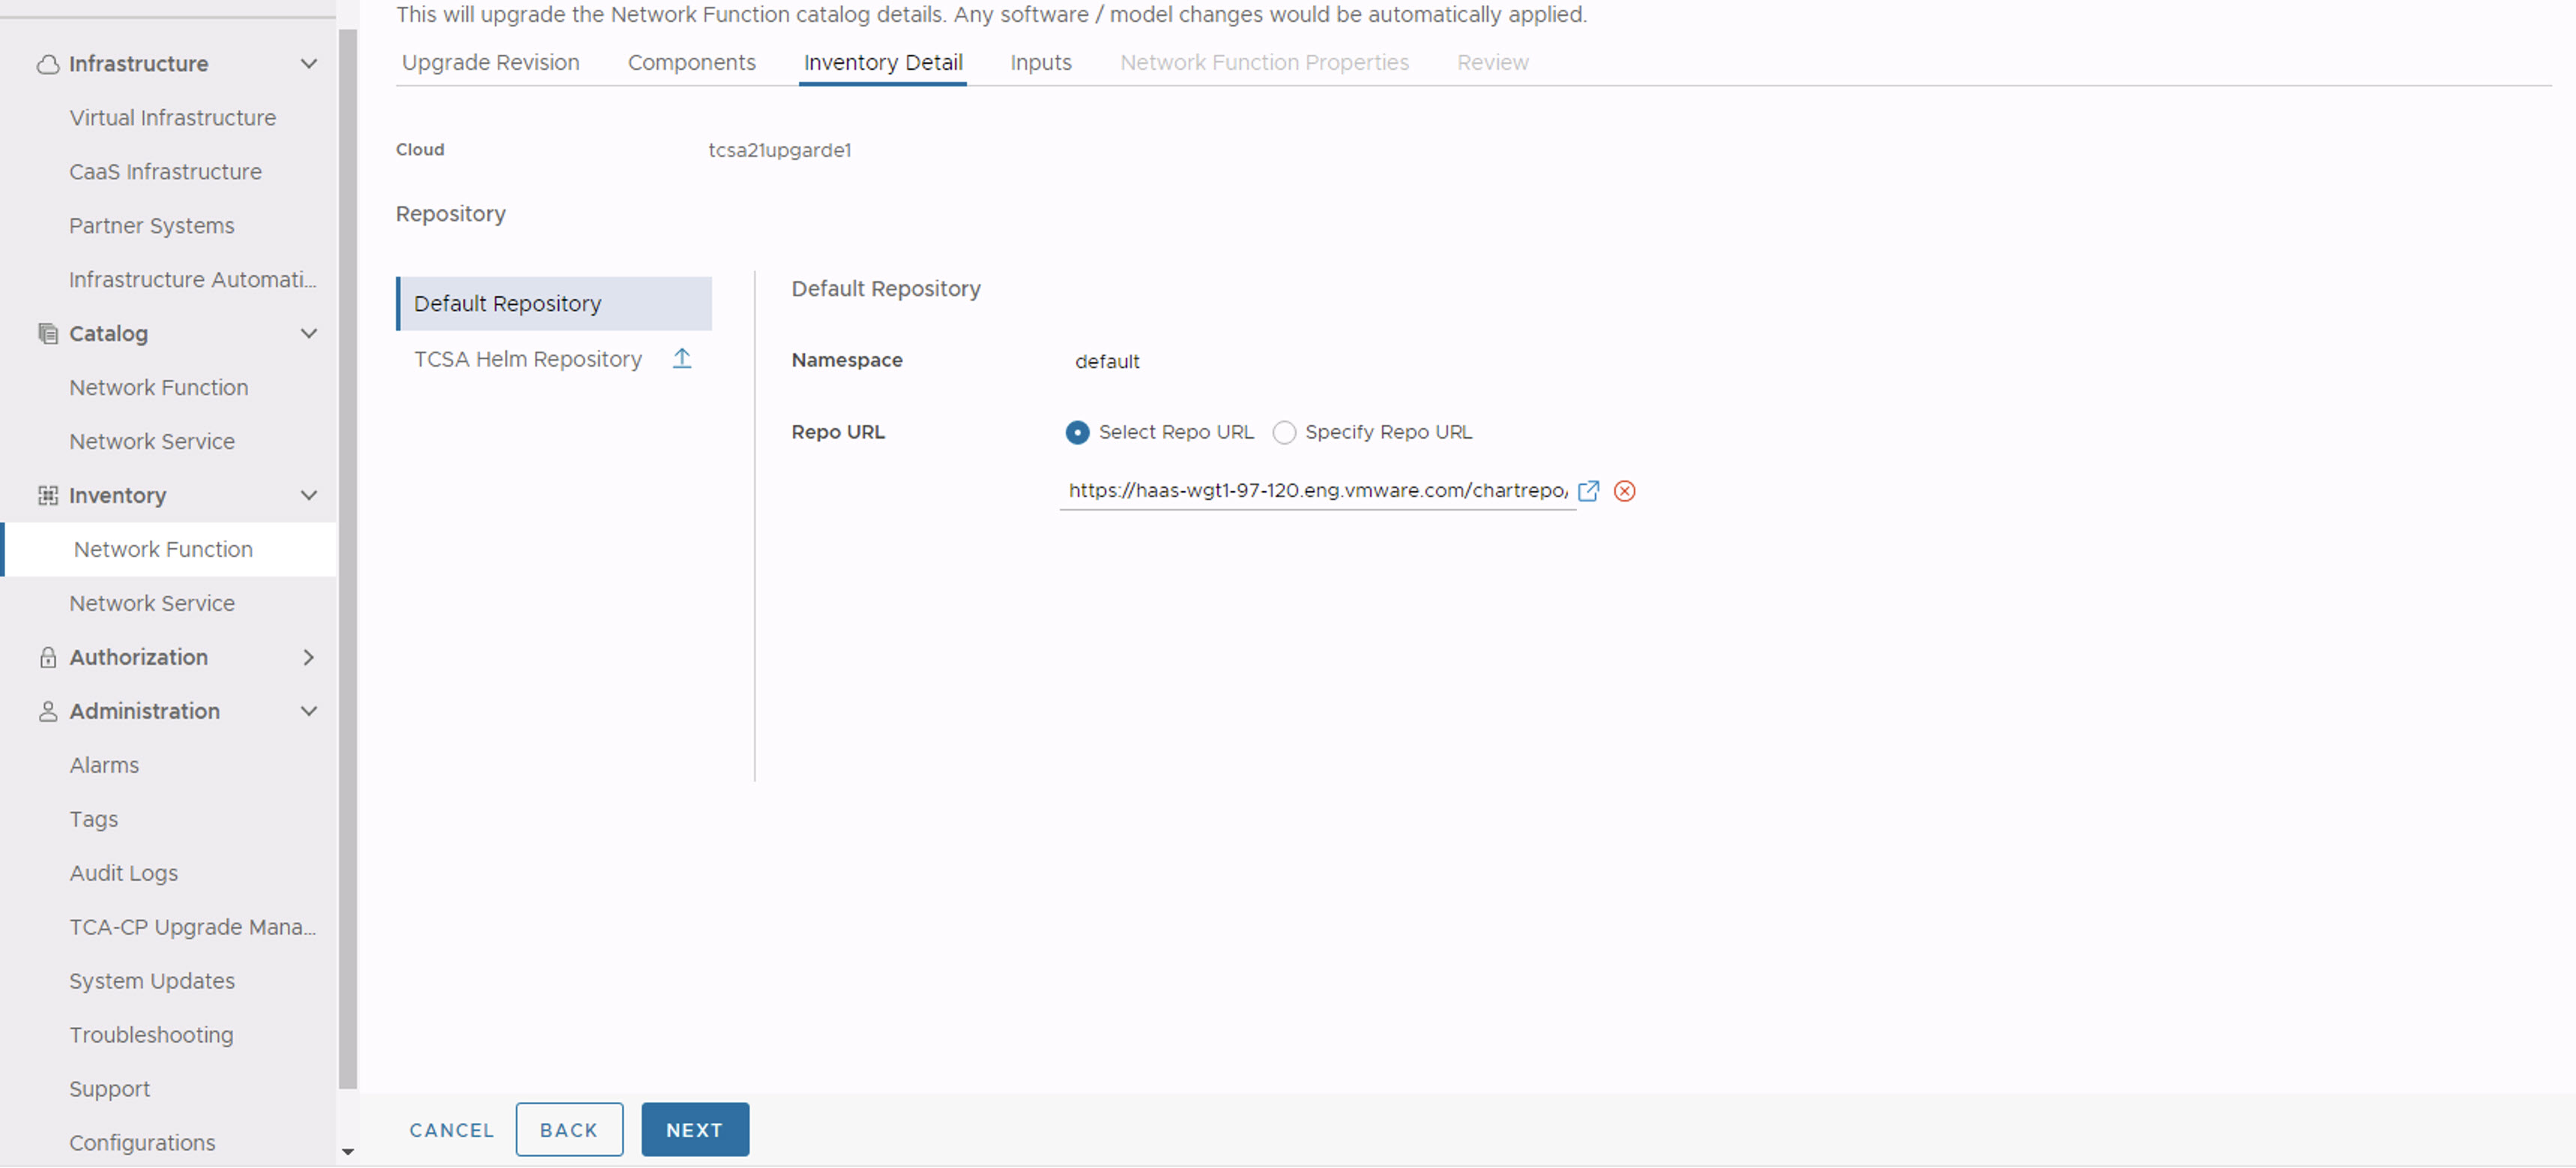
- In the Inventory Detail section, ensure that the Namespace is set to default and select the default library chart repository, that is, the https://<harbor-registry-fqdn>/chartrepo/library endpoint of the associated registry, and click Next.
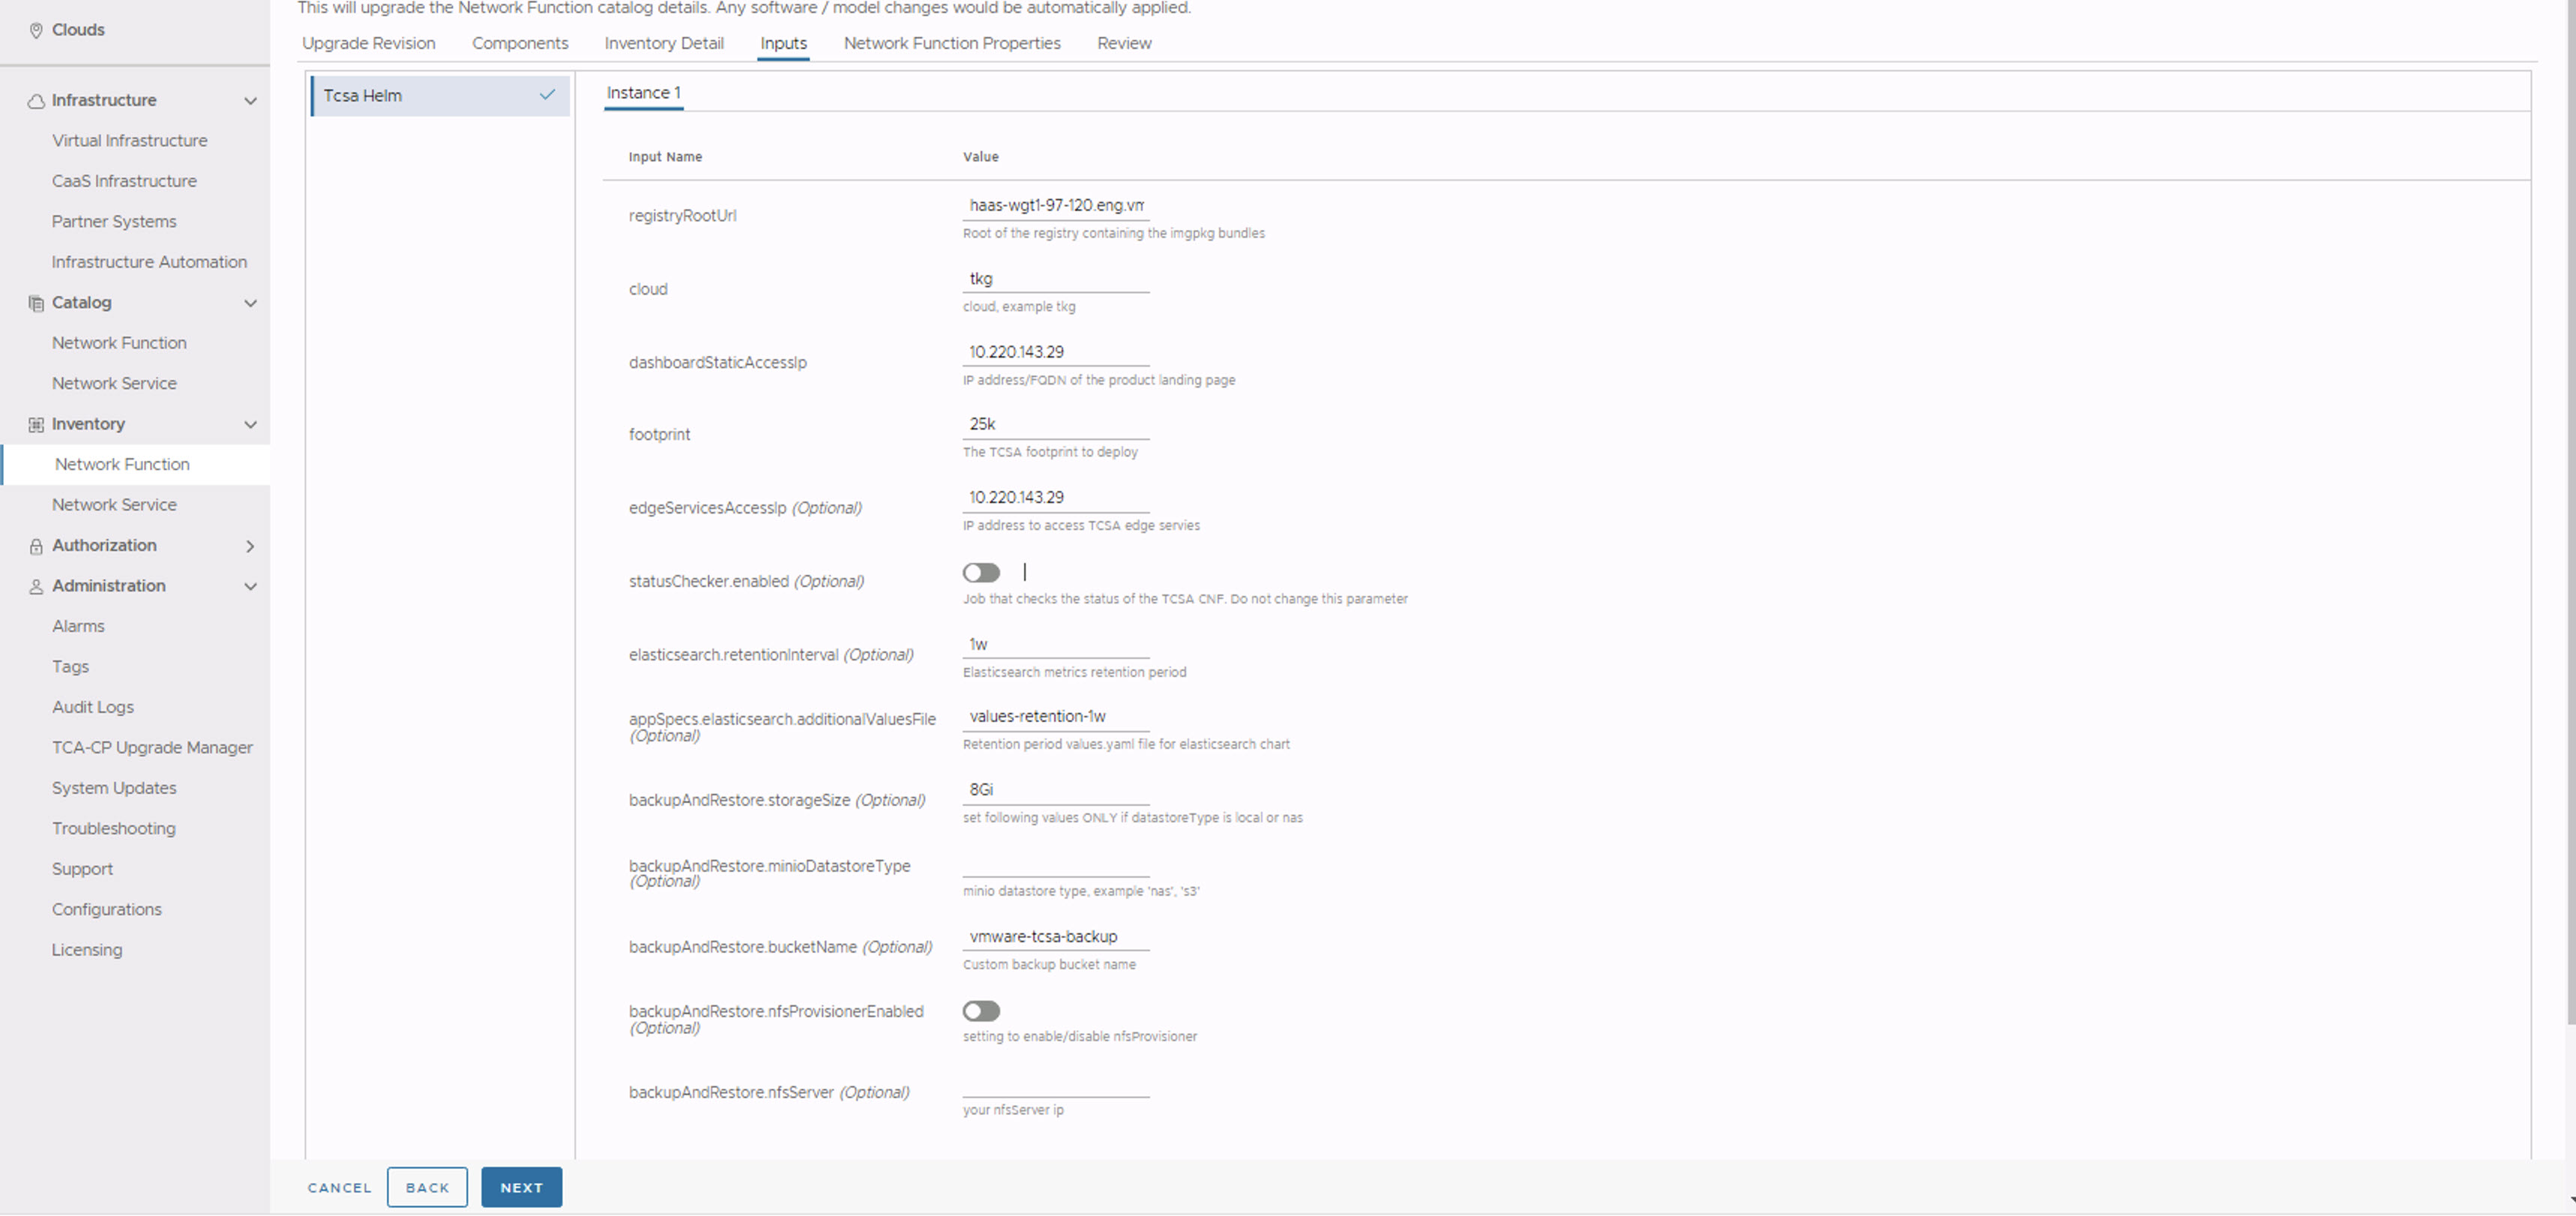
- In the Inputs section, update the following parameters:
- Set registryRootUrl to the registry URL used while pushing the artifacts.
- Set dashboardStaticAccessIp to the same value specified during the base VMware Telco Cloud Service Assurance deployment.
- Set footprint same as the base version. For example, demo, 25k, 50k, 75k, 100k, and so on.
- (Optional) Set edgeServicesAccessIpto the same value specified during the base VMware Telco Cloud Service Assurance deployment.
- Set statusChecker.enabled to disabled state if it is enabled. The default value is
disabled.Note: The statusChecker.enabled parameter is disabled in VMware Telco Cloud Service Assurance because VMware Telco Cloud Automation does not support CNF timeouts. - Set elasticsearch.retentionInterval to the same value specified during the base VMware Telco Cloud Service Assurance deployment.
- Set appSpecs.elasticsearch.additionalValuesFile to the same value specified during the base VMware Telco Cloud Service Assurance deployment.
- All the Backup and Restore values must be same as specified during the base VMware Telco Cloud Service Assurance deployment.
- Click Next.
- The Network Function Properties page appears. Click Next.
- In the Review section, click Upgrade.
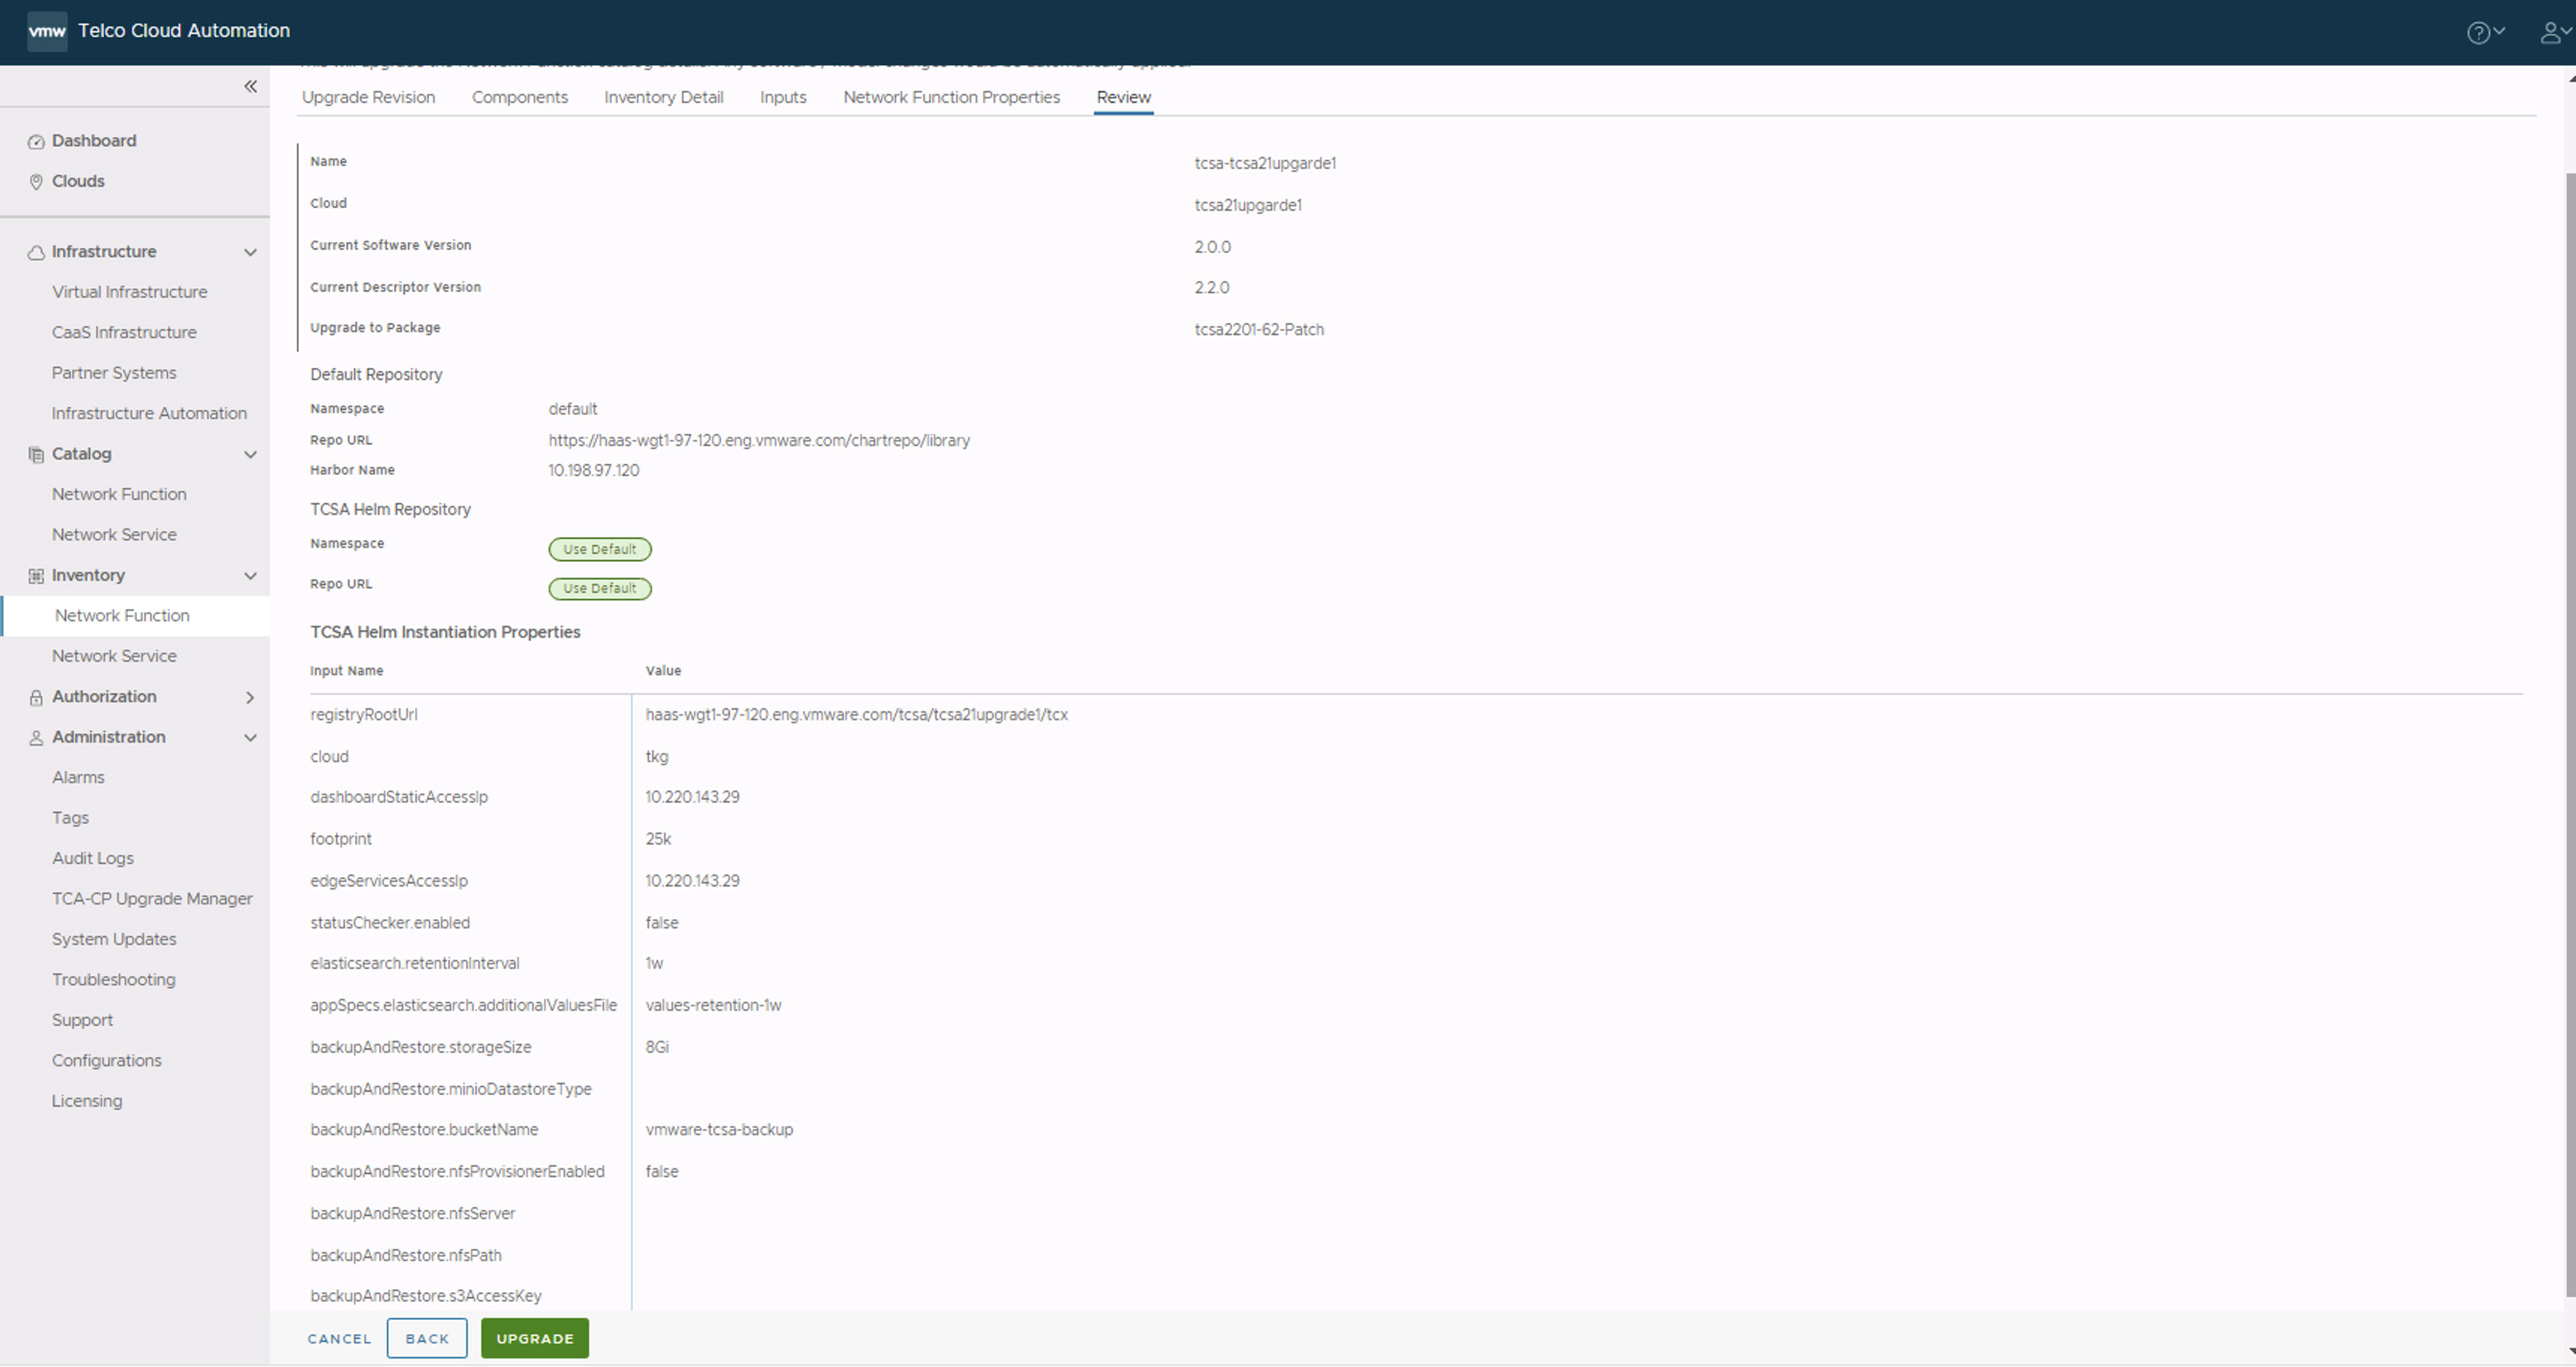
- Verify the patch deployment completion status in the VMware Telco Cloud Service Assurance UI.
kubectl command:
root [ ~/patch/tcx-deployer/scripts ]# kubectl get tcxproduct
 OR
root [ ~/patch/tcx-deployer/scripts ]# kubectl get apps
For all the apps, the reconcilation status must be successful.
If all the apps are not reconciled, the deployment fails. For more information, see VMware Telco Cloud Automation Installation Issue in the VMware Telco Cloud Service Assurance Troubleshooting Guide.
Deployment of Patch on VM Based VMware Telco Cloud Service Assurance Deployment with Native Kubernetes
- Login to the Deployment Host and create a directory called patch under /root directory.
- Download the patch bundle in the Deployment Host under the /root/patch directory.
- Extract the downloaded patch bundle. Then set the workspace to the following directory path:
export TCSA_WORK_SPACE=/root/patch
- Navigate to the values.yaml file.
$TCSA_WORK_SPACE/tcx-deployer/product-helm-charts/tcsa
- Update the required parameters in the values.yaml file.
Note: The values.yaml file in the patch must be updated with the values from the values.yaml file which was used to deploy the base VMware Telco Cloud Service Assurance deployment.
- Set Harbor registry URL.
# Default values for tcsa.
# This is a YAML-formatted file.
# Customize your TCSA deployment here by configuring the parameters that are exposed.
# Uncomment the relevant lines and configure them according to your environment.
.
.
# (string) registryRootUrl is the FQDN of the registry that has the artifacts.
registryRootUrl: <ClusterIP>:30001/tcx
Note: The ClusterIP is the IP address of the VM on which the ControlNode is deployed. - Set the footprint value.
# (string) footprint is the number of devices monitored by TCSA.
# allowed values for footprint "demo", "25k", "50k", "75k", "100k", "125k", "150k", "175k", "200k"
footprint: demo
- Set the dashboardStaticAccessIp and edgeServicesAccessIp parameters to the IP address of your cluster.
# (string) Set dashboardStaticAccessIp to the IP address used to access the TCSA dashboard. Leave empty or commented out for EKS private network deployments.
dashboardStaticAccessIp: <ClusterIP>

# (string) Set edgeServicesAccessIp to the IP address to be used to access kafka-edge. Leave empty for EKS public networks.
edgeServicesAccessIp: <ClusterIP>
Note: The ClusterIP is the IP address of the VM on which the ControlNode is deployed. - Set privateNetwork to false.
# ----IaaS configuration----
# (bool) privateNetwork indicates if TCSA is being deployed on a private EKS or AKS network
privateNetwork: false
- Set cloud provider as on-prem.
# (string) cloud indicates the cloud/K8s provider. Valid values are "tkg", "aws", "azure" and "on-prem"
cloud: on-prem
- Set Harbor registry URL.
- Trigger deployment using
tcxctlCLI.root [ ~ ]# cd $TCSA_WORK_SPACE/tcx-deployer/clis root [ ~/patch/tcx-deployer/clis ]# ./tcxctl deploy all --bundle-path $TCSA_WORK_SPACE/tcx-deployer --kubeconfig <your-kubeconfig-location> --registry <ClusterIP>:30001/tcx --registry-password TCXAdmin123 --registry-username <harbor-registry-username> --registry-cert /etc/docker/certs.d/<ClusterIP>:30001/ca.crt --timeout <time-in-mins>
Manually check the VMware Telco Cloud Service Assurance patch deployment status using the following command:root [ ~/patch/tcx-deployer/scripts ]# kubectl get tcxproduct
Alternatively, you can run the following command to check the patch deployment status:root [ ~/patch/tcx-deployer/scripts ]# kubectl get apps
For all the apps, the reconcilation status must be successful.
