You can use vRealize Suite Lifecycle Manager to enable multi-tenancy on premises on VMware Identity Manager 3.3.5 with vReallize Automation 8.4.
For vReallize Automation 8.4, multi-tenancy is enabled by default with tenant-in-host-name mode, as opposed to tenant-in-path mode. .
With tenant-in-host-name mode, you must use a URL of the tenant's fully qualified domain name (FQDN) to access tenants. A load balancer URL or the VMware Identity Manager URL will not work. For example:
- URL before multi-tenancy is enabled: https://load-balancer.vmwareidentity.com/SAAS/t/tenant1
- URL after multi-tenancy is enabled: https://tenant1.vmwareidentity.com
Be prepared to re-register existing vRealize products after you enable multi-tenancy on the load-balanced VMware Identity Manager deployment.
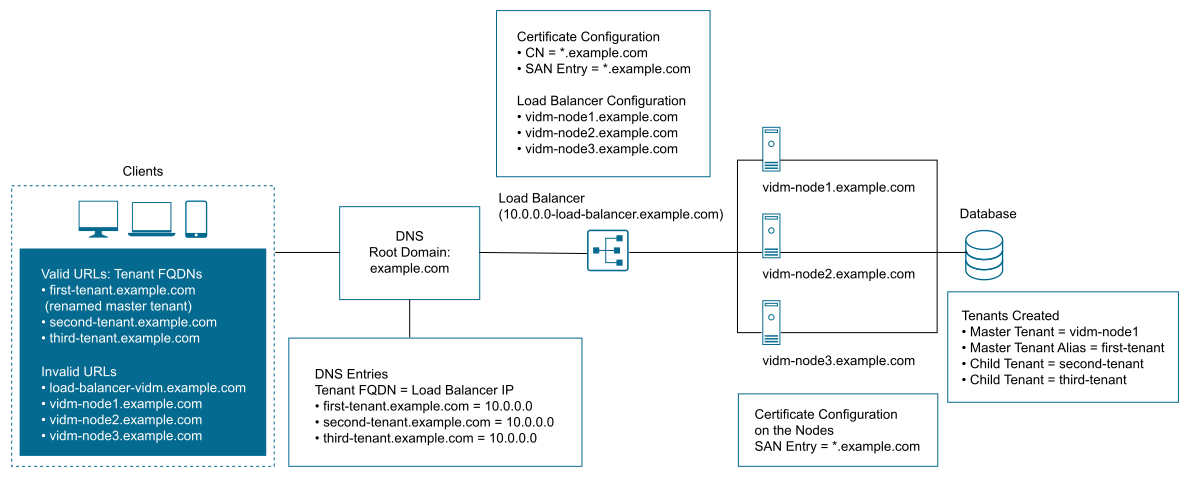
The following figure illustrates valid URLs and invalid URLs. The figure also provides examples of load balancer and DNS configurations.

Prerequisites
Create the appropriate DNS entries:
| Single Node or Clustered | Action |
|---|---|
| For a single node VMware Identity Manager deployment | Create DNS entries to resolve the fully qualified domain name for each tenant to the VMware Identity Manager IP address. |
| For a clustered VMware Identity Manager deployment | Create DNS entries to resolve the fully qualified domain name for each tenant to the load balancer IP address. |
Procedure
- ♦ Use vRealize Suite Lifecycle Manager to enable multi-tenancy.
See information about creating tenants in the vRealize Suite Lifecycle Manager 8.4 Installation, Upgrade, and Management guide.Important: Adhere to the following guidelines when you enable multi-tenancy.
- When configuring SSL certificates, the best practice is to use a wildcard Subject Alternative Name (SAN) certificate, preferably signed by a public Certificate Authority (CA). However, you can also use a self-signed certificate with a wildcard SAN.
Ensure that the certificate includes fully qualified domain names as SANs for the load balancer, nodes, and default-tennat alias.
Note: If you use a certificate without a wildcard SAN, perform the following steps as applicable.- Add all the tenant fully qualified domain names as SANs to the certificate.
- Whenever you create a tenant, ensure that the new tenant FQDN is added as a SAN to the VMware Identity Manager certificate. A certificate update requires a restart of the Horizon service.
- The following VMware Identity Manager Connector information applies.
- For a child tenant, the connector does not appear by default on the Connectors page. The Connectors page in the VMware Identity Manager Console lists a connector instance only after the enterprise directory is created using that connector instance.
- Always perform domain join operations from the master tenant.
- If you choose to create an IWA directory for a different domain on the child tenant, use different external Windows connector instances.
- The external connector instance activated against any child tenant is only used against that tenant.
- The external connector instance activated against a master tenant can be used across all the child tenants.
- During the upgrade, the VMware Identity Manager Service generates the cluster-hostname-conn-timestamp.enc file for all connector instances. The cluster-hostname-conn-timestamp.enc file contains embedded-connector configuration information.
- When configuring SSL certificates, the best practice is to use a wildcard Subject Alternative Name (SAN) certificate, preferably signed by a public Certificate Authority (CA). However, you can also use a self-signed certificate with a wildcard SAN.
What to do next
You must re-register the existing vRealize products, such as VMware vRealize Operations, VMware vRealize Automation, and VMware vRealize Log Insight with the master-tenant alias fully qualified domain name. See the vRealize Suite Lifecycle Manager 8.4 documentation.