


Configure the required IIS Manager settings for the Integration Broker.
Note: The steps in this procedure refer to the Windows Server 2012 or Windows Server 2012 R2 user interface.
Prerequisites
The credentials for the Identity user. The Identity user must meet the following requirements:
- Domain user
- Privileges to enable PowerShell Remoting on the Integration Broker server:
- Launch PowerShell with administrator privileges
- Run Enable-PSRemoting
- One of the following roles on the Citrix server:
- At least Read Only Administrator (version 7.x) or View Only Administrator (version 6.x)
- A custom administrator role that has the permissions to execute the following PowerShell cmdlets. These cmdlets are used to retrieve applications, server, farm, and icon information from the Citrix server farm.
On XenApp 6.5:
Get-XAApplicationGet-XAServerGet-XAAccountGet-XAApplicationIconGet-XAFarmOn XenApp or XenDesktop 7.x:
G
et-BrokerApplicationGet-BrokerIconGet-BrokerDesktopGroupGet-BrokerAccessPolicyRuleGet-BrokerAppEntitlementPolicyRuleGet-BrokerIconGet-BrokerEntitlementPolicyRule
Procedure
- In IIS Manager, configure the application pool that you selected while installing the Integration Broker.
Tip: To verify the correct application pool, click Application Pools in the left pane, right-click the application pool and select View Applications, and verify that the Integration Broker appears in the list.
- In the left pane, click Application Pools.
- Select the application pool that you are using for the Integration Broker.
- Click Advanced Settings in the right pane.
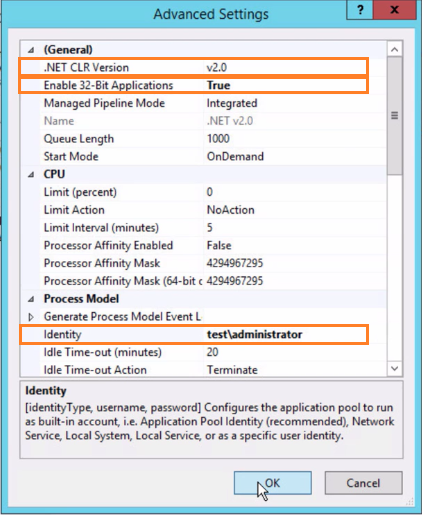
- In the Advanced Settings dialog box, configure the following settings.
Option Description .NET CLR Version Verify that the value is v2.0. Note: In Windows 2012 and Windows 2012 R2, the application pool may have been configured to a different .NET version by default. Ensure that you configure it to v2.0.Enable 32-bit Applications Set the value to True. Identity - Click Identity.
- Click the ... icon.
- In the Application Pool Identity dialog box that opens, click Custom Account, then click Set.
- Enter the user name and password for the Identity user. See the requirements for the Identity user in the Prerequisites section.
- Click OK and click OK again.
- Click OK to close the Advanced Settings dialog box.
