


Initiate a Workspace ONE Assist session, and depending on the platform, you can view the host device screen, manage the host's files, make changes to the host's registry, and access the Remote Shell.
- Navigate to and select the Friendly Name of a device capable of being remotely managed.
The Details View for the selected device displays.Note: Windows desktop devices now support unattended mode access. For more information, see Unattended Mode.
- Select the Remote Assist button and then select a tool from among the presented options. The options are Screen Share, File Manager, and Remote Shell.
The Remote Support screen displays and it commences with reviewing device registration, queuing remote management command, and creating the remote management session.
Note: To prevent request timeouts and improve the reliability of assist connection in attended mode, we have introduced the functionality where the end user can initiate the assist sessions from the device side. When the assist agent takes a long time to connect, the end user can manually launch the assist application from the device. This improves reliability and speeds up assist agent connection. As a help desk admin performing remote control sessions, the admin can request end user to manually launch assist for connection to be faster. This is an additional feature, and it is not mandatory for the end user to initiate the session.In Assist 23.02, to prevent request timeouts and improve the reliability of assist connection in Windows & MacOS platforms, we have introduced an alternate mechanism to automatically invoke the Assist agent on the device. This is achieved by sending a notification from the Assist Console/Server to the device using the Windows Notification Service (WNS) and the Apple Push Notification Service (APNS). This ensures that Assist agent doesn't always rely on the Hub to get invoked.
This feature is currently available only for SaaS Assist customers. No additional configuration is required on the device side to enable this feature.
A confirmation PIN displays on the screen intended for the end-user of the host device.
- Relay the PIN information to the end-user and ask them to enter the PIN on their device to authorize the session.
- If they enter the PIN, they consent to the remote session and the session begins.
- If they refuse to enter the PIN, they do not consent and the session ends.
Note: On Samsung BYOD devices, only applications in the Work Profile can be viewed and controlled. If you navigate to the Work profile home screen or personal side of a Samsung BYOD device during a Workspace ONE Assist session, it only displays a blank screen.
Privacy Notices and End-User Prompts
Workspace ONE Assist provides end users visibility and transparency during remote control sessions by displaying privacy notices, on screen prompts, notifications, and an on screen toolbar giving the end user power over the remote session.
Privacy Notices
When the end user launches Workspace ONE Assist for the first time, whether in Attended or Unattended mode, they see a Privacy Notice that informs them of the data accessed by the Assist application. Attended sessions always present the end user with a PIN prompt. However, if the application is launched for the first time through a connection process, the privacy notice is displayed only on the Attended mode agent. The Unattended mode agent does not display a privacy notice during the connection process.

PIN Prompt at the Beginning of a Session
When you start a session in Workspace ONE Assist, a four-digit PIN displays as a pop-up message to you, the admin. You must provide this PIN to the host device end user so they can enter it into the PIN prompt on their device. Communicate this PIN by telephone, text message, or email. This exchange represents the host device end user's acknowledgment of the privacy notice. The end-user grants access (by entering the PIN you provide) or denies access (by not entering the PIN you provide).
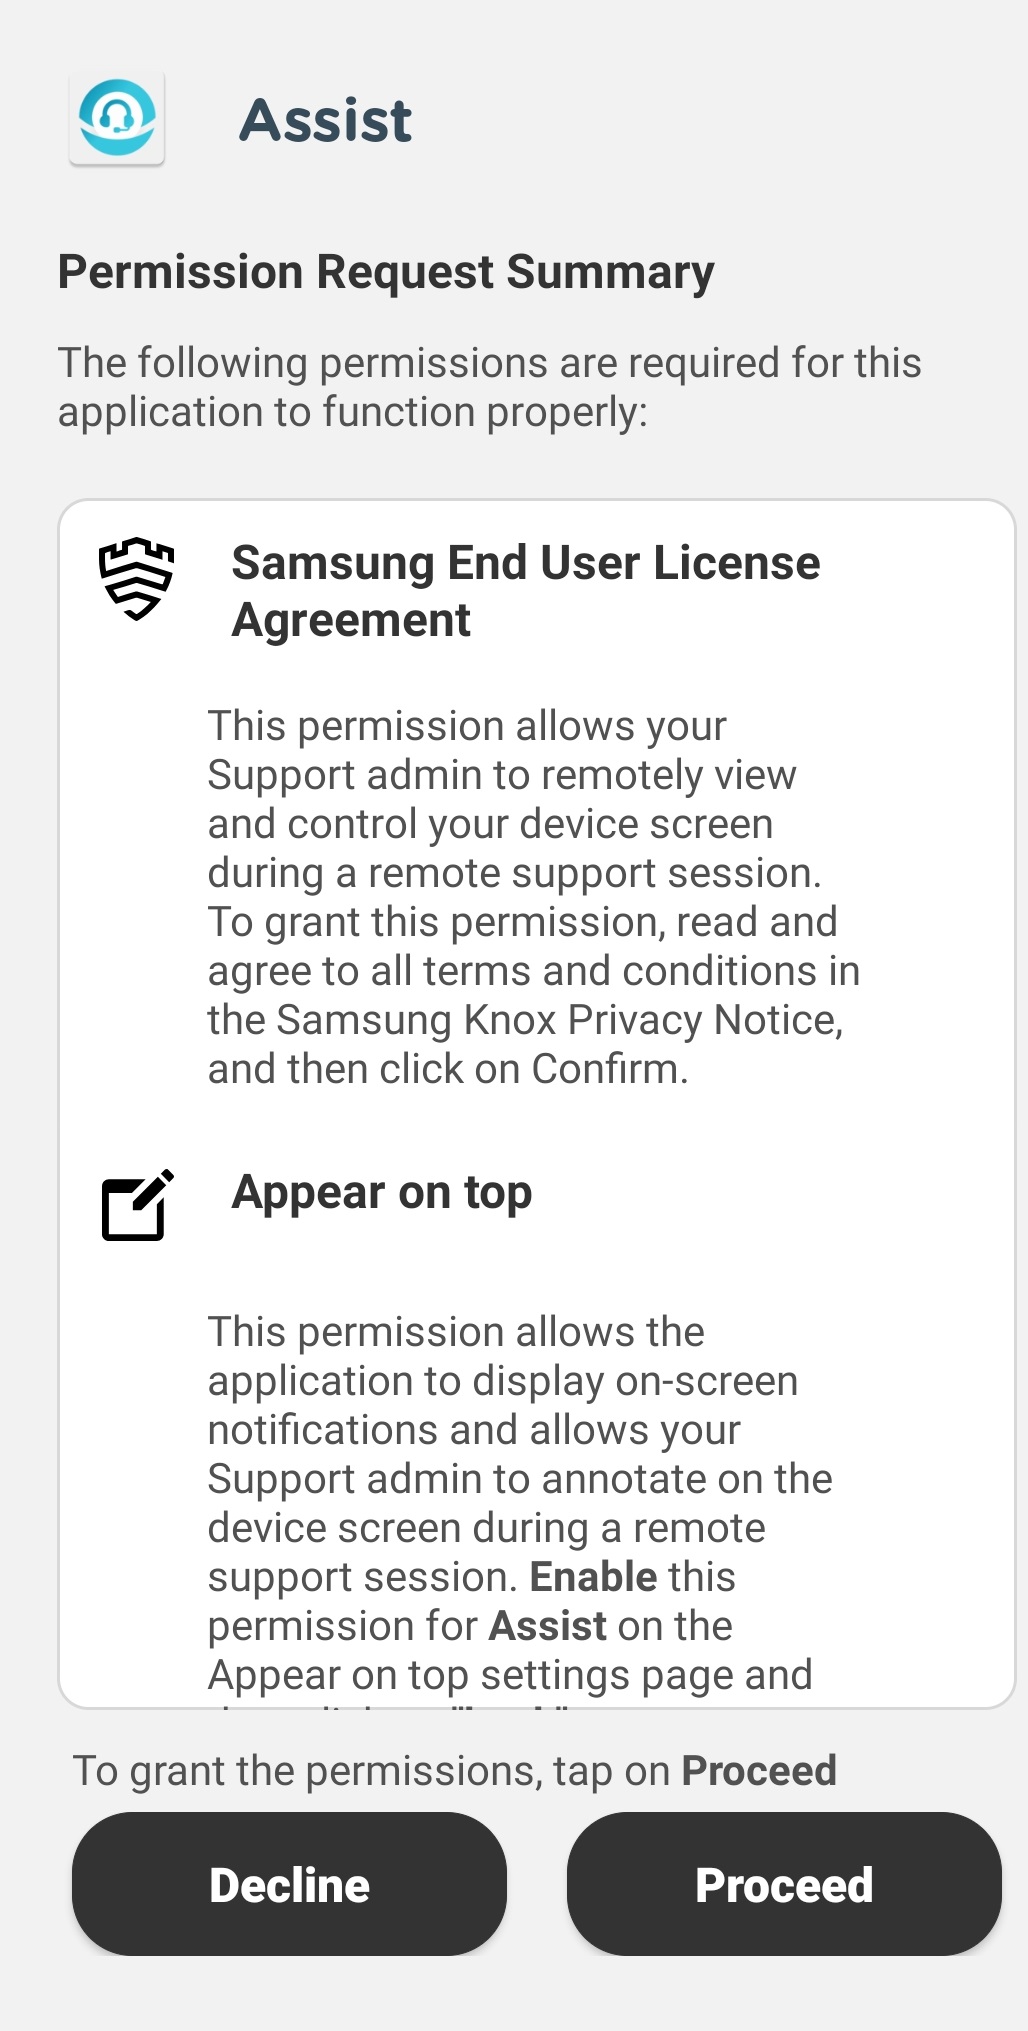
Permission Requests For Android Devices
Multiple user permissions are required for Android devices in attended mode for which we do not have an OEM signed Assist service application to provide a complete remote-control experience. End user interactions include a one-time 4-digit PIN entry per session, granting screencast permission to allow remote view of the device screen, granting a draw over apps permission that facilitate the Whiteboard feature and granting the accessibility permission to allow remote control within the device. On Samsung devices, the end user has to grant an additional one-time KNOX EULA request.
To simplify and streamline the experience, starting with Assist 22.04, there is a single information page presented on both the device and the admin console that gives information on the required permissions as well as instructions for granting them. The device's UI also automatically guide the user to accept these permissions one by one.
The Halo
When you use any client tool (Remote View, Remote Control, File Manager, or Remote Shell), a blue outline is drawn around the outer edge of the host device end user's screen called a "halo". This halo serves as a persistent notification that a Workspace ONE Assist session is active.
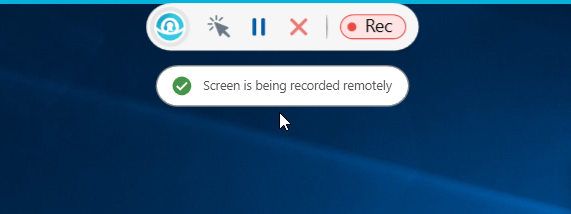
There is a toolbar that appears with the halo. This toolbar gives the host device end user the power to pause a session, revoke remote control privileges demoting the session back to Remote View only, and the power to disconnect the session entirely. The toolbar also indicates when the screen is being recorded
Permission Prompts
When you start any other client tool during a Screen Share session, the end user is again asked permission for access.
For example, an end user enters the PIN provided by the Admin resulting from initiating a Screen Share session. This action grants the Admin view only access to the end user's Windows desktop device to troubleshoot a problem. During this Screen Share session, the Admin starts the Manage Files client tool. Before the Admin gets to see and manage the end user's files remotely, the end user of the host device must select Deny or Allow from the Manage Files prompt that appears. The Screen Share session is not impacted by either choice. However, the Manage Files session cannot proceed until after the end-user grants access.
- Enable screen share for every session on Android 10 and later.
- Enable accessibility service for each remote control session.
Note: Accessibility service cannot be enabled within a Work Profile, hence, remote control using Accessibility service cannot be leveraged on COPE and BYOD devices.
Android 11 and Manage Files Client Tool
Beginning with Android 11, Google is enforcing scoped storage on all applications targeting API level 30. The enforcement of scoped storage means an app is limited to only accessing its own file sandbox and specific types of media files that the app has created.
To provide access to other file locations on the device, VMware has partnered with many of the top Android device manufacturers to create a newer version of the OEM-specific service application (v2.5). Download and install the latest version of the Assist service application to access all files on the remote device.
On devices where an OEM-specific service application is not available (for example, Samsung and Sony devices) the end user on the remote device must explicitly grant additional permissions to the application when requested. Workspace ONE Assist prompts the Android 11 device end user to 'Allow access to manage all files'. This permission must be granted to the Assist application one-time at the beginning of the first Manage Files session.
- In Attended mode, this permission must be granted or denied by the end user of the device.
- In Unattended mode, you must grant this permission through the Share Screen client tool.
Once permission is granted, all files on the remote device can be accessed during the Manage Files session. In the absence of this permission, you can only access Media and Downloads folder.
Agent Modes
- To leverage KNOX Remote Control APIs on Samsung devcies, the end user must accept a KNOX End User License Agreement on the remote device. This permission is required on Unattended mode of connection as well. From Assist 22.04, this permission is requested on the Unattended mode agent at the time of application installation. On Assist Attended mode, this permission is requested during the first remote control session.
- An additional prompt requesting the accessibility permission in the Attended mode also displays on the Samsung devices. This permission ensures that the device screen is dimmed, blocking the admin's view when the user enters a password in the foreground.
Notifications Sent Per Video Recording and Screenshot
For Android, macOS, and Windows 10 devices only, the first time you initiate a video recording or request a screenshot in a session, the host device end user is prompted to grant permission. After the end-user grants permission, each subsequent video recording or screenshot made in the same session results in a "pop-up" on-screen notification instead of a permission request.
These notifications, together with the PIN prompts and the other permissions, are designed to foster transparency during any Workspace ONE Assist session.
For more information about VMware's stance on privacy, see the VMware Privacy Notice.
Session Collaboration Notifications and Prompts
Device end users receive a popup notification for each participant that joins the active session collaboration. The only exception is for Android devices in Unattended mode.
Main Menu Toolbar
The Workspace ONE Assist client provides support tools to facilitate troubleshooting and remotely controlling end-user devices. Not all client tools are available for all platforms. You can also assign tool-specific role permissions to your admins from the Workspace ONE UEM console.
The main menu toolbar appears in the top-center of the Workspace ONE Assist client screen, giving you direct access to multiple features and functions.

![]() – The Home button gives you access to all the client tools including Manage Files, Remote Shell, Registry Editor, and Share Screen.
– The Home button gives you access to all the client tools including Manage Files, Remote Shell, Registry Editor, and Share Screen.
![]() – The Info button displays the session logs, the VMware Privacy Policy, and the version number of Workspace ONE Assist.
– The Info button displays the session logs, the VMware Privacy Policy, and the version number of Workspace ONE Assist.
![]() – The Screen Share button indicates when an active Screen Share session is running.
– The Screen Share button indicates when an active Screen Share session is running.
![]() – The Manage Files button gives you access to storage space on the host device. For more information, see Manage Files.
– The Manage Files button gives you access to storage space on the host device. For more information, see Manage Files.
![]() – The Remote Shell button helps you access the PowerShell interface of the connected Windows desktops and macOS devices.
– The Remote Shell button helps you access the PowerShell interface of the connected Windows desktops and macOS devices.
![]() - The Whiteboard button helps you access the whiteboard functionality that allows you to highlight a specific item to the user.
- The Whiteboard button helps you access the whiteboard functionality that allows you to highlight a specific item to the user.
![]() - The Shortcuts button helps you easily access common tools and funtions.
- The Shortcuts button helps you easily access common tools and funtions.
![]() – The Multi-Monitor button appears when your host machine has more than one monitor attached. It allows you to select which monitor you want to view or control. Only one monitor may be viewed or controlled at any given time.
– The Multi-Monitor button appears when your host machine has more than one monitor attached. It allows you to select which monitor you want to view or control. Only one monitor may be viewed or controlled at any given time.
![]() – The Virtual Keyboard button starts the on-screen keyboard. You can find details about the virtual keyboard in its own section of this topic.
– The Virtual Keyboard button starts the on-screen keyboard. You can find details about the virtual keyboard in its own section of this topic.
![]() – The Device Skin button points to the location of the power and volume buttons with the name tag for the admin to classify the buttons.
– The Device Skin button points to the location of the power and volume buttons with the name tag for the admin to classify the buttons.
![]() – The Screenshot button takes a static screenshot of the remote session. For more information, see Capture Video and Images.
– The Screenshot button takes a static screenshot of the remote session. For more information, see Capture Video and Images.
![]() – The Record button initiates a video recording of the remote session. For more information,see Capture Video and Images.
– The Record button initiates a video recording of the remote session. For more information,see Capture Video and Images.
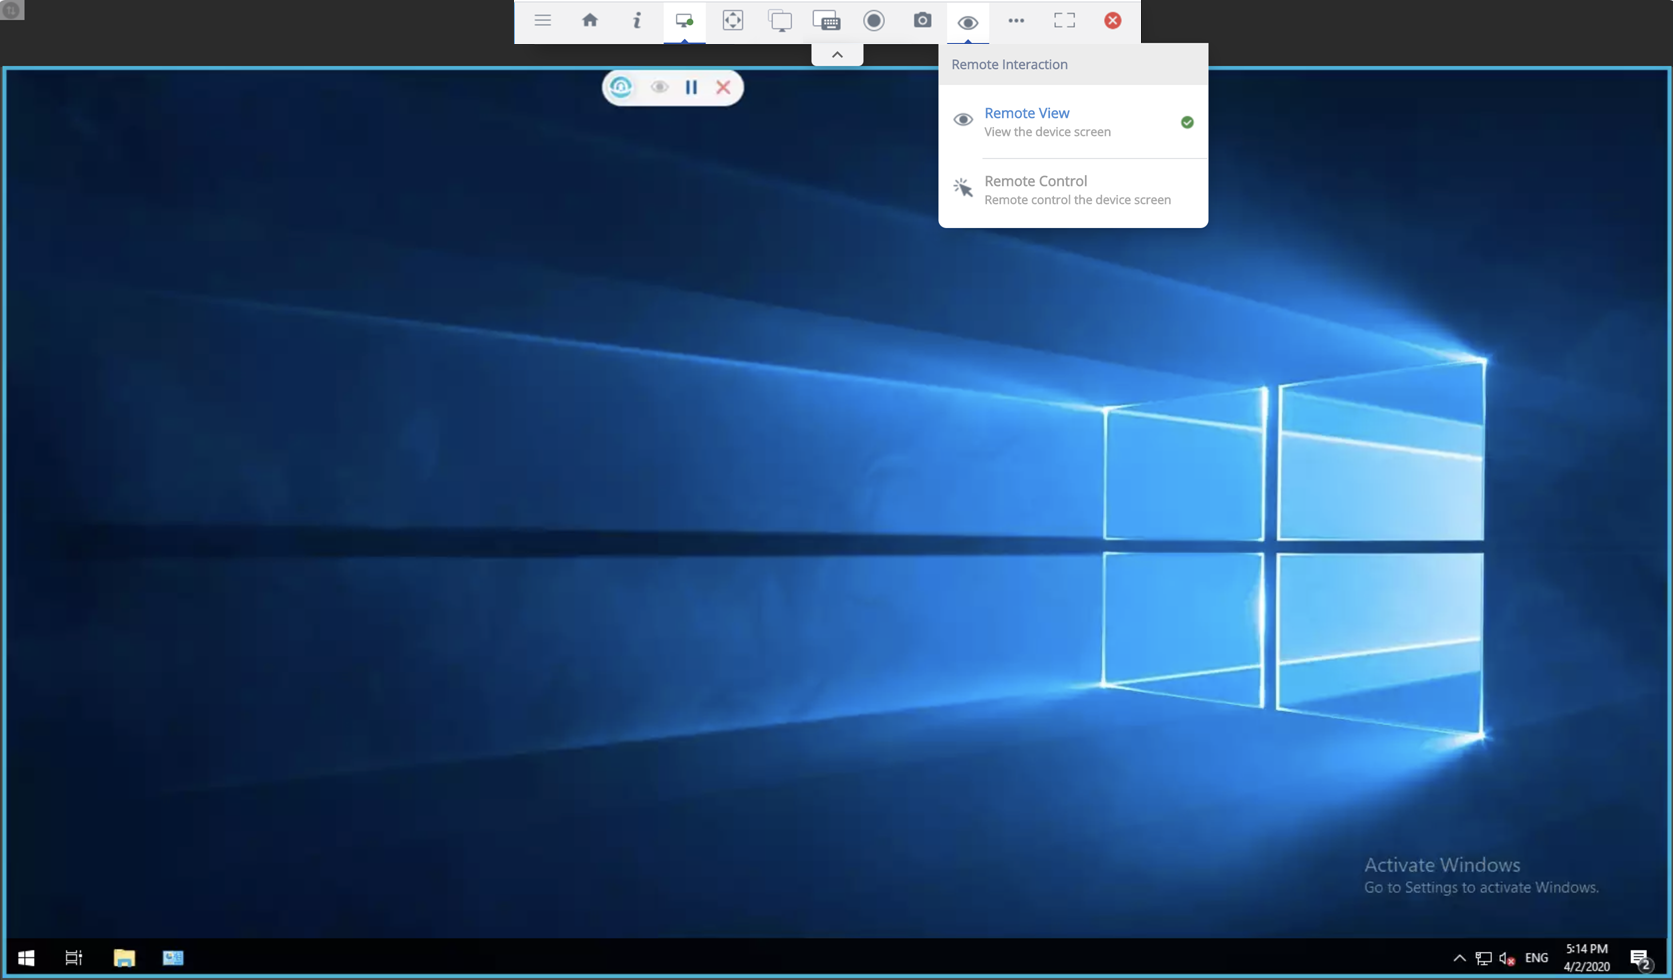
![]() – The Remote View button indicates that a Remote View is in session and selecting it lets you request a session elevation (to Control Screen) from the host device end-user.
– The Remote View button indicates that a Remote View is in session and selecting it lets you request a session elevation (to Control Screen) from the host device end-user.
![]() – The Control Screen button indicates that a Control Screen session is running and you can select it to demote your session to Remote View.
– The Control Screen button indicates that a Control Screen session is running and you can select it to demote your session to Remote View.
![]() – The Add Folder button lets you add a new storage folder on the host device. This button is available when connected to the File manager session.
– The Add Folder button lets you add a new storage folder on the host device. This button is available when connected to the File manager session.
![]() – The Refresh button refreshes folder views and their contents. This can be useful when you work with session collaborators who contribute files to host storage. This button is available when connected to the File manager session.
– The Refresh button refreshes folder views and their contents. This can be useful when you work with session collaborators who contribute files to host storage. This button is available when connected to the File manager session.
![]() – The Session Collaborate button lets you invite other participants into your active Share Screen and Remote View session. Getting extra help can be useful to troubleshoot advanced issues. Select this button to invite Guests to your active session. For more information, see Session Collaboration.
– The Session Collaborate button lets you invite other participants into your active Share Screen and Remote View session. Getting extra help can be useful to troubleshoot advanced issues. Select this button to invite Guests to your active session. For more information, see Session Collaboration.
![]() - The Clipboard button lets you to copy & paste the texts to and from the remote device. For more information, see Bi-directional Clipboard functionality for Windows & MacOS.
- The Clipboard button lets you to copy & paste the texts to and from the remote device. For more information, see Bi-directional Clipboard functionality for Windows & MacOS.
![]() – The Ellipsis button contains access to Fit to screen and the System Summary. Fit to Screen stretches or shrinks the remote device skin in a way that makes it fully visible given the current size of the Assist window.You can find details about System Summary in it's own section of this topic.
– The Ellipsis button contains access to Fit to screen and the System Summary. Fit to Screen stretches or shrinks the remote device skin in a way that makes it fully visible given the current size of the Assist window.You can find details about System Summary in it's own section of this topic.
![]() – The bell button is displayed if the File Vault security feature is enabled on a macOS device. You can execute a command to re-connect to the device while performing a device reboot. The session does not re-connect if the command is not executed with File Vault enabled on the device.
– The bell button is displayed if the File Vault security feature is enabled on a macOS device. You can execute a command to re-connect to the device while performing a device reboot. The session does not re-connect if the command is not executed with File Vault enabled on the device.
![]() – The Chat button lets you exchange text messages, including private messages, between all the participants of an Assist session: the remote user host, the Assist console user who initiated the session, and all session collaborators. See below for details.
– The Chat button lets you exchange text messages, including private messages, between all the participants of an Assist session: the remote user host, the Assist console user who initiated the session, and all session collaborators. See below for details.
![]() – The Fullscreen button maximizes the Assist window in such a way that it fills the display at its current maximum resolution.
– The Fullscreen button maximizes the Assist window in such a way that it fills the display at its current maximum resolution.
![]() – The End Session button stops the currently running session.
– The End Session button stops the currently running session.
Switch User Accounts during a Remote Session
You can now switch user accounts during an active remote-control session without getting disconnected from the session.
Assist also allows remote control of the login screen that enables you to login using other user credentials.
Auto-Reconnect on Reboot
On Windows desktop, Windows CE, and Android device sessions when a device is rebooted in an Assist session, the session automatically reconnects after the reboot.
However, in macOS, the FileVault has to be deactivated for this functionality. When FileVault is activated, there is a notification which is provided on the screen to run commands which would activate this functionality which connects the Assist session automatically after a device reboot. This is supported from Assist version 21.09.
When FileVault is activated, please run the command sudo fdesetup authrestart before the reboot to activate the device to auto reconnect after rebooting. Hence, the Helpdesk admin can enter the User ID password and run the above command before rebooting the device so that they can automatically connect back to the session. The admin reconnects with the device at the user login page.
The notification to perform the command is available on the Assist console and also when the reboot option is selected from Shortcuts menu in the Assist console. Hence, no end-user assistance is required to reboot the device. However, the login user id and password is required to run the command and then to log back into the device after the reboot.
Virtual Keyboard
The virtual keyboard is used to send platform-specific key commands, language-specific keys, and other special keystrokes to the remote device.
For example, if your remote management device is an Apple Mac, you must use the virtual keyboard to send a Windows key keystroke to the Windows desktop remote device.
If you remote into a device that is configured in a different language than your remote management device, you must use the virtual keyboard to access those special keys.
Lastly, the virtual keyboard lets you send special keystrokes to the remote device, ensuring they are not confused with keystrokes for your own device, for example Ctrl-Alt-Del.
Copy & Paste with Virtual Keyboard
The virtual keyboard is the method by which you can copy a string of text from your remote management device, and paste it onto the remote device.
Initiate copy & paste during a Share Screen session by taking the following steps.
- On the remote management device, select a text string from your application of choice.
- Copy it to the clipboard by hitting Ctrl-C on your keyboard.
- Switch to the Share Screen session and open the virtual keyboard.
- Click anywhere in the grey colored area that runs across the top of the virtual keyboard, to the right of the Auto Send switch.
- Paste it onto the virtual keyboard by hitting Ctrl-V on your keyboard.
- Ready the application on the host device to receive the text string. Do this by placing the pointer on the spot you want the text string to be pasted.
- Switch back to the virtual keyboard and select the green send button to the far-right of the virtual keyboard to paste it onto the application you made ready above.
Chat
You can exchange text messages to and from the device end user and session collaborators no matter what client tool you use. You can also send private messages to individual session participants. Chat is available during Assist sessions on Android, macOS, and Windows desktop devices.
- Initiate a chat session by selecting the Chat icon
 from the main menu toolbar of the Assist Console.
 - End users access the Chat tab from the Assist application installed on their devices in both Attended and Unattended modes.
- Only devices connected by Attended mode receive notifications about chat messages.
- The Chat feature is available while using any Assist Client Tool including Manage Files, Remote Shell, and so on.
- To send a private chat message, select an individual participant from the To: drop down menu.
- You can get the device end user's attention of an incoming chat message by selecting the Chat Bullhorn button
 . This button directs the connected device to emit an audible signal, which can be useful for when the end user is in a noisy environment.
Shortcuts
The shortcuts menu grants access to common administrator tools and useful functions. It gives you immediate access to the listed functions.
- Command Prompt
- Control Panel
- Ctrl-Alt-Del
- Event Viewer
- Lock Screen
- Log Out of device (including confirmation prompt for end user)
- Network and Sharing screen
- Registry Editor
- Restart PC
- Services
- Show Desktop
- Task Manager
System Summary
The System Summary contains information similar to Device Details in Workspace ONE UEM. Use this information to diagnose issues on a device while connected. There are five subsections within System Summary.
- The Device Information pane provides at-a-glance information about the remote device during troubleshooting. The pane displays signal strength, battery, network status, storage, and main memory information.
- The Application List subsection displays all the installed applications on the device.
- The Process List subsection displays all processes running on the device and includes the option to stop only those processes that can be terminated.
- The Service Book subsection displays all services running on the device.
- The Share Screen subsection displays a historical log of all prior remote sessions.
All the content in each subsection can be searched using the Search list below feature, located in the upper-right corner of the System Summary screen.
You can also select the Export button (to the right of the search function) to export each subsection to an Excel-viewable file saved to your device for detailed analysis.
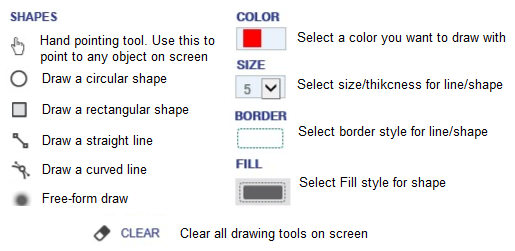
Device Whiteboard
The device whiteboard functionality allows you to highlight a specific item to the user. The whiteboard allows you to draw, highlight, and point to areas on the screen.
To use the whiteboard, select the whiteboard icon (![]() ) in the bottom right of the device screen view.
) in the bottom right of the device screen view.
The whiteboard menu consists of the following items.
This feature is supported by Android, macOS, and Windows desktop devices.
Be sure that the Android devices in your fleet are configured to use the Whiteboarding feature. For more information, see Configure Android Devices for Whiteboarding Feature.
Share Screen
The Share Screen tool is the section of the Workspace ONE Assist which allows you to control the end-user device remotely for troubleshooting and research purposes.
This functionality requires the Remote Control permission to be part of your assigned administrator roles. For more information, see Role-Based Access to Workspace ONE Assist.
For more information about the main menu toolbar, see Main Menu Toolbar.
With regard to the permission prompts for the Remote View and Remote Control functions on macOS devices, be aware of the following.
- macOS devices running version 10.14 (Mojave) allow the Share Screen feature by default. No additional permissions are required to share the screen, therefore, no prompt is displayed at the beginning of a Share Screen session.
- For macOS devices running version 10.15 (Catalina), the Share Screen and Remote View features both require that you enable the Screen Recording permission to Workspace ONE Assist in the Privacy tab of Security & Privacy preferences, located in System Preferences. Only during the first time you initiate a Share Screen session with a qualifying macOS device, an access request popup displays including a convenience link to this privacy setting in System Preferences.
- Similarly, macOS devices running version 11 (Big Sur) or later must enable Screen Recording permission to Workspace ONE Assist for both Remote View and Share Screen features. This permission is configured in a slightly different way for version 11:
Enable Screen Recording by navigating to then select the Lock icon to unlock the Privacy settings and enter the Administrator password. This is a one-time activation by the end user.
- For Unattended mode in MacOS, Screen Share tool has two possible flows to auto-grant the Screen Recording permissions.
- If a user is logged into the device, the Screen Recording permission is granted automatically before the start of each Screen Share session by pushing a TCC profile from the UEM console. Before each Screen Share session, the Assist Agent checks if the permission is already granted. If the permission is granted, the connection goes through. If the permission is not granted, Assist agent grants the permission while the Screen Share connection is in progress. This is a safe way since the permission can be revoked anytime by the end user. The TCC profile is bundled with the Assist 23.02 agent package and can be downloaded from the My Workspace ONE ™ portal.
- If there is no user logged into the device, the Screen Recording permission cannot be granted automatically. In such a situation, the admin has to log into any user account for the automatic Screen Recording permission to kick-in. This can be done by passing username and password using following commands through Remote Shell Tool, these steps are essentially just to enter username and passwords on the remote Mac.
To achieve this connect to Remote Shell tool and log in to their user account by entering the listed commands.
osascript -e ‘tell application “System Events” to keystroke “<user name>"’osascript -e ‘tell application “System Events” to keystroke return’osascript -e ‘tell application “System Events” to keystroke "<password>"’osascript -e ‘tell application “System Events” to keystroke return’
Once these commands are executed, the admin console might show a brief interruption of the remote session while the user is logged in and eventually will re-connect. Now once user is logged in, the Screen Recording permission is granted automatically and the admin can view the screen right after that. This is a one time procedure and need not be performed in subsequent session as long as the permission is not revoked by the user. If the Screen Recording permissions are already granted before the start of connection, the connection goes through and there is no need to connect to Remote Shell tool.
Irrespectively, if the connection is only either Remote Shell and/or File Manager then there are no limitations as above, and Unattended connection goes through without providing additional permission other than configuring TCC profile.
End-User Can Pause Share Screen Session
During a long share screen session, an end user might need to perform some activity that requires privacy, for instance, answering an email.
If an end user needs privacy, they can pause a remote control session by clicking the blue Pause button (![]() ) located in the Assist window, which places the share screen session in a "hold" state. The end user can unpause the session by clicking the blue button again.
) located in the Assist window, which places the share screen session in a "hold" state. The end user can unpause the session by clicking the blue button again.
Capture Video and Images
You can capture video of your Workspace ONE Assist remote session and save it as a file to your download folder. You can do the same with still images (screenshots).
For Android, macOS, and Windows 10 devices only, the first time you initiate a video recording or request a screenshot in a session, the host device end user is prompted to grant permission. After the end-user grants permission, each subsequent video recording or screenshot made in the same session results in a "pop-up" on-screen notification instead of a permission request.
Devices in Unattended mode receive no permission requests and no notifications.
- Invoke the drop-down toolbar by selecting the down arrow at the top-center of your remote session window.
- Select the icon of the action you want to perform.
- For video capture, select the round 'Record' icon (
 ). Stop recording the session to video by clicking the same button.
 - For an image capture (screenshot) of the session, select the 'Camera' icon (
 ).
).
- For video capture, select the round 'Record' icon (
- Once completed, your captures can be found in the default downloads folder of your browser.
- Video captures are saved as .WEBM files.
- Image captures are saved as PNG files.
Configure Android Devices for Whiteboarding Feature
You can configure Android devices to use the Whiteboarding feature in Workspace ONE Assist's Share Screen client tool. The Whiteboarding feature enables you to draw freehand on the host's screen and be viewed by the host user, which you can use to call the host user's attention to certain screen elements.
Before you begin:
- Confirm whether an OEM-specific service APK is available for your Android device and install it.
- Android devices with an OEM-specific service APK installed are preconfigured to use the Whiteboarding feature and require no other setting.
- Android devices made by Samsung, Sony, and any other OEM without a specific service APK installed must take the following steps to use the Whiteboarding feature.
- Include a customization to the device profile that allows the system UI overlays.
- In Workspace ONE UEM, navigate to .
Choose From:
- Existing Profile - If you want to include this customization to an existing device profile, then find the profile you want to modify in the listing. Then select the edit icon (
 ) next to the profile name in the Profile Details column. Before you can make changes to an existing profile, you must select the Add Version button.
 - New Profile - If you want to include this customization to a new device profile, then select Add followed by Add Profile, select the Android platform, and make all your other device profile specifications. The Android Legacy platform does not support enabling system UI overlays. For details, see Device Profiles in the Managing Devices documentation and Android Device Management and Android (Legacy) Platform documentation, each available on docs.vmware.com.
- Existing Profile - If you want to include this customization to an existing device profile, then find the profile you want to modify in the listing. Then select the edit icon (
- Select the Restrictions payload and if necessary, select the Configure button. The Restrictions payload screen displays.
- In the Device Functionality section, scroll down to Allow System UI (Toasts, Activities, Alerts, Errors, Overlays) and enable this option by adding a check mark to its check box.
- Select Save and Publish. The device profile (including the customization to allow system UI overlays) is saved and pushed to all applicable devices.
- In Workspace ONE UEM, navigate to .
- On the Android device, navigate to Settings.
- Navigate to App Settings.
- Open the Assist app settings.
- Locate the Advanced section.
- Enable permission to Draw over other Apps.
The Whiteboarding feature can now be used by this Android device lacking an OEM-specific service APK.
Remote View
The Remote View client tool in Workspace ONE Assist allows you to only view a host device screen remotely. You can elevate to a full remote control session if you have the proper permissions from the assigned role as well as from the device end user.
This functionality requires the Remote View permission to be part of your assigned administrator roles. For more information, see Role-Based Access to Workspace ONE Assist.
Think of the Remote View client tool as the "read only" component of Workspace ONE Assist. The virtual keyboard feature is unavailable. You can see what the host device end user sees but you cannot intervene unless you elevate the Remote View session to a fully remote controlled Share Screen session.
Manage Files
You can use the Manage Files client tool in Workspace ONE Assist to upload files, download files, download folders, rename files, and delete files on the device.
This functionality requires the File Manager permission to be part of your assigned administrator roles. For more information, see Role-Based Access to Workspace ONE Assist.
Beginning with Android 11, Google is enforcing scoped storage on all applications targeting API level 30. The enforcement of scoped storage means an app is limited to only accessing its own file sandbox and specific types of media files that the app has created.
To provide access to other file locations on the device, VMware has partnered with many of the top Android device manufacturers to create a newer version of the OEM-specific service application (v2.5). Download and install the latest version of the Assist service application to access all files on the remote device.
On devices where an OEM-specific service application is not available (for example, Samsung and Sony devices) the end user on the remote device must explicitly grant additional permissions to the application when requested. Workspace ONE Assist prompts the Android 11 device end user to 'Allow access to manage all files'. This permission must be granted to the Assist application one-time at the beginning of the first Manage Files session.
- In Attended mode, this permission must be granted or denied by the end user of the device.
- In Unattended mode, you must grant this permission through the Share Screen client tool.
Once permission is granted, all files on the remote device can be accessed during the Manage Files session. In the absence of this permission, you can only access Media and Downloads folder.
Upload a File
You can upload a file to the device you are managing remotely.
- In the active Workspace ONE Assist session and the Manage Files client tool activated, select the red, circular Upload button in the bottom-right corner of the screen.
- Select the Browse button and select a file accessible to the Workspace ONE ™ UEM console you want to add to the device's file system.
- Select Close on the File Upload Completed confirmation.
Dowload a File
You can download a file from the device with the Manage Files client tool.
- In the active Workspace ONE Assist session and the Manage Files client tool activated, locate the file on the device you want to download.
You can find the "breadcrumbs" style folder path at the top of the file listing a useful navigation aid.
- Select the Download button (
 ).
).Downloaded files are saved according to your default browser's downloaded file action.
Rename a File
You can rename a file on the remote device using the Manage Files client tool.
- In the active Workspace ONE Assist session and the Manage Files client tool activated, locate the file on the device you want to rename.
- Select the Rename button.
This button is located in the button cluster to the left of the Size column.
The Rename screen displays where you can enter the new name for the file.
- Select OK to save your changes.
Select Multiple Files
You can select multiple files on the remote device using the Manage Files client tool. Multi-selecting files can be useful if you want to cut, copy (followed by paste), or delete them.
- In the active Workspace ONE Assist session and the Manage Files Client tool activated, locate the files you want to select.
- Click the check box to the left of each file you want to select.
Download a Folder
You can download an entire folder from the remote device including the folder's contents.
- In the active Workspace ONE Assist session and the Manage Files client tool activated, locate the folder on the device you want to download.
You might find the "breadcrumbs" style folder path at the top of the file listing a useful navigation aid.
- Select the Download button ().
The downloaded folder and all its content is saved according to your default browser's download action.
For example, if you select a folder to download called "remoteDocs" and your default browser's download action is to save all downloads to "C:\Documents\downloads", then once the download successfully completes, you can expect to find the folder's content in C:\Documents\downloads\remoteDocs.
Cut, Copy, and Paste a File
You can cut, copy, and paste files on the remote device using the Manage Files client tool in Workspace ONE Assist.
- Once you have selected the files you want, select the Cut button (
 ) or Copy button (
 ).
).Cutting files removes the files from the source location while copying files leaves the files in the source location.
- Navigate to the target location on the device.
- Select the Paste button, which only becomes visible when either the Cut or Copy buttons have been selected.
Delete a File
You can also delete a file from the remote device.
- In the active Workspace ONE Assist session and the Manage Files client tool activated, locate the file on the device you want to delete.
- Select the Delete button (
 ).
). - Select OK to confirm file deletion.
Close the Manage File Session
When you are finished managing files remotely, you can close the Manage Files session while keeping the Display Capture session running.
- In the active Workspace ONE Assist session, locate the header bar toward the top of the browser.

- Select the circled X button to the right of the Manage Files indicator.
- Select OK to confirm closure of the Manage Files session.
Remote Shell
Workspace ONE Assist's Remote Shell client tool, you can remote into the PowerShell interface of connected Windows desktops and macOS devices, enabling you to make detailed and precise configurations in a command-line environment.
Microsoft's PowerShell interface combines automation with a sophisticated scripting language with a configuration management framework. For more information about PowerShell, see https://docs.microsoft.com/en-us/powershell/.
This functionality requires the Remote Shell permission to be part of your assigned administrator roles. For more information, see Role-Based Access to Workspace ONE Assist.
Command-Line Interface, Android
The Command-Line Interface (CLI), available for Android devices and supported in Workspace ONE Assist, is the counterpoint to the Graphical User Interface (GUI). While a graphical user interface makes common tasks easy, a command-line interface makes complicated tasks possible.
This functionality requires the Remote Shell permission to be part of your assigned administrator roles. For more information, see Role-Based Access to Workspace ONE Assist.
| CLI Commands | Support Level | Function |
|---|---|---|
| am get-config | Full | Gather configuration data from a device. |
| cd | Full | Change directory. |
| getprop | Full | Get properties by way of the android property service. |
| getprop ro.build.version.sdk | Full | Get API level device properties. |
| ip -f inet addr show wlan0 | Full | Show the WiFi IP address. |
| logcat | Full | Prints log data to the screen. |
| logcat *:D | Partial | Prints log data to the screen, filter to show only the debug level. In a few devices, this command cannot be canceled. |
| logcat *:E | Partial | Prints log data to the screen, filter to show only the error level. In a few devices, this command cannot be canceled. |
| logcat *:I | Partial | Prints log data to the screen, filter to show only the info level. In a few devices, this command cannot be canceled. |
| logcat *:V | Partial | Prints log data to the screen, filter to show only the verbose level. In a few devices, this command cannot be canceled. |
| logcat *:W | Partial | Prints log data to the screen, filter to show only the warning level. In a few devices, this command cannot be canceled. |
| ls | Full | List the directory contents. |
| ls -a | Full | List the directory contents, do not hide entries starting with a dot. |
| ls -n | Full | List the directory contents, list numeric UIDs, and GIDs. |
| ls -R | Full | List the directory contents, list subdirectories recursively. |
| ls -s | Full | List the directory contents, print size of each file, in blocks. |
| mkdir | Full | Make a directory. |
| netcfg / ifconfig | Full | Configure and manage network connections by way of profiles. |
| netstat | Full | Network statistics. |
| ping | Partial | Test the connection and latency between two network connection. In few devices, this command cannot be canceled. |
| pm list packages | Full | Prints all packages, optionally only those package names included in <FILTER>. |
| pm list packages -3 | Full | Prints all packages filtered to show only the third-party packages. |
| pm list packages -d | Full | Prints all packages filtered to show only the deactivated packages. |
| pm list packages -e | Full | Prints all packages filtered to show only the enabled packages. |
| pm list packages -f | Full | Prints all packages including their associated file. |
| pm list packages -i | Full | See the installer for the packages. |
| pm list packages -s | Full | Prints all packages filtered to show only the system packages. |
| pm list packages -u | Full | Prints all packages including uninstalled packages. |
| pm list permission-groups | Full | Lists all permissions groups. |
| pm list permissions | Full | Lists all permissions on the device. |
| Full | Print the path to the APK of the given <package>. | |
| ps | Full | Print process status. |
| ps -p | Full | Print process status and show scheduling policy. |
| pwd | Full | Print the current working directory location. |
| rm -d | Full | Remove a directory, even if it is not empty. |
| rm -f | Full | Remove a directory, force remove without prompt. |
| rm -r | Full | Remove the contents of the directory recursively. |
| top | Partial | Display top CPU processes. In a few devices, this command cannot be canceled. |
| touch | Full | Create an empty file or change file timestamps. |
Registry Editor
You can edit the registry of Windows CE devices remotely using the Workspace ONE Assist client tool.
Much like the Registry Editor that includes Windows desktop PCs, the Workspace ONE Assist client tool includes a Registry Editor for Windows CE devices. Using this editor, you can add, rename, and delete registry keys and values on the Windows CE devices in your fleet.
This functionality requires the Registry Editor permission to be part of your assigned administrator roles. For more information, see Role-Based Access to Workspace ONE Assist.
Before you begin any of the following registry procedures, you must start a remote management session. For details, see Start an Assist Session and select Registry Editor when prompted.
The registry editor is arranged with Keys listed on the left side panel and Values listed on the right side panel.
Add a Key
- Once a connection has been established to the remote device, you can add a key by selecting the hive you want to add a key to. Select a hive folder on the left and the entire hive folder opens up, revealing all the existing keys.
- Select the 'Hamburger menu' icon to the right of the hive folder. A menu displays showing options for making new keys and values, renaming keys and values, and deleting keys and values.

- Select New followed by Key. A new key (or folder) appears in the left side panel, labeled New Key, selected, and ready for editing.
- Give the New Key a new label and press the Enter key.
Add a Value
- With the correct key selected in the left side panel, select the 'Hamburger menu.' A menu displays showing options for making new keys and values, renaming keys and values, and deleting keys and values.
- Alternately, you can select the Plus Sign circled in red to create a Value.
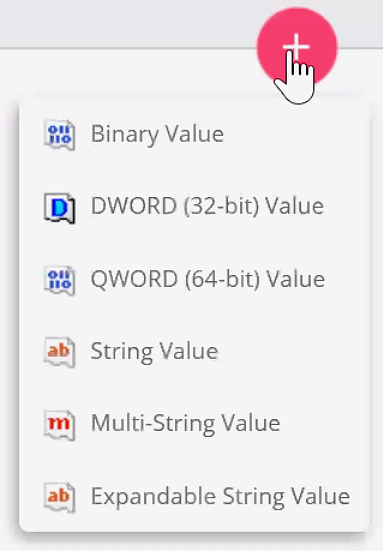
- Select the type of Value you want to add. The right side panel displays, featuring the options you must complete to create the value you selected.
- Binary Value
- DWORD (32-bit) Value
- QWORD (64-bit) Value
- String Value
- Multi String Value
- Expandable String Value
- Complete the Value Name and Value Data options then select Save.
Rename a Key or Value
- Identify the key or value you want to rename.
- To rename a key or value, select from among the following.
- Key – In the left side panel, select the 'Hamburger menu' icon to the right of the key name and select Rename.
- Value – With the key selected in the left side menu, identify the value in the key you want to rename. Select the pencil icon to the far right side of the Value listing.
- Enter the new Key Name or Value Name.
Delete a Key or Value
- Identify the key or value you want to delete.
- To delete a key or value, select from among the following.
- Key – In the left side panel, select the 'Hamburger menu' icon to the right of the key name and select Delete.
- Value – With the key selected in the left side menu, identify the value in the key you want to delete. Select the trash bin icon to the far right side of the Value listing.
- Confirm that you want to delete the Key Name or Value Name or you can cancel the deletion.
Session Collaboration
You can get additional help during advanced troubleshooting sessions in Workspace ONE Assist by starting a Session Collaboration. Share your active session with 'Tier 2' technical support and allow them to remotely view and control the same end user device.
Session Collaboration is available during Screen Share and Remote View Assist sessions on Android, macOS, and Windows desktop devices.
As the initiator of the Assist session with the end user, you are the Host during session collaborations. The Host invites other participants, called Guests, to join the active Assist session by chat or email. If you grant your Guest control of the active Assist session, then they become a Privileged Guest.
- Bandwidth Limitations – In order to ensure a smooth session collaboration, you are limited to a grand total of six (6) participants in any given session. This includes the Host, the device End User, and four (4) Guests, only one of which can be the Privileged Guest at any given time.
The only active sessions Guests and Privileged Guests are able to see is Screen Share and Remote View sessions. During a Session Collaboration, if the Host invokes other client tools such as Manage Files or Registry Editor, Guests and Privileged Guests see the Screen Share or Remote View screen while the Host uses the other client tool. The session becomes visible again to Guests and Privileged Guests only when the Host returns to the Remote View or Screen Share session.
For more information about what the end user experiences during a session collaboration, see Session Collaboration Notifications and Prompts.
Session Collaboration Features by Participant Type
| Features | Host | Privileged Guest | Guest |
|---|---|---|---|
| AppList / Device Info / Process List | YES | NO | NO |
| Connect to a new Tool (File Manager / Remote Shell / Command Line / Registry Editor) |
YES | NO | NO |
| Invite a Guest | YES | NO | NO |
| Key / Touch / Mouse Events | YES | YES | NO |
| Multiple Monitors | YES | YES | NO |
| Remove a Guest from the session | YES | NO | NO |
| Revoke Session Control | YES | NO | NO |
| Screen Recording / Capture | YES | NO | NO |
| Session Elevation from remote view to Share Screen | YES | YES | NO |
| Shortcuts | YES | YES | NO |
| Transfer Session Control | YES (to Guest) | YES (to Host Only) | NO |
| Virtual Keyboard | YES | YES | NO |
| Whiteboard | YES | YES | YES |
Invite Guests to a Session
Only you, the Host, can invite guests to a session.
- Initate an invitation by selecting the Session Collaboration icon
 on the main menu toolbar.
- If you have hosted a session collaboration before, a list of past guests displays, allowing you to select from this list.
- Select the +Invite Guest link. The Invite Guest screen displays.
- Select the Copy invitation button.
- Open a separate email app or chat app. Paste the copied invitation into a new email or chat and send to the contact of your choice.
- The link included is a one-time use link and valid only while the Assist session remains active.
Once the invitation is sent, you can cancel the invitation by selecting the Session Collaboration icon ![]() and clicking the cancel button
and clicking the cancel button ![]() next to the invitation.
next to the invitation.
Joining a Session as a Guest
- Select the link provided in the invitation. You are redirected to a Guest Login Page.
- Enter your Name and the password provided in the invite.
- Once connected, the Host and device End User are notified of your arrival to the session.
- You can view the list of participants by selecting the Session Collaboration icon .
Request to be Elevated to a Privileged Guest
Guests can request to become a Privileged Guest and take control of the session.
- The Guest must select the Session Collaboration icon and click the Request Session link. You receive a notification that a Guest has requested elevation.
- If you grant access, the Guest becomes a Privileged Guest and takes control of the session.
Elevate One of Your Guests to a Privileged Guest
As the Host, you can hand off control to one of the Guests of a session, elevating them to a Privileged Guest.
- Select the Session Collaboration icon and click the mouse icon
 next to the guest you want to elevate to Privileged Guest.
 - Your new Privileged Guest now has control over the session.
- Despite the temporary loss of control over the session, you are still the Host.
Revoke Controls from a Privileged Guest
As the Host, you can Revoke control from the Privileged Guest of a session.
- Select the Session Collaboration icon and click the solid mouse icon
 next to the Privileged Guest you want to demote to Guest.
 - You now have control over the session once again.
Remove a Participant from a Session Collaboration
As the Host, you can remove or excuse a Guest or Privileged Guest from a session.
- Select the Session Collaboration icon and click the cancel icon
 next to the participant you want to excuse from the session.
 - The participant is excused from the session and disappears from the participant listing.
Leaving a Session Collaboration as a Guest
Guests can select the Disconnect icon ![]() in the main menu toolbar at any time to leave the active session.
in the main menu toolbar at any time to leave the active session.
Ending a Session Collaboration as Host
To end a session as the Host, select the Disconnect icon ![]() in the main menu toolbar at any time to leave the active session.
in the main menu toolbar at any time to leave the active session.
Bi-directional Clipboard functionality for Windows & MacOS
Bi-directional ClipBoard functionality allows IT or Helpdesk Admins to copy & paste text to and from the remote device. Customers use Workspace ONE Assist to connect to remote devices for troubleshooting, support, maintenance, and so on. In some cases they are supporting employees facing issues on their devices and in others, they are performing remote sessions on unattended devices where there is no user present.
As part of the troubleshooting process, one of the common actions that might be needed is to copy large strings of text from the admin's local machine on to the remote device. For example, when adding or editing registry on a windows device, registry keys might need to be copied over to the remote device, long web urls may need to be entered to direct the user to the right website, html code may need to be run on the remote device, and more. It is also a common use case to copy text from remote device on to the admin's local machine. For example, copying error codes that might have occurred on the remote device for further troubleshooting, web urls, log snippets, and so on.
For a seamless troubleshooting experience while using Workspace ONE Assist on remote desktop devices, there is a need for bi-directional clipboard functionality that helps the Helpdesk and IT admins to copy and paste to and from the remote device using a simple method like using keyboard shortcuts or an on-screen menu option. This improves efficiency in troubleshooting and average handling time.
Clipboard functionality is available during Remote Control Assist sessions on macOS and Windows desktop devices.
- Click the Clipboard icon. The responses vary depending on the Assist agent mode on the remote devices.
- Attended mode - An authentication prompt is seen on the remote device requesting the end user to either grant access or deny.
- Unattended mode - The clipboard functionality is activated on clicking the clipboard icon.
- Click the Lock icon to the left of the web address.
- Click the Toggle icon on the prompt to allow browser clipboard permission.
Table 1. Keyboard Shortcuts to use Clipboard Feature in Remote Assist Screen Share Session Admin PC Remote PC To Copy from Admin PC To Paste in Remote PC To Copy from Remote PC To Paste in Admin PC Windows Windows Ctrl+C Ctrl+V Ctrl+C Ctrl+V Windows MacOS Ctrl+C Ctrl+V NA** Ctrl+V MacOS MacOS Cmd+C Cmd+V Cmd+C Cmd+V MacOS Windows Cmd+C Cmd+V Ctrl+C Cmd+V ** Mouse right-click to Copy
Activity Logs (Accessed From App Only)
The device end user can access activity logs from the Workspace ONE Assist App during and after remote support sessions.
Activities Logged
These logs provide the end user full visibility into all activity performed by the Help Desk Admins during a remote session related to the following tools
- File Manager
- Remote Shell (Windows desktop and macOS)
- Command Line (Android)
During a remote session, access the log by selecting the Log tab (![]() ) located next to the Home tab.
) located next to the Home tab.
After a remote session, access the log by selecting the Settings icon (![]() ) in the upper-right corner of the app.
) in the upper-right corner of the app.
Audit Logs
All the actions performed by an admin in a remote assist session are logged for security auditing purposes. These actions are recorded and sent to the UEM event logger and can be exported to UEM Syslog.
- . Click the Remote Management link under the Events.
- . Select the device to view the device details page and then select . This displays the Event Log page where all the actions performed in the Assist session are logged.
Listed are some of the actions that may be logged.
| Actions Logged for Audit | |
|---|---|
|
|
- Workspace ONE Assist does not collect any PII information as part of the event logging.
- UEM 2302 or later is required to support this feature.
- The AssistOAuthProvisioningFeatureFlag must be set to TRUE in the UEM DB. To request for the FF to be enabled in your environment submit a ticket through the following link: https://servicedesk.eng.vmware.com/servicedesk/customer/portal/21/create/1413.
- This feature is currently available only for SaaS Assist customers.
