NDES for SCEP
Install and set up the Microsoft certificate authority (CA) over the NDES for SCEP protocol for integration with Workspace ONE UEM.
In order for Workspace ONE UEM to use a certificate in a profile, which is used to authenticate a user, an enterprise certificate authority does not need to be set up in the same domain as the Workspace ONE UEM server. There are several methods for Workspace ONE UEM to retrieve a certificate from the certificate authority. Each method requires the basic installation and configuration described in this documentation. See sample CA Configurations for Workspace ONE UEM SaaS environments. Configurations differ in on-premises environments.
- Workspace ONE UEM to NDES/SCEP and then to Certificate Authority

- Workspace ONE UEM to AirWatch Cloud Connector, then to NDES/SCEP, and then to Certificate Authority

- On-premises DS and NDES in the DMZ with Internal Workspace ONE UEM and CA

- On-premises with All Servers Internal and SCEP Proxy

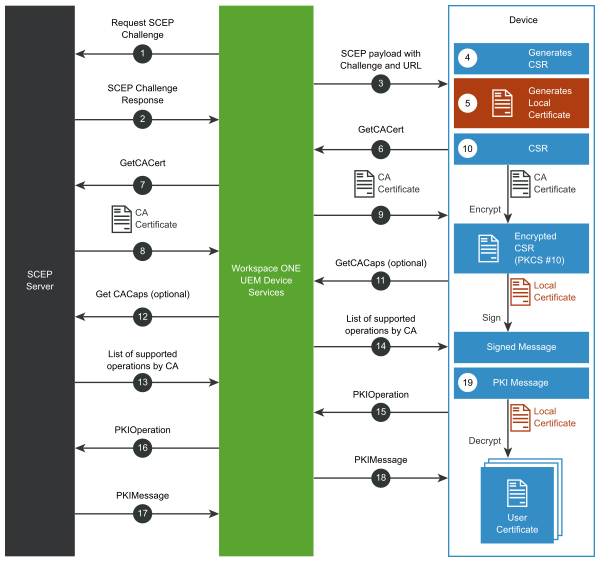
If you do not want to expose your SCEP endpoints to external devices, you can use the SCEP Proxy. This feature, Enable Proxy, is an advanced feature when you configure the CA in the Workspace ONE UEM console. The SCEP Proxy allows Workspace ONE UEM to act as an intermediary between the SCEP server and the device. It forwards and returns requests and responses between the two components. Workspace ONE UEM does not have the SCEP server’s private key, so it cannot parse requests from devices.
Traffic flows in the following sequence.

- Workspace ONE UEM Device Services (where the SCEP Proxy is located) requests a SCEP challenge from the CA’s SCEP server.
- The CA responds with a SCEP challenge phrase.
- Device Services builds the SCEP payload and sends it to the device.
The payload contains the SCEP challenge phrase, the SCEP URL, and other attributes (for example, Subject Name, Key Usage, and SAN). The SCEP URL has the SCEP enrollment token that is associated with the CA and certificate template. - The device receives the SCEP payload and it generates a certificate signing request (CSR) based on all the attributes in the payload.
- The device generates a local certificate with a private key.
- The device sends a GetCACert request to the Workspace ONE UEM SCEP Proxy.
- The Workspace ONE UEM SCEP Proxy resolves the GUID to the CA’s SCEP endpoint and forwards the request to the respective SCEP endpoint.
- The CA responds with a CA certificate to the Workspace ONE UEM SCEP Proxy.
- The Workspace ONE UEM SCEP Proxy forwards the CA certificate to the device.
- The CA certificate encrypts the CSR the device generated. The local device certificate signs the encrypted CSR to build a signed message.
- Optionally, the device sends a GetCACaps request to the Workspace ONE UEM SCEP Proxy.
- The Workspace ONE UEM SCEP Proxy forwards the request to the CA’s SCEP endpoint.
- If the CA supports the GetCACaps request, the CA returns a list of all the supported operations to the Workspace ONE UEM SCEP Proxy.
- The Workspace ONE UEM SCEP Proxy forwards the list of supported operations to the device.
- The device sends a PKIOperation request to the Workspace ONE UEM SCEP Proxy.
The request includes the generated signed message. - The Workspace ONE UEM SCEP Proxy validates that the SCEP enrollment token is compliant and enrolled with Workspace ONE UEM. If the validation is successful, it forwards the request to the CA SCEP endpoint.
- the PKIOperation is valid, the CA responds with PKIMessage that contains the user certificate.
- The Workspace ONE UEM SCEP Proxy sends the response to the device.
- The CA certificate signs the PKIMessage, it decrypts it using the local device certificate, and it installs the user certificate on the device.
Prerequisites
Meet the list requirements to configure the protocol.
- NDES is available in the Enterprise version of Microsoft Server 2008, 2008 R2, and 2012 or 2016 Standard and Enterprise.
- A Certificate Authority (CA) installed, configured, and made available to the NDES/SCEP/MSCEP server.
- You can install the CA and NDES for SCEP on the same server or on different servers. If you do put them both on the same server, complete the CA installation first and restart the server before installing NDES for SCEP.
- You need certificate templates during NDES for SCEP setup and service certificate renewal:
- Exchange Enrollment Agent (Offline request)
- CEP Encryption
Note:
It is possible for all the following accounts to be the same account. However, using a single account has security concerns.
Connection Requirements
-
The SCEP endpoint must be accessible from the device in order for certificate enrollment to finish.
* The exception to this requirement is when you use the **Enable Proxy** menu item in the **Certificate Authority - Add/Edit** page for non-generic, SCEP protocol use. - An Admin Account must exist in the domain. This account is used to install the NDES/SCEP/MSCEP role service and must meet the following requirements.
- Member of the Local Administrators group (Standalone Installation)
- Member of the Domain Admins group (Enterprise)
- ‘Enroll’ permissions on the NDES for SCEP service certificate templates (Enterprise).
- A Service Account must exist. It is used by the NDES for SCEP application pool and must meet the following requirements.
- Member of the local IIS_USRS group. If this setting is not configured, role installation fails.
- ‘Request’ permission on the configured CA. ‘Read’ and ‘Enroll’ permissions on configured device certificate templates.
- A Service Principal Name (SPN) must be added by using:
SetSpn –a HTTP/<ComputerName> <AccountName>.
<ComputerName>is the name of the computer where NDES for SCEP is installed.<AccountName>is the computer account name when NetworkService is used, or the domain user account when a custom application pool identity is configured.- The Device Administrator account used to request password challenges from NDES for SCEP must meet the following requirements.
- ‘Enroll’ permissions on all configured device certificate templates (Enterprise).
- Member of the Local Administrator group (standalone).
Procedure
- Install the Microsoft CA role.
- Add the ADCS role.
- Click the Server Manager icon next to Start to open the Server Manager window.
- Click Roles in the left pane.
- Click Add Role in the right pane. An Add Roles Wizard window displays.
- Under Server Roles, select the Active Directory Certificate Services check box.
- Click Next.
- Select the Certification Authority check box and then select Next.
- Select Enterprise and then select Next.
- Select Root CA and then select Next.
- Define CA private key settings.
- Select Create a new private key and then select Nex.
- Select your preferred Key character length (for example 4096).
- Select your preferred algorithm (for example SHA256) from the Select the hash algorithm for signing certificates issued by the CA and then select Next.
- Click Common name for this CA and enter the name of the CA or use the default CA displayed and then select Next.
Note the name of the CA server. You must enter this information in Workspace ONE UEM when setting up access to the CA. - Select the desired length of time under Set the validity period for the certificate generated for this CA and then select Next.
The length of time you select is the validity period for the CA, not the certificate. However, when the validity for the CA expires, so does the certificate.
- Configure the ADCS certificate database.
- Click Next to accept the default information in the Configure Certificate Database screen.
- Click Next to accept the Confirm Installation Selections screen.
- Click Install. The installation begins. After the installation completes, the Installation Results window displays.
- Click Close.
- Add the ADCS role.
- Set permissions for the NDES/SCEP Admin Account.
- Run the Certification Authority Console from the Administrative Tools in Windows.
- Right-click the server name and select Properties.
- Select the Security tab.
- Click Add. The Select Users, Computers, Service Accounts, or Groups dialog box displays.
- Click within the Enter the object names to select text box and type the name of the SCEP Admin Account.
- Click OK. The CA Properties dialog box displays.
- Select the SCEP Admin Account from the Group or user names list.
- Select the Manage CA permission Allow check box.
- Select the Request Certificates permission Allow check box.
- Click OK.
- Set the Read and Enroll permissions on the certificate template for the NDES/SCEP Service Account and the Device Administrator.
- Run the Certificate Templates Console by running
certtmpl.mscfrom the Windows Desktop. - Right-click the required template and select Properties. The example here is ‘MobileUser’ from the CA Setup Document.
- Select the Security tab.
- Click Add. The Select Users, Computers, Service Accounts, or Groups dialog box displays.
- Click within the Enter the object names to select text box and type the name of the Service Account.
- Click OK. The Properties dialog box displays.
- Select the Service Account from the Group or user names: list.
- Select the Read permission Allow check box.
- Select the Enroll permission Allow check box.
- Click OK.
- Run the Certificate Templates Console by running
- Install the NDES/SCEP role.
- Run the Server Manager on the server to be used as the NDES/SCEP/MSCEP server.
- Select Roles.
- Click Add Roles. The Add Roles Wizard displays.
- Click Next. The Select Server Roles dialog box displays.
- Select Active Directory Certificate Services.
- Click Next. The Select Role Services dialog box displays.
- Clear the Certification Authority check box.
- Select Network Device Enrollment Service (or SCEP).
- Click Next.
- Click Select User. The user selected MUST be in the local IIS_USRS Group.
- Enter the Username and Password for the account NDES/SCEP Admin Account.
- Click Next. The Specify CA for Network Device Enrollment Service (or SCEP) dialog box displays.
- Select CA Name.
- Click Browse.
- Select the CA in the Select Certification Authority dialog box.
- Click OK.
- In the Specify Registration Authority dialog box, select Next.
- In the Configure Cryptography for Registration Authority dialog box, select Next.
- Navigate through any additional required services or roles and then select Install and Next.
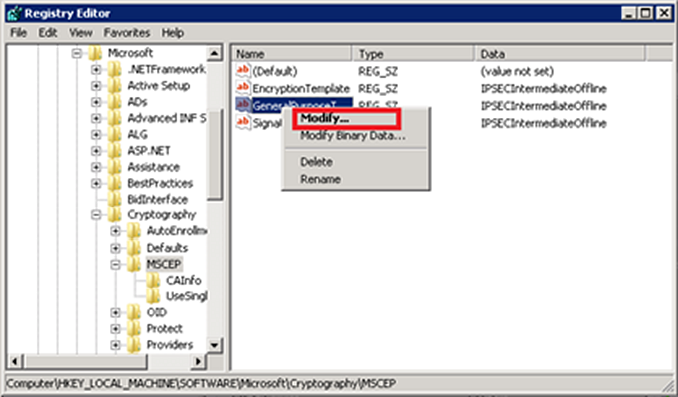
- Specify the NDES/SCEP template. NDES/SCEP uses one template from the certificate authority. This template is specified in the registry and must be edited using Registry Editor.
- Run the Registry Editor by running
regedit.exefrom the Windows Desktop. - Navigate to
HKEY_LOCAL_MACHINE\SOFTWARE\Microsoft\Cryptography\MSCEP(or NDES/SCEP). - Right-click the General Purpose Template and select Modify.
- Replace the value
IPSECIntermediateOfflinewith the template name being used.

- Close the Registry Editor.
- Restart Internet Information Services by opening a command prompt and running iisreset.
- Run the Registry Editor by running
- Configure IIS to allow for large query strings.
When the device requests a certificate from NDES/SCEP, it sends a string of over 2700 characters as part of the request. This string is larger than the default size for query strings and results in a 404.15 error. The default query string length must be increased to accommodate this large string.- Open a command prompt from the Windows Desktop.
- Enter
c:\windows\system32\inetsrv\appcmd.exe set config -section:system.webServer/security/requestFiltering /requestLimits.maxQueryString:"3072" /commit:apphost.
- Configure the CA and the certificate template in Workspace ONE UEM so that Workspace ONE UEM can retrieve a certificate from a CA.
- Configure the CA.
- Log in to the Workspace ONE UEM console as a user with Workspace ONE UEM admin privileges, at minimum.
- Navigate to System > Enterprise Integration > Certificate Authorities.
- Click Add.
- Enter details about the CA:
- Select ‘Microsoft ADCS’ from the Authority Type drop-down menu. Configure this setting first, because dependent settings appear.
- Enter the Name and Description of the new certificate authority.
- Select the Protocol: ADCS or SCEP.
- Select the Version: NDES 2008/2012 or SCEP 2003.
- Enter the URL of the CA server in the SCEP URL field. Note: The URL for NDES must follow the format http://
/certsrv/mscep/mscep.dll - Select the Challenge Type that reflects whether a challenge phrase is required for authentication.
- If you want basic authentication, select Static and enter an authentication phrase consisting of a singular key or password that is used to authenticate the device with the certificate enrollment URL.
- To enable a new challenge to be generated for every SCEP enrollment request, select Dynamic.
- Enter the Challenge Username/Challenge Password. This user-name and password combination is used to authenticate the device making the request.
For additional security, upload a certificate under Challenge Client Certificate for Workspace ONE UEM to present when fetching the dynamic challenge from the SCEP endpoint. - Finish the SCEP Challenge URL text box with a URL in the following format:
http://host/certsrv/mscep_admin/. - Advanced Options
- Enter the SCEP Challenge Length, which represents the number of characters in the challenge password.
- Enter the Retry Timeout, which is the time the system waits between retries.
- For Windows 10 devices, this should be a non-zero value.
- Enter the Max Retries When Pending, which is the maximum number of retries the system allows while the authority is pending.
- With Enable Proxy selected, Workspace ONE UEM acts as a proxy between the device and the SCEP endpoint defined in the CA configuration.
- Click Test Connection. If you select Save before Test Connection, a “Test is unsuccessful” error displays.
- Click Save.
- Configure the CA.
- Configure the certificate template.
- Click the Request Templates tab.
- Click Add.
- Enter the following details about the template in the remaining text boxes:
- Enter the template Name and Description.
- Select the certificate authority that was created from the Certificate Authority drop-down box.
- Enter the distinguished name in the Subject Name text box. The text entered in this text box becomes the Subject of the certificate, which lets the network administrator determine which devices receive the certificate.
A typical entry in this text box is “CN={EnrollmentUser}” or “CN={DeviceUid}” where the {} text boxes are Workspace ONE UEM lookup values. - Select the private key length from the Private Key Length drop-down menu.
This value is typically 2048 matches the setting on the certificate template that is being used by NDES/SCEP. - Select the applicable Private Key Type.
This value can be Signing, Encryption, or both, and the value matches the certificate template being used by NDES/SCEP. - You can optionally select any of the following:
- If Workspace ONE UEM renews the certificate when it expires, select Automatic Certificate Renewal and make sure the assignment is set to Auto. Enter the number of days before expiration that Workspace ONE UEM automatically reissues a certificate to the device in the Auto Renewal Period (days) text box .
- Select Publish Private Key if the certificate is published to Active Directory or any other customer web service. Then select the proper destination by selecting the appropriate Private Key Destination, either Directory Services or a Custom Web Service.
- Click Add to the right of Eku Attributes to insert an object identifier (OID) that represents any additional extended key usages that might be required. You can add multiple Eku Attributes to fit your needs.
- The EKU Attribute is required for Windows 10 devices.
- Select Force Key Generation On Device to generate a public and private key pair on the device itself. This setting improves CA performance and security.
- Click Save.
- Confirm and test the installation and the configuration.
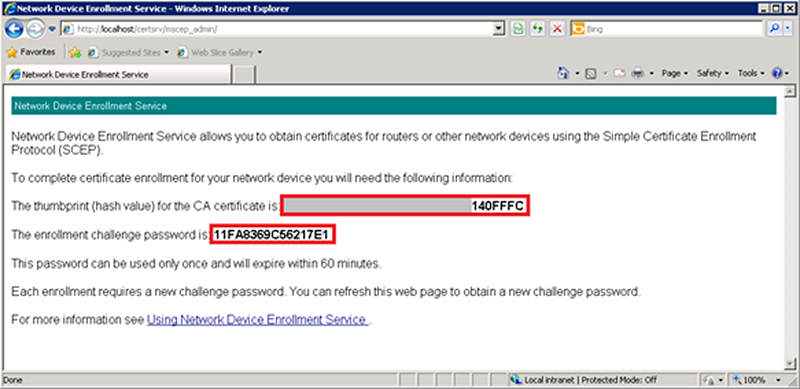
Testing of the installation and configuration can be performed by browsing to the NDES/SCEP webpage, entering the service account credentials, and confirming the presence of a challenge.- Open a web browser and navigate to
http://<servername>/certsvr/mscep_admin/where<servername>is the name of the server running NDES/SCEP. If confirmation and testing are being run from the NDES/SCEP server, the<servername>can be “localhost”. - Enter the NDES/SCEP Service Account user name and password if prompted.
- The webpage shows a thumbprint and a password if configured properly. If a problem exists with either the authentication of the Service Account or the template, an error displays.

- Open a web browser and navigate to
What to do next
Review some tips and troubleshooting steps for the integration.
- Configuring the certificate password settings, use the default setting (dynamic password mode).
- Although Workspace ONE UEM supports the use of the registry setting for Single Password mode, consider not using it. The “Single Password” mode sets a static challenge password all devices can use which can expose security vulnerabilities.
- If the NDES/SCEP challenge cache is full, (an issue which can arise when publishing a profile, for example), edit the cache value by:
- Run
regedit.exeto edit the PasswordMax value. - The PasswordMax value is at:
HKEY_LOCAL_MACHINE\Software\Microsoft\Cryptography\MSCEP(or NDES/SCEP) within the registry. - Increase the PasswordMax value to a number greater than the default value of 5.
- Run
- If you receive a Password Not Present error when installing the SCEP Profile to a device, confirm that the challenge response length setting in the Workspace ONE UEM console matches the length setting associated with the certificate.