You can view and manage every aspect of your mobile device deployment. With this single, web-based resource, you can quickly and easily add new devices and users to your fleet, manage profiles, and configure system settings.
Acquaint yourself with security settings and interface features such as the Getting Started Wizard, menu icons, sending feedback, and global search.
For more information about how VMware handles information collected through Workspace ONE UEM, such as analytics, see the VMware Privacy Policy at https://www.vmware.com/help/privacy.html.
Supported Browsers
The Workspace ONE Unified Endpoint Management (UEM) console supports the latest stable builds of the following web browsers.
- Chrome
- Firefox
- Safari
- Microsoft Edge
Comprehensive platform testing has been performed to ensure functionality using these web browsers. If you run the UEM console with an older version browser or on a non-certified browser, you can experience minor issues.
|
|
|
|
|
|
|
Limited support might be available for other devices or operating systems. Workspace ONE Direct Enrollment is supported on iOS and Android devices only. For more information, see the topic Workspace ONE Direct Enrollment in the Workspace ONE UEM Managing Devices documentation.
Refer to each platform-specific guide by searching the online help, visiting docs.vmware.com, or contacting VMware Support for more information.
Header Menu
The Header Menu appears at the top of nearly every page of the Workspace ONE UEM powered by AirWatch, enabling you to access to the following functions and features.

- Organization Group – Select the Organization Group (the tab labeled Global) to which you want to apply changes.
- Add – Quickly create an admin, device, user, policy, content, profile, internal application, or public application.
- Global Search – (
 ) Search all aspects of your deployment within the UEM console, including devices, users, content, applications, configuration settings, admins, pages, and more.
 - Notifications – (
 ) Stay informed about important console events with Notifications. The number badge on the Notifications bell icon indicates the number of alerts that require your attention.
 - Saved – (
 ) Access your favorite and most-utilized pages within the UEM console.
 - Help – (
 ) Browse or search the available guides and UEM console documentation.
 - My Services Selector – (
 ) Use this menu button to select between all Workspace ONE services that are available to you.
 - Account – View your account information. Change the Account Role that you are assigned to within the current environment. Customize settings for contact information, language, Notifications, view history of Logins, and Security settings including PIN reset. You can also Log out of the UEM console and return to the Login screen.
- Refresh – (
 ) See updated stats and info without leaving the current view by refreshing the screen.
 - Available Sections – (
 ) Customize the view of the Monitor Overview by selecting only the sections you want to see. Available only on the Monitor screen.
 - Export – (
 ) Produces a full (or filtered, if filtering is used) listing of users, devices, profiles, apps, books, or policies to an XLSX or CSV (comma-separated values) file. You can view and analyze these files with MS Excel.
 - Home – (
 ) Use this icon to assign any screen in the UEM console as your home page. The next time you open the UEM console, your selected screen displays as your home page.
 - Save – (
 ) Add the current page to the Saved page list for quick access to your favorite UEM console pages.
Global Search
Using a modular design with a tabbed interface, Global Search runs searches across your entire deployment. Global Search applies your search string to a single tab at a time, which produces faster results. Apply the same string to another area of the Workspace ONE UEM by selecting another tab.
After running a global search, select the following tabs to view the results.
- Devices – Returns matches to Device friendly name and Device Profile name searches.
- Accounts – Returns matches to user name and administrator name searches.
- Applications – Returns matches to internal, public, purchased, and Web application searches.
- Content – Returns matches to any content that appears on devices.
You can use the asterisk * as a wildcard in your search parameters in the following ways.
- Entering *device returns ruggeddevice, appledevice, mobiledevice
- Entering m*e returns manufacture, Maine, merge
- Entering admin* returns administrator, administration, admins
- With the introduction of wildcards, Global Search only returns exact matches unless wildcards are used both before and after your search parameter.
- For example, entering *desktop* returns all devices that include the string "desktop" anywhere in their device list listing.
- An alternate way to find desktops is to use filters in device list view. Using filters means you can produce a single list of not only windows desktops but also macOS plus a large array of other variables. For more information, see Filtering Devices in List View.
- To include an asterisk as part of your search parameter, enclose it in double quotes or precede it with a backslash.
- Entering micro"*" returns micro*
- Entering valueable\* returns valueable*
Search for an Organization Group
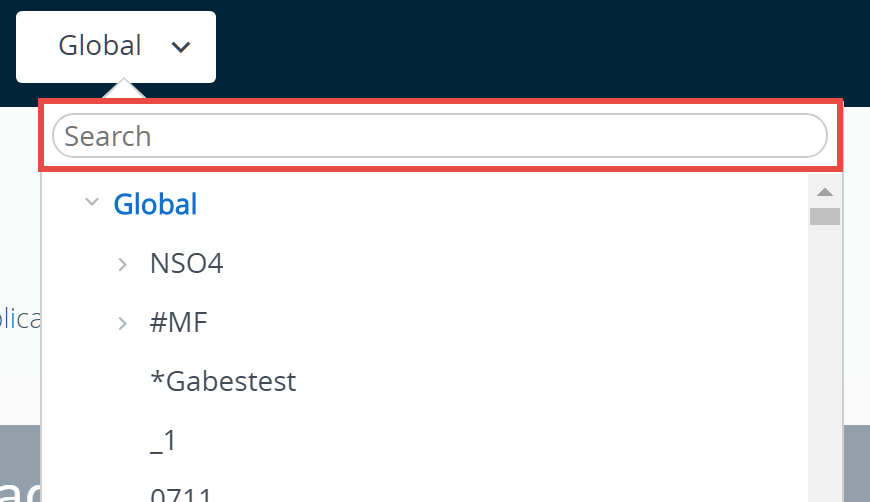
You can also perform a search for an organization group by selecting the organization group drop-down menu. The Search bar displays above the list.

Search for Settings
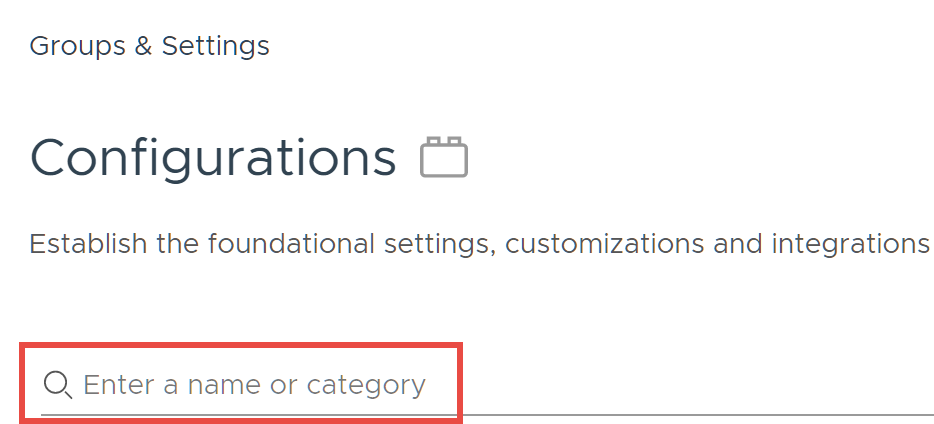
You can search for settings by initiating a search from the Configurations page. Navigate to and enter your keyword in the search text box.

Collapse and Expand the Submenu
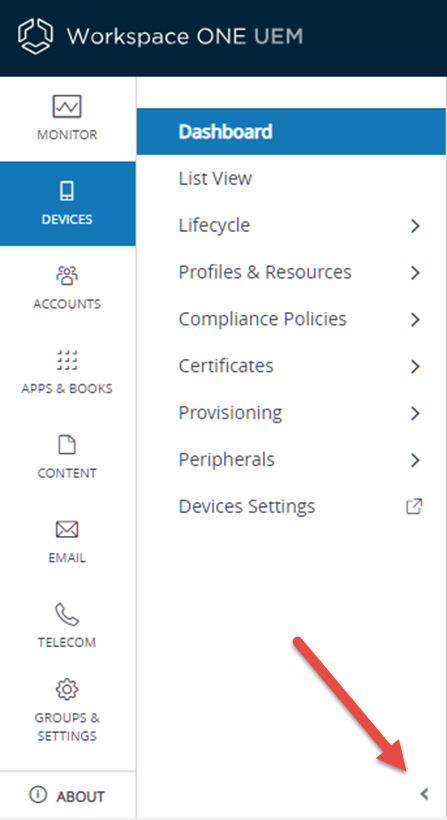
You can collapse the left panel submenu of the Workspace ONE UEM to create more screen space for device information. You can also expand or reopen a collapsed submenu.
- To collapse the submenu temporarily, select the arrow pointing left shown here.

- To expand or reopen the collapsed submenu, select the arrow pointing right at the bottom-left of the screen.
Customize the UI with Branding
Workspace ONE UEM allows extensive customization options. These options allow you to brand your tools and resources according to the color scheme, logo, and overall aesthetic of your organization.
Branding can be configured in support of multi-tenancy, so different divisions of your enterprise can have their unique look and feel at their organization group level. For more information, see Organization Groups.
- Select the organization group you want to brand and then navigate to .
- Configure logo and background settings on the Branding tab.
- Upload a Company Logo by uploading a file saved on your computer. The suggested resolution of the uploaded image is 800x300.
- Upload a background for the login page by uploading a file saved on your computer. The suggested resolution of the uploaded image is 1024x768.
- Upload a background for the Self-Service Portal (SSP) login page by uploading a file saved on your computer. The suggested resolution of the uploaded image is 1024x768.
- Configure customizations to the Colors section in the Branding tab.
- Configure the settings on the Custom CSS tab. Enter customized CSS code for advanced branding.
- Select Save.
Join or Leave the Customer Experience Improvement Program
The VMware Customer Experience Improvement Program (CEIP) provides information that VMware uses to improve its products and services, to fix problems, and to advise you on how best to deploy and use VMware products. This program is only available to on-premises deployments of Workspace ONE UEM.
Before you begin: Workspace ONE UEM participates in VMware's Customer Experience Improvement Program ("CEIP"). Details regarding the data collected through CEIP and the purposes for which it is used by VMware are set forth at the Trust & Assurance Center at http://www.vmware.com/trustvmware/ceip.html.
For more information about how VMware handles information collected through Workspace ONE UEM, such as analytics, see the VMware Privacy Policy at https://www.vmware.com/help/privacy.html.
About this task: The CEIP prompt appears when you install or upgrade Workspace ONE UEM. You must make a selection. You can change your selection any time afterwards from the UEM console by taking the following steps.
- Navigate to .
- If you want to participate in the CEIP, enable the check box next to Join the VMware Customer Experience Improvement Program.
- If you do not want to participate in the CEIP, deactivate (clear) this check box.
- Select the Save button