


Using the Windows OS Upgrade file/action, upgrade your Motorola and Zebra Windows Rugged devices remotely. By creating a product containing the OS Upgrade file/action, you can upgrade all your devices without having them shipped back to you.
Before You Begin
For Windows Rugged devices, all OS upgrade files are restricted access files and require a valid user account with Motorola to log in with a valid device serial number. The OS upgrade files are specific to both device model and OS version. The Workspace ONE ™ UEM OS upgrade process uses the APF files and requires the administrator to first install the MSP Package Builder utility.
This utility is required to extract the contents of the APF file into individual components that are then pushed to the device and used to upgrade the OS.
To use the Windows Rugged OS Upgrade, you must have the following:
- The MSP Package Builder utility installed on your computer.
- A Motorola user account to download the OS Upgrade.
- The serial number for the device you want to upgrade.
- The OS update utility included with the extracted APF files. This file can be downloaded from the Zebra support website.
- A relay server configured to deliver the product to the device.
OS Upgrade Resources for WinRugg
The Windows Rugged OS Upgrade file/action might require Run command arguments to process the action on the device. You can also change the device registry settings.
Check Device Registry Settings
If at any point an error occurs, review the device registry settings. The 5.x Hub has been designed to update these settings based on the Workspace ONE ™ UEM console configuration settings. The relay server settings are a part of the job XML and are applied during provisioning just before processing the job.
If the OS Update process does not complete successfully, the following settings are monitored as part as any troubleshooting effort.
| HKEY_LOCAL_MACHINE\SOFTWARE\AIRBEAM\ | |
|---|---|
| IGNORESERVER | string “1” |
| SERVERRIP | string [Enter the Server URL or IP Address] |
| FTPUSER | string [Enter the FTPs user name] |
| FTPPASSWORD | string [Enter the FTPs password] - THIS FIELD MUST BE ENCRYPTED |
| TFTP | string "0" |
| PASSIVEMODE | string "1" |
| FTPPORT | string "21" |
| FTPS | string "0" or "1" |
| VERIFYSERVER | string "0" |
| SOFTKEY1 | number "123" |
| SOFTKEY2 | number "124" |
| ENTERKEY | number "13" |
Run Command Argument Information
- -d option describes the Workspace ONE UEM relay server folder path containing files required to update the device. It uses the following format (with forward slashes and double quotes): "[path of your relay server]/PFILES/[file action name]_version/"
- -y option describes the maximum number of retry attempts while the –z option describes the retry delay.
- -q is the folder on the device that is used to download the files from the FTP server when updating Windows Mobile. This location is typically “\Temp” or “\Storage Card”. In CE updates, the files are downloaded one at a time into memory so the parameter is not used in that case.
- -p is the OSUpdate project name. The project name can be whatever the user wants it to be but is usually something to indicate what the update package contains. This name must be the same as the Motorola APF file. The project (APF) must be named so it can identify the target device, OS type, and so forth.
For the Workspace ONE UEM process, this name is the same as whatever you call the dummy APD file (which can be an empty text file).
- If your command line contained –p”WT41N0”, you must have a WT41N0.APD file put down to the device before applying the update. This is only needed for CE devices.
- For Windows Mobile devices –p”MC9190WM65” is required by the command-line parsing, but in effect is not used.
Extract Required OS Update Files
Before you can create an OS Upgrade file/action, you must extract the required files from the APF files. These files are extracted using the MSP Package Builder Utility.
- Start the MSP Package Builder Utility.
- Navigate to and select the appropriate APF file and open it in MSP Package Builder.
- Navigate to to open the Convert to Project dialog box.
- Complete the following text boxes.
- Name – Enter the name for the OS Upgrade project.
- Extract FilesTo – Enter the location the files should be saved to or select the Browse button to select the location.
- Select OK to close the Convert to Project dialog box.
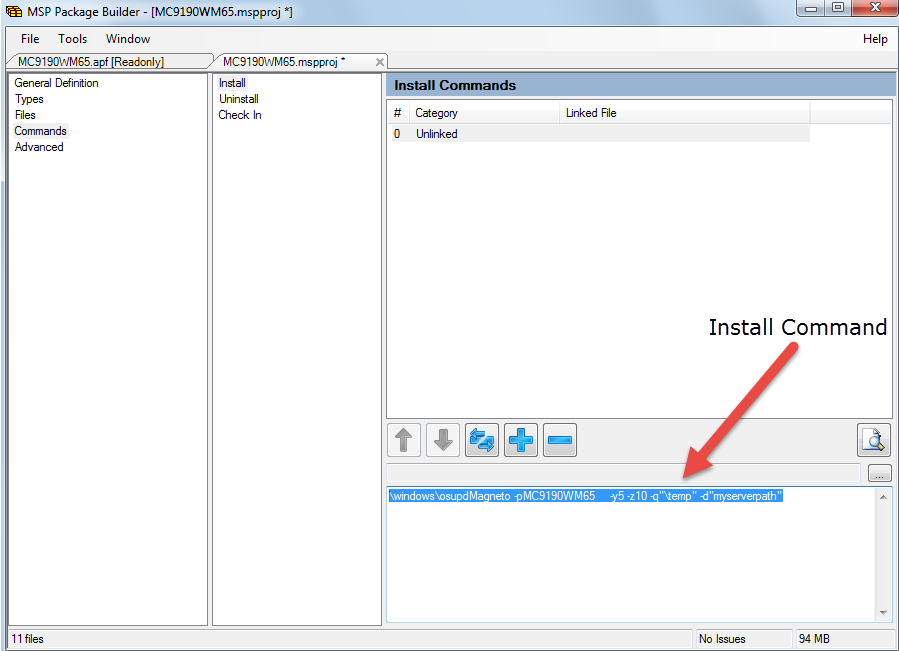
- Select Command from the left window pane.
- Select Install and copy the install command from the bottom right window pane.
Consider copy-pasting this install command to a file (Notepad, Word, and so on) so you can access it later while creating the File/Action for the OS Upgrade.
Create an OS Upgrade File-Action
Once you extract the OS upgrade files from the APF file, create an OS Upgrade file-action. If you must update the device registry, create a separate files-actions for the Registry Edit file and list that Files-Action first in the product manifest.
- Navigate to and select the Add Files/Actions button.
- Select the Windows Rugged platform.
- Complete the General text boxes.
- Enter a Name.
- Enter a Description.
- View the pre-populated Version number of the file-action.
- View and confirm the Platform for the file-action.
- Enter who the files-actions are Managed By.
- Select the Files tab and select Add Files.
- Select Choose Files and upload the extracted OS update files.
- Specify the Download Path
\[directory]\[full file name] - Enable Store OS Update Files on Relay Server to ensure that OS Update files remain on the Relay Server until needed by the OSUpdate utility.
- Select Save and add the file and return to the Files tab.
- Select Add Files and add additional files.
- Upload the OS Update Utility EXE and the "package.TXT" manifest file.
Windows Mobile devices always use a file named "osupdMagneto.exe." For Windows CE devices, the filename varies with the device.
Windows CE devices also require a package .APD. The contents of this file are not important and can be a simple text format file containing something benign. It can even be empty.
- Specify separate Download Paths for both the OS Update Utility and the package .TXT manifest file.
The Download Path for the OS Update utility and the package.TXT manifest file must be: "\Windows\".
The Windows CE .APD file must be placed in: "\Application\AirBeam\PKG."
Important: Do not select Relay Server Only. These files must be delivered directly to the device. - (Optional) Create a files/actions to download and install the REG file to the device.
This step is only necessary if the registry settings are not already correctly updated on the device.
Download the REG file to the '\Temp' directory specifying the full filename. On the manifest tab, add an Install action type and specify the directory location and the filename of the REG file to be run on the device.
- Once all the files have been uploaded, select the Manifest tab and select Add Action to add Install Actions.
- Select the Run action in the Action Types text box.
- Copy the Install Command from the MSP Package Builder utility and paste it into the Command Line and Arguments to Run.
You must edit the syntax of the Install Command to match Workspace ONE ™ UEM run syntax:
- Windows Mobile
- You must use double quotes around "\windows\osupdMagento" and add the .exe to the end of osupdMagento.
- -d"myserverpath" must be updated in the following format: "[path of your relay server]/PFILES/[file action name]_version/". If the directory on the relay server that you are using for OS Update is /Motorola/OSUpdateFiles, the name of the OS Update file/action is "OSUpdate" and the "OSUpdate" file/action is on version 5, then the -d argument might look like: -d"/Motorola/OSUpdateFiles/PFILES/OSUpdate_5/".
- The full run command syntax with all the arguments looks like the following.
\windows\osupdMagneto.exe" -p"MC9190WM65" -o -y5 -z10 -q"\temp\" -d"/Motorola/OSUpdateFiles/PFILES/OSUpdate_5/
- The full run command syntax with all the arguments looks like the following.
- Windows CE
- You must use double quotes around "\windows\ [OS Update Utility filename]" and add the .exe to the end of the filename.
- -d"myserverpath" must be updated in the following format: "[path of your relay server]/PFILES/[file action name]_version/". If the directory on the relay server that you are using for OS Update is /Motorola/OSUpdateFiles, the name of the OS Update file/action is "OSUpdate" and the "OSUpdate" file/action is on version 5, then the -d argument might look like: -d"/Motorola/OSUpdateFiles/PFILES/OSUpdate_5/".
- The full run command syntax with all the arguments looks like the following.
\windows\[OS Update filename].exe" -p"WT41N0" -o -y5 -z10 -d"/Motorola/OSUpdateFiles/PFILES/OSUpdate_5/
- The full run command syntax with all the arguments looks like the following.
- Windows Mobile
- Select Save.
Next Step: Create a Product that includes the OS Upgrade File-Action you just made and assign it to all applicable devices.
Results: Once the device receives the product, the OS Update process initiates. A notification screen displays when the upgrade is complete.
