You can make a custom role that allows a help desk admin to do only the things in Workspace ONE UEM powered by AirWatch that you allow them to do. Learn how accounts, roles, and programmable permissions all work together to get you where you need to go.
Use Case: You need dedicated help desk resources to shoulder the task of adding users and devices without impacting your other administrators. These admins must also allowlist and denylist devices. At the same time, limiting the points of access to higher console abilities is crucial. You want to add a handful of admin accounts and give these accounts the ability to add users and devices, allowlist and denylist devices, and nothing else.
The role being made in this use case is outfitted with just a handful of console functions: adding users and devices, and allowlisting and denylisting devices. This role prohibits all other functions in Workspace ONE UEM.
Prerequisites
You must have an existing administrator account. This use case makes a custom role based on the "help desk" role, included with Workspace ONE UEM powered by AirWatch, and assigns it to your admin account.
Procedure
- Navigate to .
The full listing of Administrator Roles displays.
- Enter the keyword 'help' in the search text box in the upper-right corner of the screen.
All roles containing the text string 'help' display in the listing.
- Select the Help Desk role by selecting the check box to the left of the role name.
A new button cluster appears under the main button cluster.
- Select the Copy button.
The
Copy Role screen displays.
- Enter the Name and Description for your custom help desk role.
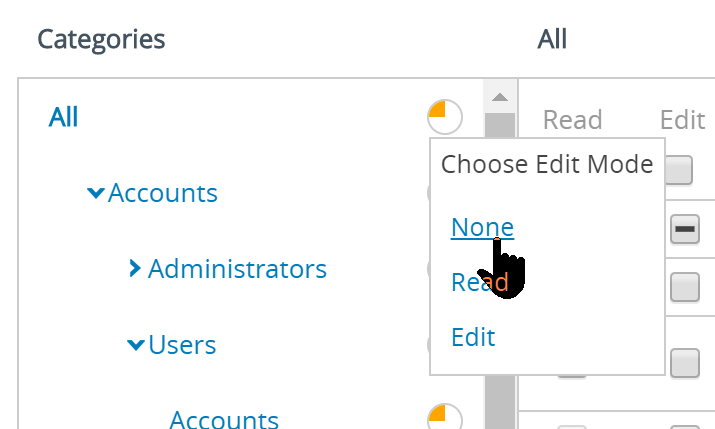
- Select the orange pie chart to the right of the All category on the left side of the Copy Role screen. Select None from the Choose Edit Mode popup that displays.
This action removes all permissions from this custom help desk role, giving you a clean slate. So the only permissions these admins have are the ones you give them here.
- Enable the following eight permissions. You can find the location of each permission check box by following the category, subcategory, and permission name from the table.
Remember also that you can type the permission name in the
Search Resources text box and jump directly to its location.
| Category > Subcategories |
Permission Name (check box) |
| Accounts > Users > Accounts |
User Accounts Add (Edit) |
| Accounts > Users > Accounts |
User Accounts Edit (Edit) |
| Accounts > Users > Accounts |
User Registration Edit (Edit) |
| Accounts > Users > Accounts |
User Registration (Read) |
| Device Management > Devices List View |
Device List View Access (Read) |
| Device Management > Devices List View |
Devices (Read) |
| Settings > Devices & Users > General |
Add Denylisted Device (Edit) |
| Settings > Devices & Users > General |
Add Allowlisted Device (Edit) |
Starting at the top of the table, here is a walk through of the first four permissions as an example. The first permission name we need (called User Accounts Add) can be found in the Copy Role screen by selecting the "Account" category from the left panel.
In the same left panel, select the "Users" subcategory and lastly, select "Accounts" which is under Users. You can now see all the permissions in the right panel of the Copy Role screen.
In this "Accounts > Users > Accounts" subcategory, there are four check boxes we are interested in.
1 & 2) Select the Details link in "Add/Edit" to reveal two permissions from the list. Enable those check boxes as indicated in the table. "User Accounts Add" gets the Edit check box and "User Accounts Edit" also gets the Edit check box.
3) Next, select the Details link for "Add Device" above. You should see the next permission in our list: "User Registration Edit," which also gets the Edit check box.
4) One permission from this subcategory remains, called "User Registration" and it is found by selecting the Details link for "View". It gets the Read check box.
Follow the same process for the remaining four permissions in the table, starting with "Device List View Access".
- Select Save to finalize the custom help desk role definition.
- Assign this custom role to your existing administrator account by navigating to and locate your administrator account from the listing.
- Select the Edit icon (
 ) to the left of your admin account.
The
Add/Edit Admin screen displays.
- Select the Roles tab.
- Assign the custom help desk role to the administrator account.
This use case dictates that only nine UEM Console functions are assigned to your administrator role. Despite this, you can add this custom help desk role and other roles to your admin account, even if your admin account already has one or more roles assigned to it.
- Select Save to finalize the role assignment.
Results
When administrators with only this custom help desk role log into your Workspace ONE UEM environment, the only functions they have access to is the Add button, from which they can only select from two choices: Device and User. They also have access to the Devices main menu button which includes List View and , which is where you add allowlisted and denylisted devices.


 This action removes all permissions from this custom help desk role, giving you a clean slate. So the only permissions these admins have are the ones you give them here.