


Software Distribution in Workspace ONE UEM allows you to deliver Windows applications and adhere to the application life-cycle. Software Distribution enables your organization to deploy applications, track the installation statuses, debug and troubleshoot installation issues, and maintain applications with ease.You can upload Win32 applications as either main files or dependency files. You can use the same process for EXE, MSI, and ZIP files. If you are using a ZIP file, you can compress the application packages that are 4GB or larger using 7-Zip. Workspace ONE UEM does not decompress ZIP packages containing application packages of 4GB or larger when compressed using the native Windows zip compressor.Software Distribution engine (SFD) requires an MSI file or an EXE file inside the ZIP file to deploy a PowerShell script file.
Complete the following steps to upload Win32 Files for Software Distribution:
Procedure
- Complete the settings in .
This tab instructs the system to install the application with specific criteria. The system can parse information for MSI files. However, for EXE and ZIP files, the system requires you to enter this information.
- Select and complete the options that depend on the criteria type you select.
Set contingencies for instruction and completion scenarios.
Instruction – Contingencies instruct the system to install applications when the device meets specific criteria.
Completion – Contingencies identify when an installation is complete.
Setting - App
Description - App
Criteria Type
App exists
App does not exist
Instruction – Configure the system to install the application when a specific application is or is not on devices.
Completion – Configure the system to identify the installation is complete when a specific application is or is not on devices.
Workspace ONE UEM checks for the existence of the application but it does not deploy the application to devices.
Application Identifier
Enter the application identifier so the system can recognize the existence or non-existence of the auxiliary application.
This value is also known as the product code of the application.
Version
Enter the specific version.
Use a comparison operator to specifically target an app version or to target a range of app versions.
Setting - File
Description - File
Criteria Type
File exists
File does not exist
Instruction – Configure the system to install the application when a specific file is or is not on devices.
Completion – Configure the system to identify the installation is complete when a specific file is or is not on devices.
Path
Enter the path on the device where you want the system to look for the file and include the filename.
Version
Enter the specific version.
Use a comparison operator to target a specific file version or a range of file versions.
Modified On
Enter the date the file was last modified.
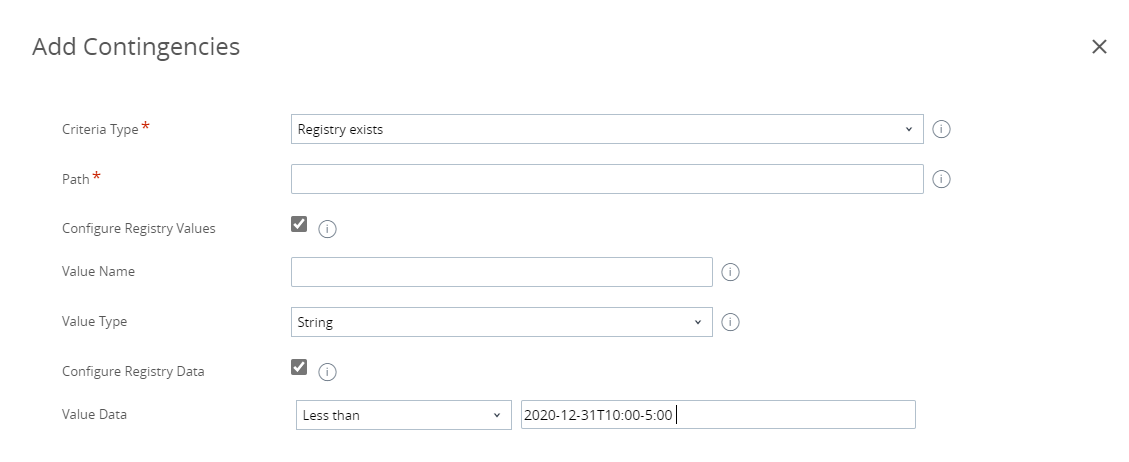
Setting - Registry
Description - Registry
Criteria Type
Registry exists
Registry does not exist
Instruction – Configure the system to install the application when a specific registry value is or is not on devices.
Completion – Configure the system to identify the installation is complete when a specific registry value is or is not on devices.
Path
Enter the path on the device where the system can find the keys and values. Include the entire path, beginning with HKLM\ or HKCU\.
Configure Registry Values
Value Name- Enter the name of the key. This container object stores the value and it displays in the file structure of the device.
Value Type- Select the type that corresponds to the registry value.
-
Value Data - Enter the value of the key.Note: To correctly parse data values, use decimals when defining a DWORD/QWORD value type. Hex is not supported and if used results in incorrect data parsing.
You can use comparison operators to target registry values by date and time. However, you must use the ISO Date and Time standard. Access information about the standard, ISO 8601, on the W3C (W3 Consortium) website at Date and Time Formats. Here is an example of targeting registries existing before 10 am Eastern Standard Time on December 31, 2020.
- Set the disk space devices must have available for the system to install the application for Disk Space Required.
- Set the battery power devices must have available for the system to install the application for Device Power Required.
- Set the random access memory devices must have available for the system to install the application for RAM Required.
- Select and complete the options that depend on the criteria type you select.
- Complete the settings in .
Configure Workspace ONE UEM to identify the successful installation of Win32 applications. The system requires this information for EXE and ZIP files.
- Configure the system to use specific criteria to recognize the completion of the installation process for Use Additional Criteria.
- To identify the installation completion or use custom scripts, add a specific criteria for Identify Application By.
Setting - Defining Criteria - App
Description - Defining Criteria - App
Criteria Type
App exists
App does not exist
Instruction – Configure the system to install the application when a specific application is or is not on devices.
Completion – Configure the system to identify the installation is complete when a specific application is or is not on devices.
Workspace ONE UEM checks for the existence of the application but it does not deploy the application to devices.
Application Identifier
Enter the application identifier so the system can recognize the existence or non-existence of the auxiliary application.
This value is also known as the product code of the application.
Version
Enter the specific version.
Use a comparison operator to specifically target an app version or to target a range of app versions.
Setting - Defining Criteria - File
Description - Defining Criteria - File
Criteria Type
File exists
File does not exist
Instruction – Configure the system to install the application when a specific file is or is not on devices.
Completion – Configure the system to identify the installation is complete when a specific file is or is not on devices.
Path
Enter the path on the device where you want the system to look for the file and include the filename.
Version
Enter the specific version.
Use a comparison operator to target a specific file version or a range of file versions.
Modified On
Enter the date the file was last modified.
Setting - Defining Criteria - Registry
Description - Defining Criteria - Registry
Criteria Type
Registry exists
Registry does not exist
Instruction – Configure the system to install the application when a specific registry value is or is not on devices.
Completion – Configure the system to identify the installation is complete when a specific registry value is or is not on devices.
Path
Enter the path on the device where the system can find the keys and values. Include the entire path, beginning with HKLM\ or HKCU\.
Configure Registry Values
Value Name- Enter the name of the key. This container object stores the value and it displays in the file structure of the device.
Value Type-Select the type that corresponds to the registry value.
Value Data - Enter the value of the key.
You can use comparison operators to target registry values by date and time. However, you must use the ISO Date and Time standard. Access information about the standard, ISO 8601, on the W3C (W3 Consortium) website at Date and Time Formats. Here is an example of targeting registries existing before 10 am Eastern Standard Time on December 31, 2020.
Setting - Using Custom Script
Description - Using Custom Script
Script Type
Select the type of script.
Command to Run the Script
Enter the value that triggers the script.Custom Script Type.
For example, you can run a script such as powershell -executionpolicy bypass -file script.ps1
Custom Script File
Select Upload and navigate to the custom script file on the network.
Success Exit
Enter the code that the script outputs to identify the successful installation.
Note:If you are required to edit the When to Call Installation Complete criteria after an app has been deployed, select the Edit button in this section. Enter the Admin PIN to complete the action. If you change the criteria to a value that is invalid, the app will be removed from all the systems where it is deployed. Be cautious while editing the Call Installation Complete criteria.
What to do next
You can now monitor your Win32 applications deployed through software distribution with the statistics on the Details View and by reviewing installation status codes. View the reasons in the Details View to track the progression of an installation. The reason codes help identify the status of an installation and if there is an issue with an installation, so that you can easily track and troubleshoot application deployments.
You can remove Win3 applications from your devices. Workspace ONE UEM includes several methods to remove Win32 applications from your devices. Choose from deleting, the application, devices, organization group, assignment group, or user. Several admin functions impact multiple assets. It is important for you to understand the impact before making any changes.
Table 1. Win32 Application Deletion Methods Deletion Method
Description
Details View
Select the Delete Application function in the details view of the application.
This action removes the Win32 application off devices in smart groups assigned to the application.
Device
Delete the applicable device from the console.
Organization Group
Delete the organization group.
This action impacts all assets and devices in the organization group.
Assignment Group
Delete the smart or user group assigned to the Win32 application.
This action impacts every device in the group.
User
Delete the applicable user account from the console.
