Device Profiles
Device Profiles are the primary means by which you can manage devices in Workspace ONE UEM. They represent the settings that, when combined with compliance policies, help you enforce corporate rules and procedures.
Create profiles for each platform type then configure a payload, which consists of the individual settings you configure for each platform type.
The process for creating a profile consists of first specifying the General settings followed by the Payload settings.
- The General settings determine how the profile is deployed and who receives it.
- The Payload for the profile is the actual restriction itself and other settings as applied to the device when the profile is installed.
Device Profiles List View
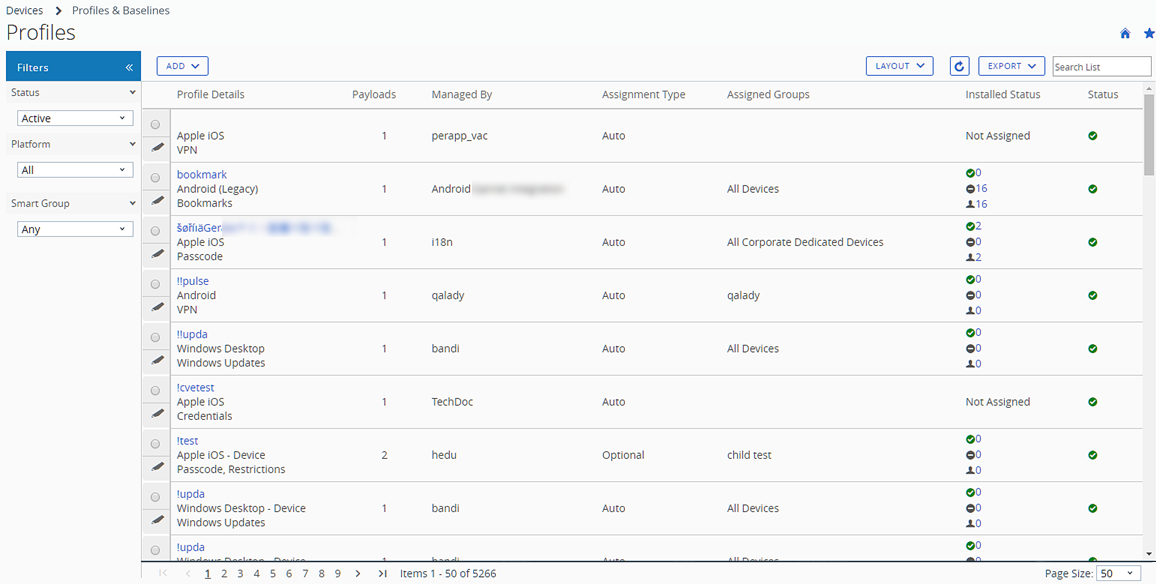
After you create and assign profiles in Workspace ONE UEM, you need a way to manage these settings one at a time and remotely from a single source. The Resources > Profiles & Baselines > Profiles provides a centralized way to organize and target profiles.
You can create tailor-made lists of device profiles based on the criteria you specify by using Filters, Layout, and Column Sorting. You can also export these lists to a CSV file suitable for viewing with Excel and see the status of the device profile.

Device Profile Hover-Over Pop-Up
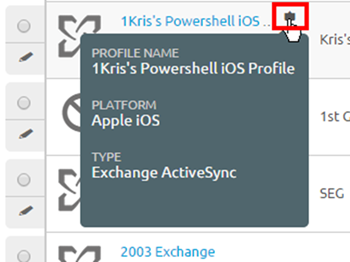
Each device profile in the Profile Details column features a tool tip icon in the upper-right corner. When this icon is tapped (mobile touch device) or hovered-over with a mouse pointer (PC or Mac), it displays a hover-over pop-up.
This pop-up contains profile information such as Profile Name, the Platform, and the included payload Type.

You can find a similar tooltip in the Assigned Groups column in the Profiles List view, featuring hover-over pop-ups displaying Assigned Smart Groups and Deployment Type.
Device Profiles Read-Only View
Device Profiles created in and managed by one organization group (OG) are in a read-only state when accessed by a logged-in administrator with lower-level privileges. The profile window reflects this read-only state by adding a special comment, “this profile is being managed at a higher organization group and cannot be edited.”
This read-only limitation applies to smart group assignments as well. When a profile is created at a parent OG and is assigned to a smart group, a child OG admin can see but not edit it.
Such behavior maintains a hierarchy-based security and fosters communication among admins.
List View Options
| Setting | Description |
|---|---|
| Filters | View only the desired profiles by using the following filters. |
| * Status – Filter devices to view Active, Inactive, and All devices. |
|
| * Platform – Filter devices by 13 types of platforms or all platforms. |
|
| * Smart Group – Filter devices by selecting a smart group from the drop-down menu. | |
| Layout | Enables you to customize the column layout of the listing. |
| * Summary – View the List View with the default columns and view settings. |
|
| * Custom – Select only the columns in the List View you want to see. You can also apply selected columns to all administrators at or below the current organization group. | |
Export  |
Save an XLSX or CSV (comma-separated values) file of the entire List View that can be viewed and analyzed with MS Excel. If you have a filter applied to the List View, the exported listing reflects the filtered results. |
| Column Sorting | Select the column heading to toggle the sorting of the list. |
| Profile Details | In both the Summary and Custom views, the Profile Details column displays the name, platform, and payload types. |
| Payloads | Displays the number of payloads specified in the device profile. |
| Installed Status | This column shows the status of a profile installation by displaying three icon indicators, each with a hypertext number link. Selecting this link displays the View Devices page, which is a listing of affected devices in the selected category. |
* Pending Install ( ) – This indicator displays the number of devices that are scheduled to have the profile installed. ) – This indicator displays the number of devices that are scheduled to have the profile installed. |
|
* Installed ( ) – This indicator displays the number of devices on which the profile is assigned and successfully installed. ) – This indicator displays the number of devices on which the profile is assigned and successfully installed. |
|
* Not Installed ( ) – This indicator displays the number of devices to which the profile is assigned but not installed. ) – This indicator displays the number of devices to which the profile is assigned but not installed. |
|
* Assigned ( ) – This indicator displays the total number of assigned profiles whether they are installed or not. ) – This indicator displays the total number of assigned profiles whether they are installed or not. |
|
* Pending Removal ( ) – This indicator displays the total number of profiles scheduled for removal. ) – This indicator displays the total number of profiles scheduled for removal. |
|
* Removed ( ) – This indicator displays the total number of removed profiles. ) – This indicator displays the total number of removed profiles. |
|
* Out of Date ( ) – This indicator appears when an updated version of the installed profile is available. ) – This indicator appears when an updated version of the installed profile is available. |
|
* Pending Information ( ) This indicator displays when the profile is in a 'held' state. Typical examples of this state include profiles that require information from third party servers (such as VPN profiles involving Websense and zScaler and Certificate profiles needing CA data) remain in a held state until contact with these servers is made and the requisite information is obtained. ) This indicator displays when the profile is in a 'held' state. Typical examples of this state include profiles that require information from third party servers (such as VPN profiles involving Websense and zScaler and Certificate profiles needing CA data) remain in a held state until contact with these servers is made and the requisite information is obtained. |
|
| * Not Assigned – This text only indicator displays when the profile is defined and saved but not yet assigned to devices. | |
| * Not Applicable – This text only indicator displays when the profile is defined, saved, and assigned but there are details in its configuration that make it inapplicable to the devices it is assigned to. | |
| - Installation Failed – This text only indicator displays when the profile is defined, saved, and assigned but there is an error that prevents it from installing successfully. | |
| Radio button and Edit Icon | The List View features a selection radio button and Edit icon, each to the left of the profile. Selecting the Edit icon ( |
| * Devices – View devices that are available for that profile and whether the profile is installed and if not, see the reason why. Survey which devices are in your fleet and manually push profiles if necessary. | |
| * </ > XML – Display the XML code that Workspace ONE UEM generates after profile creation. View and save the XML code to reuse or alter outside of the Console. | |
| * More Actions | |
| Copy – Make a copy of an existing profile and tweak the configuration of the copy to get started with device profiles. | |
| Activate/Deactivate – Toggle between making a device profile active and inactive. | |
| Delete – Maintain your roster of profiles by removing unnecessary profiles. |
Confirm Device Profile Installation
During those infrequent cases in which profiles do not install on targeted devices, the View Devices screen enables you to see the specific reason why.
Profile Install Status
Navigate to Resources > Profiles & Baselines > Profiles and observe the listing that displays.
Review the Installed Status column and select the number links that display to the right of the indicator icons to open the View Devices screen. For details about the indicator icons, see the Installed Status definitions in the Device Profiles List View.

Result: The View Devices -
screen displays. (Optional) Produce a comma-separated value (CSV) file of the entire View Devices page by selecting the Export icon (
 ). Excel can be used to read and analyze the CSV file.
(Optional) Customize which columns in the View Devices page you want to be visible by selecting the Available Columns icon (
 ).
).
View iOS Devices Command Status Column
iOS devices feature a Command Status column on the View Devices screen which includes useful installation statuses as they relate to the selected iOS device. The following statuses appear in the Command Status column.
- Error – Displays as a link that, when selected, shows the specific error code applicable to the device.
- Held – Displays when the device is included in a certificate batch process that is underway.
- Not Applicable – Displays when the profile assignment does not impact the device but is nonetheless part of the smart group or deployment. For example, when the profile type is unmanaged.
- Not Now – Displays when the device is locked or otherwise occupied.
- Pending – Displays when the installation is queued and is on schedule to be completed.
- Success – Displays when the profile is successfully installed.