This section describes the procedure to install the Print server application required to manage printers through Workspace ONE UEM.
Procedure
- On the Add Server page, take these steps.
- Enter a friendly name for the print server.
- Note the HMAC Token (HMAC Token is automatically generated by Workspace ONE UEM).
- your User id.
Note: Do NOT close the Add Server page. In subsequent step you will be populating the ServiceUID field.

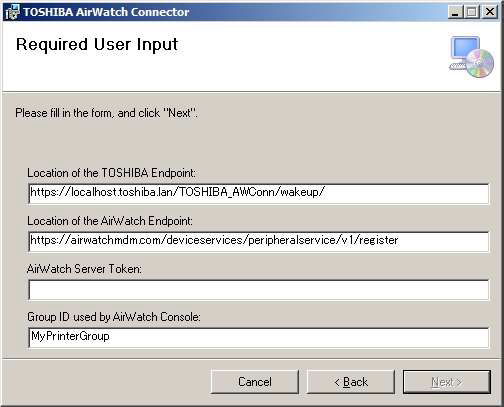
- >On the Request User Form, enter the details and then select Next.
Option Description Location of the TOSHIBA Endpoint Change the Domain name to your server name. Example - https: //xxcompany.com/TOSHIBA_AWConn/wakeup/ Location of the Workspace ONE UEM Endpoint Change to the Workspace ONE UEM Device Services Endpoint URL obtained from Workspace ONE UEM. Example - https: //api.airwatchmdm.com/deviceservices/peripheralservice/v1/register Workspace ONE UEM Server Token Enter the HMAC Token which you noted in Step 3. Group ID used by UEM console Enter the basic Group ID for your company from Workspace ONE UEM.
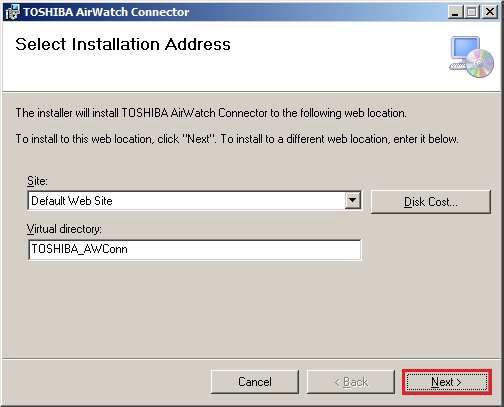
- On the Select Installation Address screen, select Next.
Unless you have a specific reason, do not edit the entry TOSHIBA_AWConn in the Virtual directory field. TOSHIBA_AWConn means the first directory name of the TOSHIBA Endpoint URL. This step cannot use Back. If you need to go back, please start over by selecting Cancel.