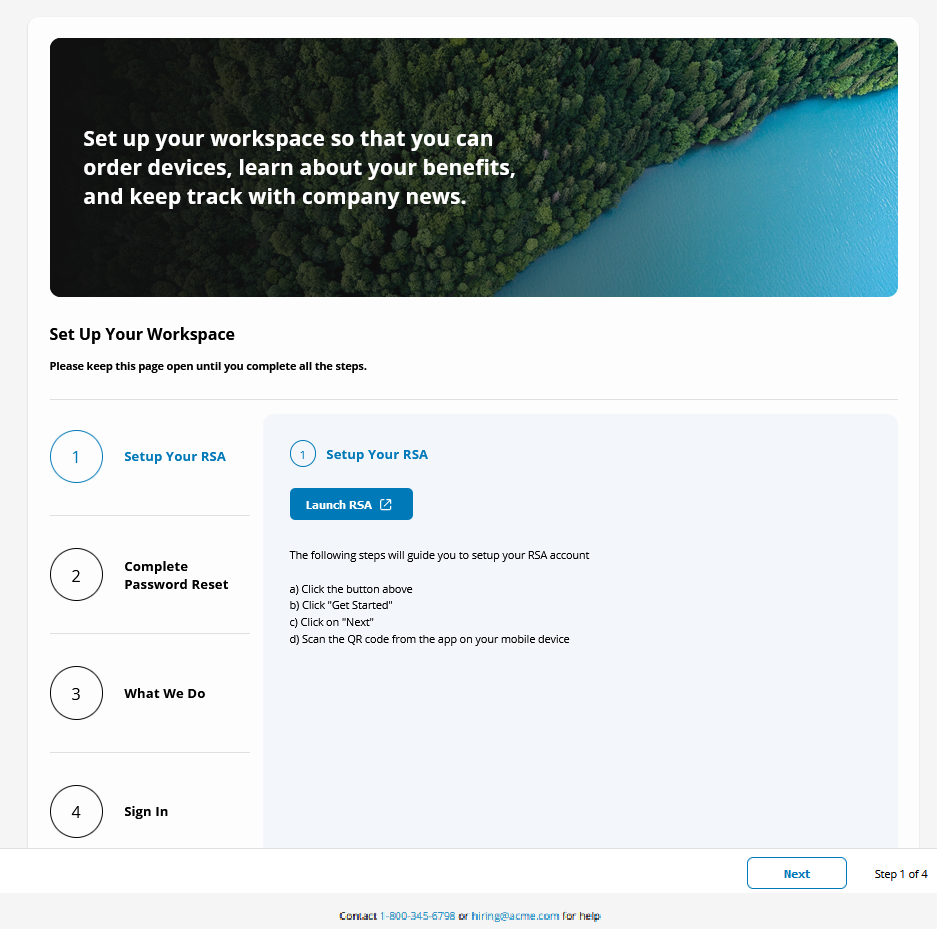
In the Hub Services console, you design and configure the New Hire Welcome page that pre-hires see when they click the magic link in the email they receive. The welcome page displays a pre-hire greeting and directions to set up their account and sign in to the Workspace ONE Intelligent Hub portal in a web browser.
You can design the welcome page with a banner and an introduction that displays in the banner. You add tasks with directions to help pre-hires set up their account. You can include up to four different setup tasks in the New Hire Welcome page.
Setting Up the New Hire Welcome Page
Prerequisites
- If Workspace ONE UEM is configured, Workspace ONE UEM must be version 20.08 or later to configure Templates in Hub Services.
- User authentication is set to Workspace ONE Access in the Workspace ONE UEM console. See Enable Intelligent Hub Device Enrollment and Authentication Mode.
- Day Zero configuration steps are completed in Workspace ONE Access to configure the Token Auth adapter and set up the magic link. See Prepare Day Zero Onboarding in Workspace ONE Access.
Procedure
The following steps describe how to set up the New Hire Welcome page in the Hub Services console.
- In the Hub Services console, navigate to New Hire Welcome.
The pre-hire user group is automatically added from the Workspace ONE Access service and added to the New Hire User Group text box.
- In the Banner section, click REPLACE to add a banner to the Welcome page.
The maximum size of the banner image is 1140 x 600 pixels. The maximum file size is 4 MB. The file format can be JPEG, PNG, GIF, or SVG.
- Select the gradient overlay mode. Options are Dark or Light.
- Add a description to the banner. The text can be no longer than 280 characters.

- In the Account Setup section, describe the tasks that the pre-hires must complete from the welcome page.
- Step 1 - Authentication
Configure the first step to guide a user to set up a multi-factor authentication app such as RSA SecureID Token. Pre-hires use this multi-factor authentication app to sign in to Workspace ONE Intelligent Hub after they complete the required steps on the welcome page.
Step Description Example Step Title Type a title that describes the step. This title displays in the Welcome page. Download RSA SecurID Token App Button Text Type the text that displays on the button that the pre-hire clicks to access the app. Launch RSA
Button Destination: Web App Web App is required for this step. Start typing in the search text box. The app must be available in the Hub catalog and configured for the pre-hire group. Select the authentication app.
RSA Secure Token Step Text Describe the steps required to set up the app and include any helpful information for the pre-hire to follow. When you add a URL, the URL becomes a hyperlink on the Welcome page.
The following steps will guide
you to setup your RSA account
 a) Click the button above.
 b) Click "Get Started".
 c) Click on "Next".
 d) Scan the QR code from the app on your
mobile device.
Image Upload images and screen shots to display in the welcome page as visual aids to help pre-hires set up their account. The maximum size of the image is 100 by 100 pixels. The maximum file size is 1 MB. The file format can be JPEG, PNG, GIF, or SVG.
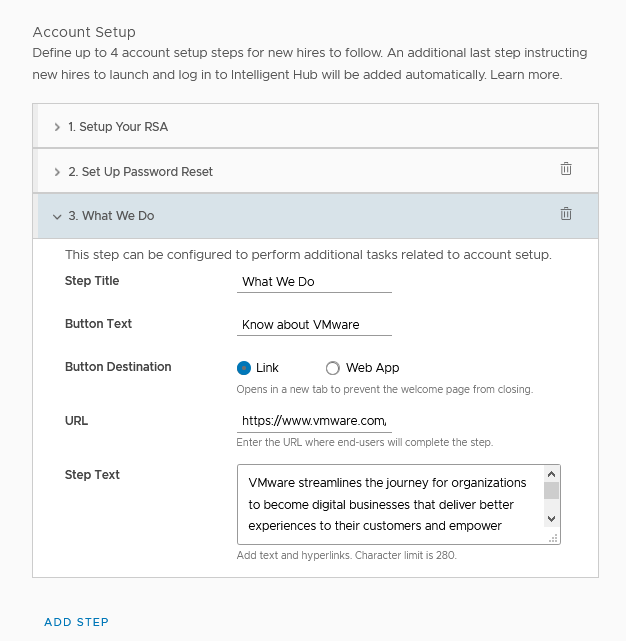
- Steps 2–4 (Optional)
You can set up three additional steps that pre-hires must finish while the New Hire Welcome page is open. This example shows the step that links to a company's website.
Step Description Example Step title Type a title that describes the step. This title displays in the Welcome page. What We Do Button Text Type the text that displays on the button that the pre-hire clicks to begin the steps. Learn about myCompany Button Destination URL to Link or Web App name You can select Web App to access a web app that is enabled in the Hub catalog set up for apps for the pre-hire group. Select URL and enter the destination URL address. https:// careers.mycompany.com/what-we-do Step Text Include a long description and any relevant information to complete the step. When you add a URL, the URL becomes a hyperlink on the Welcome page.
Work here. Advance Anywhere.
We believe that software has the power to unlock new possibilities. Our cloud, digital workspace, networking, and security offerings from an essential, ubiquitous digital foundation that powers the applications, services, and experiences transforming the world.
- Last Step - Sign In to Workspace ONE Intelligent Hub
The last step in the New Hire Welcome page is instructions about how to sign in to Workspace ONE Intelligent Hub. This step is automatically configured and displays as the last step in the welcome page. The following is an example of the sign-in instructions on the Welcome page.

- Step 1 - Authentication
- In the Contact Information section, in the Information Text text box, add helpful contact information such as phone numbers and email addresses to your support or HR teams. For example, Contact 1 800 - 555-1212 or email hr@mycompany for assistance.. The text is limited to 280 characters.
- Click Save.
The pre-hire must complete all the steps described in the welcome page in one session. If they leave the welcome page before completing the step, they must request a new magic link from your organization.
Examples of Pre-Hire Account Setup Tasks to Include in the Welcome Page
The following is an example of the Welcome page with these tasks.
- Download the RSA SecurID Token app for authentication. The magic link is a one-time-use authentication token. To enable pre-hires to authenticate to Workspace ONE Intelligent Hub after they leave the Welcome page, include the steps required to set up second-factor authentication with RSA.
- Explains how to set their password the first time that they sign in to Workspace ONE Intelligent Hub.
- Provide a link to your company's website to introduce your company to the pre-hire.