


It is the VNF vendor’s responsibility to provide onboarding instructions to the customers. This section provides general onboarding guidance assuming that the VNF is packaged in the format as stated in the VNF package for VMware Integrated OpenStack consumption section.
Before the onboarding processes can begin, the target cloud infrastructure should be designed and provisioned to meet the target VNF deployment. The following diagram illustrates the physical, virtualized, and logical layers of the stack upon which the VNFs are onboarded.
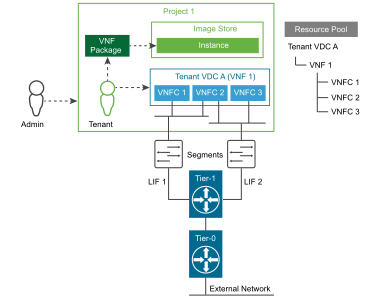
VMware Integrated OpenStack utilizes both UI (Horizon Dashboard) and CLI methods for VNF onboarding. The following high-level steps are required to onboard a VNF.
-
Create a project and import the VNF package into the image store.
-
Launch the service instance from Project Orchestration Stacks. The launched instances can be seen from Project Instances.
-
Create Tenant vDC based on the requirement.
-
Create a Resource Pool. Allocate CPU and memory for an OpenStack tenant on a compute node that provides the resource guarantee for tenants.
-
To manage the Tenant vDC, use the VMware Integrated OpenStack command line utility.
-
When the VMs are powered on, the system will apply configurations for each VNF-C using the packaged configuration files.
-
Verify that the instances are running properly.
-
Apply any EPA configurations to the instances so that the VNF can be placed appropriately by the DRS, NUMA, and Nova Schedulers.
