


As a systems administrator, you can create jobs in SaltStack Config to run remote execution tasks, apply states, start Salt runners, and more. Jobs are generally intended for system operations that need to be automated and executed multiple times.
Before you start
Jobs in SaltStack Config usually incorporate one of the execution modules or state modules that have been developed by the Salt open source community. For that reason, you'll need to first become familiar with some of the basic concepts about the Salt system and how to perform common administrative tasks using the available execution and state modules.
| To learn about... | See... |
|---|---|
| The basics of working with Salt |
|
| Salt states |
|
| Salt execution and state modules |
|
Creating jobs
To create a new job:
- Research which Salt execution or state modules would help you achieve your desired outcome. When you find the Salt module that meets your needs, read the module's documentation to ensure you are familiar with the module's parameters and other requirements.
- If your job uses Salt state modules, create a new state file in the SaltStack Config File Server. See How do I create state files and pillar data? for more information.
- Create a new job.
- Click Config > Jobs in the side menu to open the Jobs workspace.
- Click the Create Job button.
Note:
If you don’t see the Create Job button, you do not have permission to create new jobs. Contact your vRealize Automation administrator for access or to create this job on your behalf so that you can complete the tutorial.
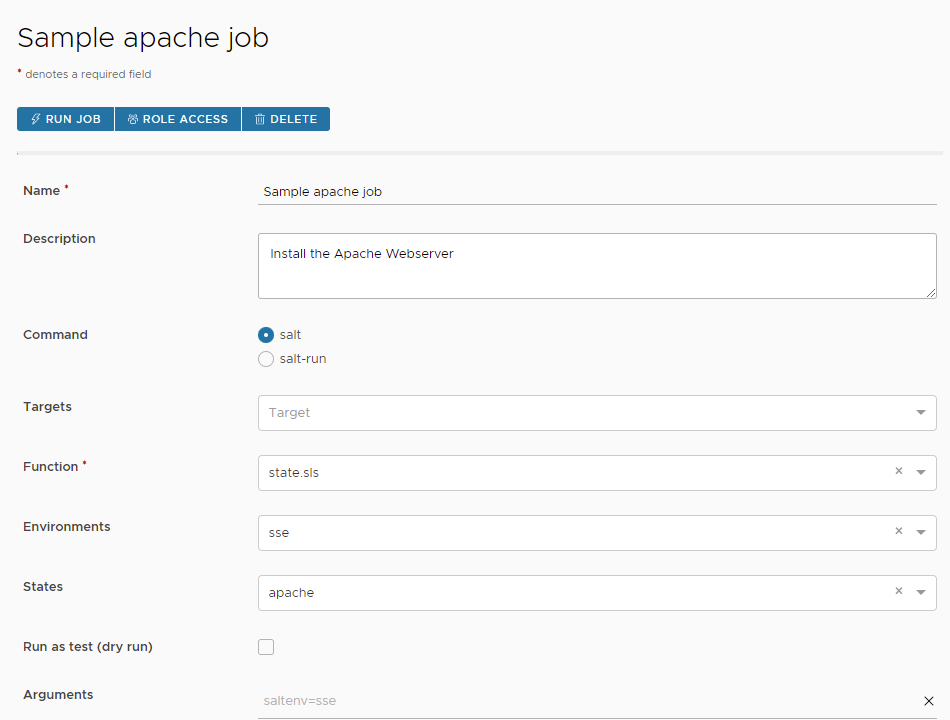
- Enter the details for the new job.
Field Value Name
Give the job a descriptive name that briefly indicates the purpose of the job or the task the job is meant to do. For example, "Configure Windows firewall settings."
Description
Add a description that tells other users the purpose of this job, such as "Opens the firewall for port 445 on Windows nodes."
Command
- Select salt for jobs that are run against minions.
- Select salt-run for jobs that are run against the Salt master.
salt-runjobs are also known as Salt runners. Salt runners are modules used to execute convenience functions on the Salt master. You can use Salt runners to run orchestration, power minions remotely, call webhooks, and more. They are useful for executing tasks centrally or from a central starting point. For example, you could apply a highstate to all minions associated with a given Salt master.
If you are unsure which option to select, use salt since most jobs are run against minions.
Note: If you decide to change the command, you will be presented with a new list of functions to choose from.
Targets
Optional: A target is a group of minions, across one or many Salt masters, that a job's Salt command applies to. You can create targets for your jobs in the Targets workspace. See How do I create targets? for more information.
If you want the targets to be selected at the time you run the job, do not select anything from this menu. Leaving this field blank allows you to select the target at the time you run the job. However, defining a job’s target also prevents that job from running on nodes on which it should not be run.
Function
Select which Salt module to execute when you run this job. Click this field and begin typing the name of the Salt module you want to select or select it from the menu. You can also type your own value if the module you want to use is not in the dropdown.
If this job is intended to apply a Salt state file to a minion, use the
state.applymodule. See state.apply for more information.See the Salt Module Index for a complete list of Salt modules. Also see Examples of common jobs for a table describing some of the most commonly used modules.
Arguments You can use the Arguments field to pass
argsandkwargsto the Salt module.Each line in the Arguments field represents one argument. For example, if you're using the
file.copymodule, you could passpath/to/src/andpath/to/dstto the module.You can also use keyword arguments. For example, you could pass
src=path/to/src/anddst=path/to/dst/to thefile.copymodule.See the Salt Module Index for a complete list of Salt modules.
Environments
This field is only available when applicable to the chosen function, such as
state.apply,state.highstate, and others.Select your desired Salt environment from the menu or type it in if it does not appear in the list. For example, if you are applying a state file from the base environment, select
basefrom the menu.States
This field is only available when applicable to the chosen function, such as
state.apply.Select the state file you want to apply from the menu or type it in if it does not appear in the list.
Pillar Override
This field is only available when applicable to the chosen function, such as
state.apply. It accepts pillar data as JSON. The pillar data is saved into the job definition and passed to the module function at runtime.Using Pillar Override in SaltStack Config is similar to sending custom pillar values through the CLI. Values passed this way override existing Pillar values set using
pillar_rootsor an external Pillar source. Pillar values that are not included in thekwargwill not be overwritten.See How do I create state files and pillar data? for more information about pillar data.
- Optional: Check the Run as test (dry run) option to run a test job and generate a mock job return. Test (dry run) is available only for certain functions, such as
state.apply. If you select Test, the job runs in dry run mode and no changes will be made. If this option is left unselected, you can choose to run the job as a test later when you run the job. - Optional: Add Job inputs to your job. See Adding job inputs for more information.
- Save the job and confirm that it appears in the Jobs workspace.
Adding job inputs
As a systems administrator, you can use job inputs to configure arguments or variables that other users can change at runtime. Rather than creating multiple jobs for different use cases, you can create general-purpose jobs and then define optional and required job inputs for your users. These general-purpose jobs can help to reduce the amount of job creations requests you receive.
One advantage of using job inputs is that you can restrict or limit access to the types of arguments or variables that other administrators can pass into the function at job runtime while still giving them the ability to perform the tasks necessary to do tasks within the scope of their responsibility. In this way, clearly defined job inputs ensures your organization is following standard security best practices, such as the principle of least privilege.
Before you start
Consider what job inputs users need to edit
Before you define your job inputs, it is important to think about which job inputs you want users to see and edit at runtime. Remember that someone else besides you might run this job and that the way the job inputs appear to them will change depending on how you set up the job inputs. Take some time to think through which job inputs you want these users to see and edit at runtime.
For example, perhaps you create a job that applies configuration settings to servers based on the server's purpose or role. You could possibly create a generic job that applies configuration settings from a state file, then create job inputs that allow an administrator to select which state file is applied from a list in the drop-down menu. At job runtime, the user would see the drop-down menu with a list of the possible state files you defined and nothing else.
In this way, job inputs gives system administrators more control over what you allow other administrators to see and change at job runtime. You can simultaneously provide flexibility while also ensuring that other users can only change what is allowed within their scope of responsibility or permission level.
- Click Config > Jobs in the side menu to open the Jobs workspace.
- Select a job to open the job's details.
- Scroll down to the Job Inputs section of the job detail page.
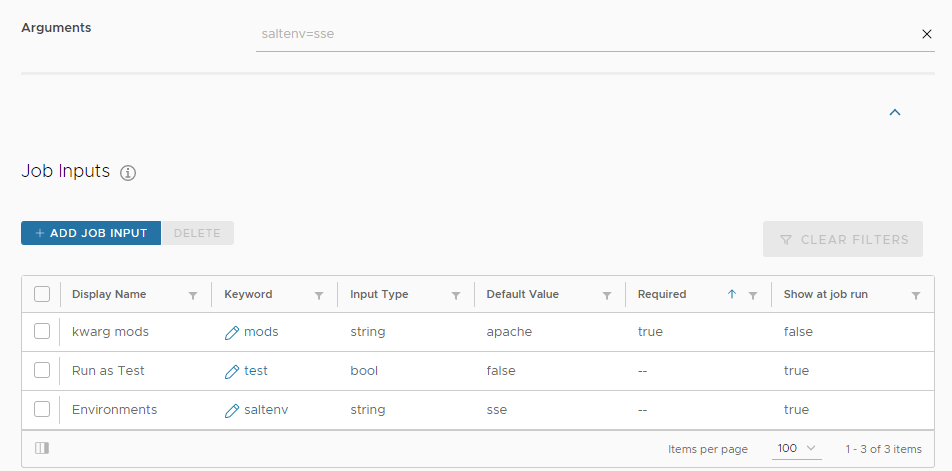
- Click the Add Job Input button.
- Enter the details for the job input.
Field Value Display Name Set the name for the job input.
When a user sees this job input at runtime, the text you enter as the Display Name is the most important indicator of the input's function and purpose.
Choose a name that is brief, accurate, and descriptive, like "Service to restart."
Input Type Set the job input's type. There are four input types: string, number, boolean, and select.
- Use the string input type if you want users to provide a value.
- Use the number if you want users to specify quantity or sizing.
- Use boolean for true or false scenarios.
- Use select if you want users to choose from a list of values. Values in a select list can be strings, numbers, or booleans. For example, the input type for the "Service to restart" job input might be a select list of strings. For example,
httpd,sshd, ormysqld.
Before you choose an input type, consult the Salt Module Index. The input type is determined by the Salt module the job uses and which parameter the input type correlates with in the Salt module. If you choose the wrong input type, the job will fail.
Show at job run Allow users to see and edit values when running the job.
If you toggle this setting, the Help text field appears in the Edit job input window.
If you find yourself struggling to find a brief and accurate Display Name, use Help text field to provide additional information about the job input. For example, you might describe a situation that would require a user to provide a value.
This help text shows up under a help tooltip (?) next to the job input's name when a user runs the job.
Keyword Provide the parameter or argument that is passed to the module function being executed. See the Salt Module Index for more information about module functions.
Note: Job inputs does not support non-keyworded positional arguments. These can be specified in the job under Arguments, but they can't be provided at job run.
Default Value/Value If Show at job run is enabled, you can use the optional Default value field to provide a default value for the job input. Users can either pass the default value to the module function or change it at runtime.
Consider whether providing a default value for your users will be helpful. Providing a default value can help your users save time when running jobs, but there may be situations where it is not needed. For example, a job input called "Datacenter" might not require a default value because the value will vary.
If Show at job run is disabled, you can use the Value field to pass a default value to the module function. Users will not be able to see or edit the value.
Required at job input If Show at job run is enabled, you have the option to require users to provide a value for the job input.
Consider whether requiring users to provide a value will be helpful. As you design your jobs, think about what might happen if users do not provide a value. If the job may fail without a value, then require it at runtime. If the job can run successfully without it, then make it optional.
If possible, use the Help Text field to help users understand the job input's function.
- Save the job input and confirm that it appears in the list of job inputs in the job details page.
Note:
Other fields might appear in the list of job inputs, such as Environments, States, or Test, depending on the module function you're using. If you want users to see these inputs at runtime, click the pencil icon next to the keyword to edit the job input and toggle Show at job run.
- Save the job.
- To validate that your job inputs work as expected, log in to SaltStack Config as a user who can run who can run jobs with a lower permission level or role that has less access privileges.
If a job input is missing, the job fails, or the job input needs additional arguments or descriptions, make any necessary adjustments to the job before allowing users to run it.
Next steps
After you've created your job, you can now be run it either ad-hoc or on a regular schedule. For more information, see:
