You can install the SaltStack Config service in your vRealize Automation environment using one of two installation methods. Determining the appropriate installation method for your environment depends on a few different factors.
The two installation methods available for SaltStack Config are:
- Standard installation - Installs the architectural components needed for SaltStack Config in four or more separate nodes.
- vRealize Suite Lifecycle Manager (vRLCM) installation - Installs SaltStack Config and all of its architectural components on a single node. This method also installs the Salt master host and configures a required vRealize Automation property group.
The following sections provide detailed descriptions of these two installation scenarios. As you read the descriptions and decide which installation scenario is appropriate for your network, the key questions to answer are:
- How many nodes does your network have? Will SaltStack Config manage all these nodes?
- Does your network have high availability needs, such as load balancing and automatic failover?
- What is your purpose for installing SaltStack Config? For example, are you installing SaltStack Config as a trial run before deploying to production?
Standard installation overview
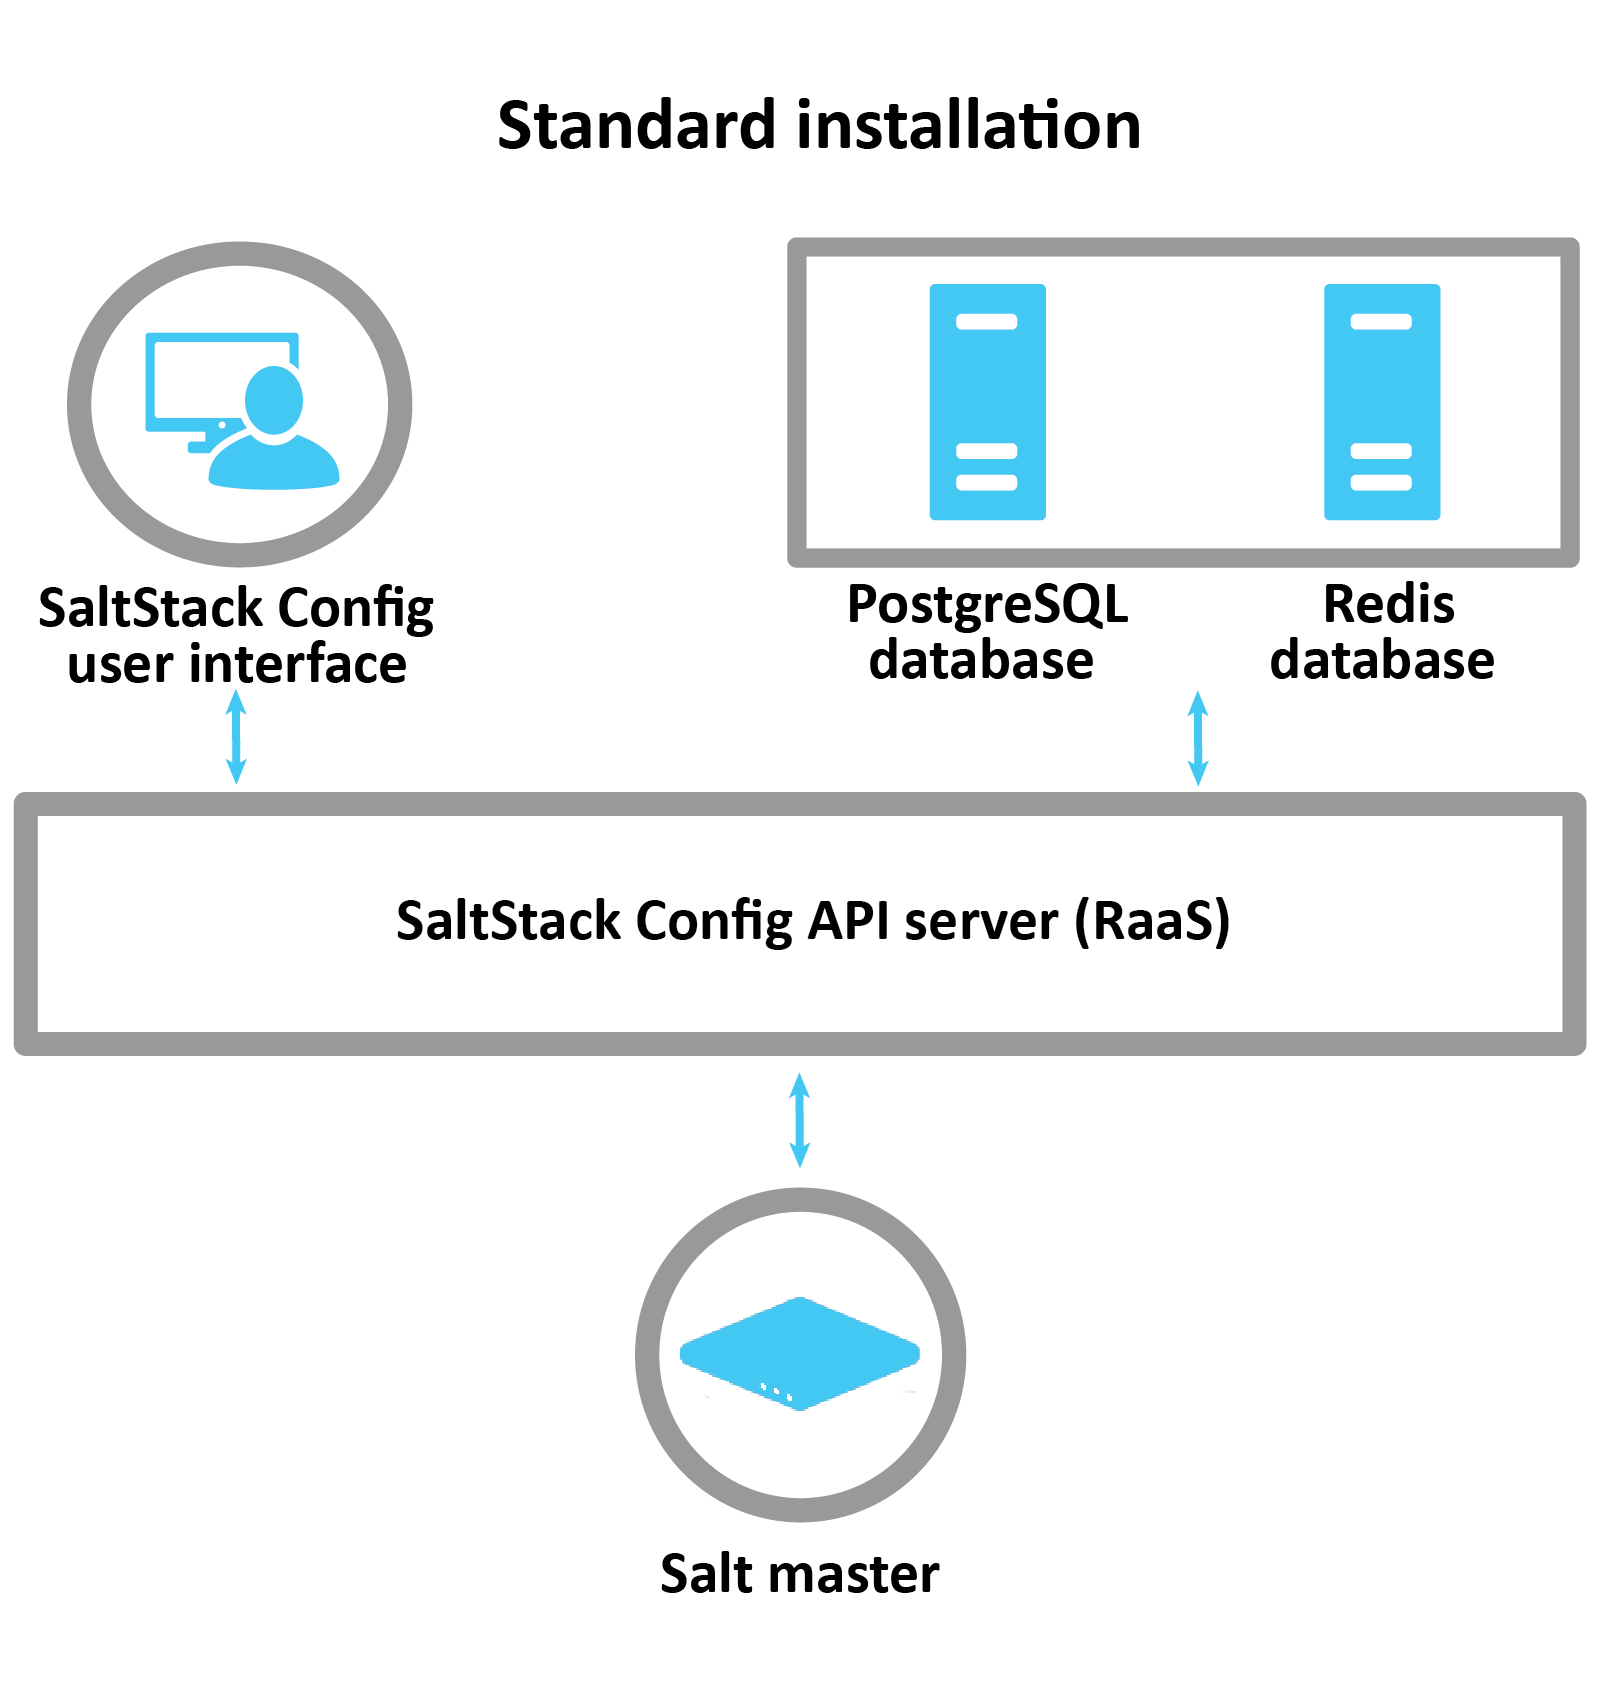
In the standard installation, you install SaltStack Config on multiple nodes (servers) using the SaltStack Config installer. In this installation scenario, the end goal is to have four nodes, each with a different host function:
- A Salt master
- A PostgreSQL database node
- A Redis database node
- A RaaS node, also known as SaltStack Config
In the standard installation, you run an orchestration highstate provided in the installer. The highstate runs on your Salt master and sets up the multi-node environment. It installs the core SaltStack Config architecture on the three other nodes that will host PostgreSQL, Redis, and the RaaS node.
Use the multi-node installation scenario if:
- Your network has more than 1,000 nodes that SaltStack Config will manage. Be aware that this scenario is also appropriate for smaller installations as well.
- If you are unsure which installation method is best for your system, the standard installation is the recommended scenario.
The advantages of the standard installation scenario are:
- It can scale as your network grows.
- It is not dependent on the availability of a single node for functionality.
- This installation method can support networks with high availability needs, such as load balancing and automatic failover.
The disadvantages are:
- The installation process is more complex, requiring careful planning and thought. You may want to consider using professional services from an expert who has deployed SaltStack Config in a production environment before.
- If your network has high availability needs, you might need support and/or consultation services from an expert who has deployed SaltStack Config in a production environment before.
- The installation process may take a full day or two to complete, depending on the size and complexity of your network.
The following image shows the system architecture that you'll have after you complete a standard installation but before you complete the post-installation or Salt installation steps:
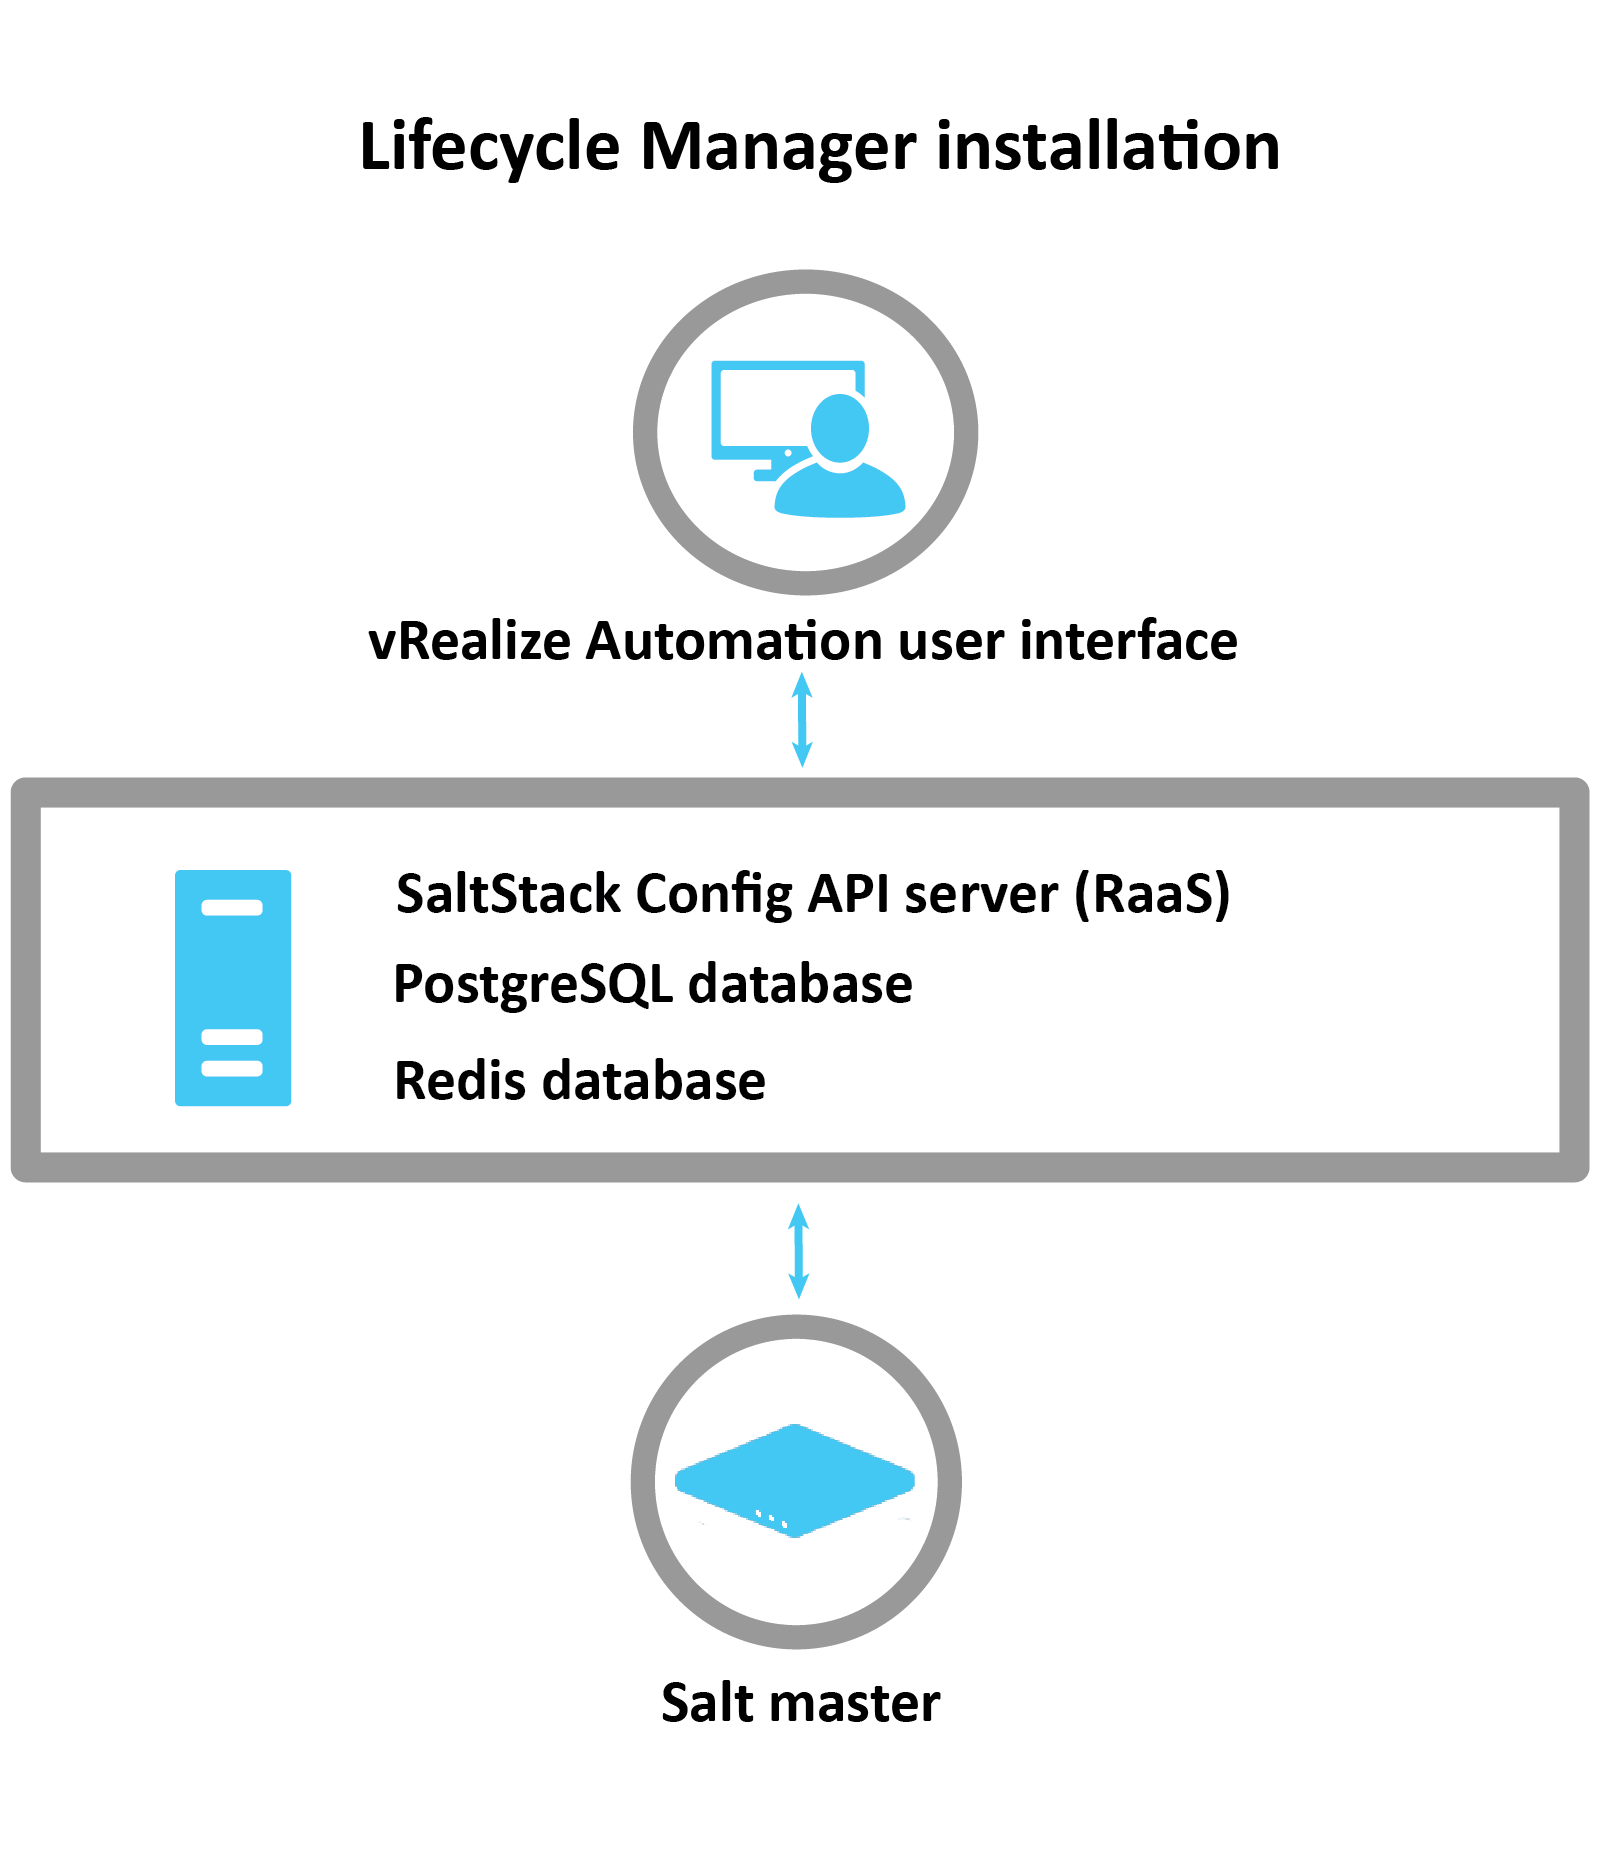
vRealize Suite Lifecycle Manager installation overview
In the Lifecycle Management installation scenario, you install SaltStack Config on a single node (server). After installation, a Salt master, the RaaS node, a Redis database, and a PostgreSQL database all run on this same node.
Use the Lifecycle Management installation if:
- Your network has 1,000 nodes or less that you intend to manage using SaltStack Config
- You want to quickly install SaltStack Config and evaluate it first-hand before deploying it to production. (Later when you deploy to production, you can use the standard installation.)
The advantages of the Lifecycle Management installation scenario are:
- It is easy and simple to install.
- It is easy to maintain since SaltStack Config and all of its dependencies are on the same node.
- The process only takes a few hours, depending on the size of your network.
The disadvantages are:
- This installation method is not recommended for production grade systems.
- Your SaltStack Config system is reliant on the availability of a single node. If that node goes down, your SaltStack Config ecosystem goes down as well.
The following image shows the system architecture that you'll have after you complete a Lifecycle Manager (vRLCM) installation but before you complete the post-installation or Salt installation steps: