


After you have installed and integrated the SaltStack Config service, you also need to install, run, and register the Salt minion service on any nodes that you intend to manage using SaltStack Config. You can deploy the Salt minion service to your nodes using either vRealize Automation cloud templates or by installing the service through Secure Shell (SSH).
Salt and its relationship to SaltStack Config
SaltStack Config runs on Salt, a Python-based open-source remote execution framework used for:
- Configuration management
- Automation
- Provisioning
- Orchestration
Salt is the technology that underlies the core functionality of SaltStack Config . SaltStack Config enhances and extends Salt, providing additional functionality and features that improve ease of use.
Salt uses the controller-client model in which a controller issues commands to a client and the client executes the command. In the Salt ecosystem, the controller is a server that is running the Salt master service. It issues commands to one or more Salt minions, which are nodes that are running the Salt minion service and that are registered with that particular master.
Another way to describe Salt is as a publisher-subscriber model. The master publishes jobs that need to be executed and minions subscribe to those jobs. When a specific job applies to that minion, it executes the job. When a minion finishes executing a job, it sends job return data back to the master.
Minions are nodes that run the salt-minion service. The service listens to commands from a Salt master and performs the requested tasks. You can deploy minions from vRealize Automation cloud templates.
Before you can begin using SaltStack Config for configuration management, you must first install the Salt minion service on all nodes that you want to manage. You must also register the minions by sending and accepting their keys to SaltStack Config .
Before you start
- Install and configure the SaltStack Config and integrate it with vRealize Automation.
- Nodes that are managed by SaltStack Config must be able to reach the Salt master and must reside on the same network as the SaltStack Config integration point and the Salt master.
- vSphere machines that are deployed to a private network must be able to initiate a connection with SaltStack Config integration and the Salt master.
Installing the Salt minion service through SSH
The process for installing the Salt minion service using SSH depends on the operating system running on those nodes.
- For information about installing the Salt minion service on RedHat Linux or CentOS, see Install Salt (pre-installation).
- For other operating systems, see http://repo.saltstack.com/.
- Configure each minion to communicate with the master by creating a
master.conffile in the/etc/salt/minion.ddirectory. In this file, provide the master’s IP address. For example:master: 192.0.2.1 - Start the minion service:
sudo systemctl enable salt-minionsudo systemctl start salt-minion - Repeat the previous steps for all remaining nodes.
After configuring these minion files to point to the Salt master, accept the minion keys in the SaltStack Config service in the Minion Keys workspace.
Installing the Salt minion service using vRealize Automation cloud templates
To deploy the Salt minion service using cloud templates, you must have access to, and be proficient at using, cloud-init (Linux) or Cloudbase-init (Windows). To add Salt minions to the Salt master that is configured for the SaltStack Config integration, the virtual machine in your cloud template must support cloud-init (Linux) or Cloudbase-init (Windows).
The following sections explain how to deploy the Salt minion service using cloud templates.
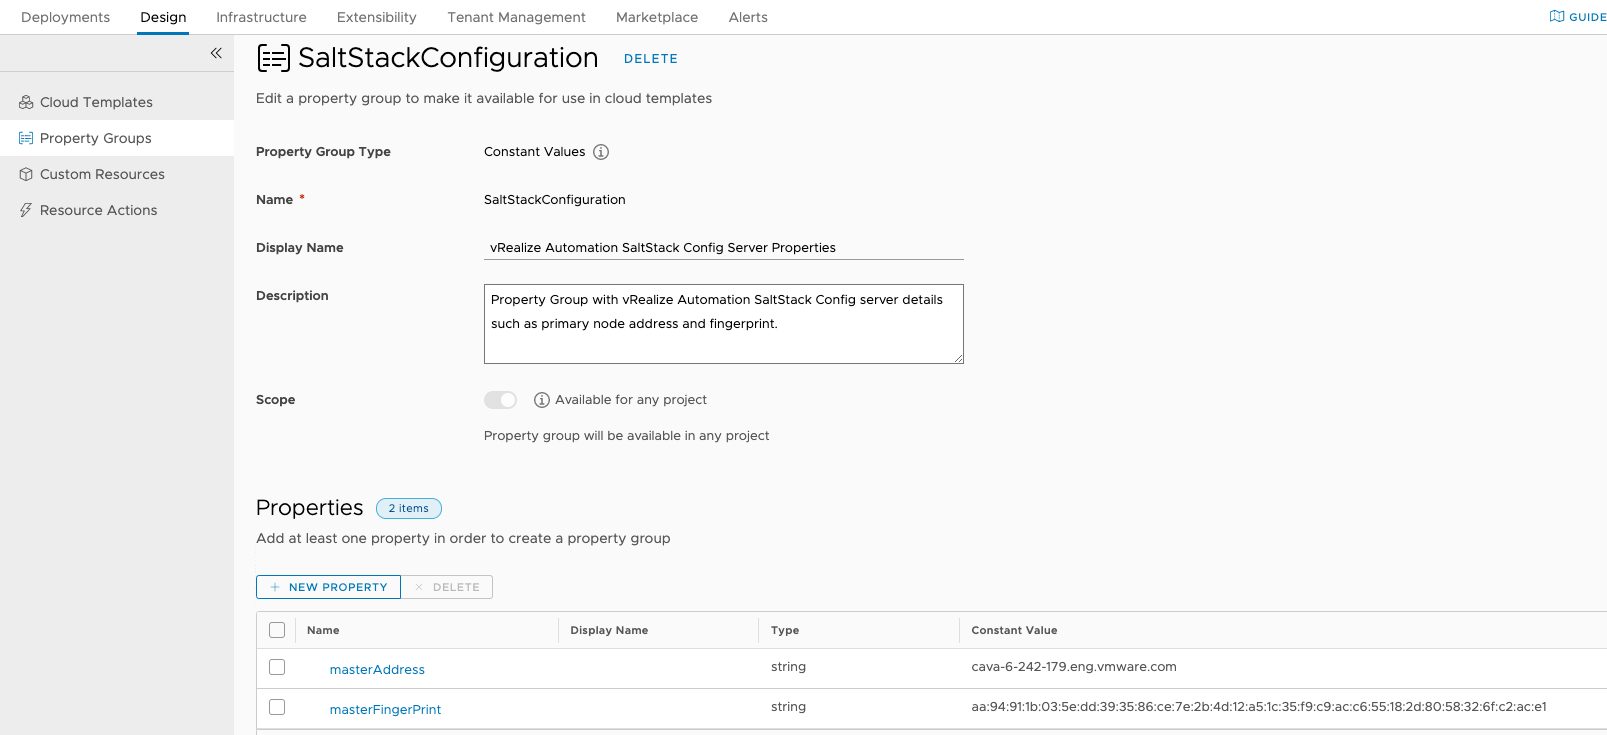
SaltStackConfiguration property group
The process of installing and configuring the SaltStack Config service in vRealize Suite Lifecycle Manager creates a vRealize Automation property group named SaltStackConfiguration. You use the SaltStackConfiguration property group values when configuring the SaltStack Config integration in a vRealize Automation cloud template or deployment.
You also use them in cloud-init or Cloudbase-init-based configuration in a vRealize Automation template (previously called blueprints) to install minions. The two properties in the SaltStackConfiguration are masterAddress, which matches the hostname setting on the SaltStack Config integration point, and masterFingerprint. A sample SaltStackConfiguration property group is shown below.
Add minions to the Salt master configured for vRealize Automation
When SaltStack Config is installed, a Salt master IP address is specified. That master IP address is used as the masterAddress property when you deploy minions from a vRealize Automation cloud template.
You install and deploy minions by using cloud-init or Cloudbase-init scripting in a vRealize Automation cloud template or deployment. You can also use an image mapping that represents a cloud configuration script that uses either of those formats. To add Salt minions to the Salt master that is associated to a vRealize Automation SaltStack Config integration, the target machine must support cloud-init (Linux) or Cloudbase-init (Windows). vRealize Automation cloud configuration scripting supports both formats.
You configure a machine resource in the cloud template with a minionId value and cloudConfig value and refer to the property group SaltStackConfiguration. The SaltStackConfiguration property group is created during SaltStack Config service installation and configuration in vRealize Suite Lifecycle Manager. It contains the masterAddress and masterFingerprint properties.
The minionId value must match the value specified for the machine's /salt/minion_id in the cloudConfig section of the cloud template code.
- vRealize Automation image that is called from the cloud template code
- Cloud configuration script that is called from the cloud template code
- Cloud configuration script content that is added directly to the cloud template code
Note: When you deploy a cloud template that contains Salt minions, if the deployment is not visible in Cloud Assembly, you can display the deployment by using the Service Broker service.
Example - Linux-based deployment and cloud-init
resources:
  Salt-Minion:
    type: Cloud.Machine
    properties:
      image: Ubuntu-18
      flavor: medium
      constraints:
        - tag: 'env:vsphere'
      cloudConfig: |
        #cloud-config
        hostname: ${input.saltminionhostname}
        users:
          - name: ${input.user}
            sudo: ['ALL=(ALL) NOPASSWD:ALL']
            groups: sudo
            shell: /bin/bash
        runcmd:
          - PASS=${input.password}
          - USER=${input.user}
          - echo $USER:$PASS | /usr/sbin/chpasswd
          - sed -i "s/PasswordAuthentication no/PasswordAuthentication yes/g" /etc/ssh/sshd_config
          - service ssh reload
          - curl -L https://bootstrap.saltstack.com -o install_salt.sh
          - sudo sh install_salt.sh -A ${propgroup.SaltStackConfiguration.masterAddress}
Example - Windows-based deployment and Cloudbase-init
formatVersion: 1
inputs: {}
resources:
  WindowsVM-Minion:
    type: Cloud.vSphere.Machine
    properties:
      image: win2016
      flavor: medium
      customizationSpec: Windows
      minionId: '${resource.WindowsVM-Minion.resourceName}'
      networks:
        - network: '${resource.wpnet.id}'
          name: '${wpnet.name}'
          assignPublicIpAddress: true
      cloudConfig: |
        #ps1_sysnative
        [Net.ServicePointManager]::SecurityProtocol = [Net.SecurityProtocolType]::Tls12; Invoke-WebRequest -OutFile C:\Salt-Minion-3002.2-Py3-AMD64-Setup.exe -Uri https://repo.saltstack.com/windows/Salt-Minion-3002.2-Py3-AMD64-Setup.exe
        Start-Process -Wait -FilePath "C:\Salt-Minion-3002.2-Py3-AMD64-Setup.exe" -ArgumentList "/S" -PassThru
        ((Get-Content -path C:\salt\conf\minion -Raw) -replace "#master: salt", "master: ${propgroup.SaltStackConfiguration.masterAddress}") | Set-Content -Path C:\salt\conf\minion
        ((Get-Content -path C:\salt\conf\minion -Raw) -replace "#master_finger: ''", "master_finger: '${propgroup.SaltStackConfiguration.masterFingerPrint}'") | Set-Content -Path C:\salt\conf\minion
        Set-Content -Path C:\salt\conf\minion_id -Value '${resource.WindowsVM-Minion.resourceName}'
        C:\salt\salt-call.bat service.restart salt-minion
  wpnet:
    type: Cloud.Network
    properties:
      name: wpnet
      networkType: existing
How to configure PowerShell commands
You configure PowerShell commands in the cloudConfig section of your cloud templates.
- Install the Salt minion service in the Windows VM.
- Update the Salt master host name value in the minion configuration.
- Update the Salt master fingerprint value in the minion configuration.
- Set the
minion_idto the VM resource name that will be used to accept the minion on the Salt master. - Restart the minion.
More information about deploying Salt minions
For alternative methods of using integrated SaltStack Config to deploy Salt minions from a vRealize Automation cloud template, see Cloud Assembly and ABX Secrets (and how to use them for installing vRealize SaltStack Minion Agents).
For related information about defining and deploying Cloud Assembly templates in general, especially if you are familiar with SaltStack but new to vRealize Automation, see Designing your vRealize Automation Cloud Assembly deployments.
