Before you can begin using the Management Pack, you must create an adapter instance to identify the host from which the Management Pack will retrieve data.
Prerequisites
Procedure
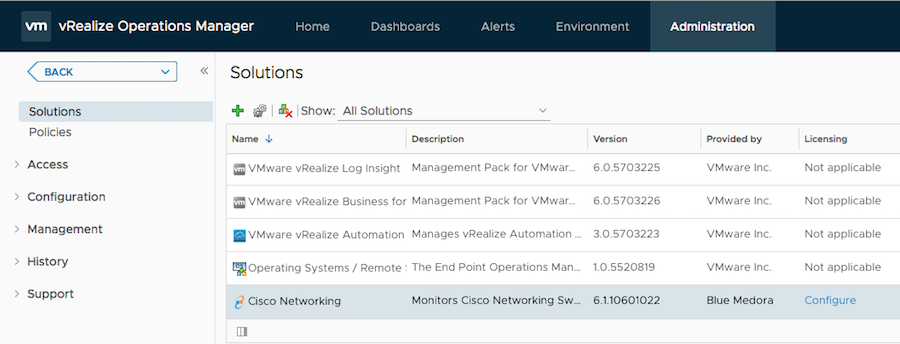
- From the top navigation bar, select Administration. In the right panel, the Solutions view will be displayed.
- Select Cisco Networking from the Solutions list on the right.

- Click the Configure
 icon. The Manage Solution window will appear.
Note: Click the Add
 icon above the Instance Name list on the left to create multiple adapter instances.

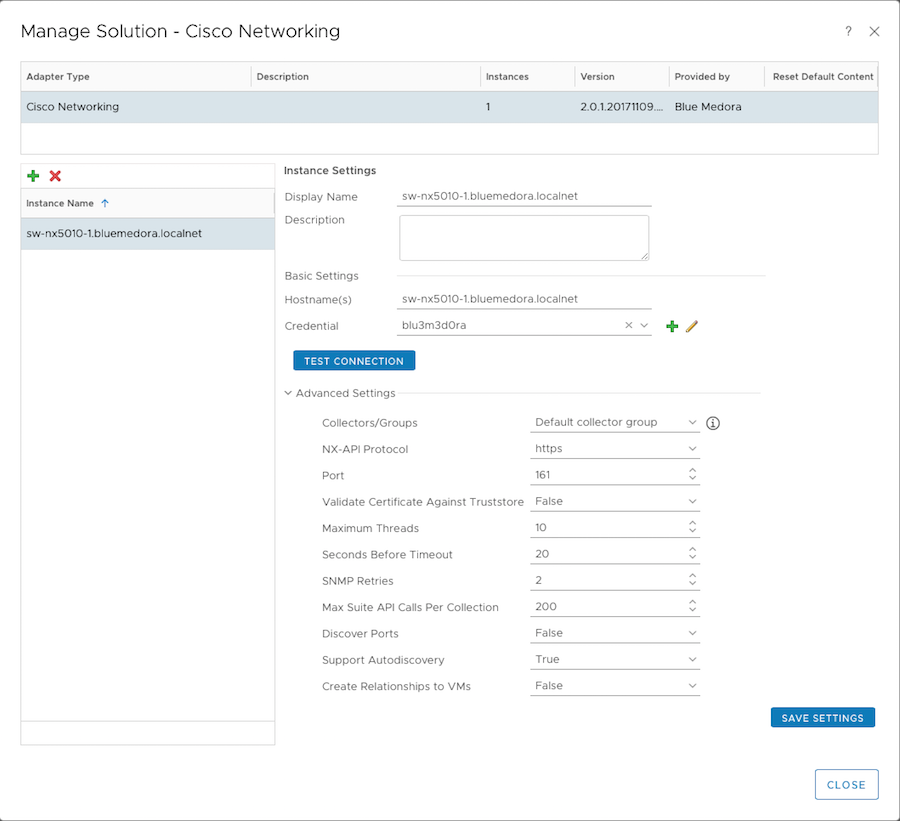
- In the Manage Solution window, enter the following information:
- Instance Settings:
- Display Name: A name for this particular instance of the Management Pack
- Description: Optional, but it can be helpful to describe multiple instances of the Management Pack
- Basic Settings:
-
Hostname(s): Options include: Hostname, IP address, IP range (written in IPv4 or IPv6 CIDR notation), or comma-separated list of the preceding options.
Important: The recommended maximum IP range is 254 IP addresses (a /24 or /120 in CIDR notation). Larger ranges are not supported. Example correct formats in CIDR notation are: 10.6.14.0/24. (IPv4) and 2620:0:2d0:200:1f00:400::7/120 (IPv6). - Credential: Creating a Credential (Cisco Networking)
-
- Advanced Settings:
-
Collector(s)/Groups: Default Collector/Group is automatically selected. Click the drop-down menu to select a different collector, if you want to run the collection on a different node.
-
NX-API Protocol: HTTP/HTTPS
-
Port: Default ports are 161 for SNMP, 80 for NX-API (HTTP), and 443 for NX-API (HTTPS).
-
Validate Certificate Against Truststore: Optional; default setting is False (all server certificates are trusted by vROps). If set to True, the Cisco Networking host server SSL certificate must be added to the truststore on your vROps system. For more information, see: Adding an SSL Certificate to the vROps Truststore (Cisco Networking).
-
Maximum Threads: Specify the maximum number of concurrent endpoint collections made by the adapter. The default value is 10, but can be adjusted as necessary for performance concerns.
-
Seconds Before Timeout: Specify the number of seconds to wait for each SNMP call to return before the adapter moves on to the next call. Default timeout value is 20 seconds. We recommend keeping the timeout value at 15 seconds or above to help ensure all data is returned.
-
SNMP Retries: Specify the number of times each SNMP call is retried before the adapter moves on to the next call. Default value is 2 retries.
Note: If upgrading from a previous version of the Management Pack, please note that the Max Relationships Per Collection Advanced Setting (used for specifying the maximum number of relationships to return per collection) is now located in the cisconetworking.properties file, which can be found in the following location: $VCOPS_BASE/user/plugins/inbound/cisconetworking_adapter3/conf. -
Max Suite API Calls Per Collection: Specify the maximum number of calls the adapter should make to Suite API per collection. Default value is 200.
-
Support Autodiscovery: Default setting is True, which enables the adapter instance to create resources for you. This should not be changed to False.
-
Discover Ports: Default value is False. Set this to True to create switch port objects and enable detailed switch port statistics.
Note: Detailed port collection is disabled by default in order to limit the number of objects the Management Pack collects within vROps. In large environments, too many collected objects have the potential to overload the vROps nodes. In the default configuration, relationships and alerts on port configuration issues will still be present on the monitored switches, but detailed statistics on individual ports will not be collected.
-
- Instance Settings:
- Click Test Connection to ensure the Management Pack can connect to the specified host(s). Click Save Settings and Close to save your configuration.
What to do next
To validate data collection, see: Validating Data Collection (Cisco Networking).