You can enable vSAN File Services on a vSAN Original Storage Architecture (OSA) cluster or a vSAN Express Storage Architecture (ESA) cluster.

Prerequisites

Ensure that the following are configured before enabling the vSAN File Services:
  • The vSAN cluster must be a regular vSAN cluster, a vSAN stretched cluster, or a vSAN ROBO cluster.
  • Every ESXi host in the vSAN cluster must have minimal hardware requirements such as:
    • 4 Core CPU
    • 16 GB physical memory
  • You must ensure to prepare the network as vSAN File Service network:
    • If using standard switch based network, the Promiscuous Mode and Forged Transmits are enabled as part of the vSAN File Services enablement process.
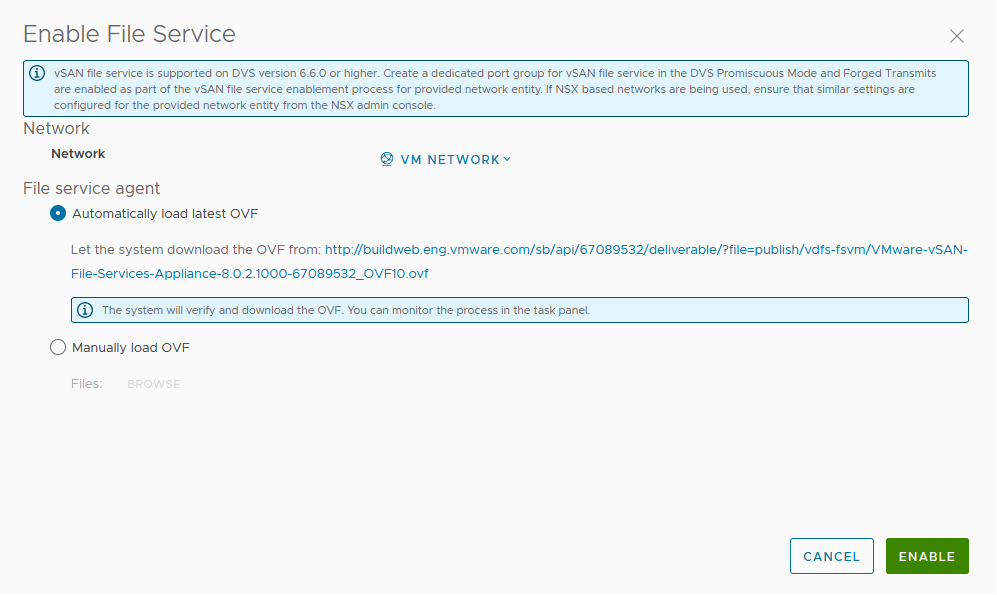
    • If using DVS based network, vSAN File Services are supported on DVS version 6.6.0 or later. Create a dedicated port group for vSAN File Services in the DVS. MacLearning and Forged Transmits are enabled as part of the vSAN File Services enablement process for a provided DVS port group.
    • Important: If using NSX-based network, ensure that MacLearning is enabled for the provided network entity from the NSX admin console, and all the hosts and File Services nodes are connected to the desired NSX-T network.

Procedure

  1. Navigate to the vSAN cluster and click Configure > vSAN > Services.
  2. On the File Service row, click Enable.
    The Enable File Service wizard opens. Enable file service wizard
  3. From the Select drop-down, select a network.
  4. In the File service agent, select one of the following options to download the OVF file.
    Option Description
    Automatically load latest OVF This option lets the system search and download the OVF.
    Note:
    • Ensure that you have configured the proxy and firewall so that vCenter can access the following website and download the appropriate JSON file.

      https://download3.vmware.com/software/VSANOVF/FsOvfMapping.json

      For more information about configuring the vCenter DNS, IP address, and proxy settings, see vCenter Server Appliance Configuration.
    • Use current OVF: Lets you use the OVF that is already available.
    • Automatically load latest OVF: Lets the system search and download the latest OVF.
    Manually load OVF This option allows you to browse and select an OVF that is already available on your local system.
    Note: If you select this option, you should upload all the following files:
    • VMware-vSAN-File-Services-Appliance-x.x.x.x-x_OVF10.mf
    • VMware-vSAN-File-Services-Appliance-x.x.x.x-x-x_OVF10.cert
    • VMware-vSAN-File-Services-Appliance-x.x.x.x-x-x-system.vmdk
    • VMware-vSAN-File-Services-Appliance-x.x.x.x-x-cloud-components.vmdk
    • VMware-vSAN-File-Services-Appliance-x.x.x.x-x-log.vmdk
    • VMware-vSAN-File-Services-Appliance-x.x.x.x-x_OVF10.ovf
  5. Click Enable.

Results

  • The OVF is downloaded and deployed.
  • The vSAN file services is enabled.
  • A File Services VM (FSVM) is placed on each host.
    Note: The FSVMs are managed by the vSAN File Services. Do not perform any operation on the FSVMs.