For the Python developer, this chapter shows how to install the Python SDKs and run example programs against vSphere APIs.
VMware vSphere offers two important programming interfaces: (1) Web Services API in the vSphere Management SDK, which is SOAP based and the integration point for pyvmomi. (2) vSphere Automation API, which is primarily REST based but has additional bindings for Python and Java. SOAP interfaces were first used decades ago to implement the vSphere Client UI. The Automation API is newer with additional features and some duplication. Code samples in this chapter use them together.
Prerequisite: Python 3.8 or higher. Recent Linux distributions and MacOS include higher Python versions. The command name is probably python3 but can be aliased.
Installing the Python SDKs for vSphere
Python access to vSphere APIs is most convenient with the pyvmomi library. To install pyvmomi:
- If not already installed, get the Python installer pip. On Ubuntu systems, the package is named
python-pip. On MacOS there are several alternatives; one is to download and run get-pip.py. In any case, add pip's location to your PATH. - Update pip and setup tools, then install (or upgrade)
pyvmomiwith the pip command.pip install --upgrade pip pip install --upgrade setuptools pip install --upgrade pyvmomi
- Install the vSphere Automation SDK for Python from its Github archive. The expression
git+httpsmeans to use secure HTTP for downloading the Github install.pip install --upgrade git+https://github.com/vmware/vsphere-automation-sdk-python.git
You could also download the vSphere Automation SDK for Python (as a ZIP file) from its https://developer.broadcom.com/sdks landing page. Install instructions, including for a secure air-gapped environment, are available in the Quick Start Guide section of README.md on the http://github.com/vmware/vsphere-automation-sdk-python web page.
- Now you are ready to run the code samples below. Copy and paste the code into a file and run the python or python3 command on the file. You can run one at a time, or all three copy-and-pastes together at once.
Basic Authentication Using pyvmomi
The pyvmomi SDK simplifies code for connecting to the VIM endpoint by using a SmartConnect function that accepts basic user credentials, opens a session with the server, and returns the ServiceInstance object. ServiceInstance contains references to specific managed objects needed to use VIM API features.
The vsphere_client object contains interface stubs for all Automation API endpoints. This code excerpt shows a function that connects to both the VIM endpoint and the Automation API endpoint and returns both the vsphere_client object and the ServiceInstance object.
hostname = 'vc1.example.com'
username = '[email protected]'
password = 'TooSecret2C!'

from pyVim.connect import SmartConnect
from vmware.vapi.vsphere.client import create_vsphere_client, VsphereClient
import requests, urllib3
import sys
from pyVmomi import vim

def connect(host: str, user: str, pwd: str, insecure: bool) -> tuple[VsphereClient, vim.ServiceInstance]:
    session = requests.session()
    if insecure:
        session.verify = False
        urllib3.disable_warnings(urllib3.exceptions.InsecureRequestWarning)
    print('Creating an Automation API session.')
    vsphere_client = create_vsphere_client(host, user, pwd, session=session)
    print('Creating a VIM/SOAP session.')
    si = SmartConnect(host=host,
                      user=user,
                      pwd=pwd,
                      disableSslCertValidation=insecure)
    return vsphere_client, si

(vsphere_client, service_instance) = connect(hostname,
                                             username,
                                             password,
                                             insecure=True)
At this point, your session is established and the session ID is stored in a cookie that will be passed along with future requests.
Creating a Hello Folder with the VIM API Using pyvmomi
ServiceContent object contains a reference to the root folder of the managed object hierarchy. You can invoke the
CreateFolder() method on the
rootFolder object to create a subfolder named
Hello Folder.
...
print('Using VIM to create Hello Folder.')
try:
  hello_folder = service_instance.content.rootFolder.CreateFolder('Hello Folder')
except vim.fault.DuplicateName as oops:
  print(oops)
  print('Please delete folder from Inventory and try again.\n')
  sys.exit(1)
print('Hello Folder MOref: ', hello_folder, type(hello_folder), '\n')

# Convert object IDs from VIM to VAPI.
def vim_moref_to_moid(moref):
  return moref._GetMoId()
...
Tagging the Folder with Automation API for Python
To tag a folder, start by creating a tag category, then create a tag in that category, and finally attach the tag to the folder.
...
# Interface factory object:
stub_config = vsphere_client._stub_config

print('Automation API creating a tag category.')
from com.vmware.vapi.std_client import DynamicID
from com.vmware.cis.tagging_client import Category, CategoryModel, Tag, TagAssociation
import com.vmware.vapi.std.errors_client
category_id = None
tag_id = None
category_stub = Category(stub_config)
tc_create_spec = category_stub.CreateSpec(name='hello_category',
   description = 'example of tagging category from pyvmomi',
   cardinality = CategoryModel.Cardinality.MULTIPLE,
   associable_types = set(['Folder']))
try:
  category_id = category_stub.create(tc_create_spec)
except com.vmware.vapi.std.errors_client.AlreadyExists as oops:
  print(oops)
  print('Please delete category from Tags & Custom Attributes and try again.\n')
  sys.exit(1)
print('New category created: ', category_id)

print('VAPI creating a tag in new category.')
tag_stub = Tag(stub_config)
tag_create_spec = tag_stub.CreateSpec(name='hello_tag',
description= 'example of a tag',
category_id=category_id)
try:
  tag_id = tag_stub.create(tag_create_spec)
except errors_client.NotFound as oops:
  print('Exception: \n', oops, '\n')
  sys.exit(1)
print('New tag created: ', tag_id)

print('VAPI creating association of tag with Hello Folder.')
dynamic_id = DynamicID(type='Folder',
 id=vim_moref_to_moid(hello_folder))
tag_association_stub = TagAssociation(stub_config)
tag_association_stub.attach(tag_id=tag_id,
 object_id=dynamic_id)
print('Tag attached to folder.')
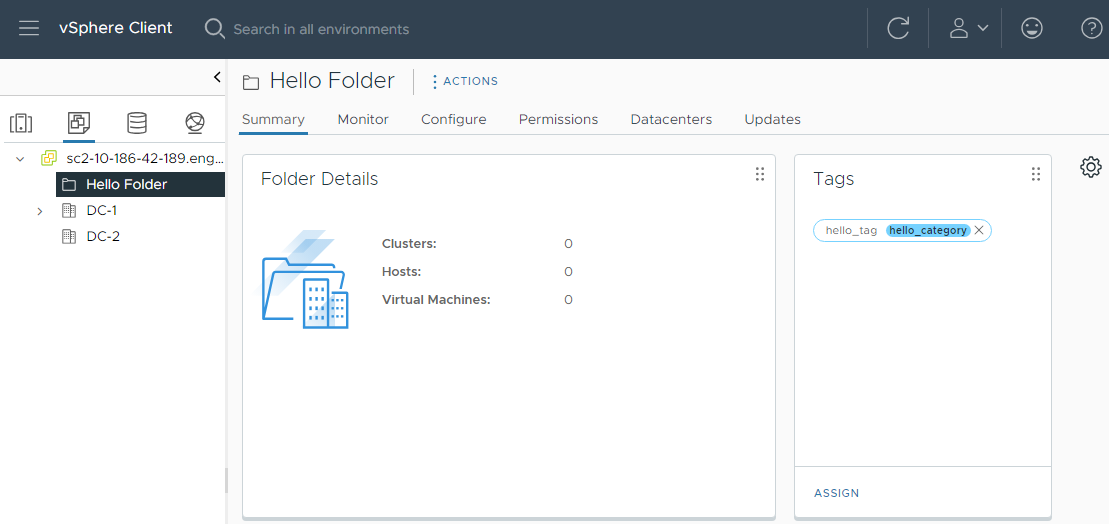
The following image shows the Hello Folder and Category as it looks in the vSphere Client UI.

What To Do Next
You can download community-sourced pyvmomi examples three different ways:
- git clone https://github.com/vmware/pyvmomi-community-samples
- the Zip file: https://github.com/vmware/pyvmomi-community-samples/zipball/master
- the tarball: https://github.com/vmware/pyvmomi-community-samples/tarball/master