


You can update the vCenter Server with patches by using the software-packages utility available in the vCenter Server appliance shell.
Patching vCenter Server
VMware regularly releases patches for the vCenter Server. You can use the Appliance Management Interface or the appliance shell to apply patches to a vCenter Server.
VMware makes patches available on a monthly basis. These patches can only be applied in between major releases of vCenter Server. For example, patches released for the initial release of vCenter Server 8.0, are not applicable to vCenter Server 8.0 Update 1, as any patches previously made available will be included with the Update 1 release.
- You can download the patch ISO images from https://my.vmware.com/group/vmware/patch.
VMware publishes a single type of ISO image that contains patches.
Download Filename Description VMware-vCenter-Server-Appliance-product_version-build_number-patch-FP.iso Full product patch for the appliance, which contains the VMware software patches and the fixes related to security and third-party products (e.g. JRE and Photon OS components). - You can configure the vCenter Server appliance to use a repository URL as a source of available patches. The appliance is preset with a default VMware repository URL.
You can download the patches in ZIP format from the VMware Web site at https://my.vmware.com/web/vmware/downloads and build a custom repository on a local Web server. The download filename is VMware-vCenter-Server-Appliance-product_version-build_number-updaterepo.zip.
Patching vCenter Server Using the vCenter Server Management Interface
You can use the vCenter Server Management Interface to view the installed patches, check for new patches and install them, and configure automatic checks for available patches.
To perform ISO-based patching, you download an ISO image, attach the ISO image to the CD/DVD drive of the appliance, check for available patches in the ISO image, and install the patches.
To perform URL-based patching, you check for available patches in a repository URL and install the patches. The vCenter Server is preset with a default VMware repository URL for the build profile of the appliance. You can configure the appliance to use the default VMware repository URL or a custom repository URL, for example, a repository URL that you previously built on a local Web server running within your data center.
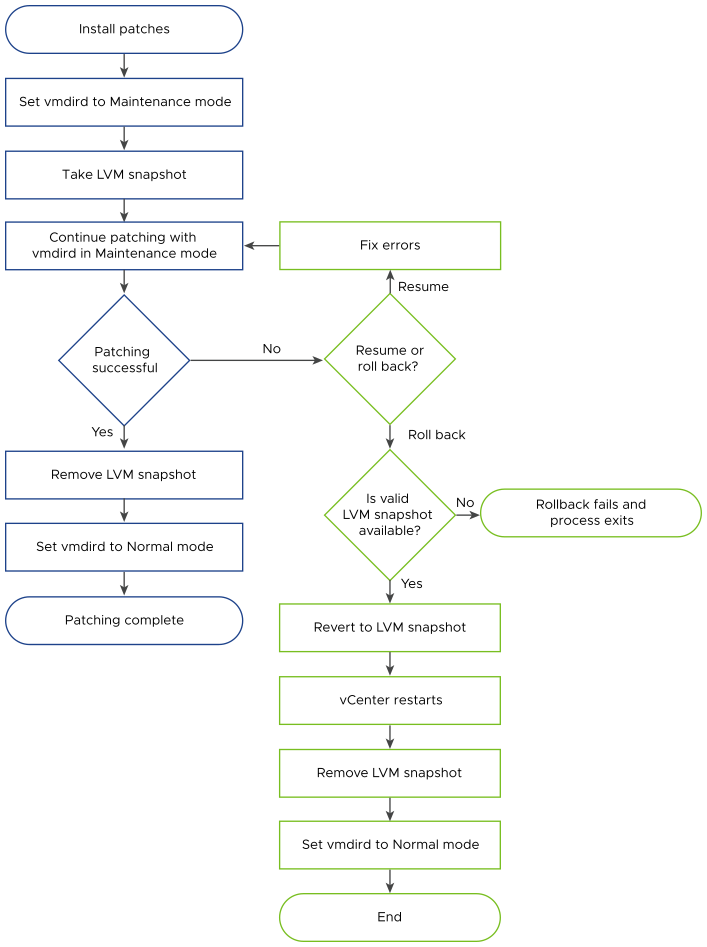
Automatic Creation of LVM Snapshot
The vCenter Server patching orchestrator automatically creates a Logical Volume Manager (LVM) snapshot of the vCenter Server before performing a patch installation. If the patching fails, the orchestrator provides options to either continue patching or roll back to the automatically created LVM snapshot.
The roll back option is only available when you are patching vCenter Server 8.0 Update 2 and higher versions.
When you initiate the installation of a patch, prechecks are performed to verify that a snapshot can be taken and there is sufficient disk space for the LVM snapshot. If the precheck returns an error, the patching workflow exits.
After prechecks run successfully, the VMware Directory Services (vmdird) is stopped and the orchestrator takes an image-based backup (LVM snapshot). The snapshot is saved as snapshot disk on the vCenter Server Appliance. If there is a failure while taking the snapshot, the vmdird is started in normal replication mode, an error is thrown and the patching workflow exits and the snapshot is cleaned up.
If the snapshot is taken successfully, the patching resumes with vmdird in standalone mode.
If an error occurs during patching, the vCenter Server Management Interface displays options to resume or rollback the process. You can select Resume the vCenter installation and correct the problem preventing the patching to finish staging the patches or select Revert to the last vCenter backup version to roll back.
If you choose to revert, a patching rollback API is called. The API checks if an LVM snapshot is available and reverts to the snapshot. After reverting, the snapshot is removed to reclaim the disk space and vmdird is set to normal replication mode. The API also performs a cleanup of any changes made by the patching install workflow before creating the backup. If a valid snapshot is not available, the installation exits with an error.
Log In to the vCenter Server Management Interface
Log in to the vCenter Server Management Interface to access the vCenter Server configuration settings.
Prerequisites
Verify that the vCenter Server is successfully deployed and running.
Procedure
Check for and Stage Patches to the vCenter Server Appliance
Before you install available patches, you can stage the patches to the appliance. You can use the vCenter Server Management Interface to stage patches either from a local repository by attaching an ISO image to the appliance, or from a remote repository directly by using a repository URL.
During the process of staging, the vCenter Server Management Interface validates that a patch is a VMware patch, that the staging area has enough free space, and that the patches are not altered. Only new patches or patches for existing packages that can be upgraded are staged.
If you are patching vCenter Server 8.0 Update 2 and higher versions, the patching orchestrator automatically creates a backup of the vCenter Server before performing a patch installation. For more information, see Automatic Creation of LVM Snapshot.
If a problem that prevents the successful staging of the patches occurs, vCenter Server suspends the staging process. Review the error messages, correct the problem, and, in many cases, you can resume staging the patches from the point at which vCenter Server encountered the problem.
Prerequisites
- If you are staging patches from an ISO image that you previously downloaded from https://my.vmware.com/group/vmware/patch, you must attach the ISO image to the CD/DVD drive of the vCenter Server. You can configure the ISO image as a datastore ISO file for the CD/DVD drive of the appliance using the vSphere Client. See vSphere Virtual Machine Administration.
- If you are staging patches from a remote repository, verify that you have configured the repository settings and that the current repository URL is accessible. See Configure URL-Based Patching.
Procedure
What to do next
If you decided to stage the available patches for installation at a later time, you can now install. See Install vCenter Server Patches.
Configure the Repository for URL-Based Patching
For URL-based patching, by default the vCenter Server appliance is configured to use the default VMware repository URL that is preset for the build profile of the appliance. You can configure a custom repository URL as the current source of patches for your environment's requirements.
By default the current repository for URL-based patching is the default VMware repository URL.
If vCenter Server is not connected to the Internet or if your security policy requires it, you can build and configure a custom repository. The custom patching repository runs on a local Web server within your data center and replicates the data from the default repository. Optionally, you can set up an authentication policy for accessing the Web server that hosts the custom patching repository.
Prerequisites
Log in to the vCenter Server Management Interface as root.
Procedure
What to do next
Install vCenter Server Patches
You can check for and install patches either from an ISO image or directly from a repository URL.
Prerequisites
-
Log in to the vCenter Server Management Interface as root.
- Before you can install available patches, you check for new patches and stage the patches to the vCenter Server appliance. See Check for and Stage Patches to the vCenter Server Appliance.
-
If you are patching the appliance from an ISO image that you previously downloaded from https://my.vmware.com/group/vmware/patch, you must attach the ISO image to the CD/DVD drive of the vCenter Server appliance. You can configure the ISO image as a datastore ISO file for the CD/DVD drive of the appliance by using the vSphere Client. See vSphere Virtual Machine Administration.
-
If you are patching the appliance from a repository URL, verify that you have configured the repository settings and that the current repository URL is accessible. See Configure the Repository for URL-Based Patching.
- Create an image-based backup and take a powered-off snapshot of the vCenter Server Appliance you are patching as a precaution in case there is a failure during the patching process.
Procedure
Results
In the Available Updates pane, you can see the changed update status of the vCenter Server appliance.
Enable Automatic Checks for vCenter Server Patches
You can configure vCenter Server to perform automatic checks for available patches in the configured repository URL at a regular interval.
Prerequisites
-
Log in to the vCenter Server Management Interface as root.
-
Verify that you have configured the repository settings and that the current repository URL is accessible. See Configure the Repository for URL-Based Patching.
Procedure
- In the vCenter Server Management Interface, click Update.
- Click Settings.
- Select Check for updates automatically, and select the day and time in UTC to perform automatic checks for available patches.
- Click OK.
Results
Patching the vCenter Server Appliance by Using the Appliance Shell
You can use the software-packages utility in the appliance shell of a vCenter Server appliance to see the installed patches, stage new patches, and install new patches.
To perform ISO-based patching, you download an ISO image, mount the ISO image to the CD/DVD drive of the appliance, optionally stage the available patches from the ISO image to the appliance, and install the patches. For steps to mount the ISO image to the CD/DVD drive, see Configure a Datastore ISO File for the CD/DVD Drive section in the vSphere Virtual Machine Administration.
To perform URL-based patching, you optionally stage the available patches from a repository URL to the appliance and install the patches. The vCenter Server appliance is preset with a default VMware repository URL for the build profile of the appliance. You can use the update.set command to configure the appliance to use the default VMware repository URL or a custom repository URL, for example, a repository URL that you previously built on a local Web server running within your data center. You can also use the proxy.set command to configure a proxy server for the connection between the vCenter Server appliance and the repository URL.
View a List of All Installed Patches in the vCenter Server Appliance
You can use the software-packages utility to see a list of the patches currently applied to the vCenter Server appliance. You can also view the list of the installed patches in chronological order and details about a specific patch.
Procedure
Configure URL-Based Patching
For URL-based patching, the vCenter Server appliance is preset with a default VMware repository URL for the build profile of the appliance. You can use the update.set command to configure the appliance to use the default or a custom repository URL as the current source of patches and enable automatic checks for patches.
By default the current repository for URL-based patching is the default VMware repository URL.
If vCenter Server is not connected to the Internet or if your security policy requires it, you can build and configure a custom repository. The custom patching repository runs on a local Web server within your data center and replicates the data from the default repository. Optionally, you can set up an authentication policy for accessing the Web server that hosts the custom patching repository.
Procedure
What to do next
If you configured the appliance to perform automatic checks for available patches, you can regularly view the vCenter Server appliance health status for notifications about available patches. See vCenter Server Configuration.
Stage Patches to the vCenter Server Appliance
Before you install available patches, you can stage the patches to the appliance. You can use the software-packages utility to stage patches either from a local repository by attaching an ISO image to the appliance, or from a remote repository directly by using a repository URL.
Prerequisites
- If you are staging patches from an ISO image that you previously downloaded from https://my.vmware.com/group/vmware/patch, you must attach the ISO image to the CD/DVD drive of the vCenter Server appliance. You can configure the ISO image as a datastore ISO file for the CD/DVD drive of the appliance by using the vSphere Client. See vSphere Virtual Machine Administration.
- If you are staging patches from a remote repository, verify that you have configured the repository settings and that the current repository URL is accessible. See Configure URL-Based Patching.
Procedure
What to do next
Install the staged patches. See Install vCenter Server Patches.
Install vCenter Server Patches
You can use the software-packages utility to install the staged patches. You can also use the software-packages utility to install patches directly from an attached ISO image or repository URL without staging the patch payload.
Prerequisites
- If you are installing staged patches, verify that you staged the correct patch payload. See Stage Patches to the vCenter Server Appliance.
- If you are installing patches that you previously staged from an ISO image, verify that the ISO image is attached to the CD/DVD drive of the vCenter Server appliance. See Stage Patches to the vCenter Server Appliance.
- If you are installing patches directly from an ISO image that you previously downloaded from https://my.vmware.com/group/vmware/patch, you must attach the ISO image to the CD/DVD drive of the vCenter Server Appliance. You can configure the ISO image as a datastore ISO file for the CD/DVD drive of the appliance by using the vSphere Client. See vSphere Virtual Machine Administration.
- If you are installing patches directly from a repository, verify that you have configured the repository settings and that the current repository URL is accessible. See Configure URL-Based Patching.
- Create an image-based backup and take a powered-off snapshot of the vCenter Server Appliance you are patching as a precaution in case there is a failure during the patching process.
Procedure
Patching a vCenter High Availability Environment
To patch a vCenter Server Appliance configured in a vCenter High Availability (HA) cluster, you must remove the vCenter Server High Availability configuration and delete the Passive and Witness nodes. After patching the vCenter Server Appliance, you must re-create your vCenter Server High Availability clusters.
This procedure describes how to remove the vCenter HA configuration.
Procedure
What to do next
After patching the vCenter Server Appliance, you can configure vCenter HA. For information about configuring vCenter HA, see vSphere Availability.
