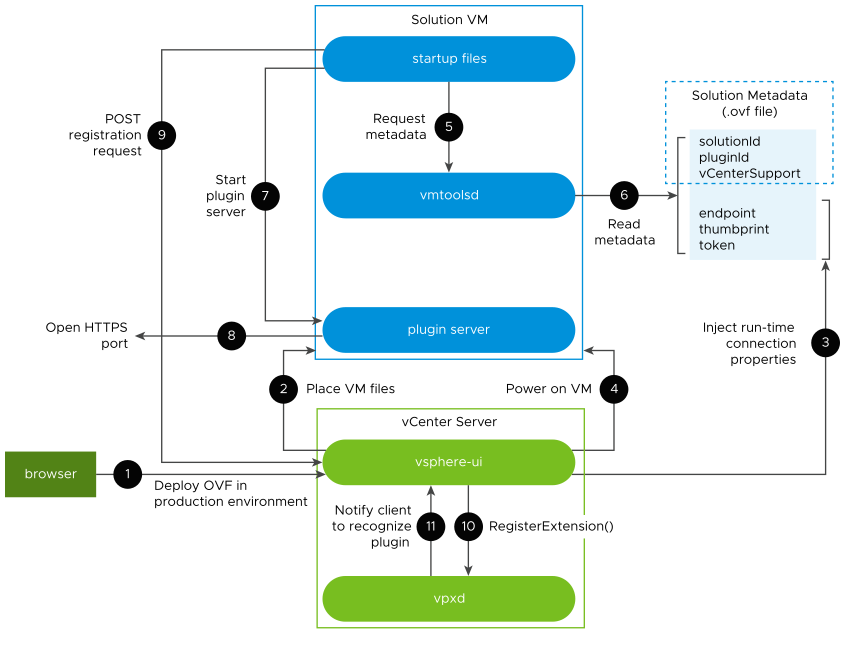
After you complete the configuration steps and export the virtual machine as an OVF template, it is ready to install as a plug-in server in your production environment.
Deploy the OVF template in a production environment
- If you prepared the virtual machine in a development environment, copy the OVF file to a location accessible to your production system.
- Use the vSphere Client, connected to your production system, to add the OVF file to your plug-in deployment.
-
Navigate to and click the ADD button to install and launch the plug-in in the vCenter Server environment.
-
- There is a specific solution installation task in the Tasks console. As of vSphere 8.0 U2, the specific solution install task shows its progress and can be cancelled.

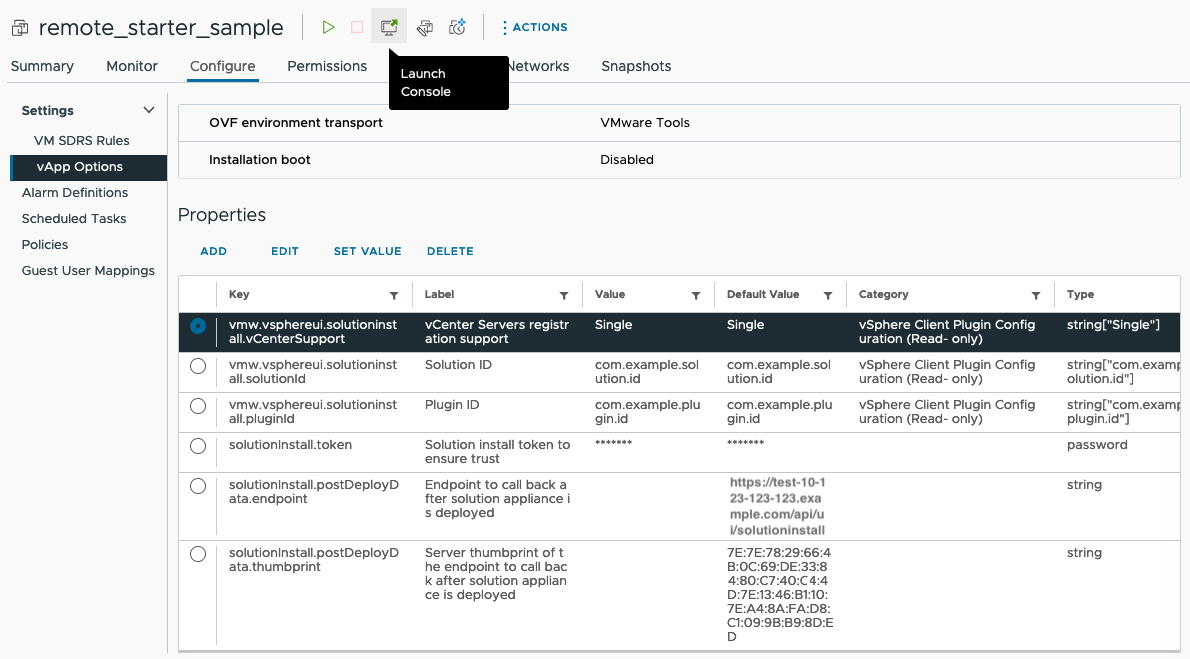
When the plug-in server deploys to the destination compute resource, the vSphere Client inserts additional connection properties into the OVF. When the virtual machine starts up, these properties enable the plug-in server to connect and authenticate with vCenter Server for the self-registration operation.

Injected OVF Properties
Here are properties injected into the OVF:
solutionInstall.token– Solution install token to ensure trust. A simple base64 token that is issued by vSphere UI, cached and then validated upon receiving a request from the newly deployed Solution Manager. It has 30 minutes timeout after the VM has been deployed and is one-time use.solutionInstall.postDeployData.endpoint– Endpoint to call back after solution appliance is deployed.solutionInstall.postDeployData.thumbprint– Server thumbprint of the endpoint to call back after solution appliance is deployed. Must be verified when making a call to the endpoint.
Since vSphere 8.0 U2 (<index> = zero indicates first vCenter and increases to N-1):
solutionInstall.targetVcenterServers.count– number of associated vCenter ServerssolutionInstall.targetVcenterServers.<index>.hostname– vCenter FQDNsolutionInstall.targetVcenterServers.<index>.guid– vCenter GUIDsolutionInstall.targetVcenterServers.<index>.thumbprint– vCenter thumbprint
As of vSphere 8.0 U3:
solutionInstall.targetVcenterServers.<index>.version– vCenter version numbersolutionInstall.postDeployData.version– Version of the endpoint to call back after solution appliance is deployed (vSphere Client version).
Solution Install API
The solution's appliance VM is responsible for providing information to the vSphere Client about its plug-in extension. Once the special parameters are injected and the VM is powered on, the vSphere Client waits to receive a call from the solution appliance on the solutionInstall.postDeployData.endpoint (that is, vCenterIP/api/ui/solutioninstall). The solutionInstall.token should also be present in the headers (solution-install-token header) of the request. Endpoint definition:
POST /api/ui/solutioninstall
| Header | Value | Summary |
|---|---|---|
| solution-install-token | String | One-off base64-encoded token issued by vSphere UI, used to establish trust |
Body payload JSON follows. For more details, see data object Extension in the Web Services API Reference. All fields down to serverThumbprint are required, including ones not so listed in the API reference, such as company, client, and server. Description summary is displayed in the Client Plug-ins view; label is currently not used. Server type and adminEmail are optional. If the solution should be available in the Solution Manager UI, set shownInSolutionManager true. Format of privilegeList and resourceList module are as prescribed in the Extension data object. If you want to add use cases and payload types later, set additionalProperties true.
{
  "vcenterExtensions": [
    {
      "extension": {
        "key": "<plugin id>",
        "version" : "<plugin version in format a.b.c.d>",
        "company" : "<company name>",
        "description" : {
          "label": "<plugin extension name>",
          "summary": "<plugin extension summary>"
        },
        "client": [
          { "type" : "vsphere-client-remote",
            "url": "<plugin manifest uri>" },
          ...
        ],
        "server": [
          { "url": "<server1 uri>",
            "serverThumbprint": "<server1 thumbprint>",
            "type": "<server purpose type>"
            "adminEmail": "<email>" },
          ...
        ],
        "shownInSolutionManager": <true|false>,
        "faultList": [
          { "faultID": "<fault-id>" },
          { "faultID": "<fault-id>" }
        ],
        "taskList": [
          { "taskID": "<task-id>" },
          { "taskID": "<task-id>" }
        ],
        "eventList": [
          { "eventID": "<event-id>" },
          { "eventID": "<event-id>" }
        ],
        "privilegeList": [
          { "privID": "<priv-group-name>.<priv-id>",
            "privGroupName": "<priv-group-name>" },
          { "privID": "<priv-group-name>.<priv-id>",
            "privGroupName": "<priv-group-name>" }
        ],
        "resourceList": [
          { "data": [
              { "key": "key-1", "value": "value-1" },
              { "key": "key-2", "value": "value-2" } ],
            "locale": "EN_US",
            "module": "<module>"
          }
        ]
      },
      ...
      additionalProperties: true
    }
  ]
}
As of vSphere 8.0 U3, body payload vcenterExtensionsPerGuid indicates which extensions to register for a given vCenter GUID. You can specify a list of extensions for each vCenter and have different extensions for every vCenter if desired. Be sure to provide extensions for every vCenter that a user can select. Body payload vcenterExtensionsPerGuid extends vcenterExtensions – do not use both. Similar format is encapsulated in GUID designation.
{
  "vcenterExtensionsPerGuid": {
    "vc-guid01": [
      "extension" section similar to vcenterExtensions
    ]
    "vc-guid02": [
      "extension" section like vcenterExtensions
    ]
  }
}