To provision TKG clusters on Supervisor, you can create a local content library and import Tanzu Kubernetes releases. The typical use case for a local content library is internet-restricted environments (air-gapped).
Creating a local content library involves configuring the library, downloading the OVA files, and importing them to the local content library.
Prerequisites
The content library functionality is a feature of vCenter Server that TKG on Supervisor relies on. For more information, see Using Content Libraries.
Procedure
- Log in to the vCenter Server using the vSphere Client.
- Click Menu.
- Click Content Library.
- Click Create.
The system displays the
New Content Library wizard.
- Specify the Name and location of the content library and click Next when you are done.
| Field |
Description |
| Name |
Enter a descriptive name, such as TKr-local. |
| Notes |
Include a description, such as Local library for TKrs for TKG |
| vCenter Server |
Select the vCenter Server instance where vSphere IaaS control plane is enabled. |
- At the Configure content library page, select the Local content library option and click Next.
For local content libraries you manually import the OVF templates you want to use.
- Configure the OVF security policy at the Apply security policy page and click Next when you are done.
- Select Apply Security Policy.
- Select OVF default policy.
When you select this option, the system verifies the OVF signing certificate during the synchronization process. An OVF template that does not pass certificate validation is marked with the
Verification Failed tag. The template metadata is kept, but the OVF files cannot be synchronized.
Note: Currently the
OVF default policy is the only supported security policy.
- At the Add storage page, select a datastore as a storage location for the content library contents and click Next.
- On the Ready to complete page, review the details and click Finish.
- At the Content Libraries page, select the new content library you created.
- Download the OVA files for each Tanzu Kubernetes release you want import to the local content library.
- Using a browser, navigate to the following URL:
- Click the directory for the image you want. Typically this directory is the latest or most recent version of the Kubernetes distribution.
For example:
ob-18186591-photon-3-k8s-v1.20.7---vmware.1-tkg.1.7fb9067
Important: You will need to use the distribution name to import the files to the local content library. You should copy the destination name to a file or keep the browser open until you complete the procedure. The required portion of the name string that you will need based on the above example is
photon-3-k8s-v1.20.7---vmware.1-tkg.1.7fb9067.
- For each of the following files, right-click and select Save link as.
photon-ova-disk1.vmdkphoton-ova.certphoton-ova.mfphoton-ova.ovf

- Verify that each file successfully downloads to your local file system.
Note: The files you import are the OVF and VMDK files. However, if a security policy is applied, all four files, including the certificate (
*.cert) and manifest (
*.mf), must be present in the source directory during import. If the certificate and manifest files are not available during import, the imported
TKG release is not usable.
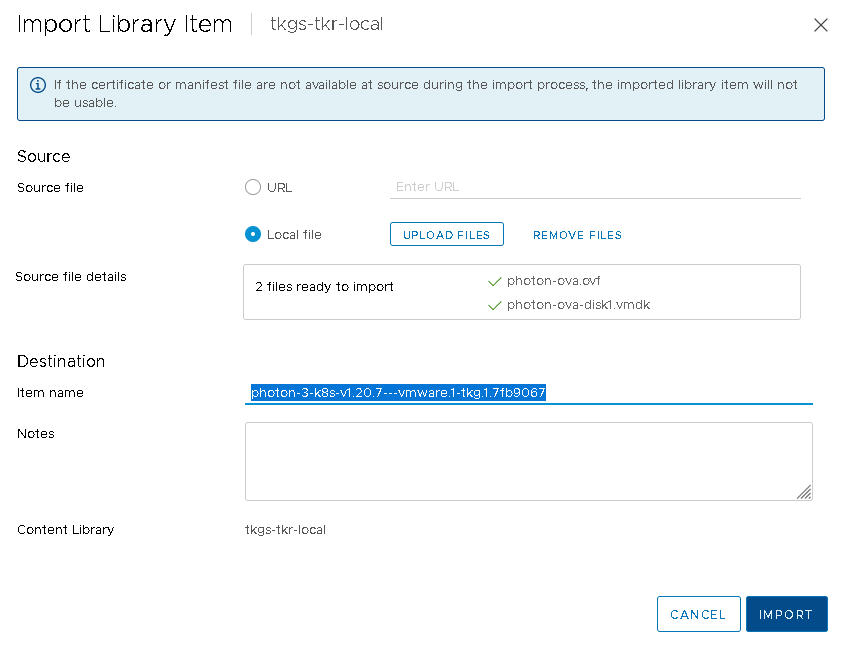
- Import the OVA and VMDK files to the local content library.
- Select .
- From the list of Content Libraries, click the link for the name of the local content library you created.
- Click Actions.
- Select Import Item.
- In the Import Library Item window, select Local File.
- Click Upload Files.
- Select both files
photon-ova.ovf and photon-ova-disk1.vmdk.
You see the message
2 files ready to import. Each file is listed with a green check mark beside its name.
- Change the Destination Item name to be the OS image version plus the Kubernetes version from the directory where you downloaded the files.
For example:
photon-3-k8s-v1.20.7---vmware.1-tkg.1.7fb9067
Warning: The content library
Destination Item name must match exactly the folder name string for the desired
TKG release. If the names do not match,
Supervisor cannot resolve the image to a valid
TKG release.
- Click Import.
- Verify that the local content library is populated with the Tanzu Kubernetes release.
- Reveal the Recent Tasks pane at the bottom of the page.
- Monitor the task Fetch Content of a Library Item and verify that it is successfully Completed.
- In the local content library, select .
- Verify that the Tanzu Kubernetes release metadata is listed and its content is stored locally.
What to do next
The Tanzu Kubernetes release content library must be associated with each vSphere Namespace where you provision TKG clusters. See Configuring vSphere Namespaces for Hosting TKG Service Clusters.


