


In this example, you first configure a Gerrit listener, then you use that listener in a Gerrit trigger with two events on three different pipelines.
Prerequisites
- Verify that you are a member of a project in Code Stream. If you are not, ask a Code Stream administrator to add you as a member of a project. See How do I add a project in Code Stream.
- Verify that you have a Gerrit endpoint configured in Code Stream. See How do I integrate Code Stream with Gerrit.
- Verify that you know your Gerrit release version.
- For pipelines to trigger, verify that you set the input properties of the pipeline as Gerrit, which allows the pipeline to receive the Gerrit parameters as inputs when the pipeline runs.
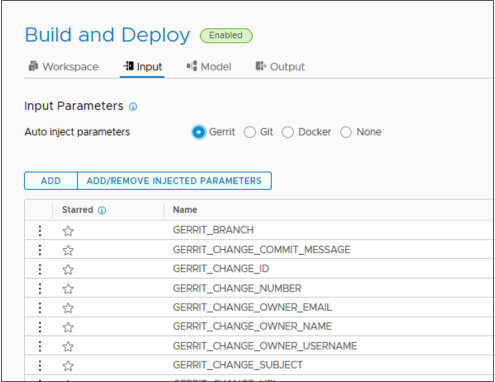
For information about input parameters, see Planning a CICD native build in Code Stream before manually adding tasks.
Procedure
- (Optional) Click the Listeners tab, then click New Listener.
Note: If the Gerrit listener that you plan to use for the Gerrit trigger is already defined, skip this step.
- Select a project.
- Enter a name for the Gerrit listener.
- Select a Gerrit endpoint.
- Enter the API Token.
The VMware Cloud Services API token authenticates you for external API connections with Code Stream. To obtain the API token:
- Click Generate Token.
- Enter the email address associated with your user name and password and click Generate.
The token that you generate is valid for six months. It is also known as a refresh token.
- To keep the token as a variable for future use, click Create Variable, enter a name for the variable and click Save.
- To keep the token as a text value for future use, click Copy and paste the token into a text file to save locally.
- Click Close.
If you created a variable, the API token displays the variable name that you entered by using dollar binding. If you copied the token, the API token displays the masked token.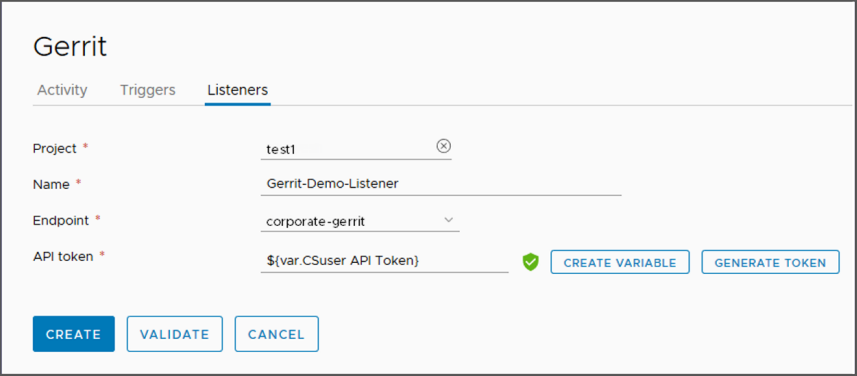
- To validate the token and endpoint details, click Validate.
Your token expires after 90 days.
- Click Create.
- On the listener card, click Connect.
The listener starts monitoring all activity on the Gerrit server and listens for any activated triggers on that server. To stop listening for a trigger on that server, you deactivate the trigger.Note: To update a Gerrit endpoint that is connected to a listener, you must disconnect the listener before updating the endpoint.
- Click .
- Click the Listeners tab.
- Click Disconnect on the listener that is connected to the endpoint that you want to update.
- (Optional) Provide file inclusions or exclusions as conditions for the trigger.
- You provide file inclusions that trigger the pipelines. When any of the files in a commit match the files specified in the inclusion paths or regex, pipelines trigger. With a regex specified, Code Stream only triggers pipelines with filenames in the changeset that match the expression provided. The regex filter is useful when configuring a trigger for multiple pipelines on a single repository.
- You provide file exclusions that keep pipelines from triggering. When all the files in a commit match the files specified in the exclusion paths or regex, the pipelines do not trigger.
- Prioritize Exclusion, when toggled on, ensures that pipelines do not trigger. The pipelines won't trigger even if any of the files in a commit match the files specified in the exclusion paths or regex. The default setting for Prioritize Exclusion is turned off.
In the following example, both the file inclusions and the file exclusions are conditions for the trigger.
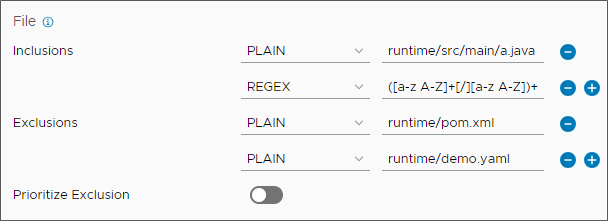
- For file inclusions, a commit that has any change to runtime/src/main/a.java or any Java file will trigger the pipelines configured in the event configuration.
- For file exclusions, a commit that has changes only in both files will not trigger the pipelines configured in the event configuration.
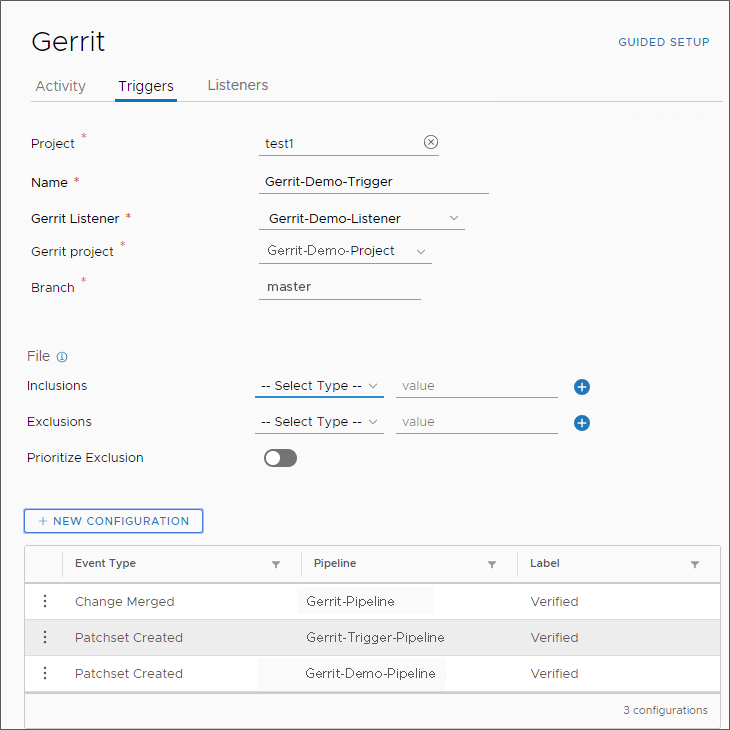
- Click New Configuration.
- For a Gerrit event, select Patchset Created, Draft Published, or Change Merged. Or, for a direct push to Git that bypasses Gerrit, select Direct Git push.
Note: As of Gerrit release version 2.15, draft changes and draft change sets are no longer supported. So if you are running Gerrit release version 2.15 or later, Draft Published is not a supported event.
- Select the pipeline that will trigger.
If the pipeline includes custom added input parameters, the Input Parameters list displays parameters and values. You can enter values for input parameters to be passed to the pipeline with the trigger event. Or, you can leave the values blank, or use the default values.Note: If default values are defined:
- Any values you enter for the input parameters will override the default values defined in the pipeline model.
- The default values in the trigger configuration will not change if the parameter values in the pipeline model change.
For information about Auto inject input parameters for Gerrit triggers, see the Prerequisites.
- For Patchset Created, Draft Published, and Change Merged, some actions appear with labels by default. You can change the label or add comments. Then, when the pipeline runs, the label or comment appears on the Activity tab as the Action taken for the pipeline.
The Gerrit Event configuration allows you to enter comments by using a variable for the Success comment or Failure comment. For example:
${var.success}and${var.failure}. - Click Save.
To add multiple trigger events on multiple pipelines, click New Configuration again.In the following example, you can see events for three pipelines:- If a Change Merged event occurs in the Gerrit project, the pipeline named Gerrit-Pipeline triggers.
- If a Patchset Created event occurs in the Gerrit project, the pipelines named Gerrit-Trigger-Pipeline and Gerrit-Demo-Pipeline trigger.
- For a Gerrit event, select Patchset Created, Draft Published, or Change Merged. Or, for a direct push to Git that bypasses Gerrit, select Direct Git push.
Results
What to do next
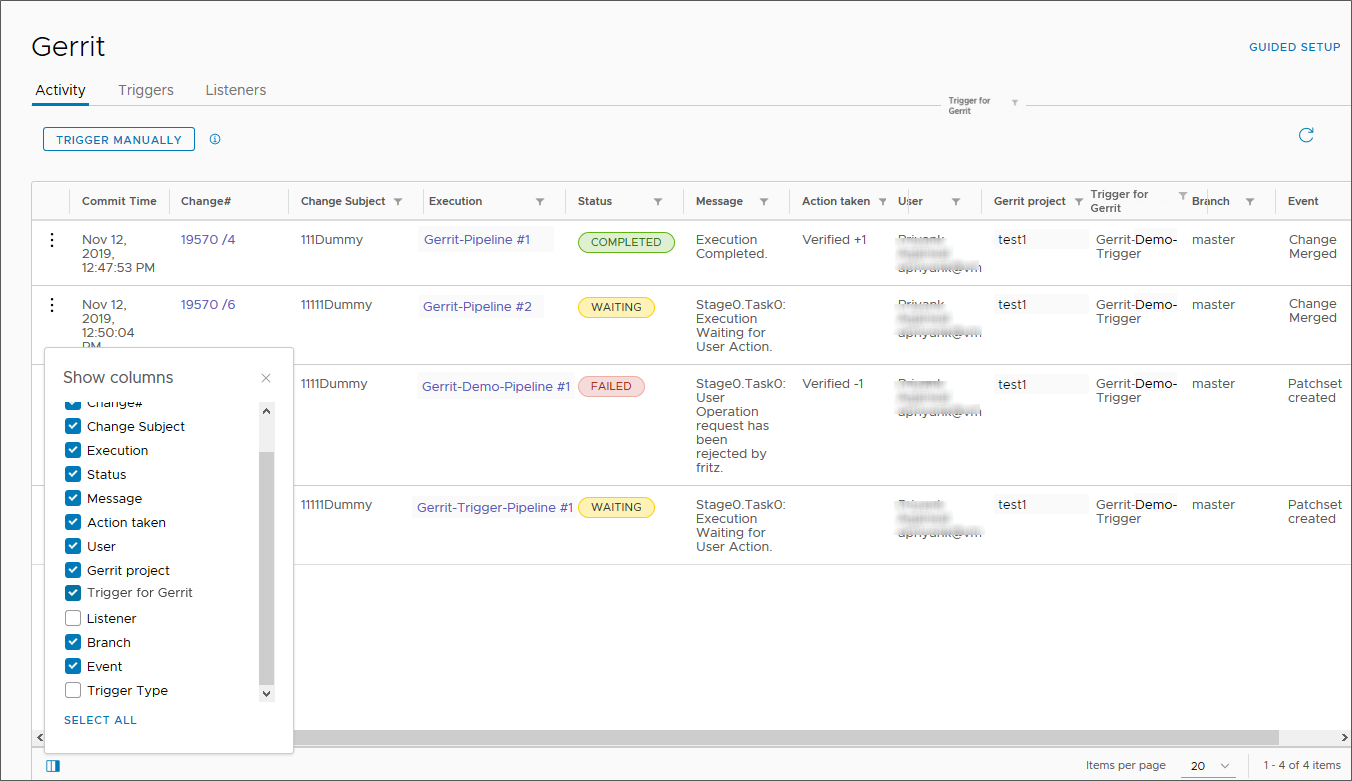
After you commit a code change in the Gerrit project, observe the Activity tab for the Gerrit event in Code Stream. Verify that the list of activities includes entries that correspond to every pipeline execution in the trigger configuration.
When an event occurs, only pipelines in the Gerrit trigger that relate to the particular type of event can run. In this example, if a patch set is created, only the Gerrit-Trigger-Pipeline and the Gerrit-Demo-Pipeline will run.
- The Change Subject and Execution columns are empty when the trigger was a direct Git push.
- The Trigger for Gerrit column displays the trigger that created the event.
- The Listener column is turned off by default. When you select it, the column displays the Gerrit listener that received the event. A single listener can appear as associated with multiple triggers.
- The Trigger Type column is turned off by default. When you select it, the column displays the type of trigger as AUTOMATIC or MANUAL.
- Other columns include Commit Time, Change#, Status, Message, Action taken, User, Gerrit project, Branch, and Event.
To control the activity for a completed or failed pipeline run, click the three dots at the left of any entry on the Activity screen.
- If the pipeline fails to run because of a mistake in the pipeline model or another problem, correct the mistake and select Re-run, which runs the pipeline again.
- If the pipeline fails to run because of a network connectivity issue or another problem, select Resume, which restarts the same pipeline execution, and saves run time.
- Use View Execution, which opens the pipeline execution view. See How do I run a pipeline and see results.
- Use Delete to delete the entry from the Activity screen.
