


As a Code Stream administrator or developer, you can use Code Stream and VMware Tanzu Kubernetes Grid Integrated Edition (formerly known as VMware Enterprise PKS) to automate the deployment of your software applications to a Kubernetes cluster. This use case mentions other methods that you can use to automate the release of your application.
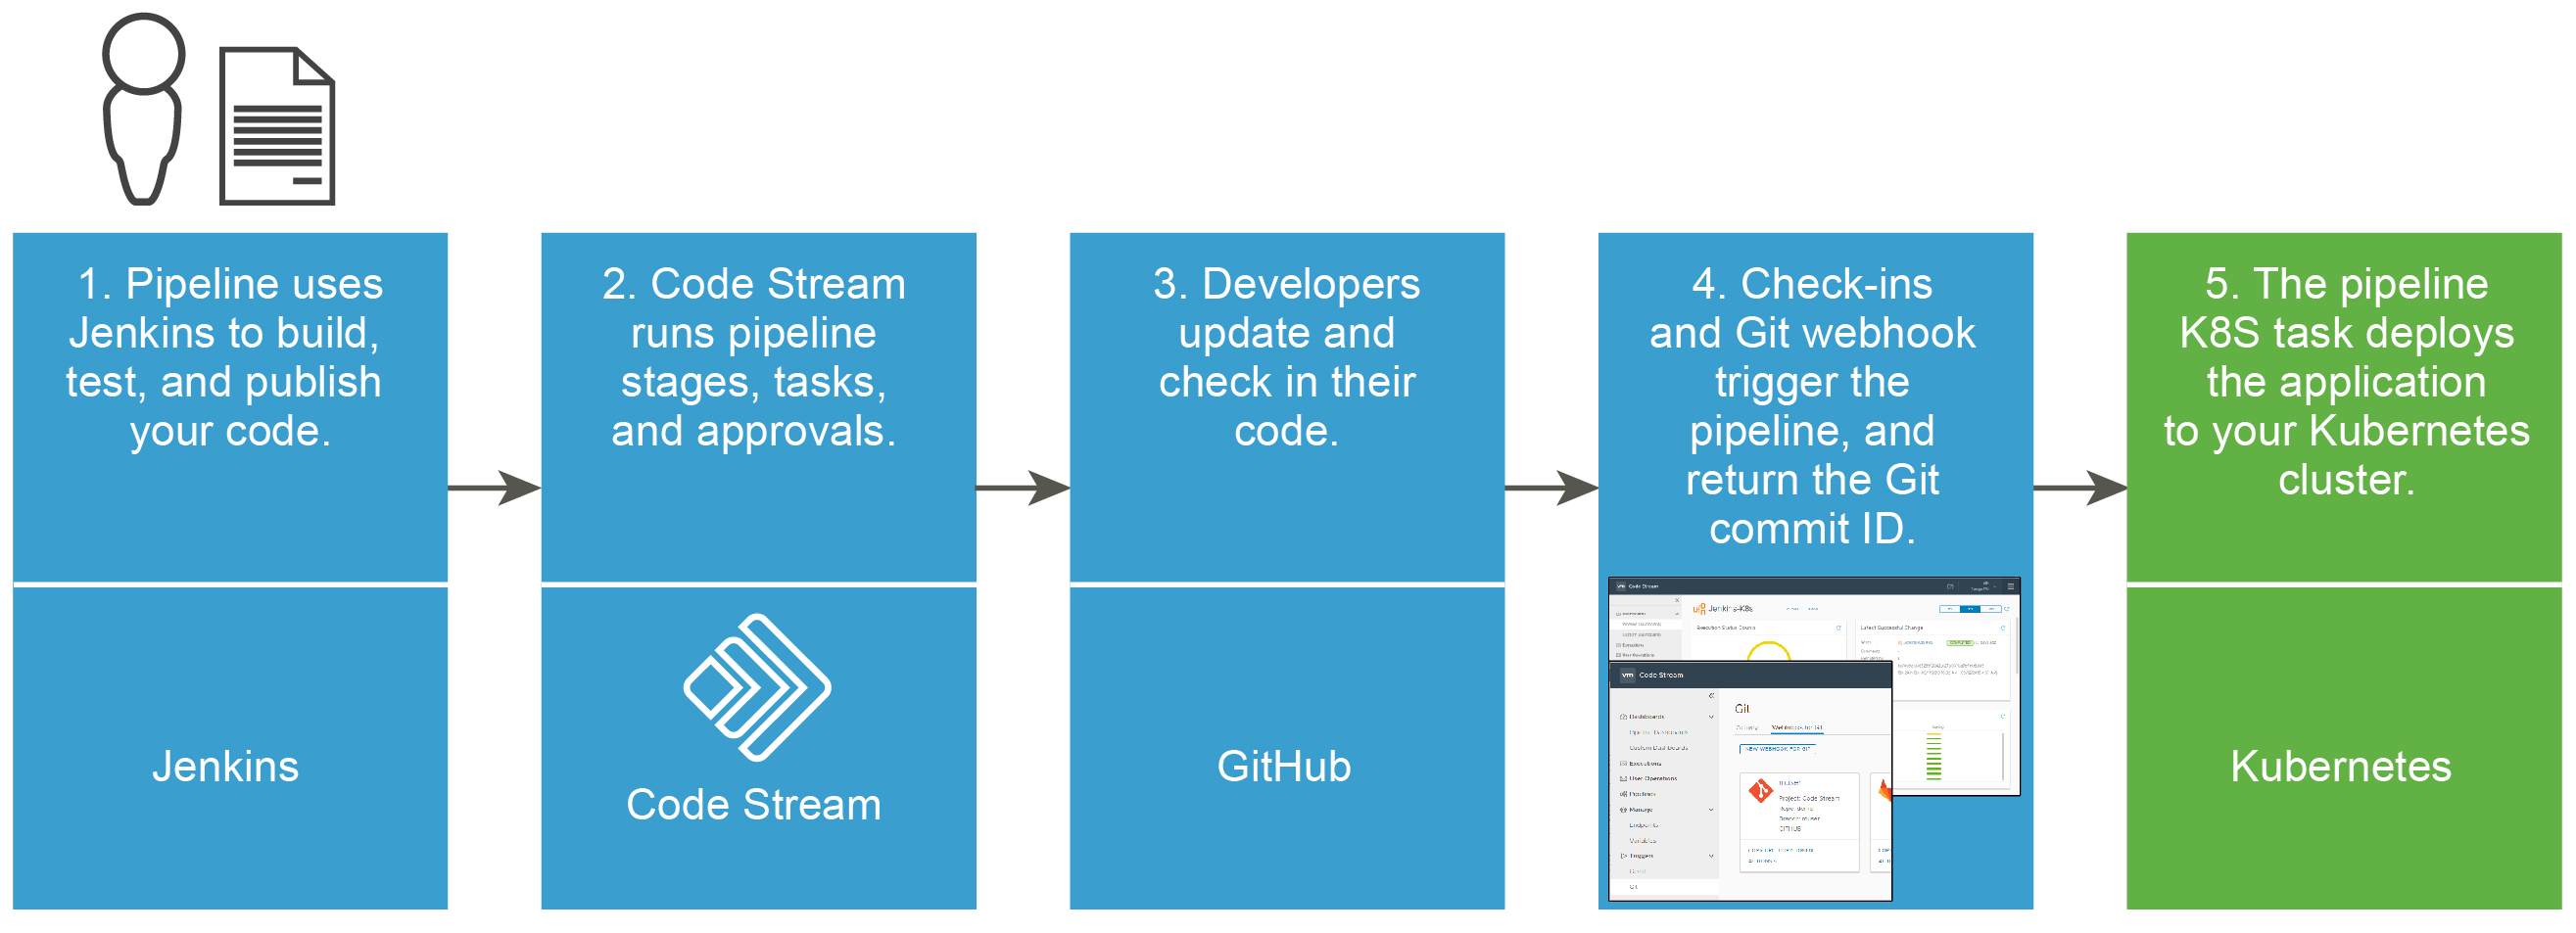
In this use case, you will create a pipeline that includes two stages, and will use Jenkins to build and deploy your application.
- The first stage is for development. It uses Jenkins to pull your code from a branch in your GitHub repository, then build, test, and publish it.
- The second stage is for deployment. It runs a user operation task that requires approval from key users before the pipeline can deploy your application to your Kubernetes cluster.
When using a Kubernetes API endpoint in the pipeline workspace, Code Stream creates the necessary Kubernetes resources such as ConfigMap, Secret, and Pod to run the continuous integration (CI) task or custom task. Code Stream communicates with the container by using the NodePort.
To share data across pipeline runs, you must provide a persistent volume claim, and Code Stream will mount the persistent volume claim to the container to store the data, and use it for subsequent pipeline runs.
The Code Stream pipeline workspace supports Docker and Kubernetes for continuous integration tasks and custom tasks.
For more information about configuring the workspace, see Configuring the Pipeline Workspace.
The development tools, deployment instances, and pipeline YAML file must be available so that your pipeline can build, test, publish, and deploy your application. The pipeline will deploy your application to development and production instances of Kubernetes clusters.
Other methods that automate the release of your application:
- Instead of building your application by using Jenkins, you can use the Code Stream native build capability and a Docker build host.
- Instead of deploying your application to a Kubernetes cluster, you could deploy it to an Amazon Web Services (AWS) cluster.
For more information about using the Code Stream native build capability and a Docker host, see:
Prerequisites
- Verify that the application code to deploy resides in a working GitHub repository.
- Verify that you have a working instance of Jenkins.
- Verify that you have a working email server.
- In Code Stream, create an email endpoint that connects to your email server.
- Set up two Kubernetes clusters on Amazon Web Services (AWS), for development and production, where your pipeline will deploy your application.
- Verify that the GitHub repository contains the YAML code for your pipeline, and alternatively a YAML file that defines the metadata and specifications for your environment.
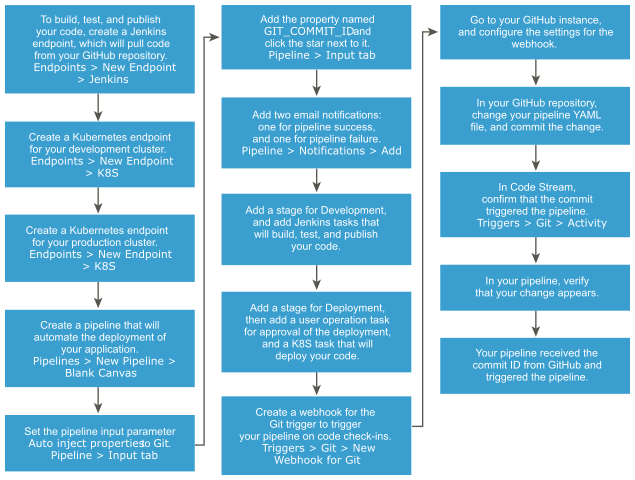
Procedure
- Create a pipeline that deploys a container of your application, such as Wordpress, to your development Kubernetes cluster, and set the input properties for the pipeline.
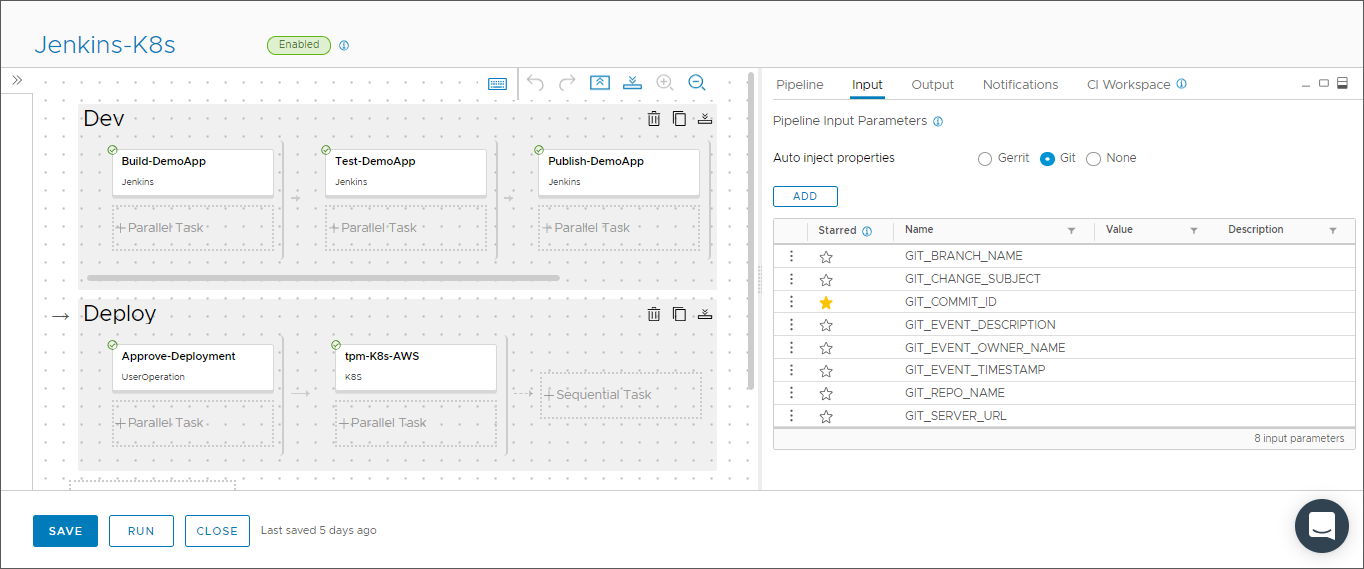
- To allow your pipeline to recognize a code commit in GitHub that will trigger the pipeline, in the pipeline click the Input tab and select Auto inject properties.
- Add the property named GIT_COMMIT_ID, and click the star next to it.
When the pipeline runs, the pipeline execution will display the commit ID that the Git trigger returns.
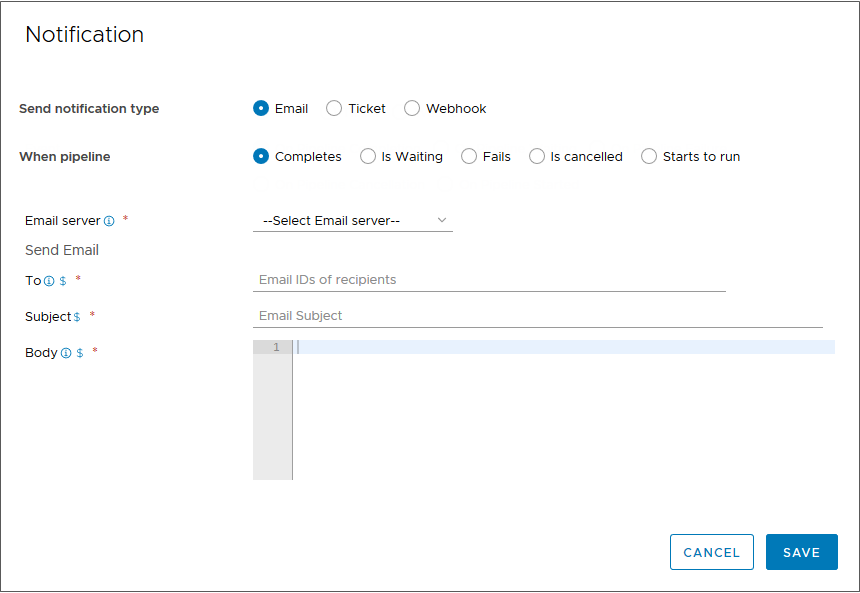
- Add notifications to send an Email when the pipeline succeeds or fails.
- In the pipeline, click the Notifications tab, and click Add.
- To add an email notification when the pipeline finishes running, select Email, and select Completes. Then, select the email server, enter email addresses, and click Save.
- To add another email notification for a pipeline failure, select Fails, and click Save.
- Add a development stage to your pipeline, and add tasks that build, test, and publish your application. Then, validate each task.
- To build your application, add a Jenkins task that uses the Jenkins endpoint, and runs a build job from the Jenkins server. Then, for the pipeline to pull your code, enter the Git branch in this form: ${input.GIT_BRANCH_NAME}
- To test your application, add a Jenkins task that uses the same Jenkins endpoint, and runs a test job from the Jenkins server. Then, enter the same Git branch.
- To publish your application, add a Jenkins task that uses the same Jenkins endpoint, and runs a publish job from the Jenkins server. Then, enter the same Git branch.

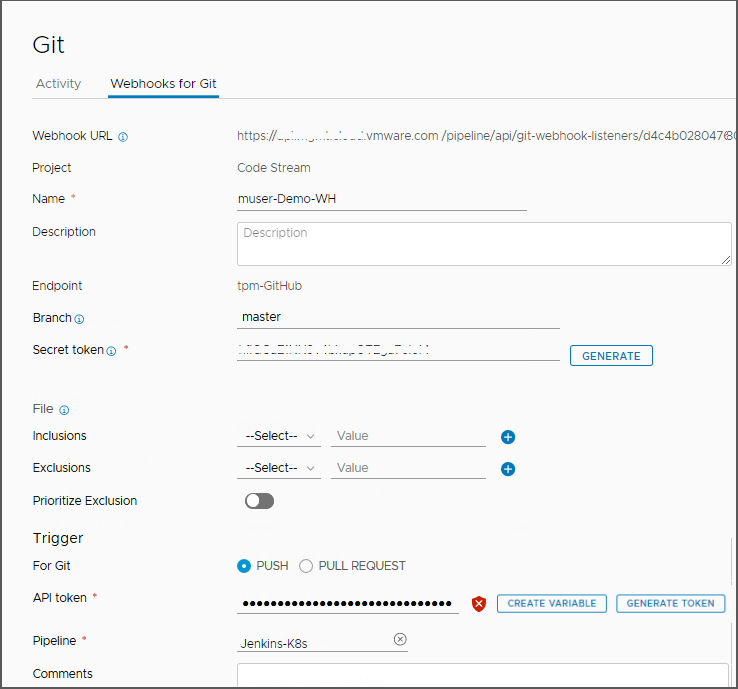
- Add a Git webhook that enables Code Stream to use the Git trigger, which triggers your pipeline when developers commit their code.
Results
Congratulations! You automated the deployment of your software application to your Kubernetes cluster.
Example: Example pipeline YAML that deploys an application to a Kubernetes cluster
For the type of pipeline used in this example, the YAML resembles the following code:
apiVersion: v1
kind: Namespace
metadata:
  name: ${input.GIT_BRANCH_NAME}
  namespace: ${input.GIT_BRANCH_NAME}
---
apiVersion: v1
data:
  .dockercfg: eyJzeW1waG9ueS10YW5nby1iZXRhMi5qZnJvZy5pbyI6eyJ1c2VybmFtZSI6InRhbmdvLWJldGEyIiwicGFzc3dvcmQiOiJhRGstcmVOLW1UQi1IejciLCJlbWFpbCI6InRhbmdvLWJldGEyQHZtd2FyZS5jb20iLCJhdXRoIjoiZEdGdVoyOHRZbVYwWVRJNllVUnJMWEpsVGkxdFZFSXRTSG8zIn19
kind: Secret
metadata:
  name: jfrog
  namespace: ${input.GIT_BRANCH_NAME}
type: kubernetes.io/dockercfg
---
apiVersion: v1
kind: Service
metadata:
  name: codestream
  namespace: ${input.GIT_BRANCH_NAME}
  labels:
    app: codestream
spec:
  ports:
    - port: 80
  selector:
    app: codestream
    tier: frontend
  type: LoadBalancer
---
apiVersion: extensions/v1
kind: Deployment
metadata:
  name: codestream
  namespace: ${input.GIT_BRANCH_NAME}
  labels:
    app: codestream
spec:
  selector:
    matchLabels:
      app: codestream
      tier: frontend
  strategy:
    type: Recreate
  template:
    metadata:
      labels:
        app: codestream
        tier: frontend
    spec:
      containers:
      - name: codestream
        image: cas.jfrog.io/codestream:${input.GIT_BRANCH_NAME}-${Dev.PublishApp.output.jobId}
        ports:
        - containerPort: 80
          name: codestream
      imagePullSecrets:
      - name: jfrog
What to do next
To deploy your software application to your production Kubernetes cluster, perform the steps again and select your production cluster.
To learn more about integrating Code Stream with Jenkins, see How do I integrate Code Stream with Jenkins.
