Virtual servers contain the virtual IP address (VIP) for the pools of nodes that will be accessed
You can add an NSX Edge internal or uplink interface as a virtual server.
Procedure
- Log in to the vSphere Web Client.
- Click Networking & Security and then click NSX Edges.
- Double-click an NSX Edge.
- Click Manage and then click the Load Balancer tab.
- In the left navigation panel, click Virtual Servers.
- Click the Add (
 ) icon.
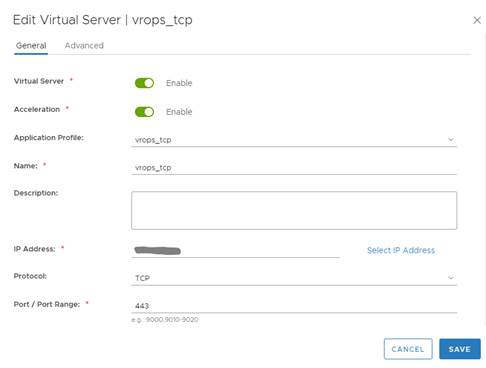
 - Enter a name for the virtual server. For example: vROps_Virtual_Server
- Select Enable Virtual Server and Enable Acceleration.
- Select the Application Profile name from the drop-down list. For example: Exp: vrops_https
- Enter a Name for the virtual server.
- (Optional) Enter a description.
- Enter the IP Address to be used for the VIP.
- From the drop-down list for Protocol, select TCP.
- Enter the Port value as 443.
- From the drop-down list for Default Pool, select the default pool that you have configured. For example: vROps_Pool
- For Connection Limit and Connection Rate Limit, leave the default as 0.
Results
Note:
If you are using separate load balancers for vRealize Operations Manager and EPOps, the above steps need to be repeated for EPOps virtual server. Use different names for EPOps profile and respective pool. For example: epops_http and EPOPS_Pool.
Example
Example: