


The Alert List widget is a list of alerts for the objects it is configured to monitor. You can create one or more alert lists in vRealize Operations for objects that you add to your custom dashboards. The widget provides you with a customized list of alerts on objects in your environment.
How the Alert List Widget and Configuration Options Work
You can add the Alert List widget to one or more custom dashboards and configure it to display data that is important to different dashboard users. The data that appears in the widget is based on the configured options for each widget instance. You edit an Alert List widget after you add it to a dashboard. The changes you make to the options create a custom alert list to meet the needs of the dashboard users.
Where You Find the Alert List Widget
The widget might be included on any of your custom dashboards. From the left menu, click to see your configured dashboards.
To customize the data that appears in the dashboard widget, from the left menu, click . To create your dashboard, from the left menu, click . From the Dashboards panel, click Create. To edit your dashboard, from the left menu, click . From the Dashboards panel, select the dashboard you want to edit and select . Toggle between the Views and Widgets option to view and add a widget or view to the dashboard. The widgets list panel displays a list of all the predefined widgets. Drag a widget to the dashboard workspace in the upper panel.
Alert List Widget Toolbar Options
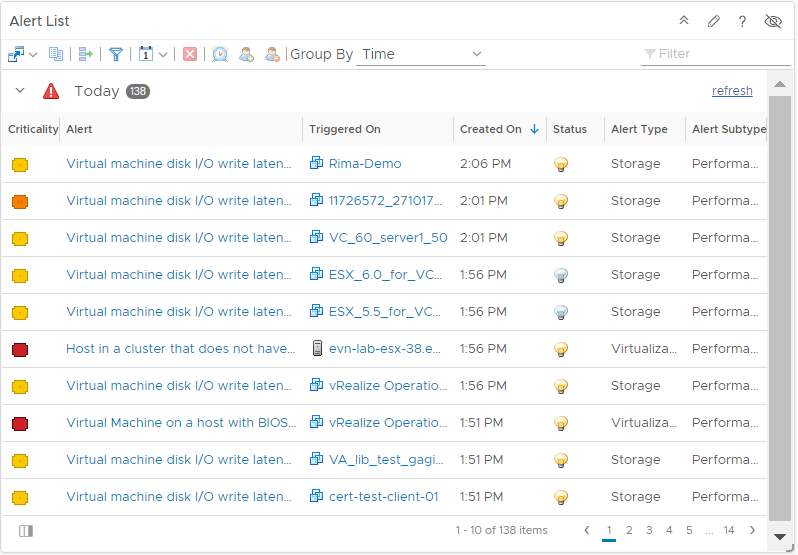
On the title bar of the widget, click the Show Toolbar icon to access the toolbar options.
| Option | Description |
|---|---|
| Dashboard Navigation | Actions you can run on the selected alert. For example, you use the option to open a vCenter Server, data center, virtual machine, or in the vSphere Web Client, allowing you to directly modify an object for which an alert was generated and fix any problems. |
| Reset Interaction | Returns the widget to its initial configured state and undoes any interactions selected in a providing widget. Interactions are usually between widgets in the same dashboard, or you can configure interactions between widgets on different dashboards. |
| Perform Multi-Select Interaction | If the widget is a provider for another widget on the dashboard, you can select multiple rows and click this button. The receiving widget then displays only the data related to the selected interaction items. Use Ctrl+click for Windows, or Cmd+click for Mac OS X, to select multiple individual objects or Shift+click to select a range of objects, and click the icon to activate the interaction. |
| Display Filtering Criteria | Displays the object information on which this widget is based. |
| Select Date Range | Limits the alerts that appear in the list to the selected date range. |
| Cancel Alert | Cancels the selected alerts. If you configure the alert list to display only active alerts, the canceled alert is removed from the list. You cancel alerts when you do not need to address them. Canceling the alert does not cancel the underlying condition that generated the alert. Canceling alerts is effective if the alert is generated by triggered fault and event symptoms because these symptoms are triggered again only when subsequent faults or events occur on the monitored objects. If the alert is generated based on metric or property symptoms, the alert is canceled only until the next collection and analysis cycle. If the violating values are still present, the alert is generated again. |
| Suspend | Suspend an alert for a specified number of minutes. You suspend alerts when you are investigating an alert and do not want the alert to affect the health, risk, or efficiency of the object while you are working. If the problem persists after the elapsed time, the alert is reactivated and it will again affect the health, risk, or efficiency of the object. The user who suspends the alert becomes the assigned owner.
Note: You can cancel or retrigger the alert, if it is still active when its suspension period has ended, by rerunning the automated actions connected to the alert. In this case, you can suppress cancelation and update on all instances of an alert on an object. To activate this option, open the property file
/usr/lib/vmware-vcops/user/conf/analytics/advanced.properties and add
retriggerExpiredSuspendedActiveAlerts = true to the property file, and restart the
vRealize Operations analytics service or the
vRealize Operations cluster.
|
| Take Ownership | As the current user, you make yourself the owner of the alert. You can only take ownership of an alert, you cannot assign ownership. |
| Release Ownership | Alert is released from all ownership. |
| Group By | Group alerts by the options in the drop-down menu. |
| Filter | Locate data in the widget. |
| Option | Description |
|---|---|
| None | Alerts are not sorted into specific groupings. |
| Time | Group alerts by time triggered. The default. |
| Criticality | Group alerts by criticality. Values are, from the least critical: Info/Warning/Immediate/Critical. See also Criticality in the Alert List Widget Data Grid table. |
| Definition | Group alerts by definition, that is, group like alerts together. |
| Object Type | Group alerts by the type of object that triggered the alert. For example, group alerts on hosts together. |
Alert List Widget Data Grid Options
The data grid provides information on which you can sort and search.
Expand the grouped alerts to view the data grid.
| Option | Description |
|---|---|
| Criticality | Criticality is the level of importance of the alert in your environment. The alert criticality appears in a tooltip when you hover the mouse over the criticality icon. The level is based on the level assigned when the alert definition was created, or on the highest symptom criticality, if the assigned level was Symptom Based. |
| Alert | Description of the alert. |
| Triggered On | Name of the object for which the alert was generated. |
| Created On | Date and time when the alert was generated. |
| Status | Current state of the alert. |
| Alert Type | Alert type is assigned when you create the alert definition. It helps you categorize and route the alert to the appropriate domain administrator for resolution.
The possible values include:
|
| Alert Sub-Type | Alert subtype is assigned when you create the alert definition. It helps you categorize and route the alert to the appropriate domain administrator for resolution.
The possible values include:
|
| Importance | Displays the priority of the alert. The importance level of the alert is determined using a smart ranking algorithm. |
Alert List Widget Configuration Options
On the title bar of the widget, click the Edit Widget icon to configure the widget.
The configuration options are grouped into one or more sections. You can select the objects on which you want to base the widget data and refine the objects in the following sections. Each section filters the objects further and pushes the filtered objects to the next section. The widget data is based on the objects that are the output of the last section.
The Configuration section provides general configuration options for the widget.
The Input Data section provides options to specify input for the widget. This section appears when the widget is in self provider mode.
The Input Transformation section provides options to transform the input for the widget.
The Output Filter section provides options to restrict the widget data based on the selected filter criteria.
| Option | Description |
|---|---|
| Title | Enter a custom title that identifies this widget from other instances that are based on the same widget template. |
| Configuration | |
| Refresh Content | Activate or deactivate the automatic refreshing of the data in this widget. If not activated, the widget is updated only when the dashboard is opened or when you click the Refresh button on the widget in the dashboard. |
| Refresh Interval | If you activate the Refresh Content option, specify how often to refresh the data in this widget. |
| Self Provider |
Indicates whether the objects for which data appears in the widget are defined in the widget or provided by another widget.
|
| Input Data | |
| Objects |
Select objects on which you want to base the widget data.
|
| All | If you select this option, the widget data is based on all the objects in your environment. The following sections provide options to refine the objects for the widget data. |
| Input Transformation | |
| Relationship | Transform the input for the widget based on the relationship of the objects. For example, if you select the Children check box and a Depth of 1, the child objects are the transformed inputs for the widget. |
| Output Filter | |
| Basic |
Pick tags to refine the widget data. The widget data is based on the objects that have the picked tags applied. If you pick more than one value for the same tag, the widget includes objects that have any of the tags applied. If you pick more than one value for different tags, the widget includes only the objects that have all the tags applied. If the objects have an input transformation applied, you select tag values for the transformed objects. |
| Advanced |
Refine the widget data further based on the filter criteria for object types. The widget data is based on the objects for the filtered object types. If the objects have a tag filter applied in the Basic subsection, you define filter criteria for the object types of the objects with tag filter applied. If the objects with tag filter applied do not belong to any of the object types in this filter criteria, the widget skips this filter and includes all the objects with tag filter applied. If the objects have an input transformation applied, you define filter criteria for the object types of the transformed objects.
|
| Alert Related | A group of filters limits the alerts that appear in this alert list to those that meet the selected criteria. If the objects on which the alerts are based have an input transformation applied, you define filters for the alerts based on the transformed objects.
You can configure the following filters:
|
