PowerShell スクリプトを使用すると、すべての構成を設定した環境を準備できます。PowerShell スクリプトを実行して Unified Access Gateway をデプロイすると、初めてシステムを起動したときからこのソリューションを本番環境で利用できるようになります。

重要: PowerShell デプロイでは、すべての設定を INI ファイルで提供することができ、 Unified Access Gateway インスタンスは起動するとすぐに本番環境で使用できるようになります。デプロイ後の設定を変更しない場合は、管理ユーザー インターフェイスのパスワードを入力する必要はありません。

ただし、管理ユーザー インターフェイスのパスワードがデプロイ時に入力されないと、管理ユーザー インターフェイスと API のいずれも使用できません。デプロイ時に管理ユーザー インターフェイスのパスワードを入力しておかないと、後からユーザーを追加して管理ユーザー インターフェイスや API へのアクセスを有効にすることはできません。Unified Access Gateway を再デプロイする必要があります。

監視ロールを持つ、権限の低い管理者ユーザーを作成するために、INI ファイルにパラメータを含めることができます。スーパー ユーザー管理者ユーザーの作成はサポートされていません。root ユーザーと管理者ユーザーのパスワード ポリシーを構成してから、Unified Access Gateway インスタンスをデプロイできます。

パラメータの詳細については、同等の管理ユーザー インターフェイス パラメータが使用されているセクションを参照してください。例:一部のデプロイ パラメータについては、Unified Access Gateway をデプロイするための PowerShell パラメータおよびOVF テンプレート ウィザードによる Unified Access Gateway のデプロイで説明されています。システム構成、Syslog サーバ設定、ネットワーク設定などで使用されるパラメータの詳細については、管理機能の構成ページからの Unified Access Gateway の構成を参照してください。また、Edge サービスで使用されるパラメータや、Unified Access Gateway での Workspace ONE Intelligence や ID ブリッジなどのその他の使用事例については、Unified Access Gateway デプロイの使用事例を参照してください。

前提条件

  • Hyper-V をデプロイするときに固定 IP アドレスを使用して Unified Access Gateway をアップグレードする場合は、Unified Access Gateway の新しいインスタンスをデプロイする前に古いアプライアンスを削除します。
  • システム要件を満たしており、利用可能であることを確認します。

    これは、Unified Access Gateway を自社環境にデプロイするためのサンプル スクリプトです。

    図 1. サンプルの PowerShell スクリプト
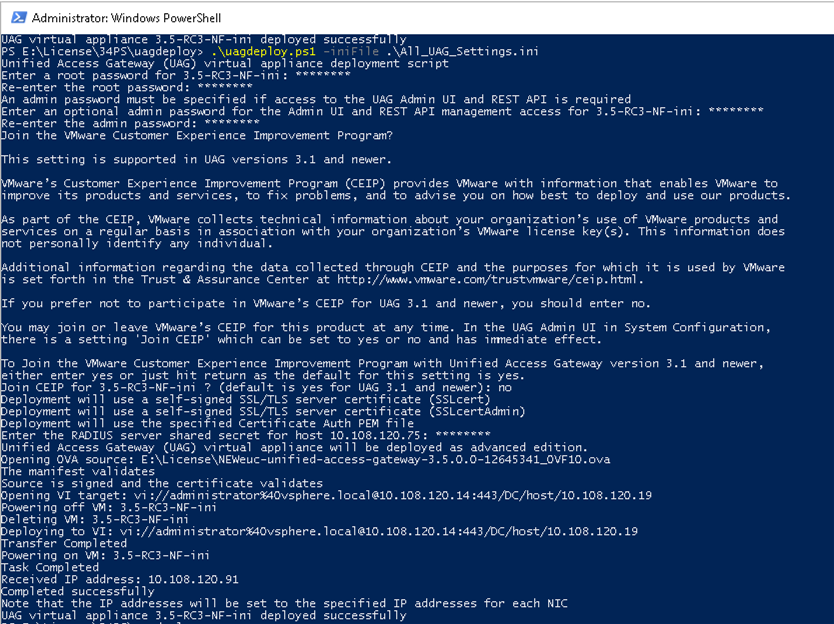
手順

  1. Customer Connect ポータルからマシンに Unified Access Gateway OVA をダウンロードします。
  2. uagdeploy-XXX.zip ファイルをマシンのフォルダにダウンロードします。
    ZIP ファイルは、 Unified Access GatewayCustomer Connect ページにあります。
  3. PowerShell スクリプトを開いて、ディレクトリをスクリプトの場所に変更します。
  4. Unified Access Gateway 仮想アプライアンスの INI 構成ファイルを作成します。
    例:新しい Unified Access Gateway アプライアンス UAG1 をデプロイします。構成ファイルの名前は、 uag1.ini です。このファイルには、UAG1 のすべての設定が含まれます。 uagdeploy.ZIP ファイルにあるサンプルの INI ファイルを使用して INI ファイルを作成し、設定を適切に変更できます。
    注:
    • 自社の複数の Unified Access Gateway デプロイ環境には一意の INI ファイルを関連付けることができます。複数のアプライアンスをデプロイするには、INI ファイルで IP アドレスと名前のパラメータを適切に変更する必要があります。
    • プライベート キーを PKCS8 から PKCS1 に変換する、つまり、「BEGIN PRIVATE KEY」形式から「BEGIN RSA PRIVATE KEY」形式に変換するには、次の openssl コマンドを実行します。

      openssl rsa -in key.pem -out keyrsa.pem

      PKCS#12 形式のファイルを p12 または .pfx のいずれかのファイル拡張子に変換し、キーが RSA キーであることを確認するには、次のコマンドを実行します。

      openssl pkcs12 -in cert.pfx -nokeys -out cert.pem

      openssl pkcs12 -in cert.pfx -nodes -nocerts -out key.pem

      openssl rsa -in key.pem -check -out keyrsa.pem

    変更する INI ファイルの例です。
    [General]
    netManagementNetwork=
    netInternet=
    netBackendNetwork=
    name=
    dns = 192.0.2.1 192.0.2.2
    dnsSearch = example1.com example2.com
    ip0=10.108.120.119
    diskMode=
    source=
    defaultGateway=10.108.120.125
    target=
    ds=
    deploymentOption=threenic
    eth0CustomConfig=DHCP^UseDNS=false
    eth1CustomConfig=DHCP^UseDNS=false
    eth2CustomConfig=DHCP^UseDNS=false
    authenticationTimeout=300000
    fipsEnabled=false
    uagName=UAG1
    locale=en_US
    ipModeforNIC3=DHCPV4_DHCPV6
    tls12Enabled=true
    ipMode=DHCPV4_DHCPV6
    requestTimeoutMsec=10000
    ipModeforNIC2=DHCPV4_DHCPV6
    tls11Enabled=false
    clientConnectionIdleTimeout=180
    tls10Enabled=false
    adminCertRolledBack=false
    cookiesToBeCached=none
    healthCheckUrl=/favicon.ico
    quiesceMode=false
    isCiphersSetByUser=false
    tlsPortSharingEnabled=true
    ceipEnabled=true
    bodyReceiveTimeoutMsec=15000
    monitorInterval=60
    cipherSuites=TLS_ECDHE_RSA_WITH_AES_128_GCM_SHA256,TLS_ECDHE_RSA_WITH_AES_256_GCM_SHA384,TLS_ECDHE_RSA_WITH_AES_128_CBC_SHA256
    , TLS_ECDHE_RSA_WITH_AES_256_CBC_SHA384
    outboundCipherSuites=
    adminPasswordExpirationDays=90
    monitoringUsersPasswordExpirationDays=90
    rootSessionIdleTimeoutSeconds=300
    rootPasswordExpirationDays=365
    passwordPolicyMinLen=6
    passwordPolicyMinClass=1
    passwordPolicyUnlockTime=900
    passwordPolicyFailedLockout=3
    adminPasswordPolicyFailedLockoutCount=3
    adminPasswordPolicyMinLen=8
    adminPasswordPolicyUnlockTime=5
    adminSessionIdleTimeoutMinutes=10
    httpConnectionTimeout=120
    isTLS11SetByUser=false
    sessionTimeout=36000000
    ssl30Enabled=false
    snmpEnabled= TRUE | FALSE
    ntpServers=ipOrHostname1 ipOrHostname2
    fallBackNtpServers=ipOrHostname1 ipOrHostname2
    sshEnabled=
    sshPasswordAccessEnabled=
    sshKeyAccessEnabled=
    sshPublicKey1=
    adminDisclaimerText=
    sshLoginBannerText=VMware EUC Unified Access Gateway
    secureRandomSource=
    hostClockSyncEnabled=false
    extendedServerCertValidationEnabled=false
    sslprovider=
    tlsNamedGroups=
    tlsSignatureSchemes=
    osLoginUsername= 
    adminMaxConcurrentSessions=5
    osMaxLoginLimit=10
    dsComplianceOS=false
    sshPort=22
    sshInterface=eth0
    
    [WorkspaceOneIntelligenceSettings1]
    encodedCredentialsFile=
    name=TEST1
    trustedCert1=
    urlThumbprints=bed22939bf8546d15de2136f4c33f48f31d44e71
    
    [WorkspaceOneIntelligenceSettings2]
    encodedCredentialsFile=
    name=RISK_SCORE
    
    [SnmpSettings]
    version= v3
    usmUser= SAM_SNMP_V3
    securityLevel=
    authAlgorithm=
    authPassword=
    privacyAlgorithm=
    privacyPassword=
    engineID=uag1.example.com
    
    [WebReverseProxy1]
    proxyDestinationUrl=https://10.108.120.21
    trustedCert1=
    instanceId=view
    healthCheckUrl=/favicon.ico
    userNameHeader=AccessPoint-User-ID
    proxyPattern=/(.*)
    landingPagePath=/
    hostEntry1=10.108.120.21 HZNView.uagqe.auto.com
    
    [Horizon]
    endpointComplianceCheckProvider=Workspace_ONE_Intelligence_Risk_Score
    proxyDestinationUrl=https://enterViewConnectionServerUrl
    trustedCert1=
    gatewayLocation=external
    disableHtmlAccess=false
    healthCheckUrl=/favicon.ico
    proxyDestinationIPSupport=IPV4
    smartCardHintPrompt=false
    queryBrokerInterval=300
    proxyPattern=(/|/view-client(.*)|/portal(.*)|/appblast(.*))
    matchWindowsUserName=false
    windowsSSOEnabled=false
    complianceCheckOnAuthentication=true
    proxyDestinationUrlThumbprints=
    proxyDestinationPreLoginMessageEnabled=true
    customExecutable1=WEBEXVDIPLUGIN
    
    [CustomExecutableSettings1]
    name=OPSWAT2
    osType=
    trustedSigningCertificates1=
    url=<<URL to custom executable file>>
    urlResponseRefreshInterval=
    isObtainedFromURL=
    
    [Airwatch]
    tunnelGatewayEnabled=true
    disableAutoConfigUpdate=false
    pacFilePath=
    pacFileURL=
    credentialFilePath=
    apiServerUsername=domain\apiusername
    apiServerPassword=*****
    proxyDestinationUrl=https://null
    ntlmAuthentication=false
    healthCheckUrl=/favicon.ico
    organizationGroupCode=
    apiServerUrl=https://null
    outboundProxyHost=1.2.3.4
    outboundProxyPort=3128
    outboundProxyUsername=proxyuser
    outboundProxyPassword=****
    reinitializeGatewayProcess=false
    airwatchServerHostname=tunnel.acme.com
    trustedCert1=c:\temp\CA-Cert-A.pem
    hostEntry1=1.3.5.7 backend.acme.com
    tunnelConfigurationId=
    
    [AirwatchSecureEmailGateway]
    memConfigurationId=abc123
    apiServerUsername=domain\apiusername
    healthCheckUrl=/favicon.ico
    apiServerUrl=https://null
    outboundProxyHost=1.2.3.4
    outboundProxyPort=3128
    outboundProxyUsername=proxyuser
    outboundProxyPassword=****
    reinitializeGatewayProcess=false
    airwatchServerHostname=serverNameForSNI
    apiServerPassword=****
    trustedCert1=c:\temp\CA-Cert-A.pem
    pfxCerts=C:\Users\admin\My Certs\mycacerts.pfx
    hostEntry1=1.3.5.7 exchange.acme.com
    
    [AirWatchContentGateway]
    cgConfigId=abc123
    apiServerUrl=https://null
    apiServerUsername=domain\apiusername
    apiServerPassword=*****
    outboundProxyHost=
    outboundProxyPort=
    outboundProxyUsername=proxyuser
    outboundProxyPassword=*****
    hostEntry1=192.168.1.1 cgbackend.acme.com
    trustedCert1=c:\temp\CA-Cert-A.pem
    ntlmAuthentication=false
    reinitializeGatewayProcess=false
    airwatchServerHostname=cg.acme.com
    
    [SSLCert]
    pemPrivKey=
    pemCerts=
    pfxCerts=
    pfxCertAlias=
    
    [SSLCertAdmin]
    pemPrivKey=
    pemCerts=
    pfxCerts=
    pfxCertAlias=
    
    [WorkspaceONEIntelligenceRiskScoreEndpointComplianceCheckSettings]
    allowLow=true
    allowMedium=true
    allowHigh=true
    complianceCheckInterval=5
    allowOthers=false
    name=Workspace_ONE_Intelligence_Risk_Score
    workspaceOneIntelligenceSettingsName=RISK_SCORE
    
    [JWTSettings1]
    publicKey1=
    publicKey2=
    publicKey3=
    name=JWT_1
    
    [JWTSettings2]
    publicKey1=
    publicKey2=
    name=JWT_2
    
    [JWTIssuerSettings1]
    issuer=issuer-1
    jwtType=PRODUCER
    name=issuerJWT_1
    pemPrivKey=
    pemCerts=
    pfxCerts=
    pfxCertAlias=
    
    [JWTIssuerSettings2]
    issuer=issuer-2
    jwtType=PRODUCER
    name=issuerJWT_2
    pemPrivKey=
    pemCerts=
    pfxCerts=
    pfxCertAlias=
    
    [AdminUser1]
    name=monitoringUser1
    enabled=true
    
    [AdminUser2]
    name=monitoringUser2
    enabled=true
    
    [OutboundProxySettings1]
    proxyUrl=
    name=
    proxyType=HTTP
    includedHosts1=
    includedHosts2=
    trustedCert1=
    
    [OutboundProxySettings2]
    proxyUrl=
    name=
    proxyType=HTTP
    includedHosts1=
    includedHosts2=
    trustedCert1=
    
    [adminSAMLSettings]
    enable=true
    entityId=https://www.entityid.com
    
    [IDPExternalMetadata1]
    allowUnencrypted=false
    certChainPem=
    encryptionCertificateType=
    entityID=<entityID>
    forceAuthN=false
    metadataXmlFile=<Path of IDP metadata xml file>
    privateKeyPem=
    
    [OPSWATEndpointComplianceCheckSettings]
    allowInCompliance=
    allowEndpointUnknown=
    complianceCheckFastInterval=
    complianceCheckInitialDelay=
    complianceCheckInterval=
    allowNotInCompliance=
    allowOutOfLicenseUsage=
    allowAssessmentPending=
    allowOthers=
    hostName=
    name=
    clientSecret=
    clientKey=
    
    [PackageUpdates]
    packageUpdatesScheme=OFF|ON_NEXT_BOOT|ON_EVERY_BOOT
    packageUpdatesOSURL=
    packageUpdatesURL=
    trustedCert1=
    
    [SyslogServerSettings1]
    sysLogType=TCP
    syslogCategory=ALL
    syslogFormat=TEXT
    syslogSettingName=
    syslogSystemMessagesEnabledV2=true
    syslogUrl=
    
    [SyslogServerSettings2]
    hostname=
    port=6515
    sysLogType=TLS
    syslogCategory=ALL
    syslogClientCertKeyPemV2=
    syslogClientCertPemV2=
    syslogServerCACertPemV2=
    syslogFormat=TEXT
    syslogSettingName=
    syslogSystemMessagesEnabledV2=false
    
    [SyslogServerSettings3]
    mqttClientCertCertPem=
    mqttClientCertKeyPem=
    mqttServerCACertPem=
    mqttTopic=
    sysLogType=MQTT
    syslogCategory=ALL
    syslogFormat=TEXT
    syslogSettingName=
    syslogSystemMessagesEnabledV2=true
    syslogUrl=
    注:
    • INI ファイルに含まれる [adminSAMLSettings] は、管理ユーザー インターフェイスへの管理者アクセス権を持つユーザーを認証するために使用する SAML 認証方法を構成するためのものです。ここで、entityId は外部メタデータ プロバイダ エンティティ ID を指します。
    • 監視ロールを持つ権限の低い管理者ユーザーのパスワードは、PowerShell スクリプトのパラメータとして提供されます。パスワードが指定されていない場合、ユーザーはパスワードを入力するように求められます。パラメータを newAdminUserPwd として指定し、パラメータ値を monitoringUser1:P@ssw0rd1;monitoringUser2:P@ssw0rd2 のように入力します。INI ファイルの enabled パラメータはオプションです。パラメータが使用できない場合は、デフォルトで true に設定されます。
  5. スクリプト実行が制限されないようにするには、PowerShell の set-executionpolicy コマンドを入力します。
    set-executionpolicy -scope currentuser unrestricted
    制限を解除するには、これを 1 回行えば十分です。
    1. (オプション) スクリプトの警告が表示される場合、次のコマンドを実行して、警告のブロックを解除します:unblock-file -path .\uagdeploy.ps1
  6. このコマンドを実行してデプロイを開始します。.INI ファイルを指定しない場合、スクリプトはデフォルトで ap.ini を使用します。
    .\uagdeploy.ps1 -iniFile uag1.ini
  7. 確認の画面が表示されたら、認証情報を入力し、スクリプトの実行を完了します。
    注: ターゲット マシンのフィンガープリントを追加するように要求されたら、 [yes] と入力します。
    Unified Access Gateway アプライアンスがデプロイされ、本番環境で利用できるようになります。

結果

PowerShell スクリプトの詳細については、 https://communities.vmware.com/docs/DOC-30835 を参照してください。

次のタスク

既存の設定を保持したまま Unified Access Gateway をアップグレードする場合は、 .ini ファイルを編集して、ソースの参照先を新しいバージョンに変更し、 .ini ファイルを再実行します: uagdeploy.ps1 uag1.ini。このプロセスには、最大で 3 分かかることがあります。
[General]
name=UAG1
source=C:\temp\euc-unified-access-gateway-3.2.1-7766089_OVF10.ova

サービスを中断せずにアップグレードする方法については、ダウンタイムなしのアップグレードを参照してください。