


KVM に SD-WAN Gateway qcow をインストールする方法について説明します。
注: このデプロイは、KVM Ubuntu 16.04 および 18.04 でテスト済みです。
インストール前の考慮事項
KVM では、仮想マシンにネットワークを提供する方法が複数あります。libvirt のネットワークは、仮想マシンの設定の前にプロビジョニングする必要があります。KVM でネットワークを設定する方法は複数あります。libvirt でネットワークを設定するために使用できるすべてのオプションを確認するには、次のリンクを参照してください。
https://libvirt.org/formatnetwork.html
すべてのオプションの中で、VMware では次のモードが推奨されます。
- SR-IOV(このモードは VMware によって指定された最大スループットを SD-WAN Gateway が提供するために必要です)
- OpenVSwitch ブリッジ
SR-IOV モードを使用する場合は、KVM で SR-IOV を有効にします。KVM で SR-IOV を有効にするには、KVM 上での SR-IOV の有効化を参照してください。
KVM での SD-WAN Gateway のインストール手順
- 「cloud-init の作成」セクションで作成した qcow ファイルと cloud-init ファイルを新しい空のディレクトリにコピーします。
- デバイスに使用するネットワーク インターフェイスを作成します。
[SR-IOV の使用 (Using SR-IOV)]:SR-IOV を使用する場合の Intel X710/XL710 NIC カード専用のネットワーク インターフェイスのサンプル テンプレートを次に示します。
    <interface type='hostdev' managed='yes'>
        <mac address='52:54:00:79:19:3d'/>
        <driver name='vfio'/>
        <source>
            <address type='pci' domain='0x0000' bus='0x83' slot='0x0a' function='0x0'/>
        </source>
        <model type='virtio'/>
    </interface>
[OpenVSwitch の使用 (Using OpenVSwitch)]:OpenVSwitch を使用する場合のネットワーク インターフェイスのサンプル テンプレートを次に示します。git ./vcg/templates/KVM_NETWORKING_SAMPLES/template_outside_openvswitch.xml
<?xml version="1.0" encoding="UTF-8"?>
<network>
   <name>public_interface</name>
   <!--This is the network name-->
   <model type="virtio" />
   <forward mode="bridge" />
   <bridge name="publicinterface" />
   <virtualport type="openvswitch" />
   <vlan trunk="yes">
      <tag id="50" />
      <!--Define all the VLANS for this Bridge -->
      <tag id="51" />
      <!--Define all the VLANS for this Bridge -->
   </vlan>
</network>
次のようにして、
inside_interfaceのネットワークを作成します。git ./vcg/templates/KVM_NETWORKING_SAMPLES/template_inside_openvswitch.xml
<network>
  <name>inside_interface</name> <!--This is the network name-->
  <model type='virtio'/>
  <forward mode="bridge"/>
  <bridge name="insideinterface"/>
  <virtualport type='openvswitch'></virtualport>
  <vlan trunk='yes'></vlan>
  <tag id='200'/> <!—Define all the VLANS for this Bridge -->
  <tag id='201'/> <!—Define all the VLANS for this Bridge -->
  <tag id='202'/> <!—Define all the VLANS for this Bridge -->
</network>
OpenVSwitch モードを使用する場合は、仮想マシンを起動する前に、基本ネットワークが作成されてアクティブになっていることを確認する必要があります。注: SR-IOV モードの場合、仮想マシンの起動前にネットワークを作成しないため、この検証手順は不要です。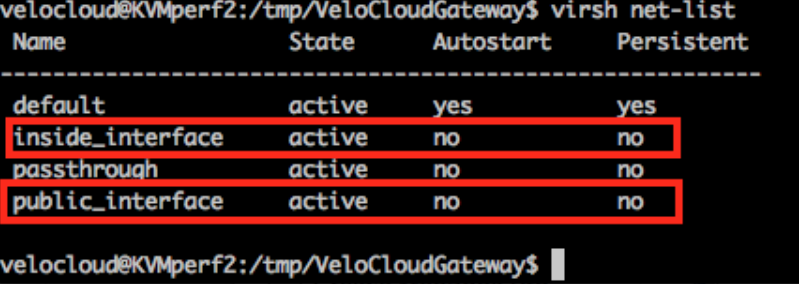
- 仮想マシンの XML ファイルを編集します。KVM で仮想マシンを作成する方法は複数あります。XML ファイルで仮想マシンを定義し、libvirt を使用して作成することができます。OpenVSwitch モードおよび SR-IOV モードに専用のサンプルの仮想マシン XML テンプレートを使用してください。
vi my_vm.xml
OpenVSwitch インターフェイスを使用する仮想マシンのサンプル テンプレートを次に示します。このテンプレートを必要に応じて編集して使用してください。<?xml version="1.0" encoding="UTF-8"?> <domain type="kvm"> <name>#domain_name#</name> <memory unit="KiB">8388608</memory> <currentMemory unit="KiB">8388608</currentMemory> <vcpu>8</vcpu> <cputune> <vcpupin vcpu="0" cpuset="0" /> <vcpupin vcpu="1" cpuset="1" /> <vcpupin vcpu="2" cpuset="2" /> <vcpupin vcpu="3" cpuset="3" /> <vcpupin vcpu="4" cpuset="4" /> <vcpupin vcpu="5" cpuset="5" /> <vcpupin vcpu="6" cpuset="6" /> <vcpupin vcpu="7" cpuset="7" /> </cputune> <resource> <partition>/machine</partition> </resource> <os> <type>hvm</type> </os> <features> <acpi /> <apic /> <pae /> </features> <cpu mode="host-passthrough" /> <clock offset="utc" /> <on_poweroff>destroy</on_poweroff> <on_reboot>restart</on_reboot> <on_crash>restart</on_crash> <devices> <emulator>/usr/bin/kvm-spice</emulator> <disk type="file" device="disk"> <driver name="qemu" type="qcow2" /> <source file="#folder#/#qcow_root#" /> <target dev="hda" bus="ide" /> <alias name="ide0-0-0" /> <address type="drive" controller="0" bus="0" target="0" unit="0" /> </disk> <disk type="file" device="cdrom"> <driver name="qemu" type="raw" /> <source file="#folder#/#Cloud_ INIT_ ISO#" /> <target dev="sdb" bus="sata" /> <readonly /> <alias name="sata1-0-0" /> <address type="drive" controller="1" bus="0" target="0" unit="0" /> </disk> <controller type="usb" index="0"> <alias name="usb0" /> <address type="pci" domain="0x0000" bus="0x00" slot="0x01" function="0x2" /> </controller> <controller type="pci" index="0" model="pci-root"> <alias name="pci.0" /> </controller> <controller type="ide" index="0"> <alias name="ide0" /> <address type="pci" domain="0x0000" bus="0x00" slot="0x01" function="0x1" /> </controller> <interface type="network"> <source network="public_interface" /> <vlan> <tag id="#public_vlan#" /> </vlan> <alias name="hostdev1" /> <address type="pci" domain="0x0000" bus="0x00" slot="0x11" function="0x0" /> </interface> <interface type="network"> <source network="inside_interface" /> <alias name="hostdev2" /> <address type="pci" domain="0x0000" bus="0x00" slot="0x12" function="0x0" /> </interface> <serial type="pty"> <source path="/dev/pts/3" /> <target port="0" /> <alias name="serial0" /> </serial> <console type="pty" tty="/dev/pts/3"> <source path="/dev/pts/3" /> <target type="serial" port="0" /> <alias name="serial0" /> </console> <memballoon model="none" /> </devices> <seclabel type="none" /> </domain>SR-IOV インターフェイスを使用する仮想マシンのサンプル テンプレートを次に示します。このテンプレートを必要に応じて編集して使用してください。<?xml version="1.0" encoding="UTF-8"?> <domain type="kvm"> <name>#domain_name#</name> <memory unit="KiB">8388608</memory> <currentMemory unit="KiB">8388608</currentMemory> <vcpu>8</vcpu> <cputune> <vcpupin vcpu="0" cpuset="0" /> <vcpupin vcpu="1" cpuset="1" /> <vcpupin vcpu="2" cpuset="2" /> <vcpupin vcpu="3" cpuset="3" /> <vcpupin vcpu="4" cpuset="4" /> <vcpupin vcpu="5" cpuset="5" /> <vcpupin vcpu="6" cpuset="6" /> <vcpupin vcpu="7" cpuset="7" /> </cputune> <resource> <partition>/machine</partition> </resource> <os> <type>hvm</type> </os> <features> <acpi /> <apic /> <pae /> </features> <cpu mode="host-passthrough" /> <clock offset="utc" /> <on_poweroff>destroy</on_poweroff> <on_reboot>restart</on_reboot> <on_crash>restart</on_crash> <devices> <emulator>/usr/bin/kvm-spice</emulator> <disk type="file" device="disk"> <driver name="qemu" type="qcow2" /> <source file="#folder#/#qcow_root#" /> <target dev="hda" bus="ide" /> <alias name="ide0-0-0" /> <address type="drive" controller="0" bus="0" target="0" unit="0" /> </disk> <disk type="file" device="cdrom"> <driver name="qemu" type="raw" /> <source file="#folder#/#Cloud_ INIT_ ISO#" /> <target dev="sdb" bus="sata" /> <readonly /> <alias name="sata1-0-0" /> <address type="drive" controller="1" bus="0" target="0" unit="0" /> </disk> <controller type="usb" index="0"> <alias name="usb0" /> <address type="pci" domain="0x0000" bus="0x00" slot="0x01" function="0x2" /> </controller> <controller type="pci" index="0" model="pci-root"> <alias name="pci.0" /> </controller> <controller type="ide" index="0"> <alias name="ide0" /> <address type="pci" domain="0x0000" bus="0x00" slot="0x01" function="0x1" /> </controller> <interface type='hostdev' managed='yes'> <mac address='52:54:00:79:19:3d'/> <driver name='vfio'/> <source> <address type='pci' domain='0x0000' bus='0x83' slot='0x0a' function='0x0'/> </source> <model type='virtio'/> </interface> <interface type='hostdev' managed='yes'> <mac address='52:54:00:74:69:4d'/> <driver name='vfio'/> <source> <address type='pci' domain='0x0000' bus='0x83' slot='0x0a' function='0x1'/> </source> <model type='virtio'/> </interface> <serial type="pty"> <source path="/dev/pts/3" /> <target port="0" /> <alias name="serial0" /> </serial> <console type="pty" tty="/dev/pts/3"> <source path="/dev/pts/3" /> <target type="serial" port="0" /> <alias name="serial0" /> </console> <memballoon model="none" /> </devices> <seclabel type="none" /> </domain> - 次の手順を実行して、仮想マシンを起動します。
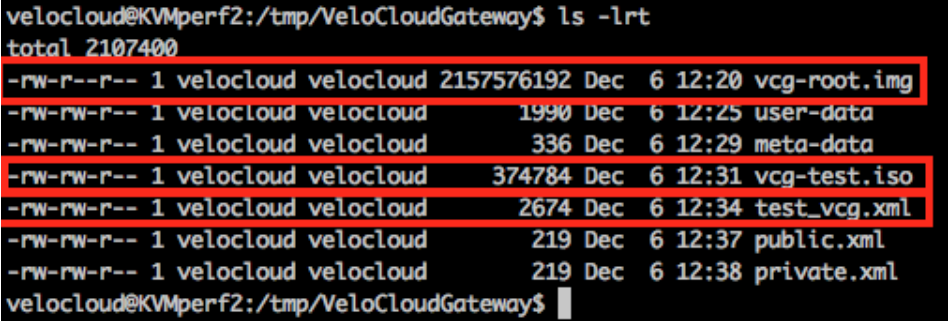
- 以下のサンプル スクリーンショットに示すように、ディレクトリに次の 3 つのファイルがあることを確認します。
- qcow ファイル - vcg-root
- cloud-init - vcg-test.iso
- 仮想マシンを定義するドメイン XML ファイル - test_vcg.xml(ここで test_vcg はドメイン名)
- 仮想マシンを定義します。
velocloud@KVMperf2:/tmp/VeloCloudGateway$ virsh define test_vcg.xml
Domain test_vcg defined from test_vcg.xml
- 仮想マシンを自動起動に設定します。
velocloud@KVMperf2:/tmp/VeloCloudGateway$ virsh autostart test_vcg
- 仮想マシンを起動します。
velocloud@KVMperf2:/tmp/VeloCloudGateway$ virsh start test_vcg
- 以下のサンプル スクリーンショットに示すように、ディレクトリに次の 3 つのファイルがあることを確認します。
- SR-IOV モードを使用する場合は、仮想マシンの起動後に、使用する仮想機能 (VF) について次のように設定します。
- スプーフィングチェックをオフに設定します。
ip link set eth1 vf 0 spoofchk off
- 信頼済み (Trusted) モードをオンに設定します。
ip link set dev eth1 vf 0 trust on
- 必要に応じて、VLAN を設定します。
ip link set eth1 vf 0 vlan 3500
注: 仮想機能の設定手順は、OpenVSwitch (OVS) モードには適用されません。 - スプーフィングチェックをオフに設定します。
- 仮想マシンのコンソールにログインします。
virsh list
Id Name State
----------------------------------------------------
25 test_vcg running
velocloud@KVMperf2$ virsh console 25
Connected to domain test_vcg
Escape character is ^]
[KVM ホストに関する特別な考慮事項]
- 物理インターフェイスで GRO (Generic Receive Offload) を無効にします(SD-WAN Gateway での不必要な再フラグメント化を回避するため)。
ethtool –K <interface> gro off tx off
- CPU の C ステートを無効にします(電源状態がリアルタイムのパフォーマンスに影響します)。通常、これは
processor.max_cstate=1を付加してカーネル起動オプションの一部として行うことができます。または、BIOS で直接この設定を無効にしてください。 -
本番環境では、vCPU をインスタンスに固定する必要があります。コアでオーバーサブスクリプションが実行されないようにする必要があります。
