PowerShell 스크립트는 모든 구성 설정을 사용하여 환경을 준비합니다. PowerShell 스크립트를 실행하여 Unified Access Gateway를 배포할 경우 첫 번째 시스템 부팅 시 솔루션의 프로덕션 사용 준비가 완료됩니다.

중요: PowerShell 배포를 사용하여 INI 파일에 있는 모든 설정을 제공할 수 있습니다. 또한 Unified Access Gateway 인스턴스는 부팅하는 즉시 운영 준비가 완료됩니다. 배포 후에 어떤 설정도 변경하지 않으려면 관리 UI 암호를 제공할 필요가 없습니다.

그러나 배포 중에 관리 UI 암호를 제공하지 않으면 관리 UI 및 API를 둘 다 사용하지 못합니다.

참고:
  • 배포 시에 관리 UI 암호를 제공하지 않으면 나중에 사용자를 추가하여 관리 UI 또는 API에 대한 액세스를 사용하도록 설정할 수 없습니다. 관리 UI 사용자를 추가하려는 경우 올바른 암호를 사용하여 Unified Access Gateway 인스턴스를 다시 배포해야 합니다.
  • Unified Access Gateway 3.5 이상에는 선택적 sshEnabled INI 속성이 포함되어 있습니다. PowerShell INI 파일의 [General] 섹션에서 sshEnabled=true를 설정하면 배포된 장치에서 ssh 액세스가 자동으로 사용 설정됩니다. VMware에서는 일반적으로 액세스를 제한할 수 있는 특정 상황을 제외하고는 Unified Access Gateway에서 ssh를 사용 설정하는 것을 권장하지 않습니다. 이 기능은 주로 대체 콘솔 액세스를 사용할 수 없는 Amazon AWS EC2 배포에 사용됩니다.
    참고: Amazon AWS EC2에 대한 자세한 내용은 Amazon Web Services로 Unified Access Gateway PowerShell 배포를 참조하십시오.

    sshEnabled=true가 지정되지 않았거나 false로 설정되면 ssh 는 사용 설정되지 않습니다.

    vSphere, Hyper-V 또는 Microsoft Azure 배포용 Unified Access Gateway에 대해 콘솔 액세스를 사용할 수 있는 경우에는 일반적으로 이러한 플랫폼에서 ssh 액세스를 사용 설정할 필요가 없습니다. Amazon AWS EC2 배포에 루트 콘솔 액세스가 필요한 경우 sshEnabled=true를 설정합니다. ssh를 사용 설정하는 경우, 방화벽 또는 보안 그룹에서 TCP 포트 22 액세스를 개별 관리자의 소스 IP 주소로 제한해야 합니다. EC2는 Unified Access Gateway 네트워크 인터페이스와 연결된 EC2 보안 그룹에서 이 제한을 지원합니다.

사전 요구 사항

  • Hyper-V 배포에서 정적 IP를 사용하여 Unified Access Gateway를 업그레이드할 경우 Unified Access Gateway의 새 인스턴스를 배포하기 전에 이전 장치를 삭제합니다.
  • 시스템 요구 사항이 적절한지와 사용 가능한지 확인합니다.

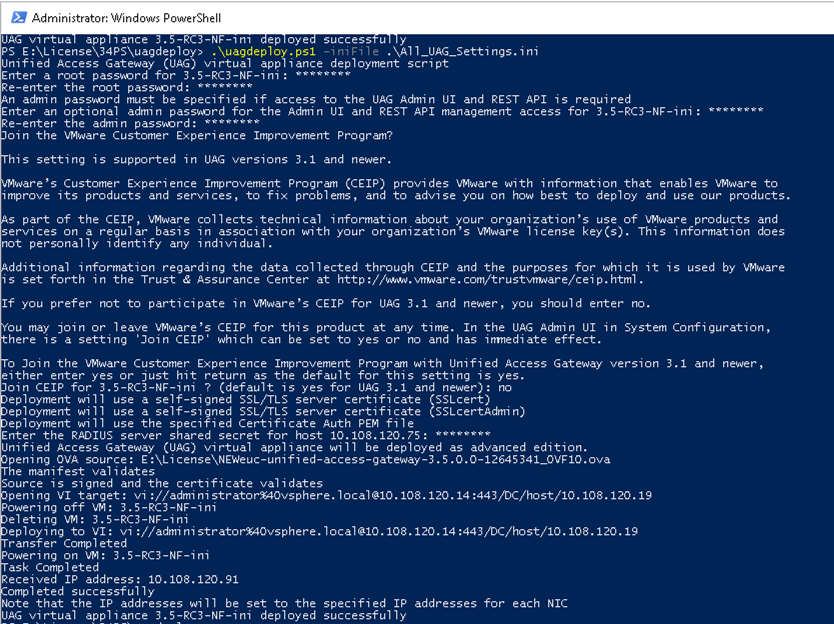
    다음은 사용자 환경에 Unified Access Gateway를 배포하기 위한 샘플 스크립트입니다.

    그림 1. 샘플 PowerShell 스크립트
프로시저

  1. [My VMware]에서 Windows 시스템으로 Unified Access Gateway OVA를 다운로드합니다.
  2. uagdeploy-XXX.zip 파일을 Windows 시스템의 폴더로 다운로드합니다.
    ZIP 파일은 Unified Access Gateway에 대한 VMware 다운로드 페이지에서 확인할 수 있습니다.
  3. PowerShell 스크립트를 열고 디렉토리를 스크립트의 위치로 수정합니다.
  4. Unified Access Gateway 가상 장치에 대한 INI 구성 파일을 생성합니다.
    예를 들어 새 Unified Access Gateway 장치 UAG1을 배포합니다. 구성 파일 이름은 uag1.ini입니다. 이 파일에는 UAG1에 대한 모든 구성 설정이 포함됩니다. uagdeploy.ZIP 파일의 샘플 INI 파일을 사용하여 INI 파일을 생성하고 설정을 적절히 수정할 수 있습니다.
    참고:
    • 환경의 여러 Unified Access Gateway 배포에 대해 고유한 lNI 파일이 있을 수 있습니다. 여러 장치를 배포하려면 INI 파일의 IP 주소 및 이름 매개 변수를 적절히 변경해야 합니다.
    수정할 INI 파일의 예입니다.
    [General]
    netManagementNetwork=
    netInternet=
    netBackendNetwork=
    name=
    dns = 192.0.2.1 192.0.2.2
    dnsSearch = example1.com example2.com
    ip0=10.108.120.119
    diskMode=
    source=
    defaultGateway=10.108.120.125
    target=
    ds=
    deploymentOption=onenic
    authenticationTimeout=300000
    fipsEnabled=false
    uagName=UAG1
    locale=en_US
    ipModeforNIC3=DHCPV4_DHCPV6
    tls12Enabled=true
    ipMode=DHCPV4_DHCPV6
    requestTimeoutMsec=10000
    ipModeforNIC2=DHCPV4_DHCPV6
    tls11Enabled=false
    clientConnectionIdleTimeout=180
    tls10Enabled=false
    adminCertRolledBack=false
    cookiesToBeCached=none
    healthCheckUrl=/favicon.ico
    quiesceMode=false
    syslogUrl=10.108.120.108:514
    isCiphersSetByUser=false
    tlsPortSharingEnabled=true
    ceipEnabled=true
    bodyReceiveTimeoutMsec=15000
    monitorInterval=60
    cipherSuites=TLS_ECDHE_RSA_WITH_AES_128_GCM_SHA256,TLS_ECDHE_RSA_WITH_AES_256_GCM_SHA384,TLS_ECDHE_RSA_WITH_AES_128_CBC_SHA256
    , TLS_ECDHE_RSA_WITH_AES_256_CBC_SHA384
    adminPasswordExpirationDays=90
    httpConnectionTimeout=120
    isTLS11SetByUser=false
    sessionTimeout=36000000
    ssl30Enabled=false
    snmpEnabled= TRUE | FALSE
    ntpServers=ipOrHostname1 ipOrHostname2
    fallBackNtpServers=ipOrHostname1 ipOrHostname2
    sshEnabled=
    sshPasswordAccessEnabled=
    sshKeyAccessEnabled=
    sshPublicKey1=
    adminDisclaimerText=
    
    [WebReverseProxy1]
    proxyDestinationUrl=https://10.108.120.21
    trustedCert1=
    instanceId=view
    healthCheckUrl=/favicon.ico
    userNameHeader=AccessPoint-User-ID
    proxyPattern=/(.*)
    landingPagePath=/
    hostEntry1=10.108.120.21 HZNView.uagqe.auto.com
    
    [Horizon]
    proxyDestinationUrl=https://enterViewConnectionServerUrl
    trustedCert1=
    gatewayLocation=external
    disableHtmlAccess=false
    healthCheckUrl=/favicon.ico
    proxyDestinationIPSupport=IPV4
    smartCardHintPrompt=false
    queryBrokerInterval=300
    proxyPattern=(/|/view-client(.*)|/portal(.*)|/appblast(.*))
    matchWindowsUserName=false
    windowsSSOEnabled=false
    
    [Airwatch]
    tunnelGatewayEnabled=true
    tunnelProxyEnabled=true
    pacFilePath=
    pacFileURL=
    credentialFilePath=
    apiServerUsername=domain\apiusername
    apiServerPassword=*****
    proxyDestinationUrl=https://null
    ntlmAuthentication=false
    healthCheckUrl=/favicon.ico
    organizationGroupCode=
    apiServerUrl=https://null
    airwatchOutboundProxy=false
    outboundProxyHost=1.2.3.4
    outboundProxyPort=3128
    outboundProxyUsername=proxyuser
    outboundProxyPassword=****
    reinitializeGatewayProcess=false
    airwatchServerHostname=tunnel.acme.com
    trustedCert1=c:\temp\CA-Cert-A.pem
    hostEntry1=1.3.5.7 backend.acme.com
    
    [AirwatchSecureEmailGateway]
    airwatchOutboundProxy=false
    memConfigurationId=abc123
    apiServerUsername=domain\apiusername
    healthCheckUrl=/favicon.ico
    apiServerUrl=https://null
    outboundProxyHost=1.2.3.4
    outboundProxyPort=3128
    outboundProxyUsername=proxyuser
    outboundProxyPassword=****
    reinitializeGatewayProcess=false
    airwatchServerHostname=serverNameForSNI
    apiServerPassword=****
    trustedCert1=c:\temp\CA-Cert-A.pem
    pfxCerts=C:\Users\admin\My Certs\mycacerts.pfx
    hostEntry1=1.3.5.7 exchange.acme.com
    
    [AirWatchContentGateway]
    cgConfigId=abc123
    apiServerUrl=https://null
    apiServerUsername=domain\apiusername
    apiServerPassword=*****
    outboundProxyHost=
    outboundProxyPort=
    outboundProxyUsername=proxyuser
    outboundProxyPassword=*****
    airwatchOutboundProxy=false
    hostEntry1=192.168.1.1 cgbackend.acme.com
    trustedCert1=c:\temp\CA-Cert-A.pem
    ntlmAuthentication=false
    reinitializeGatewayProcess=false
    airwatchServerHostname=cg.acme.com
    
    [SSLCert]
    pemPrivKey=
    pemCerts=
    pfxCerts=
    pfxCertAlias=
    
    [SSLCertAdmin]
    pemPrivKey=
    pemCerts=
    pfxCerts=
    pfxCertAlias=
    
    [JWTSettings1]
    publicKey1=
    publicKey2=
    publicKey3=
    name=JWT_1
    
    [JWTSettings2]
    publicKey1=
    publicKey2=
    name=JWT_2
  5. 스크립트 실행이 제한되지 않도록 하려면 PowerShell set-executionpolicy 명령을 입력합니다.
    set-executionpolicy -scope currentuser unrestricted
    제한을 제거하려면 이 작업을 한 번만 하면 됩니다.
    1. (선택 사항) 스크립트에 대한 경고가 표시되면 다음 명령을 실행하여 경고를 차단 해제합니다. unblock-file -path .\uagdeploy.ps1
  6. 이 명령을 실행하여 배포를 시작합니다. .INI 파일을 지정하지 않으면 스크립트는 기본적으로 ap.ini가 됩니다.
    .\uagdeploy.ps1 -iniFile uag1.ini
  7. 자격 증명을 입력하라는 메시지가 표시되면 입력하고 스크립트를 완료합니다.
    참고: 대상 시스템에 대한 지문을 추가하라는 메시지가 표시되면 yes를 입력합니다.
    Unified Access Gateway 장치가 배포되고 프로덕션용으로 사용 가능합니다.

결과

PowerShell 스크립트에 대한 자세한 내용은 https://communities.vmware.com/docs/DOC-30835를 참조하십시오.

다음에 수행할 작업

기존 설정을 유지하면서 Unified Access Gateway를 업그레이드하려면 .ini 파일을 편집하여 소스 참조를 새 버전으로 변경한 후 .ini 파일을 다시 실행합니다( uagdeploy.ps1 uag1.ini). 이 프로세스에는 최대 3분이 소요될 수 있습니다.
[General]
name=UAG1
source=C:\temp\euc-unified-access-gateway-3.2.1-7766089_OVF10.ova

서비스 중단 없이 업그레이드하려면 다운타임이 없는 업그레이드를 참조하십시오.