KVM에 SD-WAN Gateway qcow를 설치하는 방법을 설명합니다.
참고: 이 배포는 KVM Ubuntu 16.04 및 18.04에서 테스트되었습니다.
설치 전 고려 사항
KVM에서는 여러 가지 방식으로 가상 시스템에 네트워킹을 제공할 수 있습니다. libvirt의 네트워킹은 VM 구성 전에 프로비저닝되어야 합니다. KVM에서 네트워킹을 구성하는 방법에는 여러 가지가 있습니다. libvirt에서 네트워크를 구성하는 방법에 대한 전체 구성 옵션은 다음 링크를 참조하십시오.
https://libvirt.org/formatnetwork.html
VMware에서는 전체 옵션 목록 중에서 다음 모드가 권장됩니다.
- SR-IOV(이 모드는 SD-WAN Gateway에서 VMware에 지정된 최대 처리량을 제공하는 데 필요함)
- OpenVSwitch 브리지
SR-IOV 모드를 사용하기로 결정한 경우 KVM에서 SR-IOV를 사용하도록 설정합니다. KVM에서 SR-IOV를 사용하도록 설정하려면 KVM에서 SR-IOV 활성화을 참조하십시오.
KVM의 SD-WAN Gateway 설치 단계
- Cloud-init 생성 섹션에서 생성된 QCOW 및 Cloud-init 파일을 새로운 빈 디렉토리로 복사합니다.
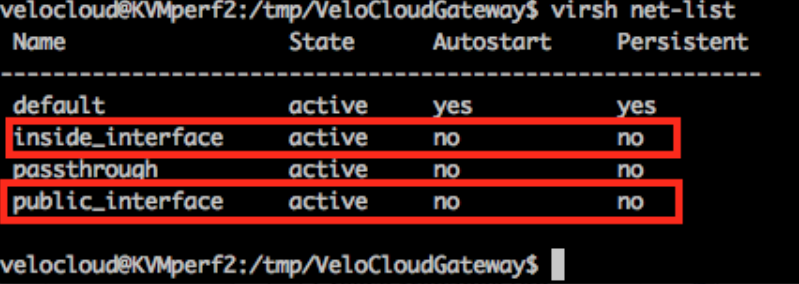
- 디바이스에 사용할 네트워크 인터페이스를 생성합니다.
SR-IOV 사용(Using SR-IOV): 다음은 SR-IOV를 사용하는 Intel X710/XL710 NIC 카드와 관련된 샘플 네트워크 인터페이스 템플릿입니다.
    <interface type='hostdev' managed='yes'>
        <mac address='52:54:00:79:19:3d'/>
        <driver name='vfio'/>
        <source>
            <address type='pci' domain='0x0000' bus='0x83' slot='0x0a' function='0x0'/>
        </source>
        <model type='virtio'/>
    </interface>
OpenVSwitch 사용(Using OpenVSwitch): 다음은 OpenVSwitch를 사용하는 네트워크 인터페이스의 샘플 템플릿입니다.git ./vcg/templates/KVM_NETWORKING_SAMPLES/template_outside_openvswitch.xml
<?xml version="1.0" encoding="UTF-8"?> <network> <name>public_interface</name> <!--This is the network name--> <model type="virtio" /> <forward mode="bridge" /> <bridge name="publicinterface" /> <virtualport type="openvswitch" /> <vlan trunk="yes"> <tag id="50" /> <!--Define all the VLANS for this Bridge --> <tag id="51" /> <!--Define all the VLANS for this Bridge --> </vlan> </network>inside_interface에 대한 네트워크를 생성합니다.git ./vcg/templates/KVM_NETWORKING_SAMPLES/template_inside_openvswitch.xml
<network>
  <name>inside_interface</name> <!--This is the network name-->
  <model type='virtio'/>
  <forward mode="bridge"/>
  <bridge name="insideinterface"/>
  <virtualport type='openvswitch'></virtualport>
  <vlan trunk='yes'></vlan>
  <tag id='200'/> <!—Define all the VLANS for this Bridge -->
  <tag id='201'/> <!—Define all the VLANS for this Bridge -->
  <tag id='202'/> <!—Define all the VLANS for this Bridge -->
</network>
OpenVSwitch 모드를 사용하는 경우 VM을 실행하기 전에 기본 네트워크가 생성되고 활성 상태인지 확인해야 합니다.참고: VM이 시작되기 전에 네트워크를 생성하지 않으므로 이 검증 단계는 SR-IOV 모드에 적용되지 않습니다.
- VM XML 파일을 편집합니다. KVM에서 가상 시스템을 생성하는 방법에는 여러 가지가 있습니다. OpenVSwitch 모드 및 SR-IOV 모드와 관련된 샘플 VM XML 템플릿을 사용하여 XML 파일에서 VM을 정의하고 libvirt를 사용하여 생성할 수 있습니다.
vi my_vm.xml
다음은 OpenVSwitch 인터페이스를 사용하는 VM의 샘플 템플릿입니다. 해당되는 경우 언제든지 편집하여 이 템플릿을 사용합니다.<?xml version="1.0" encoding="UTF-8"?> <domain type="kvm"> <name>#domain_name#</name> <memory unit="KiB">8388608</memory> <currentMemory unit="KiB">8388608</currentMemory> <vcpu>8</vcpu> <cputune> <vcpupin vcpu="0" cpuset="0" /> <vcpupin vcpu="1" cpuset="1" /> <vcpupin vcpu="2" cpuset="2" /> <vcpupin vcpu="3" cpuset="3" /> <vcpupin vcpu="4" cpuset="4" /> <vcpupin vcpu="5" cpuset="5" /> <vcpupin vcpu="6" cpuset="6" /> <vcpupin vcpu="7" cpuset="7" /> </cputune> <resource> <partition>/machine</partition> </resource> <os> <type>hvm</type> </os> <features> <acpi /> <apic /> <pae /> </features> <cpu mode="host-passthrough" /> <clock offset="utc" /> <on_poweroff>destroy</on_poweroff> <on_reboot>restart</on_reboot> <on_crash>restart</on_crash> <devices> <emulator>/usr/bin/kvm-spice</emulator> <disk type="file" device="disk"> <driver name="qemu" type="qcow2" /> <source file="#folder#/#qcow_root#" /> <target dev="hda" bus="ide" /> <alias name="ide0-0-0" /> <address type="drive" controller="0" bus="0" target="0" unit="0" /> </disk> <disk type="file" device="cdrom"> <driver name="qemu" type="raw" /> <source file="#folder#/#Cloud_ INIT_ ISO#" /> <target dev="sdb" bus="sata" /> <readonly /> <alias name="sata1-0-0" /> <address type="drive" controller="1" bus="0" target="0" unit="0" /> </disk> <controller type="usb" index="0"> <alias name="usb0" /> <address type="pci" domain="0x0000" bus="0x00" slot="0x01" function="0x2" /> </controller> <controller type="pci" index="0" model="pci-root"> <alias name="pci.0" /> </controller> <controller type="ide" index="0"> <alias name="ide0" /> <address type="pci" domain="0x0000" bus="0x00" slot="0x01" function="0x1" /> </controller> <interface type="network"> <source network="public_interface" /> <vlan> <tag id="#public_vlan#" /> </vlan> <alias name="hostdev1" /> <address type="pci" domain="0x0000" bus="0x00" slot="0x11" function="0x0" /> </interface> <interface type="network"> <source network="inside_interface" /> <alias name="hostdev2" /> <address type="pci" domain="0x0000" bus="0x00" slot="0x12" function="0x0" /> </interface> <serial type="pty"> <source path="/dev/pts/3" /> <target port="0" /> <alias name="serial0" /> </serial> <console type="pty" tty="/dev/pts/3"> <source path="/dev/pts/3" /> <target type="serial" port="0" /> <alias name="serial0" /> </console> <memballoon model="none" /> </devices> <seclabel type="none" /> </domain>다음은 SR-IOV 인터페이스를 사용하는 VM의 샘플 템플릿입니다. 해당되는 경우 언제든지 편집하여 이 템플릿을 사용합니다.<?xml version="1.0" encoding="UTF-8"?> <domain type="kvm"> <name>#domain_name#</name> <memory unit="KiB">8388608</memory> <currentMemory unit="KiB">8388608</currentMemory> <vcpu>8</vcpu> <cputune> <vcpupin vcpu="0" cpuset="0" /> <vcpupin vcpu="1" cpuset="1" /> <vcpupin vcpu="2" cpuset="2" /> <vcpupin vcpu="3" cpuset="3" /> <vcpupin vcpu="4" cpuset="4" /> <vcpupin vcpu="5" cpuset="5" /> <vcpupin vcpu="6" cpuset="6" /> <vcpupin vcpu="7" cpuset="7" /> </cputune> <resource> <partition>/machine</partition> </resource> <os> <type>hvm</type> </os> <features> <acpi /> <apic /> <pae /> </features> <cpu mode="host-passthrough" /> <clock offset="utc" /> <on_poweroff>destroy</on_poweroff> <on_reboot>restart</on_reboot> <on_crash>restart</on_crash> <devices> <emulator>/usr/bin/kvm-spice</emulator> <disk type="file" device="disk"> <driver name="qemu" type="qcow2" /> <source file="#folder#/#qcow_root#" /> <target dev="hda" bus="ide" /> <alias name="ide0-0-0" /> <address type="drive" controller="0" bus="0" target="0" unit="0" /> </disk> <disk type="file" device="cdrom"> <driver name="qemu" type="raw" /> <source file="#folder#/#Cloud_ INIT_ ISO#" /> <target dev="sdb" bus="sata" /> <readonly /> <alias name="sata1-0-0" /> <address type="drive" controller="1" bus="0" target="0" unit="0" /> </disk> <controller type="usb" index="0"> <alias name="usb0" /> <address type="pci" domain="0x0000" bus="0x00" slot="0x01" function="0x2" /> </controller> <controller type="pci" index="0" model="pci-root"> <alias name="pci.0" /> </controller> <controller type="ide" index="0"> <alias name="ide0" /> <address type="pci" domain="0x0000" bus="0x00" slot="0x01" function="0x1" /> </controller> <interface type='hostdev' managed='yes'> <mac address='52:54:00:79:19:3d'/> <driver name='vfio'/> <source> <address type='pci' domain='0x0000' bus='0x83' slot='0x0a' function='0x0'/> </source> <model type='virtio'/> </interface> <interface type='hostdev' managed='yes'> <mac address='52:54:00:74:69:4d'/> <driver name='vfio'/> <source> <address type='pci' domain='0x0000' bus='0x83' slot='0x0a' function='0x1'/> </source> <model type='virtio'/> </interface> <serial type="pty"> <source path="/dev/pts/3" /> <target port="0" /> <alias name="serial0" /> </serial> <console type="pty" tty="/dev/pts/3"> <source path="/dev/pts/3" /> <target type="serial" port="0" /> <alias name="serial0" /> </console> <memballoon model="none" /> </devices> <seclabel type="none" /> </domain> - 다음 단계를 수행하여 VM을 시작합니다.
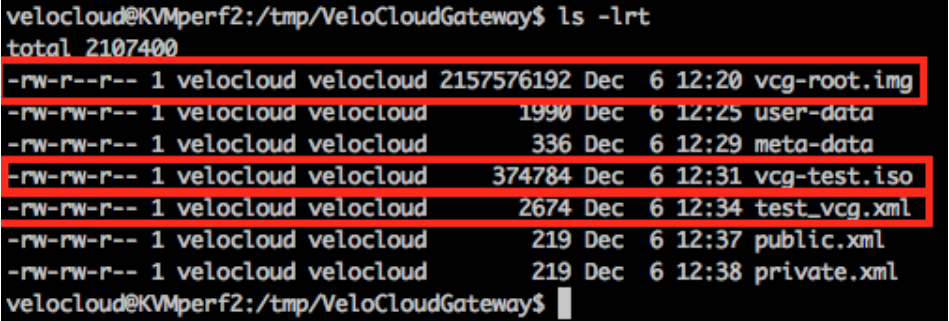
- 다음 샘플 스크린샷에 표시된 것처럼 디렉토리에 다음과 같은 세 개의 파일이 있는지 확인합니다.
- qcow file - vcg-root
- cloud-init - vcg-test.iso
- VM을 정의하는 도메인 XML 파일 - test_vcg.xml(여기서 test_vcg는 도메인 이름임)

- VM을 정의합니다.
velocloud@KVMperf2:/tmp/VeloCloudGateway$ virsh define test_vcg.xml
Domain test_vcg defined from test_vcg.xml
- VM을 자동 시작하도록 설정합니다.
velocloud@KVMperf2:/tmp/VeloCloudGateway$ virsh autostart test_vcg
- VM을 시작합니다.
velocloud@KVMperf2:/tmp/VeloCloudGateway$ virsh start test_vcg
- 다음 샘플 스크린샷에 표시된 것처럼 디렉토리에 다음과 같은 세 개의 파일이 있는지 확인합니다.
- SR-IOV 모드를 사용하는 경우 VM을 시작한 후 사용된 VF(가상 함수)에서 다음을 설정합니다.
- 스푸핑 검사를 꺼짐으로 설정합니다.
ip link set eth1 vf 0 spoofchk off
- 신뢰할 수 있는 모드를 켜짐으로 설정합니다.
ip link set dev eth1 vf 0 trust on
- 필요한 경우 VLAN을 설정합니다.
ip link set eth1 vf 0 vlan 3500
참고: OVS(OpenVSwitch) 모드에는 가상 함수 구성 단계가 적용되지 않습니다. - 스푸핑 검사를 꺼짐으로 설정합니다.
- 콘솔에서 VM으로
virsh list
Id Name State
----------------------------------------------------
25 test_vcg running
velocloud@KVMperf2$ virsh console 25
Connected to domain test_vcg
Escape character is ^]
KVM 호스트에 대한 특수 고려 사항(Special Consideration for KVM Host)
- 물리적 인터페이스에서 GRO(일반 수신 오프로드)를 비활성화합니다(SD-WAN Gateway에서 불필요한 다시 조각화 방지).
ethtool –K <interface> gro off tx off
- CPU C-상태를 비활성화합니다(전원 상태가 실시간 성능에 영향을 줌). 일반적으로 이 작업은
processor.max_cstate=1을 추가하여 커널 부팅 옵션의 일부로 수행하거나 BIOS에서 간단히 비활성화할 수 있습니다. -
운영 배포의 경우 vCPU를 인스턴스에 고정해야 합니다. 코어에 대한 초과 구독은 허용하지 않아야 합니다.