


說明如何在 KVM 上安裝 SD-WAN 閘道 qcow。
備註: 此部署已在 KVM Ubuntu 16.04 和 18.04 上進行測試。
安裝前的考量
KVM 有多種方式可提供虛擬機器的網路。設定虛擬機器之前,應該先佈建 libvirt 中的網路。有多種方式可在 KVM 中設定網路。如需有關如何在 libvirt 上設定網路的完整選項組態,請參閱下列連結:
https://libvirt.org/formatnetwork.html
在完整選項清單中,VMware 建議下列模式:
- SR-IOV (SD-WAN 閘道 需要此模式才能滿足 VMware 指定的最大總流量)
- OpenVSwitch 橋接器
如果您決定使用 SR-IOV 模式,請在 KVM 上啟用 SR-IOV。若要在 KVM 上啟用 SR-IOV,請參閱在 KVM 上啟用 SR-IOV。
KVM 上的 SD-WAN 閘道 安裝步驟
- 將〈建立 Cloud-Init〉一節中建立的 QCOW 和 Cloud-init 檔案複製到新的空白目錄。
- 建立要用於裝置的網路介面。
使用 SR-IOV (Using SR-IOV):以下是使用 SR-IOV 的 Intel X710/XL710 NIC 卡專用的網路介面範本範例。
    <interface type='hostdev' managed='yes'>
        <mac address='52:54:00:79:19:3d'/>
        <driver name='vfio'/>
        <source>
            <address type='pci' domain='0x0000' bus='0x83' slot='0x0a' function='0x0'/>
        </source>
        <model type='virtio'/>
    </interface>
使用 OpenVSwitch (Using OpenVSwitch):以下是使用 OpenVSwitch 的網路介面範本範例。git ./vcg/templates/KVM_NETWORKING_SAMPLES/template_outside_openvswitch.xml
<?xml version="1.0" encoding="UTF-8"?>
<network>
   <name>public_interface</name>
   <!--This is the network name-->
   <model type="virtio" />
   <forward mode="bridge" />
   <bridge name="publicinterface" />
   <virtualport type="openvswitch" />
   <vlan trunk="yes">
      <tag id="50" />
      <!--Define all the VLANS for this Bridge -->
      <tag id="51" />
      <!--Define all the VLANS for this Bridge -->
   </vlan>
</network>
建立
inside_interface的網路:git ./vcg/templates/KVM_NETWORKING_SAMPLES/template_inside_openvswitch.xml
<network>
  <name>inside_interface</name> <!--This is the network name-->
  <model type='virtio'/>
  <forward mode="bridge"/>
  <bridge name="insideinterface"/>
  <virtualport type='openvswitch'></virtualport>
  <vlan trunk='yes'></vlan>
  <tag id='200'/> <!—Define all the VLANS for this Bridge -->
  <tag id='201'/> <!—Define all the VLANS for this Bridge -->
  <tag id='202'/> <!—Define all the VLANS for this Bridge -->
</network>
如果您使用 OpenVSwitch 模式,則在啟動虛擬機器之前,您必須驗證基本網路是否已建立並處於作用中。備註: 此驗證步驟不適用於 SR-IOV 模式,因為您在啟動虛擬機器之前不會建立任何網路。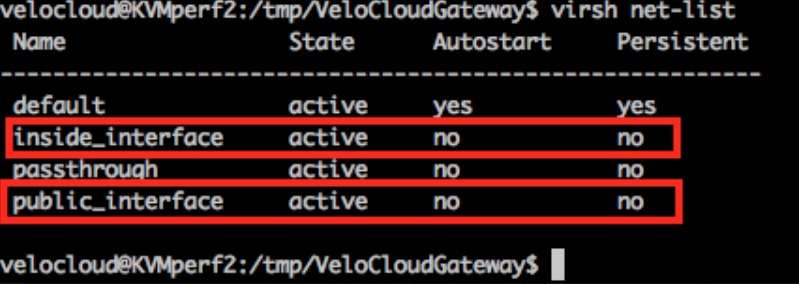
- 編輯虛擬機器 XML 檔案。有多種方式可在 KVM 中建立虛擬機器。您可以在 XML 檔案中定義虛擬機器,然後使用 libvirt 建立虛擬機器 (使用 OpenVSwitch 模式和 SR-IOV 模式專用的範例虛擬機器 XML 範本)。
vi my_vm.xml
以下是使用 OpenVSwitch 介面之虛擬機器適用的範本範例。使用此範本時,請視情況進行編輯。<?xml version="1.0" encoding="UTF-8"?> <domain type="kvm"> <name>#domain_name#</name> <memory unit="KiB">8388608</memory> <currentMemory unit="KiB">8388608</currentMemory> <vcpu>8</vcpu> <cputune> <vcpupin vcpu="0" cpuset="0" /> <vcpupin vcpu="1" cpuset="1" /> <vcpupin vcpu="2" cpuset="2" /> <vcpupin vcpu="3" cpuset="3" /> <vcpupin vcpu="4" cpuset="4" /> <vcpupin vcpu="5" cpuset="5" /> <vcpupin vcpu="6" cpuset="6" /> <vcpupin vcpu="7" cpuset="7" /> </cputune> <resource> <partition>/machine</partition> </resource> <os> <type>hvm</type> </os> <features> <acpi /> <apic /> <pae /> </features> <cpu mode="host-passthrough" /> <clock offset="utc" /> <on_poweroff>destroy</on_poweroff> <on_reboot>restart</on_reboot> <on_crash>restart</on_crash> <devices> <emulator>/usr/bin/kvm-spice</emulator> <disk type="file" device="disk"> <driver name="qemu" type="qcow2" /> <source file="#folder#/#qcow_root#" /> <target dev="hda" bus="ide" /> <alias name="ide0-0-0" /> <address type="drive" controller="0" bus="0" target="0" unit="0" /> </disk> <disk type="file" device="cdrom"> <driver name="qemu" type="raw" /> <source file="#folder#/#Cloud_ INIT_ ISO#" /> <target dev="sdb" bus="sata" /> <readonly /> <alias name="sata1-0-0" /> <address type="drive" controller="1" bus="0" target="0" unit="0" /> </disk> <controller type="usb" index="0"> <alias name="usb0" /> <address type="pci" domain="0x0000" bus="0x00" slot="0x01" function="0x2" /> </controller> <controller type="pci" index="0" model="pci-root"> <alias name="pci.0" /> </controller> <controller type="ide" index="0"> <alias name="ide0" /> <address type="pci" domain="0x0000" bus="0x00" slot="0x01" function="0x1" /> </controller> <interface type="network"> <source network="public_interface" /> <vlan> <tag id="#public_vlan#" /> </vlan> <alias name="hostdev1" /> <address type="pci" domain="0x0000" bus="0x00" slot="0x11" function="0x0" /> </interface> <interface type="network"> <source network="inside_interface" /> <alias name="hostdev2" /> <address type="pci" domain="0x0000" bus="0x00" slot="0x12" function="0x0" /> </interface> <serial type="pty"> <source path="/dev/pts/3" /> <target port="0" /> <alias name="serial0" /> </serial> <console type="pty" tty="/dev/pts/3"> <source path="/dev/pts/3" /> <target type="serial" port="0" /> <alias name="serial0" /> </console> <memballoon model="none" /> </devices> <seclabel type="none" /> </domain>以下是使用 SR-IOV 介面之虛擬機器適用的範本範例。使用此範本時,請視情況進行編輯。<?xml version="1.0" encoding="UTF-8"?> <domain type="kvm"> <name>#domain_name#</name> <memory unit="KiB">8388608</memory> <currentMemory unit="KiB">8388608</currentMemory> <vcpu>8</vcpu> <cputune> <vcpupin vcpu="0" cpuset="0" /> <vcpupin vcpu="1" cpuset="1" /> <vcpupin vcpu="2" cpuset="2" /> <vcpupin vcpu="3" cpuset="3" /> <vcpupin vcpu="4" cpuset="4" /> <vcpupin vcpu="5" cpuset="5" /> <vcpupin vcpu="6" cpuset="6" /> <vcpupin vcpu="7" cpuset="7" /> </cputune> <resource> <partition>/machine</partition> </resource> <os> <type>hvm</type> </os> <features> <acpi /> <apic /> <pae /> </features> <cpu mode="host-passthrough" /> <clock offset="utc" /> <on_poweroff>destroy</on_poweroff> <on_reboot>restart</on_reboot> <on_crash>restart</on_crash> <devices> <emulator>/usr/bin/kvm-spice</emulator> <disk type="file" device="disk"> <driver name="qemu" type="qcow2" /> <source file="#folder#/#qcow_root#" /> <target dev="hda" bus="ide" /> <alias name="ide0-0-0" /> <address type="drive" controller="0" bus="0" target="0" unit="0" /> </disk> <disk type="file" device="cdrom"> <driver name="qemu" type="raw" /> <source file="#folder#/#Cloud_ INIT_ ISO#" /> <target dev="sdb" bus="sata" /> <readonly /> <alias name="sata1-0-0" /> <address type="drive" controller="1" bus="0" target="0" unit="0" /> </disk> <controller type="usb" index="0"> <alias name="usb0" /> <address type="pci" domain="0x0000" bus="0x00" slot="0x01" function="0x2" /> </controller> <controller type="pci" index="0" model="pci-root"> <alias name="pci.0" /> </controller> <controller type="ide" index="0"> <alias name="ide0" /> <address type="pci" domain="0x0000" bus="0x00" slot="0x01" function="0x1" /> </controller> <interface type='hostdev' managed='yes'> <mac address='52:54:00:79:19:3d'/> <driver name='vfio'/> <source> <address type='pci' domain='0x0000' bus='0x83' slot='0x0a' function='0x0'/> </source> <model type='virtio'/> </interface> <interface type='hostdev' managed='yes'> <mac address='52:54:00:74:69:4d'/> <driver name='vfio'/> <source> <address type='pci' domain='0x0000' bus='0x83' slot='0x0a' function='0x1'/> </source> <model type='virtio'/> </interface> <serial type="pty"> <source path="/dev/pts/3" /> <target port="0" /> <alias name="serial0" /> </serial> <console type="pty" tty="/dev/pts/3"> <source path="/dev/pts/3" /> <target type="serial" port="0" /> <alias name="serial0" /> </console> <memballoon model="none" /> </devices> <seclabel type="none" /> </domain> - 執行下列步驟來啟動虛擬機器:
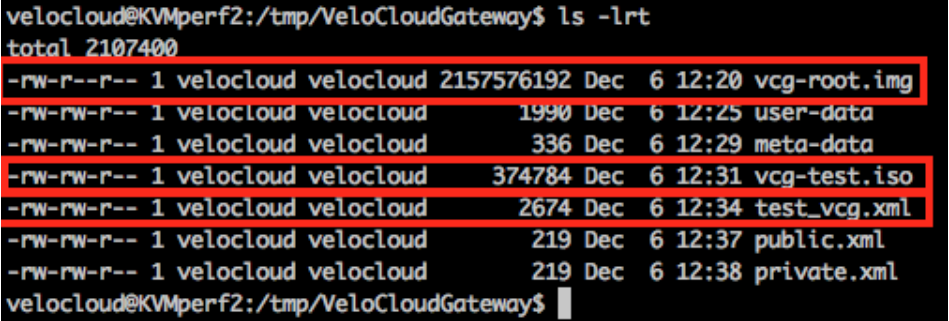
- 請確定您的目錄中有下列三個檔案,如下列範例螢幕擷取畫面所示:
- qcow file - vcg-root
- cloud-init - vcg-test.iso
- 定義虛擬機器的網域 XML 檔案 - test_vcg.xml (其中 test_vcg 為網域名稱)。
- 定義虛擬機器。
velocloud@KVMperf2:/tmp/VeloCloudGateway$ virsh define test_vcg.xml
Domain test_vcg defined from test_vcg.xml
- 將虛擬機器設定為自動啟動。
velocloud@KVMperf2:/tmp/VeloCloudGateway$ virsh autostart test_vcg
- 啟動虛擬機器。
velocloud@KVMperf2:/tmp/VeloCloudGateway$ virsh start test_vcg
- 請確定您的目錄中有下列三個檔案,如下列範例螢幕擷取畫面所示:
- 如果您使用 SR-IOV 模式,則在啟動虛擬機器後,請在使用的虛擬功能 (VF) 上設定下列項目:
- 將 spoofcheck 設定為關閉。
ip link set eth1 vf 0 spoofchk off
- 將信任模式設定為開啟。
ip link set dev eth1 vf 0 trust on
- 如有需要,請設定 VLAN。
ip link set eth1 vf 0 vlan 3500
備註: 虛擬功能設定步驟不適用於 OpenVSwitch (OVS) 模式。 - 將 spoofcheck 設定為關閉。
- 透過主控台進入虛擬機器。
virsh list
Id Name State
----------------------------------------------------
25 test_vcg running
velocloud@KVMperf2$ virsh console 25
Connected to domain test_vcg
Escape character is ^]
KVM 主機的特殊考量 (Special Consideration for KVM Host)
- 在實體介面上停用 GRO (一般接收卸載) (以避免 SD-WAN 閘道中不必要的重新分段)。
ethtool –K <interface> gro off tx off
- 停用 CPU C 狀態 (電源狀態會影響即時效能)。作法通常是在核心開機選項中附加
processor.max_cstate=1,或直接在 BIOS 中停用。 -
對於生產部署,必須將 vCPU 固定至執行個體。務必避免核心上的過度訂閱。
