This topic describes how to bind your Application to an APM service instance and start collecting data on VMware Tanzu. If you are using PKS, see Working with PKS.
Pivotal Apps Manager: Binding the Application to the APM Service
Use the Pivotal Apps Manager to bind an application to the APM service instance. Creating the service instance is only done once after the initial installation (and each upgrade) of APM as described in Installing and Configuring APM.
-
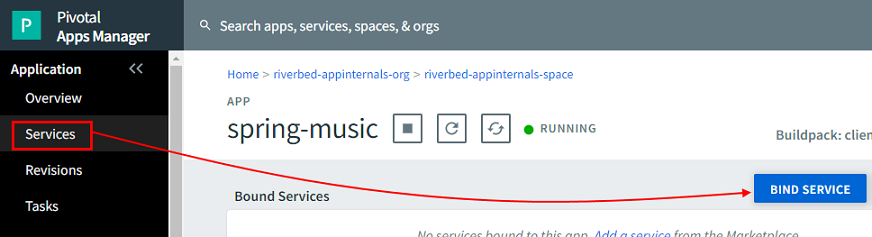
Log in to the Pivotal Apps Manager and navigate to your application.
-
Select your application instance and click the Services tab.
-
Click BIND SERVICE.
-
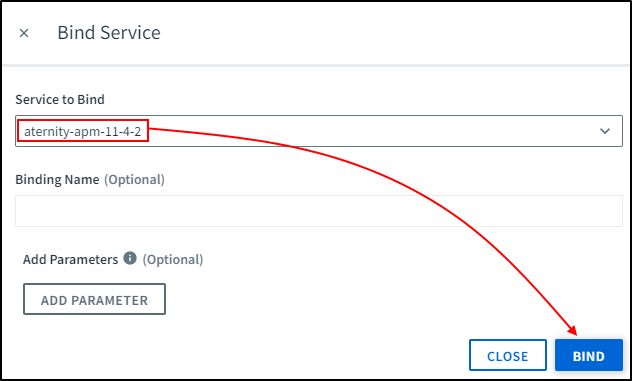
In the Service to Bind list, select the APM service instance you created.
-
There are no parameters to add. Leave the Add Parameters area empty.
-
Click CREATE.
-
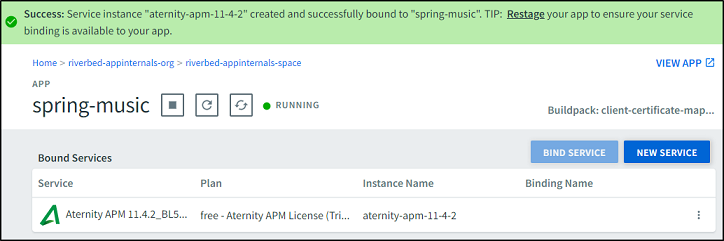
Confirm that the application is now bound to the service:
Caution: You can also do the binding in the application’s manifest, instead of using the UI, as follows:
---
applications:
- name: my-app
  services:
  - <my-apm-service-instance-name>
Environment Variables per Application
Before restaging your application, you can add environment variables to it to tailor certain things.
| Env Variable | Description |
|---|---|
| RVBD_APP_CONFIG | The APM Config name, as seen in the Analysis Server UI. This overrides the one specified in Installing and Configuring APM. Make sure the name is spelled correctly to match an existing config on the Analysis Server. If the name has spaces in it, replace them with + signs |
| RVBD_APP_INSTANCE | A meaningful instance name to use for the application, to override the default. |
There are a couple of ways to set an environment variable, such as adding it to the application’s manifest file, or using the cf command line.
Here’s how to do it by hand with the cf set-env command:
C:\testapps\spring-music-master>cf set-env spring-music-doctest RVBD_APP_CONFIG my-config-name
A more reliable way is to add this definition to the env block of the application’s manifest file, as follows:
---
applications:
- name: my-app
  env:
    RVBD_APP_CONFIG: my-config-name
You must cf restage your app after setting env variables.
Java Buildpack
Make sure you’re using at least JBP version 4.20 or higher. Version 4.29 or higher is recommended as you can pick an explicit version of Aternity APM if necessary (by cloning and editing the version string in /java-buildpack/config/riverbed_appinternals_agent.yml). Earlier versions of JBP always load the latest version of Aternity APM.
.NET Core Buildpack
Modify the application manifest by placing the aternity_apm_dotnetcore_buildpack in front of the normal buildpack, as follows:
---
applications:
- name: my-app
  buildpacks:
  - aternity_apm_dotnetcore_buildpack
  - <language specific buildpack>
Restaging the Application
The cf restage command recreates the application so that it will be monitored by APM. Specify the application name (spring-music-doctest in this example).
C:\testapps\spring-music-master>cf restage spring-music-doctest
Restaging app spring-music-doctest in org riverbed / space qa as admin...

Staging app and tracing logs...
   Creating container
   Successfully created container
   Downloading app package...
   Downloading build artifacts cache...
   Downloaded build artifacts cache (45.9M)
   Downloaded app package (40.6M)
.
.
.
Waiting for app to start...

name:              spring-music-doctest
.
.
.
     state     since                  cpu      memory         disk           details
#0   running   2018-06-08T20:41:03Z   213.2%   389.8M of 1G   209.4M of 1G
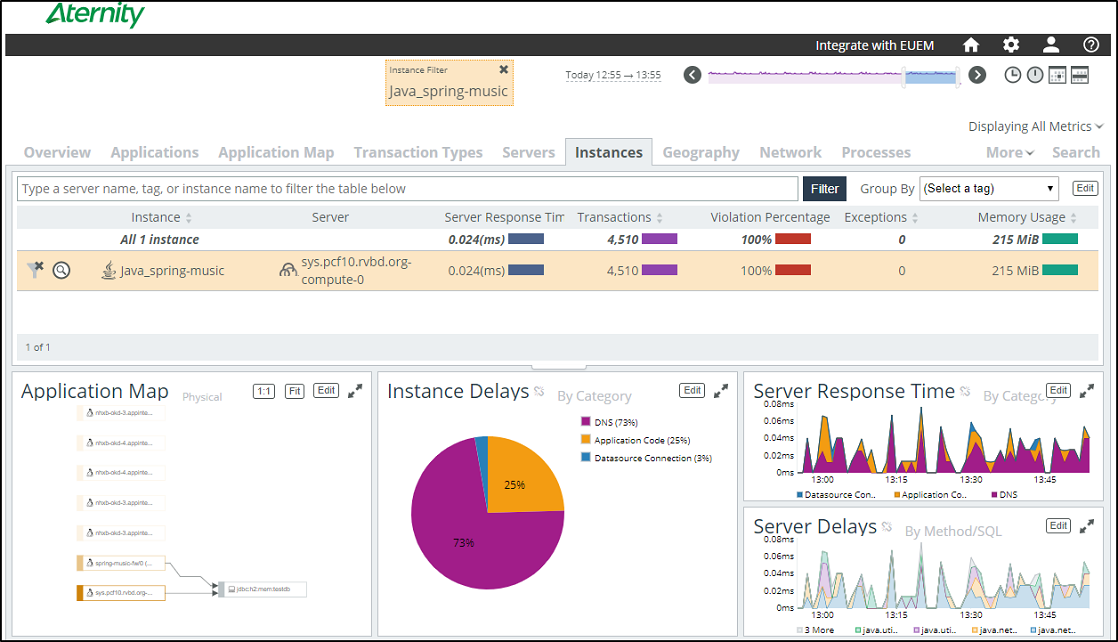
Enjoy Your Data!
After you restage the application, the APM analysis server will automatically harvest performance data. In a few minutes, transaction data for your instrumented applications will appear in the APM interface.
-
Log in to the analysis server specified during configuration of the APM tile.
-
The Instances tab will show transactions from the newly-monitored application.