


This topic tells you how to install and configure Compliance Scanner for VMware Tanzu.
Prerequisite
Compliance Scanner runs a scanner daemon on each VM that requires ~100 MB of memory. Before you install Compliance Scanner for VMware Tanzu, you might need to resize your VMs accordingly.
Install Compliance Scanner
To install the Compliance Scanner file on the Tanzu Operations Manager Installation Dashboard:
-
Download the product file from Broadcom Support.
-
Navigate to the Tanzu Operations Manager Installation Dashboard and click Import a Product to upload the product file.
-
Under the Import a Product button, click + next to the version number of Compliance Scanner. This adds the tile to your staging area.
-
Click the newly added Compliance Scanner tile.
Configure AZs and networks
To configure your AZs and networks:
-
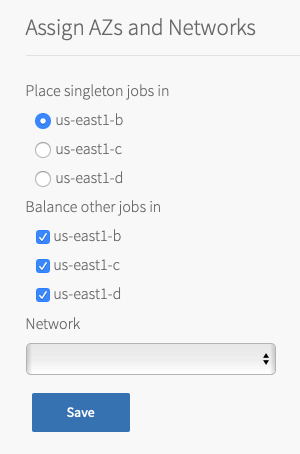
Select Assign AZs and Networks.
-
Configure the fields:
Field Description Place singleton jobs in Select the AZ that you want the oscap_storeVM to run in.
The tile runs as a singleton job.Balance other jobs in Select the same AZ as above. Network Select a subnet for the oscap_storeVM.
This is typically the same subnet that includes the VMware Tanzu Application Service for VMs (TAS for VMs) component VMs. -
Click Save.
Configure scan variables
This section is where you configure expected values for tests and select which set of benchmarks to run. To configure your scan variables:
-
Select Scan Variables.

-
Configure the fields in Scan Variables to provide the expected values for the tests:
Field Description NTP Server IP The IP address of your NTP server.
You can find this IP address in Bosh Director > Director Config > NTP Server. You can only enter one server IP address. It does not matter which NTP server you enter.Syslog Host IP The IP address of your syslog host.
You can find this in your TAS for VMs tile under Settings > System Logging > Address.Syslog Port The port number of the syslog port.
You can find this in your TAS for VMs tile under Settings > System Logging > Port.Custom SSH Banner The text expected when verifying the login SSH Banner on VMs during a scan.
The default value (which comes from the stemcell) is:
Unauthorized use is strictly prohibited. All access and activity is subject to logging and monitoring.
If you modified the text in thelogin_bannerfield ofos-conf-release, then enter the modified text in this field.
For more information aboutos-conf-release, see os-conf-release in GitHub.CNI directory (TKGI) Directory containing configuration files used by the container networking interface (CNI).
The default value, which comes from the stemcell, is:/var/vcap/jobs/flanneld. -
Click Save.
Configure scans
To configure scans:
-
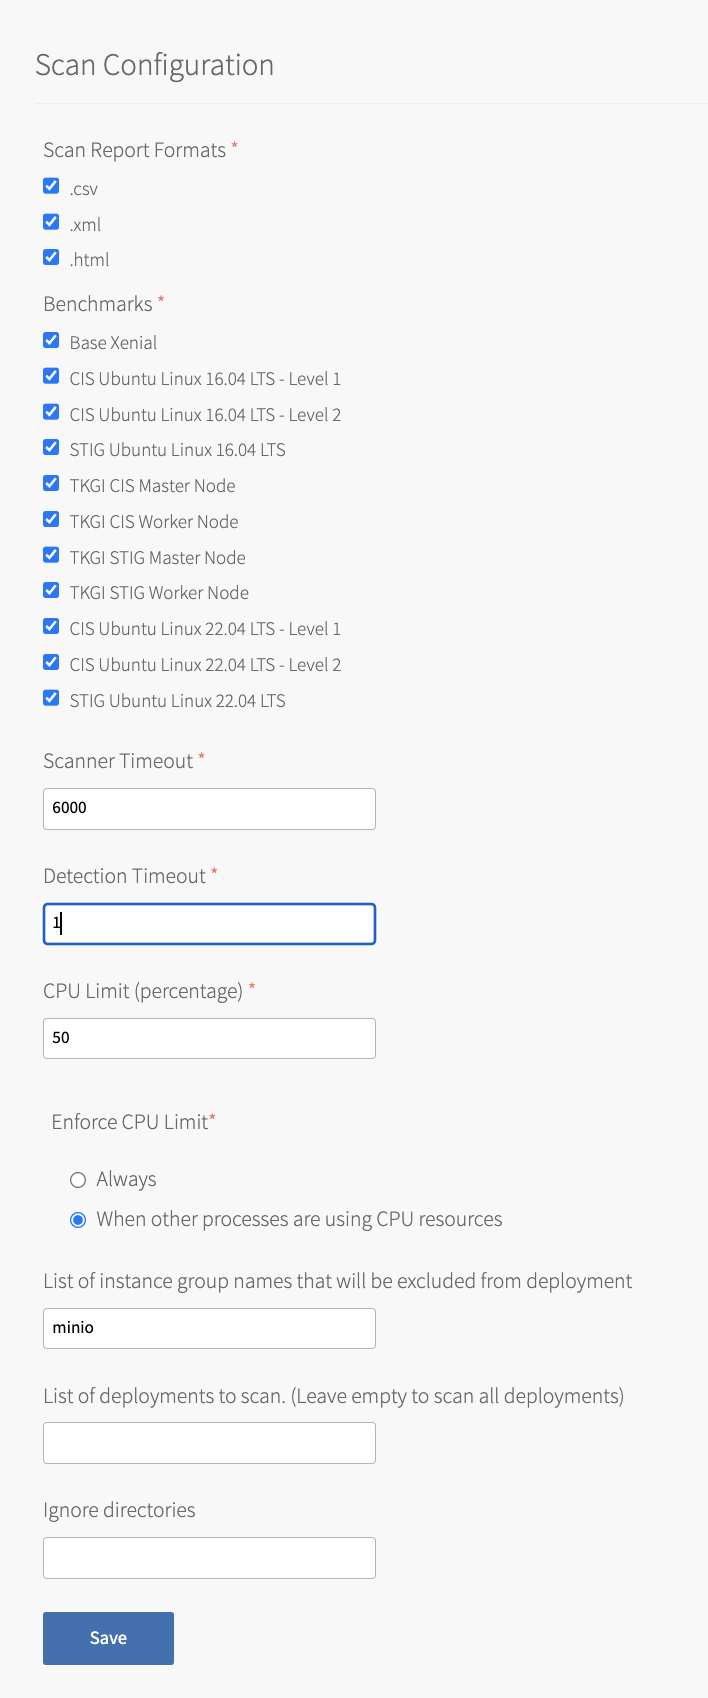
Select Scan Configuration.
-
Enable Scan Report Formats. You must select at least one format. The outputs of a scan can be in CSV, XML, and HTML formats.
-
Enable Benchmarks for the scanner to run:
Benchmark Description Base Xenial Includes a subset of the amended tests in the STIG benchmark, where failing tests due to architectural differences are removed.
This is meant to be used as a measure to see if configurations have been altered.CIS Ubuntu Linux 16.04 LTS - Level 1 Includes a configuration profile that can be used as a measure to lower the attack surface of your organization while not hindering business functionality. CIS Ubuntu Linux 16.04 LTS - Level 2 Includes a configuration profile that provides "defense in depth" for use in environments where security is very important. STIG for Ubuntu Xenial Includes all the configuration tests of the published DISA STIG for Ubuntu 16.04, amended with stemcell specific changes. Contains tests that would fail due to architectural differences. TKGI CIS Master Node Includes all the configuration tests of the published CIS Kubernetes Benchmark for Control Plane Components, etcd, and Control Plane Configuration. TKGI CIS Worker Node Includes all the configuration tests of the published CIS Kubernetes Benchmark for Worker Nodes. TKGI STIG Master Node Includes all the configuration tests of the published Defense Information Systems Agency (DISA) Kubernetes Benchmark for Control Plane Components, etcd, and Control Plane Configuration. TKGI STIG Worker Node Includes all the configuration tests of the published Defense Information Systems Agency (DISA) Kubernetes Benchmark for Worker Nodes. STIG for Ubuntu Jammy Includes all the configuration tests of the published DISA STIG for Ubuntu 22.04, amended with stemcell specific changes. Contains tests that would fail due to architectural differences. A scan report is generated for each format and benchmark on each Linux VM running on Xenial stemcells. For example, if you select .xml and .csv formats, and Base Xenial and STIG benchmarks, four CSV files are created for each VM tested.
For more information about Compliance Scanner benchmarks, see Benchmarks. -
Configure the remaining fields:
-
Click Save.
Configure scheduled scan
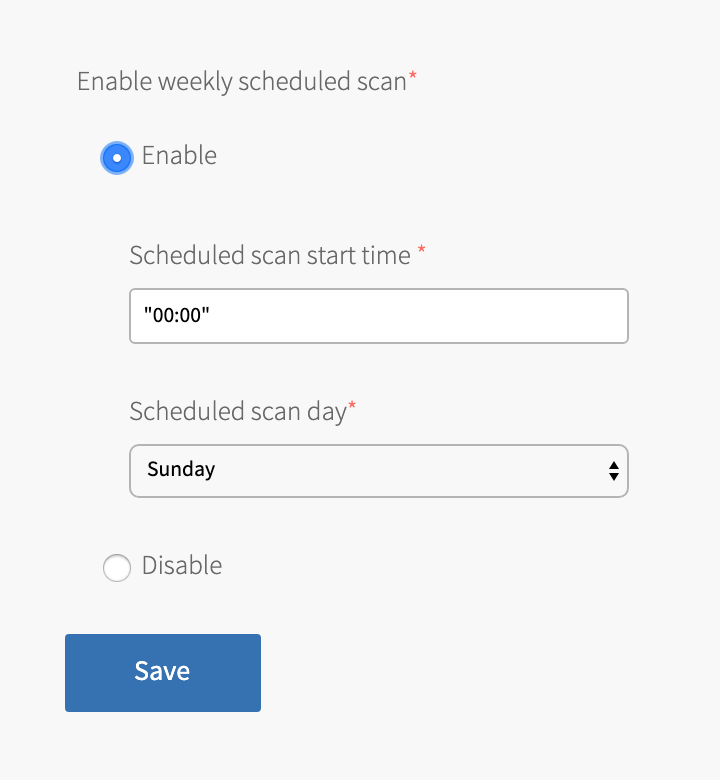
Compliance Scanner can be configured to run a scan at a scheduled time and day of the week.
The default values are "00:00" and Sunday.
VMware recommends setting up external storage to store the scan result reports. If you do not do this, Compliance Scanner overwrites your previous local reports. For more information on setting up external storage, see (Optional) Configure External Store Upload below.
To change the scheduled scan values:
-
Select Scheduled Scans.
-
Select Enable.
- Set the Scheduled scan start time value. The Scheduled scan start time must be in 24-hour format
HH:MM. - Select a Scheduled scan day. Only one value may be selected.
- Click Save.
(Optional) Configure external store upload
To store scan results in an Amazon S3 bucket, a Minio S3-compatible bucket, or an Azure Blob Storage Container, configure an external store upload.
If you configure an external store, then Compliance Scanner uploads scan results to that store. This means that auditors do not need access to Tanzu Operations Manager to download BOSH logs or rely on the operator to give them scan results. Additionally, when using a Security Information and Event Management (SIEM) system, automating the consumption of the scan results is easier and does not require access to the Tanzu Operations Manager API.
If you do not use an external store for scan results, then the scan results are stored in the oscap_store VM. For more information, see Retrieve Log Files.
Configure to upload to an S3 bucket
There are two ways that you can give Compliance Scanner access to an Amazon S3 bucket:
-
Using Access Key ID and Secret Access Key: This is the easier method. If you have the access key ID and the secret access key, enter them in the fields.
-
Using an instance profile for the S3 bucket: If you do not have the access key ID and the secret access key but you do have the name of an instance profile for the S3 bucket, then you can use the
omcommand-line interface (CLI) to give Compliance Scanner the name of the instance profile for the S3 bucket.
To configure an external store upload using an S3 bucket:
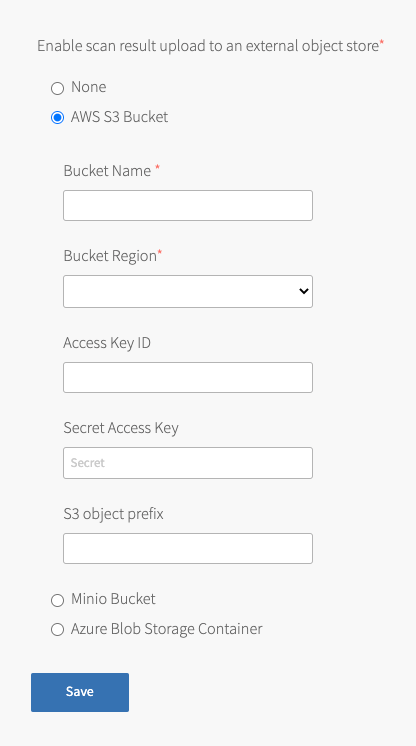
- Select External Store Upload.
-
Select AWS S3 Bucket.
-
Configure the fields:
Field Description Bucket Name Enter the name of the S3 bucket. Bucket Region Select the region that the S3 bucket was created in. Access Key ID Enter the access key ID for AWS credentials with access to the S3 bucket.
VMware recommends that you ensure the credentials permit write access to just this S3 bucket.
If you do not have this key, click Save and follow the steps in To use an instance profile to configure the S3 bucket below.Secret Access Key Enter the access key secret for AWS credentials with access to the S3 bucket.
VMware recommends that you ensure the credentials permit write access to just this S3 bucket.
If you do not have this key, click Save and follow the steps in To use an instance profile to configure the S3 bucket below.S3 object prefix Enter the object prefix for scan results.
The object prefix is similar to a directory name. It allows you to group scan results together in the bucket.
For more information about organizing objects in the Amazon S3 console using folders, see the AWS documentation. -
Click Save.
To use an instance profile to configure the S3 bucket:
For security reasons, you might not have the keys for the S3 bucket. However, if you have the instance profile name for the S3 bucket, you can use the following steps. You need the om CLI to do these steps. For introductory information about the om CLI, see Tanzu Operations Manager CLI (om).
-
On the command line, run:
 om configure-director --config <(echo "
 vmextensions-configuration:
 - name: s3_instance_profile
      cloud_properties:
        iam_instance_profile: INSTANCE-PROFILE
")
Where is
INSTANCE-PROFILEis the name of the instance profile for the S3 bucket.For example:
$ om configure-director --config <(echo " vmextensions-configuration: ‐ name: s3_instance_profile cloud_properties: iam_instance_profile: scan_store_bucket ") started configuring vm extensions applying vmextensions configuration for the following: s3_instance_profile finished configuring vm extensions -
Run:
 om configure-product --config <( echo "
 product-name: p-compliance-scanner
 resource-config:
      oscap_store:
        additional_vm_extensions:
        - s3_instance_profile
")
Example output:
configuring product...
network properties are not provided, nothing to do here
product properties are not provided, nothing to do here
applying resource configuration for the following jobs:
  oscap_store
errands are not provided, nothing to do here
finished configuring product
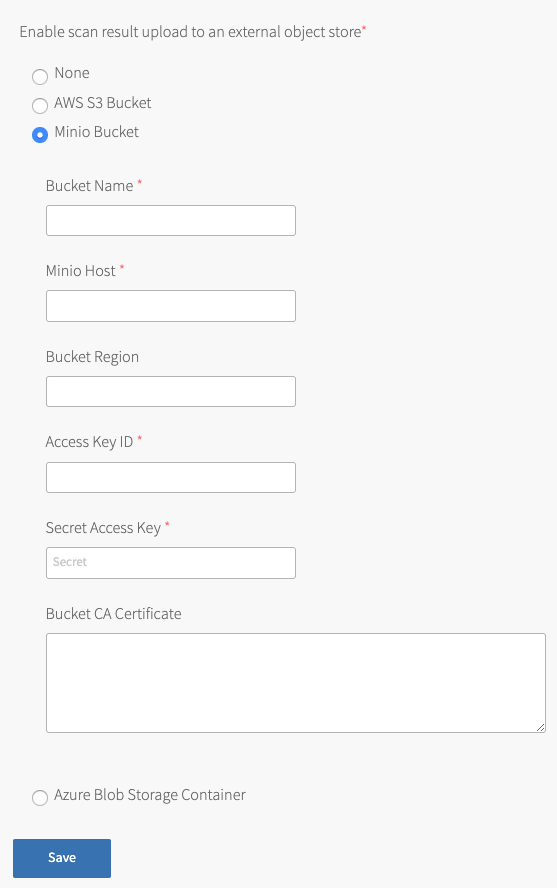
Configure to upload to a Minio bucket
To configure an external store upload using a Minio bucket:
- Select External Store Upload
-
Select Minio Bucket.
-
Configure the fields:
Field Description Bucket Name Enter the name of the bucket. Minio Host Enter the fully qualified domain name of the Minio server. This can include a port, but should not specify the protocol.
For instance,example.domain.com:9000is a valid host.Bucket Region If your Minio configuration specifies a region, enter that region here.
Otherwise, this field can be left blank.Access Key ID Enter the access key ID for the Minio server. Secret Access Key Enter the access key secret for the Minio server. Bucket CA Certificate Enter the CA Certificate used by the Minio server, if applicable. If the Minio server does not use TLS, leave this field blank.
If the Minio server is a TAS for VMs service instance, this CA Certificate must match the SAML Service Provider Credentials field under the UAA form in your TAS for VMs tile. -
Click Save.
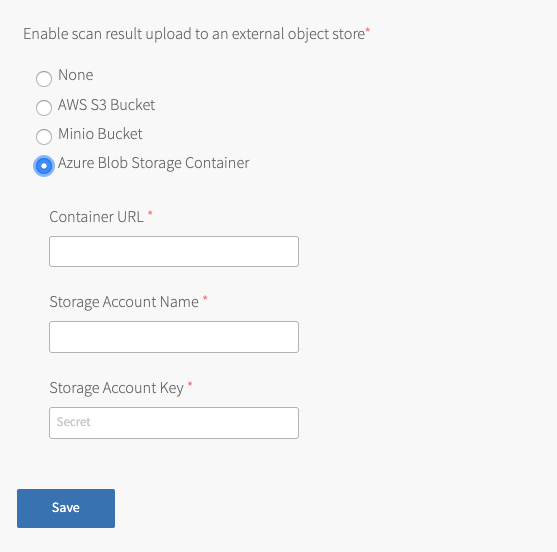
Configure to upload to a Azure blob storage container
To configure an external store upload using an Azure Blob:
- Select External Store Upload
-
Select Azure Blob Storage Container.
-
Configure the fields:
Field Description Container URL Enter the container URL for an existing Azure Blob Storage Container. Get this URL from the container properties in the Azure portal. For example: https://mystorageaccount.blob.core.windows.net/mycontainernameStorage Account Name Enter the storage account name for the Azure Blob Storage Container. Storage Account Key Enter the storage account key for the Azure Blob Storage Container. -
Click Save.
Configure errands
Compliance Scanner performs one errand that initiates scanning. This errand is deactivated by default. This is so that a scan is not run every time changes are applied.
When this errand is triggered, it initiates the scanning errand on each VM. For more information about initiating the scanning errand, see Using Compliance Scanner.
When configuring the Compliance Scanner tile for the first time:
-
Select Errands.

-
Confirm that Run configured scans is set to Default (Off).
-
Click Save.
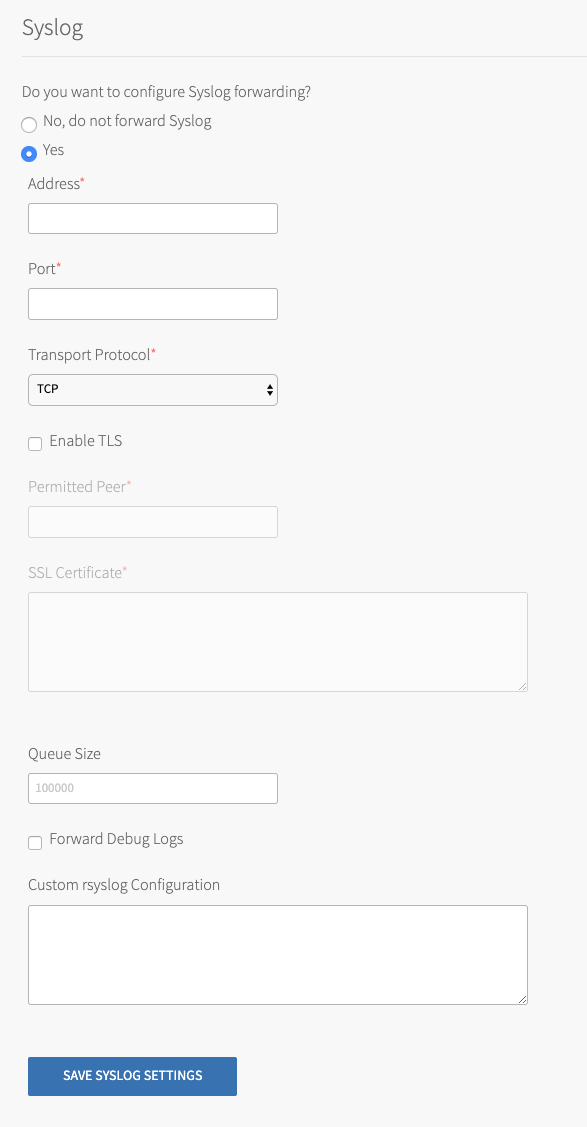
Configure syslog forwarding
To configure syslog forwarding:
-
Select Syslog.
-
Select Yes for Do you want to configure Syslog forwarding?.
-
Configure the fields as follows:
Field Instructions Address Enter the address or host of the syslog server for sending logs, for example, logmanager.example.com.Port Enter the port of the syslog server for sending logs, for example, 29279.Transport Protocol Select the transport protocol used to send system logs to the server. VMware recommends TCP. Enable TLS If you select TCP, you can also select to send logs encrypted over TLS. Permitted Peer Enter either the accepted fingerprint, in SHA1, or the name of the remote peer, for example, *.example.com.SSL Certificate Enter the SSL or TLS Certificate(s) for the syslog server. This ensures the logs are transported securely. Queue Size Enter an integer. This value specifies the number of log messages held in the buffer. The default value is 100000.Forward Debug Logs Select this box to forward debug logs to external source. This option is deselected by default. If you select it, you might generate a large amount of log data. Custom rsyslog Configuration Enter configuration details for rsyslog. This field requires RainerScript syntax. -
Click Save Syslog Settings.
Configure resources
The tile creates a new VM called oscap_store to store the logs retrieved from all the other VMs that have been scanned.
The oscap_store VM does not do anything computationally extensive. VMware recommends using the default configurations.
To configure resources:
-
Select Resource Config.
-
Click Save.
Apply changes from your configuration
Your installation is not complete until you apply your configuration changes:
-
Return to the Tanzu Operations Manager Installation Dashboard.
-
Click Review Pending Changes. Verify that all products are selected.
-
Click Apply Changes to complete the installation of Compliance Scanner.
